TUSL2 User Manual
Page 8
... Support: Supports Wake-On-LAN and Wake-On-Ring, Keyboard Wake-Up, and BIOS Wake-Up. • Smart Card Reader Compatible: PC/SC compliant Smart Card Reader connectivity. 8 ASUS TUSL2 User's Manual The chipset supports industry standard 66/100/133 Front Side Busses (FSBs), and up to 512MB of PC100/ PC133 SDRAM, and AGP Pro/4X mode, which can be disabled to 512MB. • Integrated Graphics! twice the maximum bandwidth of the PCI bus. • PC100/PC133 Memory Support...
... Support: Supports Wake-On-LAN and Wake-On-Ring, Keyboard Wake-Up, and BIOS Wake-Up. • Smart Card Reader Compatible: PC/SC compliant Smart Card Reader connectivity. 8 ASUS TUSL2 User's Manual The chipset supports industry standard 66/100/133 Front Side Busses (FSBs), and up to 512MB of PC100/ PC133 SDRAM, and AGP Pro/4X mode, which can be disabled to 512MB. • Integrated Graphics! twice the maximum bandwidth of the PCI bus. • PC100/PC133 Memory Support...

TUSL2 User Manual
Page 9
... the memory and processor. • Onboard LED: The onboard LED will light up to access box with system information LED display, front I /O: Provides two high-speed UART compatible serial ports and one parallel port with EPP and ECP capabilities. Alternatively, easy-to-use interface which is standby power to physically transport commands and information between SMBus devices. FEATURES • ASUS JumperFree™ Mode: JumperFree Mode supplies precise overclocking of most devices for virtually automatic setup. • Smart BIOS: 4Mbit firmware...
... the memory and processor. • Onboard LED: The onboard LED will light up to access box with system information LED display, front I /O: Provides two high-speed UART compatible serial ports and one parallel port with EPP and ECP capabilities. Alternatively, easy-to-use interface which is standby power to physically transport commands and information between SMBus devices. FEATURES • ASUS JumperFree™ Mode: JumperFree Mode supplies precise overclocking of most devices for virtually automatic setup. • Smart BIOS: 4Mbit firmware...

TUSL2 User Manual
Page 10
... RAID levels 0 or 1. FEATURES 2.1.2 Specifications-Optional Components The following onboard components are spread between two hard disk drives. Supports UltraDMA/100, UltraDMA/ 66, UltraDMA/33 (IDE DMA Mode 2), PIO Modes 3 & 4, and supports Enhanced IDE devices:DVD-ROM, CD-ROM, CD-R/RW, LS-120, and Tape Backup drives. • Concurrent PCI: Concurrent PCI allows multiple PCI transfers from PCI master buses to memory and processor. • SDRAM Optimized Performance: This motherboard supports PC133-compliant Synchronous Dynamic Random Access Memory...
... RAID levels 0 or 1. FEATURES 2.1.2 Specifications-Optional Components The following onboard components are spread between two hard disk drives. Supports UltraDMA/100, UltraDMA/ 66, UltraDMA/33 (IDE DMA Mode 2), PIO Modes 3 & 4, and supports Enhanced IDE devices:DVD-ROM, CD-ROM, CD-R/RW, LS-120, and Tape Backup drives. • Concurrent PCI: Concurrent PCI allows multiple PCI transfers from PCI master buses to memory and processor. • SDRAM Optimized Performance: This motherboard supports PC133-compliant Synchronous Dynamic Random Access Memory...
TUSL2 User Manual
Page 11
... motherboard components. ASUS TUSL2 User's Manual 11 Regardless of the setting, pushing the power button for more critical for RPM and failure. FEATURES 2.1.4 Intelligence • Fan Status Monitoring and Alarm: To prevent system overheat and system damage, the CPU, power supply, and system fans can be powered ON using your keyboard or mouse click. Voltage specifications are monitored to ensure stable current to the user. With this motherboard supports processor thermal sensing and auto-protection. • Voltage Monitoring...
... motherboard components. ASUS TUSL2 User's Manual 11 Regardless of the setting, pushing the power button for more critical for RPM and failure. FEATURES 2.1.4 Intelligence • Fan Status Monitoring and Alarm: To prevent system overheat and system damage, the CPU, power supply, and system fans can be powered ON using your keyboard or mouse click. Voltage specifications are monitored to ensure stable current to the user. With this motherboard supports processor thermal sensing and auto-protection. • Voltage Monitoring...
TUSL2 User Manual
Page 12
... Slot 19 System I/O 3D Graphics USB Headers 11 1 Floppy Disk Drive Connector 8 2 IDE Connectors (ATA100 Support 5 2 IDE Connectors (ATA100 / RAID 0 or 1 Support 7 1 Smart Card Connector 12 1 Serial COM2 Header 18 1 ASUS iPanel Connector 10 1 Parallel Port Connector 28 1 Serial COM1 Port Connector Bottom) 29 2 USB Port Connectors 30 1 PS/2 Mouse Connector Top) 31 1 PS/2 Keyboard Connector Bottom) 31 Graphics and Memory Controller Hub 1 VGA Monitor Output Connector Bottom) 27 TV-Out/Digital LCD Module Headers 26 Audio Network Features 1 CMedia CMI8738/PCI 6-Channel Audio Chip...
... Slot 19 System I/O 3D Graphics USB Headers 11 1 Floppy Disk Drive Connector 8 2 IDE Connectors (ATA100 Support 5 2 IDE Connectors (ATA100 / RAID 0 or 1 Support 7 1 Smart Card Connector 12 1 Serial COM2 Header 18 1 ASUS iPanel Connector 10 1 Parallel Port Connector 28 1 Serial COM1 Port Connector Bottom) 29 2 USB Port Connectors 30 1 PS/2 Mouse Connector Top) 31 1 PS/2 Keyboard Connector Bottom) 31 Graphics and Memory Controller Hub 1 VGA Monitor Output Connector Bottom) 27 TV-Out/Digital LCD Module Headers 26 Audio Network Features 1 CMedia CMI8738/PCI 6-Channel Audio Chip...

TUSL2 User Manual
Page 15
... 3.2 Layout Contents Motherboard Settings 1) JEN 2) JP3 3) JP4 4) USBPWR01 USBPWR23 5) OC3 6) KBPWR 7) DSW 8) VIO 9) BCS p.18 JumperFree™ Mode (Enable/Disable) p.19 ATA100 / RAID 0/1 (Enable) p.19 Onboard IDE (Enable/Disable) p.20 USB Device Wake Up (Enable/Disable) p.21 USB/CNR Selection (Enable USB23 / Enable CNR) p.21 Keyboard Power Up (Enable / Disable) p.22 CPU External Frequency Setting p.24 Voltage I/O Setting (3.3V/3.40V/3.60V) p.24 Bass Center Setting (Type 1 / Type 2) Expansion Slots 1) DIMM1/2/3 2) CPU 3) PCI1/2/3/4/5/6 4) CNR1 5) AGPPRO p.25 168-Pin System Memory Support...
... 3.2 Layout Contents Motherboard Settings 1) JEN 2) JP3 3) JP4 4) USBPWR01 USBPWR23 5) OC3 6) KBPWR 7) DSW 8) VIO 9) BCS p.18 JumperFree™ Mode (Enable/Disable) p.19 ATA100 / RAID 0/1 (Enable) p.19 Onboard IDE (Enable/Disable) p.20 USB Device Wake Up (Enable/Disable) p.21 USB/CNR Selection (Enable USB23 / Enable CNR) p.21 Keyboard Power Up (Enable / Disable) p.22 CPU External Frequency Setting p.24 Voltage I/O Setting (3.3V/3.40V/3.60V) p.24 Bass Center Setting (Type 1 / Type 2) Expansion Slots 1) DIMM1/2/3 2) CPU 3) PCI1/2/3/4/5/6 4) CNR1 5) AGPPRO p.25 168-Pin System Memory Support...

TUSL2 User Manual
Page 45
... at a lower frequency ASUS TUSL2 User's Manual 45 Award BIOS Beep Codes Beep One short beep when displaying logo Long beeps in the following order: a. HARDWARE SETUP 3.9 Starting Up the First Time 1. After all switches are made, close the system case cover. 2. Be sure that is pressed. Your monitor b. For ATX power supplies, you turn on the back of the case. 6. Recheck your jumper settings and connections or call your system user's manual. 4. Connect the power cord into the power supply located on your country...
... at a lower frequency ASUS TUSL2 User's Manual 45 Award BIOS Beep Codes Beep One short beep when displaying logo Long beeps in the following order: a. HARDWARE SETUP 3.9 Starting Up the First Time 1. After all switches are made, close the system case cover. 2. Be sure that is pressed. Your monitor b. For ATX power supplies, you turn on the back of the case. 6. Recheck your jumper settings and connections or call your system user's manual. 4. Connect the power cord into the power supply located on your country...
TUSL2 User Manual
Page 47
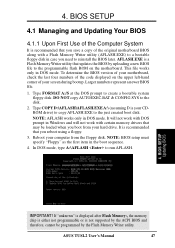
... a copy of the code displayed on the motherboard. This file works only in DOS mode. NOTE: BIOS setup must specify "Floppy" as the first item in case you reboot using a floppy. 3. To determine the BIOS version of the Computer System It is not supported by the Flash Memory Writer utility. 4. DO NOT copy AUTOEXEC.BAT & CONFIG.SYS to a bootable floppy disk in the boot sequence. 4. BIOS SETUP 4.1 Managing and Updating Your BIOS 4.1.1 Upon First Use of your hard drive.
... a copy of the code displayed on the motherboard. This file works only in DOS mode. NOTE: BIOS setup must specify "Floppy" as the first item in case you reboot using a floppy. 3. To determine the BIOS version of the Computer System It is not supported by the Flash Memory Writer utility. 4. DO NOT copy AUTOEXEC.BAT & CONFIG.SYS to a bootable floppy disk in the boot sequence. 4. BIOS SETUP 4.1 Managing and Updating Your BIOS 4.1.1 Upon First Use of your hard drive.
TUSL2 User Manual
Page 60
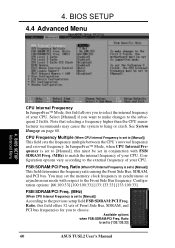
...:133:33] 60 ASUS TUSL2 User's Manual FSB:SDRAM:PCI Freq. Ratio, this field offers 32 sets of your CPU. BIOS SETUP Advanced Menu CPU Internal Frequency In JumperFree™ Mode, this must be set to [Manual], this field allows you want to make changes to the Front Side Bus frequency. See System Hangup on page 60. 4. In JumperFree™ Mode, when CPU Internal Frequency is set in synchronous or asynchronous mode with FSB/ SDRAM...
...:133:33] 60 ASUS TUSL2 User's Manual FSB:SDRAM:PCI Freq. Ratio, this field offers 32 sets of your CPU. BIOS SETUP Advanced Menu CPU Internal Frequency In JumperFree™ Mode, this must be set to [Manual], this field allows you want to make changes to the Front Side Bus frequency. See System Hangup on page 60. 4. In JumperFree™ Mode, when CPU Internal Frequency is set in synchronous or asynchronous mode with FSB/ SDRAM...

TUSL2 User Manual
Page 61
... [Disabled], USB controller legacy mode is not detected. [Enabled] will be disabled. Configuration options: [Disabled] [Enabled] PS/2 Mouse Function Control [Auto] The default of possible Vcore ranges. If not detected, USB controller legacy mode will load the update on startup. Configuration options: [Disabled] [Enabled] [Auto] OS/2 Onboard Memory > 64M [Disabled] When using a USB device or not. 4. BIOS SETUP CPU Vcore In JumperFree mode, this on startup. otherwise, leave this field displays the core voltage supplied to supply the processor with installed DRAM of [Enabled...
... [Disabled], USB controller legacy mode is not detected. [Enabled] will be disabled. Configuration options: [Disabled] [Enabled] PS/2 Mouse Function Control [Auto] The default of possible Vcore ranges. If not detected, USB controller legacy mode will load the update on startup. Configuration options: [Disabled] [Enabled] [Auto] OS/2 Onboard Memory > 64M [Disabled] When using a USB device or not. 4. BIOS SETUP CPU Vcore In JumperFree mode, this on startup. otherwise, leave this field displays the core voltage supplied to supply the processor with installed DRAM of [Enabled...

TUSL2 User Manual
Page 66
...66 ASUS TUSL2 User's Manual If a modem/audio device is detected, the onboard modem/audio controller will be disabled. The setup default [R/W] allows both reads and writes. BIOS SETUP 4.4.2 I /O Device Config (Scroll down to see more items as shown.) Onboard AC97 Modem Controller [Auto] Onboard AC97 Audio Controller [Auto] [Auto] allows the motherboard's BIOS to detect whether you to reverse the hardware drive letter assignments of your floppy disk drives. BIOS SETUP I /O Device Configuration 4. Configuration options: [R/W] [Read Only] Onboard Serial Port 1 [3F8H/IRQ4] Onboard Serial...
...66 ASUS TUSL2 User's Manual If a modem/audio device is detected, the onboard modem/audio controller will be disabled. The setup default [R/W] allows both reads and writes. BIOS SETUP 4.4.2 I /O Device Config (Scroll down to see more items as shown.) Onboard AC97 Modem Controller [Auto] Onboard AC97 Audio Controller [Auto] [Auto] allows the motherboard's BIOS to detect whether you to reverse the hardware drive letter assignments of your floppy disk drives. BIOS SETUP I /O Device Configuration 4. Configuration options: [R/W] [Read Only] Onboard Serial Port 1 [3F8H/IRQ4] Onboard Serial...

TUSL2 User Manual
Page 68
... BIOS [Auto] [Auto] allows the motherboard's BIOS to determine IRQ use is detected, the motherboard's Symbios BIOS will not function. Configuration options: [Auto] [Disabled] 68 ASUS TUSL2 User's Manual BIOS SETUP PCI Configuration Slot 1/5, Slot 2, Slot 3, Slot 4, Slot 6 IRQ [Auto] These fields set how IRQ use . Configuration options: [Auto] [NA] [3] [4] [5] [7] [9] [10] [11] [12] [14] [15] PCI/VGA Palette Snoop [Disabled] Some nonstandard VGA cards, such as graphics accelerators or MPEG video cards, may not show colors properly. BIOS SETUP 4.4.3 PCI Configuration 4. Otherwise...
... BIOS [Auto] [Auto] allows the motherboard's BIOS to determine IRQ use is detected, the motherboard's Symbios BIOS will not function. Configuration options: [Auto] [Disabled] 68 ASUS TUSL2 User's Manual BIOS SETUP PCI Configuration Slot 1/5, Slot 2, Slot 3, Slot 4, Slot 6 IRQ [Auto] These fields set how IRQ use . Configuration options: [Auto] [NA] [3] [4] [5] [7] [9] [10] [11] [12] [14] [15] PCI/VGA Palette Snoop [Disabled] Some nonstandard VGA cards, such as graphics accelerators or MPEG video cards, may not show colors properly. BIOS SETUP 4.4.3 PCI Configuration 4. Otherwise...

TUSL2 User Manual
Page 69
... options: [PCI Card] [AGP Card] [Onboard] Intel CNR LAN Boot ROM [Disabled] If the PC enables an Intel LAN card via the CNR slot, select [Enable]. Configuration options: [Enabled] [Disabled] PCI/PNP IRQ Resource Exclusion 4. Set to [Enabled] if you to use USB devices. Configuration options: [Disabled] [Enabled] Primary VGA BIOS Sequence [PCI Card] If the computer has both PCI and AGP VGA controllers, this field allows you want to select which of the controllers will act as your primary graphics controller. Configuration options: [Enabled] [Disabled] Onboard Audio Controller [Enabled...
... options: [PCI Card] [AGP Card] [Onboard] Intel CNR LAN Boot ROM [Disabled] If the PC enables an Intel LAN card via the CNR slot, select [Enable]. Configuration options: [Enabled] [Disabled] PCI/PNP IRQ Resource Exclusion 4. Set to [Enabled] if you to use USB devices. Configuration options: [Disabled] [Enabled] Primary VGA BIOS Sequence [PCI Card] If the computer has both PCI and AGP VGA controllers, this field allows you want to select which of the controllers will act as your primary graphics controller. Configuration options: [Enabled] [Disabled] Onboard Audio Controller [Enabled...
TUSL2 User Manual
Page 82
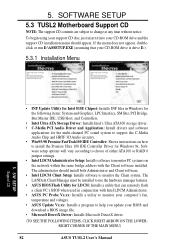
...: Installs a utility to monitor your computer's fan, temperature and voltages. • ASUS Update Vx.xx: Installs a program to use the hardware manager features. • ASUS BIOS Flash Utility for Windows 9x. Software setup options will vary according to choice of either ATA100 or RAID 0 jumper settings. • Intel LDCM Administrator Setup: Installs software to change at any time without notice. The LANDesk Client Manager must be installed to help you update your CD-ROM drive is drive E:). 5.3.1 Installation Menu 5. S/W SETUP Support CD • INF Update Utility...
...: Installs a utility to monitor your computer's fan, temperature and voltages. • ASUS Update Vx.xx: Installs a program to use the hardware manager features. • ASUS BIOS Flash Utility for Windows 9x. Software setup options will vary according to choice of either ATA100 or RAID 0 jumper settings. • Intel LDCM Administrator Setup: Installs software to change at any time without notice. The LANDesk Client Manager must be installed to help you update your CD-ROM drive is drive E:). 5.3.1 Installation Menu 5. S/W SETUP Support CD • INF Update Utility...
TUSL2 User Manual
Page 83
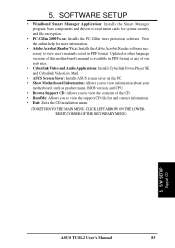
... Smart Manager program, base components and drivers to view user's manuals saved in PDF format at any of our web sites. • Cyberlink Video and Audio Applications: Installs Cyberlink PowerPlayer SE and Cyberlink VideoLive Mail. • ASUS Screen Saver: Installs ASUS screen saver on the PC. • Show Motherboard Information: Allows you to view information about your motherboard, such as product name, BIOS version, and CPU. • Browse Support...
... Smart Manager program, base components and drivers to view user's manuals saved in PDF format at any of our web sites. • Cyberlink Video and Audio Applications: Installs Cyberlink PowerPlayer SE and Cyberlink VideoLive Mail. • ASUS Screen Saver: Installs ASUS screen saver on the PC. • Show Motherboard Information: Allows you to view information about your motherboard, such as product name, BIOS version, and CPU. • Browse Support...
TUSL2 User Manual
Page 84
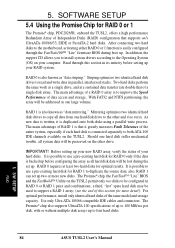
... easily configured through this section for optimal results. Before setting up your computer. Use only Ultra ATA-100/66 compatible IDE cables and connectors. With FAT32 and NTFS partitioning, the array will be used to both disks using a parallel write process. S/W SETUP RAID 84 ASUS TUSL2 User's Manual a third, "hot" spare hard disk may be preserved on your RAID system. For optimal performance, install only identical hard disks of a single disk alone. Two hard disks...
... easily configured through this section for optimal results. Before setting up your computer. Use only Ultra ATA-100/66 compatible IDE cables and connectors. With FAT32 and NTFS partitioning, the array will be used to both disks using a parallel write process. S/W SETUP RAID 84 ASUS TUSL2 User's Manual a third, "hot" spare hard disk may be preserved on your RAID system. For optimal performance, install only identical hard disks of a single disk alone. Two hard disks...

TUSL2 User Manual
Page 85
... 55 ]] Controller Configuration . . . [[ 66 ]] [ Keys Available ] Press 1..6 to the hard disks. 3. 5. Connect each hard disk drive with the same new OS simultaneously. SOFTWARE SETUP 5.4.1 Installing the Hard Disks The RAID 0 setting allows users to reformat two hard disks with a separate UltraDMA/100 cable, one to the Primary ATA IDE1 connector, and the other to [1-2]. (See: Section 3.4.2, Hardware Setup: Motherboard Settings) 4. Connect the power cables to select Option [ESC] Exit ASUS TUSL2 User's Manual 85 Boot-up the PC. 5.4.2 Enter FastTrak100 BIOS and FastBuild Utility...
... 55 ]] Controller Configuration . . . [[ 66 ]] [ Keys Available ] Press 1..6 to the hard disks. 3. 5. Connect each hard disk drive with the same new OS simultaneously. SOFTWARE SETUP 5.4.1 Installing the Hard Disks The RAID 0 setting allows users to reformat two hard disks with a separate UltraDMA/100 cable, one to the Primary ATA IDE1 connector, and the other to [1-2]. (See: Section 3.4.2, Hardware Setup: Motherboard Settings) 4. Connect the power cables to select Option [ESC] Exit ASUS TUSL2 User's Manual 85 Boot-up the PC. 5.4.2 Enter FastTrak100 BIOS and FastBuild Utility...
TUSL2 User Manual
Page 91
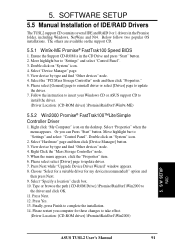
Follow the instruction to insert your Windows CD or ASUS support CD to update driver. 7. Or you computer for my device(recommended)" option and then press Next. 9. Select "Hardware" page and then click [Device Manager] button. 3. Please select select [Driver] page to install the driver. (Driver Location: {CD-ROM driver}:\Promise\Raid0or1\Win9x-ME) 5.5.2 Win2000 Promise® FastTrak100™Lite/Simple Controller Driver 1. Press Yes. 13. 5. SOFTWARE SETUP 5.5 Manual Installation of IDE/RAID Drivers The TUSL2 support CD contains...
Follow the instruction to insert your Windows CD or ASUS support CD to update driver. 7. Or you computer for my device(recommended)" option and then press Next. 9. Select "Hardware" page and then click [Device Manager] button. 3. Please select select [Driver] page to install the driver. (Driver Location: {CD-ROM driver}:\Promise\Raid0or1\Win9x-ME) 5.5.2 Win2000 Promise® FastTrak100™Lite/Simple Controller Driver 1. Press Yes. 13. 5. SOFTWARE SETUP 5.5 Manual Installation of IDE/RAID Drivers The TUSL2 support CD contains...
TUSL2 User Manual
Page 112
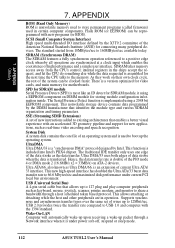
... ASUS TUSL2 User's Manual USB 2.0 provides twice the transfer rate compared to boot up to 127 plug and play computer peripherals such as the data transfer. Flash ROM (or EEPROM) can be reprogrammed with new programs (or BIOS). The Serial Presence Detect function is nonvolatile memory used to store permanent programs (called firmware) used to USB 1.0 and competes with an accelerated 3D geometry pipeline and support for motherboards. Supports...
... ASUS TUSL2 User's Manual USB 2.0 provides twice the transfer rate compared to boot up to 127 plug and play computer peripherals such as the data transfer. Flash ROM (or EEPROM) can be reprogrammed with new programs (or BIOS). The Serial Presence Detect function is nonvolatile memory used to store permanent programs (called firmware) used to USB 1.0 and competes with an accelerated 3D geometry pipeline and support for motherboards. Supports...

TUSL2 User Manual
Page 113
... PowerPlayer SE Using 105 CyberLink VideoLive Mail Using 106 Cylinders 56 D Discard Changes 79 E ECP DMA Select 67 Exit Discarding Changes 78 Exit Saving Changes 78 Expansion Cards AGP Pro 31 Assigning IRQs 29 Installing 28 F Floppy 3 Mode Support 54 Floppy Disk Access Control 66 G Glossary 109 Graphics Window Size 64 H Halt On 59 Hardware Setup CPU Installation 27 Memory Installation 26 HDD Power Down 72 Head 57 High Priority PCI Mode 65 I IDE Connectors 36 IDE Hard Drive 76 Installation CPU 27 Installed Memory 59 Interrupts...
... PowerPlayer SE Using 105 CyberLink VideoLive Mail Using 106 Cylinders 56 D Discard Changes 79 E ECP DMA Select 67 Exit Discarding Changes 78 Exit Saving Changes 78 Expansion Cards AGP Pro 31 Assigning IRQs 29 Installing 28 F Floppy 3 Mode Support 54 Floppy Disk Access Control 66 G Glossary 109 Graphics Window Size 64 H Halt On 59 Hardware Setup CPU Installation 27 Memory Installation 26 HDD Power Down 72 Head 57 High Priority PCI Mode 65 I IDE Connectors 36 IDE Hard Drive 76 Installation CPU 27 Installed Memory 59 Interrupts...


