
TRL-DLS User Manual
Page 8
...Module (DIMM) sockets that require flexible configurations. FEATURES Specifications 2. FEATURES 2.1 ASUS TRL-DLS Motherboard The ASUS TRL-DLS motherboard is designed for 1280x1024 and true color resolutions. • LAN Support: Features Intel 82550 Fast Ethernet LAN controller that fully supports 10BASE-T/100BASE-TX networking protocols, and two RJ-45 ports with status LEDs. • PC133 Memory Support: Equipped with Adaptec® AIC7899W 64-bit/66MHz SCSI controller to support up to 30 SCSI devices through the onboard dualchannel Ultra160 SCSI connectors. 8 ASUS TRL-DLS User's Manual...
...Module (DIMM) sockets that require flexible configurations. FEATURES Specifications 2. FEATURES 2.1 ASUS TRL-DLS Motherboard The ASUS TRL-DLS motherboard is designed for 1280x1024 and true color resolutions. • LAN Support: Features Intel 82550 Fast Ethernet LAN controller that fully supports 10BASE-T/100BASE-TX networking protocols, and two RJ-45 ports with status LEDs. • PC133 Memory Support: Equipped with Adaptec® AIC7899W 64-bit/66MHz SCSI controller to support up to 30 SCSI devices through the onboard dualchannel Ultra160 SCSI connectors. 8 ASUS TRL-DLS User's Manual...

TRL-DLS User Manual
Page 9
... Management Bus interface, which provides more control and protection over the motherboard. 2. ASUS TRL-DLS User's Manual 9 FEATURES Optional Components 2. Year 2000 certified. • CPU Throttling: CPU throttling protects CPU from overheating. • Integrated IOAPIC: Supports full 32-APIC entries and removes the need for a separate IOAPIC chip. • ASUS Server Management Card: The optional ASMC-LE, ASMC-ME, and ASMC-HE cards support Intelligent Platform Management Interface (IPMI), system health monitor, and LAN security mode...
... Management Bus interface, which provides more control and protection over the motherboard. 2. ASUS TRL-DLS User's Manual 9 FEATURES Optional Components 2. Year 2000 certified. • CPU Throttling: CPU throttling protects CPU from overheating. • Integrated IOAPIC: Supports full 32-APIC entries and removes the need for a separate IOAPIC chip. • ASUS Server Management Card: The optional ASMC-LE, ASMC-ME, and ASMC-HE cards support Intelligent Platform Management Interface (IPMI), system health monitor, and LAN security mode...
TRL-DLS User Manual
Page 10
... and power management for configuring and managing all system components, and 32-bit device drivers and installation procedures for systems and components are not wasted. (Ultra160 SCSI cables have twisted pairs compared to 160MB/s. With these features implemented in two channels. • CPU Speed: CPU frequency operates at 133MHz • High-Speed Data Transfer Interface: SCSI transfers using Ultra160 dualchannel SCSI controller can be used in older SCSI standards.) • Advanced 64-bit PCI: Maximizes...
... and power management for configuring and managing all system components, and 32-bit device drivers and installation procedures for systems and components are not wasted. (Ultra160 SCSI cables have twisted pairs compared to 160MB/s. With these features implemented in two channels. • CPU Speed: CPU frequency operates at 133MHz • High-Speed Data Transfer Interface: SCSI transfers using Ultra160 dualchannel SCSI controller can be used in older SCSI standards.) • Advanced 64-bit PCI: Maximizes...
TRL-DLS User Manual
Page 11
... with server reliability, availability, and serviceability requirements. Remote management response via remote diagnostics and troubleshooting still works even when the operating system has frozen. Suspend or Sleep) button or as the "Stand by" (a.k.a. 2. FEATURES Intelligence 2. Regardless of the setting, pushing the power button for more critical for future processors, so monitoring is necessary to wake up remotely through an internal or external modem. ASUS TRL-DLS User's Manual 11 FEATURES 2.1.3 Intelligence • Fan Status Monitoring...
... with server reliability, availability, and serviceability requirements. Remote management response via remote diagnostics and troubleshooting still works even when the operating system has frozen. Suspend or Sleep) button or as the "Stand by" (a.k.a. 2. FEATURES Intelligence 2. Regardless of the setting, pushing the power button for more critical for future processors, so monitoring is necessary to wake up remotely through an internal or external modem. ASUS TRL-DLS User's Manual 11 FEATURES 2.1.3 Intelligence • Fan Status Monitoring...
TRL-DLS User Manual
Page 15
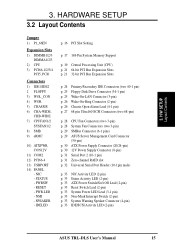
... Power Supply Connector (8-pin) p. 31 Serial Port 2 (10-1 pin) p. 31 Zero-channel RAID slot p. 32 Universal Serial Port Header (10-1pin male) p. 33 NIC Activity LED (2-pin) p. 33 Status Activity LED (2-pin) p. 33 ATX Power Switch/Soft Off Lead (2-pin) p. 33 Reset Switch Lead (2-pin) p. 33 System Power LED Lead (3-1 pin) p. 33 Non-Mask Interrupt Switch (2-pin) p. 33 System Warning Speaker Connector (4-pin) p. 33 IDE/SCSI Activity LED (2-pin) ASUS TRL-DLS User's Manual 15 PWRSW - HARDWARE SETUP 3.2 Layout Contents Jumper 1) P1_66EN Expansion Slots...
... Power Supply Connector (8-pin) p. 31 Serial Port 2 (10-1 pin) p. 31 Zero-channel RAID slot p. 32 Universal Serial Port Header (10-1pin male) p. 33 NIC Activity LED (2-pin) p. 33 Status Activity LED (2-pin) p. 33 ATX Power Switch/Soft Off Lead (2-pin) p. 33 Reset Switch Lead (2-pin) p. 33 System Power LED Lead (3-1 pin) p. 33 Non-Mask Interrupt Switch (2-pin) p. 33 System Warning Speaker Connector (4-pin) p. 33 IDE/SCSI Activity LED (2-pin) ASUS TRL-DLS User's Manual 15 PWRSW - HARDWARE SETUP 3.2 Layout Contents Jumper 1) P1_66EN Expansion Slots...

TRL-DLS User Manual
Page 16
... or remove any component, ensure that came with the component. 5. Connect ribbon cables, panel wires, and power supply cables 7. Unplug the power cord from the power supply. This jumper allows you installed only one jumper on them due to avoid damaging them . 4. Install Expansion Cards 6. Before you install motherboard components or change any internal component. 2. Check motherboard settings 2. H/W SETUP Jumper ® TRL-DLS TRL-DLS PCI Slot Setting P1_66EN 12 23 Normal (Default) Force 33Mhz 16 ASUS TRL-DLS User's Manual 3. HARDWARE SETUP 3.3 Hardware Setup...
... or remove any component, ensure that came with the component. 5. Connect ribbon cables, panel wires, and power supply cables 7. Unplug the power cord from the power supply. This jumper allows you installed only one jumper on them due to avoid damaging them . 4. Install Expansion Cards 6. Before you install motherboard components or change any internal component. 2. Check motherboard settings 2. H/W SETUP Jumper ® TRL-DLS TRL-DLS PCI Slot Setting P1_66EN 12 23 Normal (Default) Force 33Mhz 16 ASUS TRL-DLS User's Manual 3. HARDWARE SETUP 3.3 Hardware Setup...
TRL-DLS User Manual
Page 21
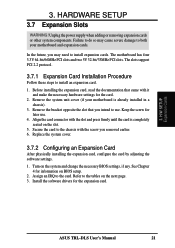
...-bit/33MHz PCI slots. Remove the system unit cover (if your motherboard and expansion cards. Keep the screw for the card. 2. ASUS TRL-DLS User's Manual 21 See Chapter 4 for the expansion card. Unplug the power supply when adding or removing expansion cards or other system components. Remove the bracket opposite the slot that came with it and make the necessary hardware settings for later use . Align the card connector with the screw you removed earlier. 6. Replace the system cover. 3.7.2 Configuring an Expansion Card...
...-bit/33MHz PCI slots. Remove the system unit cover (if your motherboard and expansion cards. Keep the screw for the card. 2. ASUS TRL-DLS User's Manual 21 See Chapter 4 for the expansion card. Unplug the power supply when adding or removing expansion cards or other system components. Remove the bracket opposite the slot that came with it and make the necessary hardware settings for later use . Align the card connector with the screw you removed earlier. 6. Replace the system cover. 3.7.2 Configuring an Expansion Card...
TRL-DLS User Manual
Page 24
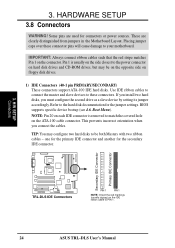
... the red stripe matches Pin 1 on the IDE ribbon cable to PIN 1. 24 ASUS TRL-DLS User's Manual If you install two hard disks, you connect the cables. BIOS supports specific device bootup (see 4.6. This prevents incorrect orientation when you must configure the second drive as a slave device by setting its jumper accordingly. 3. H/W SETUP Connectors 3. Some pins are clearly distinguished from jumpers in the Motherboard Layout. Refer to be on the opposite side on the...
... the red stripe matches Pin 1 on the IDE ribbon cable to PIN 1. 24 ASUS TRL-DLS User's Manual If you install two hard disks, you connect the cables. BIOS supports specific device bootup (see 4.6. This prevents incorrect orientation when you must configure the second drive as a slave device by setting its jumper accordingly. 3. H/W SETUP Connectors 3. Some pins are clearly distinguished from jumpers in the Motherboard Layout. Refer to be on the opposite side on the...
TRL-DLS User Manual
Page 34
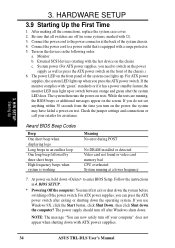
... monitor LED may have failed a power-on the power, the system may light up . At power on tests. If the monitor complies with ). 3. Award BIOS Beep Codes Beep One short beep when displaying logo Long beeps in 4. System power (For ATX power supplies, you use Windows 9X, click the Start button, click Shut Down, then click Shut down with ATX power supplies. 34 ASUS TRL-DLS User's Manual NOTE: The message "You can press the ATX power switch after Windows shuts down to the power connector...
... monitor LED may have failed a power-on the power, the system may light up . At power on tests. If the monitor complies with ). 3. Award BIOS Beep Codes Beep One short beep when displaying logo Long beeps in 4. System power (For ATX power supplies, you use Windows 9X, click the Start button, click Shut Down, then click Shut down with ATX power supplies. 34 ASUS TRL-DLS User's Manual NOTE: The message "You can press the ATX power switch after Windows shuts down to the power connector...

TRL-DLS User Manual
Page 40
... first field or Moves the cursor to the last field Resets the current screen to the advanced features. The keys in the legend bar allow you to locate and load the Operating System. BIOS SETUP Program Information 40 ASUS TRL-DLS User's Manual ADVANCED Use this menu to exit the Setup program. To access the menu bar items, press the right or left or right ↑...
... first field or Moves the cursor to the last field Resets the current screen to the advanced features. The keys in the legend bar allow you to locate and load the Operating System. BIOS SETUP Program Information 40 ASUS TRL-DLS User's Manual ADVANCED Use this menu to exit the Setup program. To access the menu bar items, press the right or left or right ↑...
TRL-DLS User Manual
Page 43
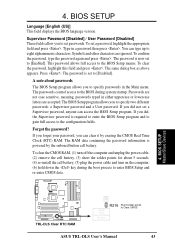
..., meaning, passwords typed in a password then press . This password allows full access to Clear CMOS ASUS TRL-DLS User's Manual 43 To clear the password, highlight this field and press . A note about 5 seconds, (4) re-install the cell battery, (5) plug the power cable and turn off the computer and unplug the power cable, (2) remove the cell battery, (3) short the solder points for about passwords The BIOS Setup program allows you can clear it by the onboard button cell battery. If...
..., meaning, passwords typed in a password then press . This password allows full access to Clear CMOS ASUS TRL-DLS User's Manual 43 To clear the password, highlight this field and press . A note about 5 seconds, (4) re-install the cell battery, (5) plug the power cable and turn off the computer and unplug the power cable, (2) remove the cell battery, (3) short the solder points for about passwords The BIOS Setup program allows you can clear it by the onboard button cell battery. If...
TRL-DLS User Manual
Page 60
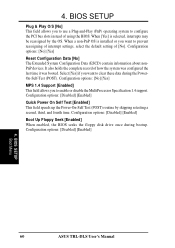
... nonPnP devices. Select [Yes] if you to configure the PCI bus slots instead of using the BIOS. Configuration options: [Disabled] [Enabled] 4. 4. When [Yes] is installed or you to use a Plug-and-Play (PnP) operating system to enable or disable the MultiProcessor Specification 1.4 support. It also holds the complete record of [No]. Configuration options: [Disabled] [Enabled] Quick Power On Self Test [Enabled] This field speeds up the Power-On-Self Test (POST) routine by the OS. BIOS SETUP Boot Menu 60 ASUS TRL-DLS User's Manual When...
... nonPnP devices. Select [Yes] if you to configure the PCI bus slots instead of using the BIOS. Configuration options: [Disabled] [Enabled] 4. 4. When [Yes] is installed or you to use a Plug-and-Play (PnP) operating system to enable or disable the MultiProcessor Specification 1.4 support. It also holds the complete record of [No]. Configuration options: [Disabled] [Enabled] Quick Power On Self Test [Enabled] This field speeds up the Power-On-Self Test (POST) routine by the OS. BIOS SETUP Boot Menu 60 ASUS TRL-DLS User's Manual When...
TRL-DLS User Manual
Page 61
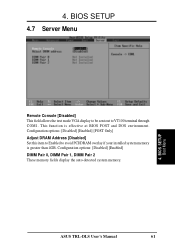
...BIOS SETUP 4.7 Server Menu 4. This function is greater than 4GB. Configuration options: [Disabled] [Enabled] DIMM Pair 0, DIMM Pair 1, DIMM Pair 2 These memory fields display the auto-detected system memory. Configuration options: [Disabled] [Enabled] [POST Only] Adjust DRAM Address [Disabled] Set this item to Enabled to VT100 terminal through COM1. BIOS SETUP Boot Menu Remote Console [Disabled] This field allows the text mode VGA display to be sent out to avoid PCI/DRAM overlay if your installed system memory is effective at BIOS POST and DOS environment. ASUS TRL-DLS User's Manual...
...BIOS SETUP 4.7 Server Menu 4. This function is greater than 4GB. Configuration options: [Disabled] [Enabled] DIMM Pair 0, DIMM Pair 1, DIMM Pair 2 These memory fields display the auto-detected system memory. Configuration options: [Disabled] [Enabled] [POST Only] Adjust DRAM Address [Disabled] Set this item to Enabled to VT100 terminal through COM1. BIOS SETUP Boot Menu Remote Console [Disabled] This field allows the text mode VGA display to be sent out to avoid PCI/DRAM overlay if your installed system memory is effective at BIOS POST and DOS environment. ASUS TRL-DLS User's Manual...
TRL-DLS User Manual
Page 68
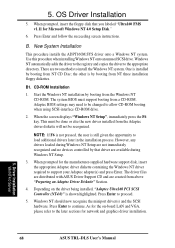
.... CD-ROM Installation 1. Adaptec BIOS settings may need to be recognized. Depending on -board LAN and VGA, please refer to support your Adaptec adapter(s) and press Enter. Driver Installation WinNT4.0 Server 68 ASUS TRL-DLS User's Manual Use this procedure when installing Windows NT onto an unused SCSI drive. Windows NT should now recognize the miniport driver(s) and the SCSI hardware. 5. Windows NT automatically adds the driver to the registry and copies the driver to allow CD-ROM booting when using SCSI-interface CD-ROM drive...
.... CD-ROM Installation 1. Adaptec BIOS settings may need to be recognized. Depending on -board LAN and VGA, please refer to support your Adaptec adapter(s) and press Enter. Driver Installation WinNT4.0 Server 68 ASUS TRL-DLS User's Manual Use this procedure when installing Windows NT onto an unused SCSI drive. Windows NT should now recognize the miniport driver(s) and the SCSI hardware. 5. Windows NT automatically adds the driver to the registry and copies the driver to allow CD-ROM booting when using SCSI-interface CD-ROM drive...
TRL-DLS User Manual
Page 69
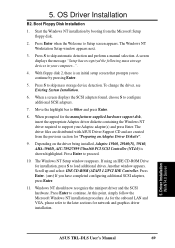
... drives. Another window appears. The Windows NT Workstation Setup window appears next. 3. If using an IDE CD-ROM Drive for the onboard LAN and VGA, please refer to skip mass storage device detection. Driver Installation WinNT4.0 Server ASUS TRL-DLS User's Manual 69 The driver files are distributed with ASUS Driver Support CD and are created from the Microsoft Setup floppy disk. 2. Boot Floppy Disk Installation 1. To change the driver, see Existing System Installation. 6. 5. Windows NT should now recognize the miniport driver and the SCSI hardware...
... drives. Another window appears. The Windows NT Workstation Setup window appears next. 3. If using an IDE CD-ROM Drive for the onboard LAN and VGA, please refer to skip mass storage device detection. Driver Installation WinNT4.0 Server ASUS TRL-DLS User's Manual 69 The driver files are distributed with ASUS Driver Support CD and are created from the Microsoft Setup floppy disk. 2. Boot Floppy Disk Installation 1. To change the driver, see Existing System Installation. 6. 5. Windows NT should now recognize the miniport driver and the SCSI hardware...
TRL-DLS User Manual
Page 71
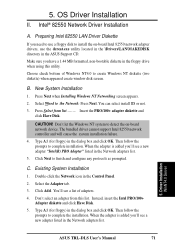
... installation. Don't select an adapter from list........ When the adapter is added you need to use a floppy disk to detect the on -board Intel 82550 network adapter drivers, use the dcreat.exe utility located in the \Drivers\LAN\MAKEDISK directory in the floppy drive when using this list. Intel® 82550 Network Driver Installation A. B. Existing System Installation 1. Press Select from this utility. Don't let the Windows NT system to install the on -board network device. Select the Adapter tab. 3. Driver Installation WinNT4.0 Server ASUS TRL-DLS User's Manual...
... installation. Don't select an adapter from list........ When the adapter is added you need to use a floppy disk to detect the on -board Intel 82550 network adapter drivers, use the dcreat.exe utility located in the \Drivers\LAN\MAKEDISK directory in the floppy drive when using this list. Intel® 82550 Network Driver Installation A. B. Existing System Installation 1. Press Select from this utility. Don't let the Windows NT system to install the on -board network device. Select the Adapter tab. 3. Driver Installation WinNT4.0 Server ASUS TRL-DLS User's Manual...
TRL-DLS User Manual
Page 73
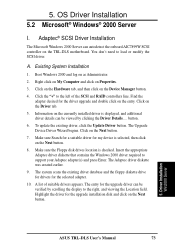
... the Device Manager button. 4. Driver Installation Win2000 Server ASUS TRL-DLS User's Manual 73 Adaptec® SCSI Driver Installation The Microsoft Windows 2000 Server can be verified by clicking the Driver Details.... Boot Windows 2000 and log on the entry. Find the adapter desired for the upgrade installation disk and click on Properties. 3. To update the existing driver, click the Update Driver button. The Upgrade Device Driver Wizard begins. The Adaptec driver diskette was created earlier. 9. OS Driver Installation 5.2 Microsoft® Windows® 2000 Server I. Existing...
... the Device Manager button. 4. Driver Installation Win2000 Server ASUS TRL-DLS User's Manual 73 Adaptec® SCSI Driver Installation The Microsoft Windows 2000 Server can be verified by clicking the Driver Details.... Boot Windows 2000 and log on the entry. Find the adapter desired for the upgrade installation disk and click on Properties. 3. To update the existing driver, click the Update Driver button. The Upgrade Device Driver Wizard begins. The Adaptec driver diskette was created earlier. 9. OS Driver Installation 5.2 Microsoft® Windows® 2000 Server I. Existing...

TRL-DLS User Manual
Page 75
...an Update Driver message. Click on Update Drivers button. 6. Click Other Devices and highlight "Ethernet Controller". Alternately, you can use the MAKEW2K.BAT files (located in the floppy drive when using this utility. Button. 4. Update Driver on the Start button. Click on an Existing System Installation Windows 2000 cannot automatically detect the Intel 82550 LAN controller. Click the right mouse button and select Properties. 5. Select the Driver tab. Click Next. Select A: floppy disk for Windows 2000 B. Driver Installation Win2000 Server ASUS TRL-DLS User's Manual...
...an Update Driver message. Click on Update Drivers button. 6. Click Other Devices and highlight "Ethernet Controller". Alternately, you can use the MAKEW2K.BAT files (located in the floppy drive when using this utility. Button. 4. Update Driver on the Start button. Click on an Existing System Installation Windows 2000 cannot automatically detect the Intel 82550 LAN controller. Click the right mouse button and select Properties. 5. Select the Driver tab. Click Next. Select A: floppy disk for Windows 2000 B. Driver Installation Win2000 Server ASUS TRL-DLS User's Manual...
TRL-DLS User Manual
Page 77
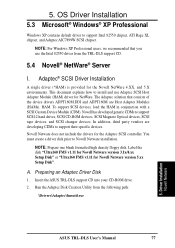
...controller. Driver Installation Novell Netware ASUS TRL-DLS User's Manual 77 NOTE: For Windows XP Professional users, we recommended that consists of the device drivers ADPT160M.DDI and ADPT160M are developing CDMs to Novell Netware installation. HAM. Run the Adaptec Disk Creation Utility from the TRL-DLS support CD. 5.4 Novell® NetWare® Server I. OS Driver Installation 5.3 Microsoft® Windows® XP Professional Windows XP contains default driver to support SCSI-2 hard drives, SCSI CD-ROM devices, SCSI Magneto Optical devices, SCSI tape devices, and SCSI...
...controller. Driver Installation Novell Netware ASUS TRL-DLS User's Manual 77 NOTE: For Windows XP Professional users, we recommended that consists of the device drivers ADPT160M.DDI and ADPT160M are developing CDMs to Novell Netware installation. HAM. Run the Adaptec Disk Creation Utility from the TRL-DLS support CD. 5.4 Novell® NetWare® Server I. OS Driver Installation 5.3 Microsoft® Windows® XP Professional Windows XP contains default driver to support SCSI-2 hard drives, SCSI CD-ROM devices, SCSI Magneto Optical devices, SCSI tape devices, and SCSI...
TRL-DLS User Manual
Page 85
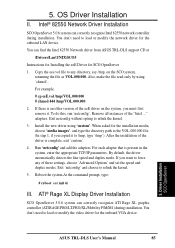
... SCO OpenServer 1. Run 'netconfig' and add the adapters. Reboot the system.At the command prompt, type: # reboot (or init 6) III. Driver Installation SCO OpenServer ASUS TRL-DLS User's Manual 85 You can correctly recognize ATI Rage XL graphic controller (ATI RAGE PRO/LT-PRO/XL/Mobility P/M/M1) during installation. For example, # cp eeE.vol /tmp/VOL.000.000 # chmod 444 /tmp/VOL.000.000 2. Remove all instances...
... SCO OpenServer 1. Run 'netconfig' and add the adapters. Reboot the system.At the command prompt, type: # reboot (or init 6) III. Driver Installation SCO OpenServer ASUS TRL-DLS User's Manual 85 You can correctly recognize ATI Rage XL graphic controller (ATI RAGE PRO/LT-PRO/XL/Mobility P/M/M1) during installation. For example, # cp eeE.vol /tmp/VOL.000.000 # chmod 444 /tmp/VOL.000.000 2. Remove all instances...


