
User Guide
Page 1
Motherboard SABERTOOTH Z97 MARK 1/USB 3.1
Motherboard SABERTOOTH Z97 MARK 1/USB 3.1
User Guide
Page 3
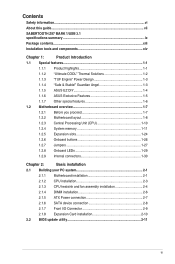
......vi About this guide...vii SABERTOOTH Z97 MARK 1/USB 3.1 specifications summary ix Package contents...xiii Installation tools and components xiv Chapter 1: Product Introduction 1.1 Special features 1-1 1.1.1 Product highlights 1-1 1.1.2 "Ultimate COOL" Thermal Solutions 1-2 1.1.3 "TUF Engine" Power Design 1-3 1.1.4 "Safe & Stable!" Guardian Angel 1-3 1.1.5 ASUS EZ DIY 1-4 1.1.6 ASUS Exclusive Features 1-5 1.1.7 Other special features 1-6 1.2 Motherboard overview 1-7 1.2.1 Before you proceed 1-7 1.2.2 Motherboard layout 1-8 1.2.3 Central Processing Unit...
......vi About this guide...vii SABERTOOTH Z97 MARK 1/USB 3.1 specifications summary ix Package contents...xiii Installation tools and components xiv Chapter 1: Product Introduction 1.1 Special features 1-1 1.1.1 Product highlights 1-1 1.1.2 "Ultimate COOL" Thermal Solutions 1-2 1.1.3 "TUF Engine" Power Design 1-3 1.1.4 "Safe & Stable!" Guardian Angel 1-3 1.1.5 ASUS EZ DIY 1-4 1.1.6 ASUS Exclusive Features 1-5 1.1.7 Other special features 1-6 1.2 Motherboard overview 1-7 1.2.1 Before you proceed 1-7 1.2.2 Motherboard layout 1-8 1.2.3 Central Processing Unit...
User Guide
Page 4
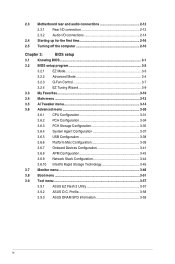
Profile 3-58 3.9.3 ASUS DRAM SPD Information 3-59 iv 2.3 Motherboard rear and audio connections 2-12 2.3.1 Rear I/O connection 2-12 2.3.2 Audio I/O connections 2-14 2.4 Starting up for the...Tweaker menu 3-14 3.6 Advanced menu 3-30 3.6.1 CPU Configuration 3-31 3.6.2 PCH Configuration 3-34 3.6.3 PCH Storage Configuration 3-35 3.6.4 System Agent Configuration 3-37 3.6.5 USB Configuration 3-38 3.6.6 Platform Misc Configuration 3-39 3.6.7 Onboard Devices Configuration 3-41 3.6.8 APM Configuration 3-43 3.6.9 Network Stack Configuration 3-44 3.6.10 Intel(R) Rapid Storage ...
Profile 3-58 3.9.3 ASUS DRAM SPD Information 3-59 iv 2.3 Motherboard rear and audio connections 2-12 2.3.1 Rear I/O connection 2-12 2.3.2 Audio I/O connections 2-14 2.4 Starting up for the...Tweaker menu 3-14 3.6 Advanced menu 3-30 3.6.1 CPU Configuration 3-31 3.6.2 PCH Configuration 3-34 3.6.3 PCH Storage Configuration 3-35 3.6.4 System Agent Configuration 3-37 3.6.5 USB Configuration 3-38 3.6.6 Platform Misc Configuration 3-39 3.6.7 Onboard Devices Configuration 3-41 3.6.8 APM Configuration 3-43 3.6.9 Network Stack Configuration 3-44 3.6.10 Intel(R) Rapid Storage ...
User Guide
Page 6
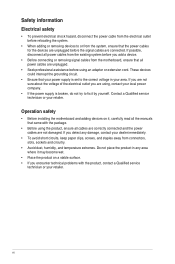
...8226; Ensure that the power cables for the devices are unplugged before the signal cables are using the product, ensure all power cables from the motherboard, ensure that came with the product, contact a Qualified service technician or your power supply is broken, do not try to fix it by yourself... devices to or from connectors, slots, sockets and circuitry. • Avoid dust, humidity, and temperature extremes. Operation safety • Before installing the motherboard and adding devices on a stable surface. • If you are connected. Do not place the product in your area.
...8226; Ensure that the power cables for the devices are unplugged before the signal cables are using the product, ensure all power cables from the motherboard, ensure that came with the product, contact a Qualified service technician or your power supply is broken, do not try to fix it by yourself... devices to or from connectors, slots, sockets and circuitry. • Avoid dust, humidity, and temperature extremes. Operation safety • Before installing the motherboard and adding devices on a stable surface. • If you are connected. Do not place the product in your area.

User Guide
Page 7
...part of the support DVD that comes with the motherboard package and the software. • Chapter 5: RAID support This chapter describes the RAID configurations. ASUS websites The ASUS website provides updated information on the motherboard. • Chapter 2: Basic installation This chapter ...may include optional documentation, such as warranty flyers, that you need when installing and configuring the motherboard. vii Where to find more information Refer to the ASUS contact information. 2. Optional documentation Your product package may have to perform when installing system components....
...part of the support DVD that comes with the motherboard package and the software. • Chapter 5: RAID support This chapter describes the RAID configurations. ASUS websites The ASUS website provides updated information on the motherboard. • Chapter 2: Basic installation This chapter ...may include optional documentation, such as warranty flyers, that you need when installing and configuring the motherboard. vii Where to find more information Refer to the ASUS contact information. 2. Optional documentation Your product package may have to perform when installing system components....
User Guide
Page 13
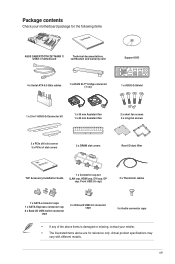
... Package contents Check your motherboard package for the following items User Manual ASUS SABERTOOTH Z97 MARK 1/ USB3.1 motherboard Technical documentations, certification and warranty card Support DVD 4 x Serial ATA 6.0 Gb/s cables 1 x ASUS SLI™ bridge connector (7 cm) 1 x ASUS Q-Shield 1 x 2-in-1 ASUS Q-Connector kit 1 x...(LAN cap, HDMI cap, DVI cap, DP cap, Front USB 3.0 cap) 3 x Thermistor cables ExSprAeTssA 7 x SATA connector caps 1 x SATA Expresss connector cap 8 x Back I/O USB 3.0/2.0 connector caps 2 x Onboard USB 2.0 connector caps 5 x Audio connector caps • If...
... Package contents Check your motherboard package for the following items User Manual ASUS SABERTOOTH Z97 MARK 1/ USB3.1 motherboard Technical documentations, certification and warranty card Support DVD 4 x Serial ATA 6.0 Gb/s cables 1 x ASUS SLI™ bridge connector (7 cm) 1 x ASUS Q-Shield 1 x 2-in-1 ASUS Q-Connector kit 1 x...(LAN cap, HDMI cap, DVI cap, DP cap, Front USB 3.0 cap) 3 x Thermistor cables ExSprAeTssA 7 x SATA connector caps 1 x SATA Expresss connector cap 8 x Back I/O USB 3.0/2.0 connector caps 2 x Onboard USB 2.0 connector caps 5 x Audio connector caps • If...

User Guide
Page 14
Installation tools and components 1 bag of screws Philips (cross) screwdriver PC chassis Power supply unit Intel® LGA1150 CPU Intel® LGA1150 compatible CPU Fan DIMM SATA hard disk drive SATA optical disc drive (optional) Graphics card (optional) The tools and components in the table above are not included in the motherboard package. xiv
Installation tools and components 1 bag of screws Philips (cross) screwdriver PC chassis Power supply unit Intel® LGA1150 CPU Intel® LGA1150 compatible CPU Fan DIMM SATA hard disk drive SATA optical disc drive (optional) Graphics card (optional) The tools and components in the table above are not included in the motherboard package. xiv
User Guide
Page 15
...174; Core™ i7 / Intel® Core™ i5 / Intel® Core™ i3, Pentium®, and Celeron® processors This motherboard supports the 4th, New 4th, and 5th generation Intel® Core™ i7 / Intel® Core™ i5 /Intel® Core™...® and Celeron® processors. Intel® Z97 Express Chipset Intel® Z97 Express Chipset is the PCI Express bus standard that features data transfer rates of DDR3 1866 / 1600 / 1333 MHz to boost the system's performance, and to two SATA drives of PCIe 2.0. Chapter 1 ASUS SABERTOOTH Z97 MARK 1/USB 3.1 1-1
...174; Core™ i7 / Intel® Core™ i5 / Intel® Core™ i3, Pentium®, and Celeron® processors This motherboard supports the 4th, New 4th, and 5th generation Intel® Core™ i7 / Intel® Core™ i5 /Intel® Core™...® and Celeron® processors. Intel® Z97 Express Chipset Intel® Z97 Express Chipset is the PCI Express bus standard that features data transfer rates of DDR3 1866 / 1600 / 1333 MHz to boost the system's performance, and to two SATA drives of PCIe 2.0. Chapter 1 ASUS SABERTOOTH Z97 MARK 1/USB 3.1 1-1
User Guide
Page 16
...your computer a faster wake-up to six times faster than USB 2.0. Complete USB 3.0 integration This motherboard offers you the strategic USB 3.0 accessibility for caching function. When the gate is reserved ... sensors to 6.0 Gb/s data transfer. Extra SATA 6.0 Gb/s Support The Intel® Z97 Express Chipset natively supports the next-generation Serial ATA (SATA) interface, delivering up to ten...solution, and noise reduction. ASUS provides extra SATA 6.0 Gb/s ports with enhanced scalability, faster data retrieval, and double the bandwidth of Green ASUS eco-friendly computing, reduces...
...your computer a faster wake-up to six times faster than USB 2.0. Complete USB 3.0 integration This motherboard offers you the strategic USB 3.0 accessibility for caching function. When the gate is reserved ... sensors to 6.0 Gb/s data transfer. Extra SATA 6.0 Gb/s Support The Intel® Z97 Express Chipset natively supports the next-generation Serial ATA (SATA) interface, delivering up to ten...solution, and noise reduction. ASUS provides extra SATA 6.0 Gb/s ports with enhanced scalability, faster data retrieval, and double the bandwidth of Green ASUS eco-friendly computing, reduces...
User Guide
Page 17
... memory boot compatibility, determine fail-safe settings, and dramatically improve the system's bootup. Chapter 1 ASUS SABERTOOTH Z97 MARK 1/USB 3.1 1-3 Guardian Angel TUF Fortifier The metal base TUF Fortifier strengthens the base of the motherboard and secures the Thermal Armor and the motherboard in place. Dust Defenders Dust Defenders provides rear I /O shield provide four times better protection and...
... memory boot compatibility, determine fail-safe settings, and dramatically improve the system's bootup. Chapter 1 ASUS SABERTOOTH Z97 MARK 1/USB 3.1 1-3 Guardian Angel TUF Fortifier The metal base TUF Fortifier strengthens the base of the motherboard and secures the Thermal Armor and the motherboard in place. Dust Defenders Dust Defenders provides rear I /O shield provide four times better protection and...
User Guide
Page 18
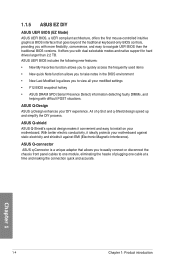
... POST situations. Chapter 1 1-4 Chapter 1: Product introduction With better electric conductivity, it ideally protects your motherboard against static electricity and shields it convenient and easy to install on your DIY experience. 1.1.5 ASUS EZ DIY ASUS UEFI BIOS (EZ Mode) ASUS UEFI BIOS, a UEFI compliant architecture, offers the first mouse-controlled intuitive graphical BIOS interface that...
... POST situations. Chapter 1 1-4 Chapter 1: Product introduction With better electric conductivity, it ideally protects your motherboard against static electricity and shields it convenient and easy to install on your DIY experience. 1.1.5 ASUS EZ DIY ASUS UEFI BIOS (EZ Mode) ASUS UEFI BIOS, a UEFI compliant architecture, offers the first mouse-controlled intuitive graphical BIOS interface that...

User Guide
Page 20
... to reduce carbon footprint of the product and thus mitigate environmental impacts. Chapter 1 1-6 Chapter 1: Product introduction ErP Ready The motherboard is European Union's Energy-related Products (ErP) ready, and ErP requires products to meet certain energy efficiency requirement in line with...highest quality home theater experience. Simply output 3D signals through the connected DisplayPort cable with your 3D display, then you with ASUS vision of colors and bi-directional communications, thus enabling the fastest refresh rates, and the highest resolution digital display through a...
... to reduce carbon footprint of the product and thus mitigate environmental impacts. Chapter 1 1-6 Chapter 1: Product introduction ErP Ready The motherboard is European Union's Energy-related Products (ErP) ready, and ErP requires products to meet certain energy efficiency requirement in line with...highest quality home theater experience. Simply output 3D signals through the connected DisplayPort cable with your 3D display, then you with ASUS vision of colors and bi-directional communications, thus enabling the fastest refresh rates, and the highest resolution digital display through a...
User Guide
Page 21
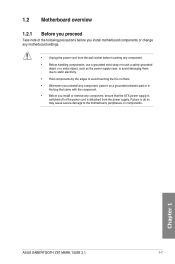
Chapter 1 ASUS SABERTOOTH Z97 MARK 1/USB 3.1 1-7 1.2 Motherboard overview 1.2.1 Before you proceed Take note of the following precautions before you install motherboard components or change any motherboard settings. • Unplug the power cord from the wall socket before touching any component. • Before handling components,...such as the power supply case, to avoid damaging them due to static electricity. • Hold components by the edges to the motherboard, peripherals, or components. Failure to do so may cause severe damage to avoid touching the ICs on them. • Whenever ...
Chapter 1 ASUS SABERTOOTH Z97 MARK 1/USB 3.1 1-7 1.2 Motherboard overview 1.2.1 Before you proceed Take note of the following precautions before you install motherboard components or change any motherboard settings. • Unplug the power cord from the wall socket before touching any component. • Before handling components,...such as the power supply case, to avoid damaging them due to static electricity. • Hold components by the edges to the motherboard, peripherals, or components. Failure to do so may cause severe damage to avoid touching the ICs on them. • Whenever ...
User Guide
Page 22
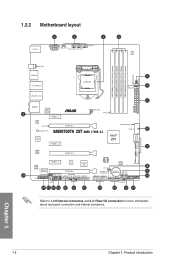
1.2.2 Motherboard layout Chapter 1 Refer to 1.2.9 Internal connectors and 2.3.1 Rear I/O connection for more information about rear panel connectors and internal connectors. 1-8 Chapter 1: Product introduction
1.2.2 Motherboard layout Chapter 1 Refer to 1.2.9 Internal connectors and 2.3.1 Rear I/O connection for more information about rear panel connectors and internal connectors. 1-8 Chapter 1: Product introduction

User Guide
Page 24
...8226; Upon purchase of the motherboard, ensure that you see any damage to the socket contacts resulting from incorrect CPU installation/removal, or misplacement/loss/incorrect removal of the PnP cap. DO NOT install a CPU designed for LGA1150 only. ASUS will process Return Merchandise Authorization ...(RMA) requests only if the motherboard comes with a surface mount LGA1150 socket designed for the 4th, New 4th, and 5th generation Intel®...
...8226; Upon purchase of the motherboard, ensure that you see any damage to the socket contacts resulting from incorrect CPU installation/removal, or misplacement/loss/incorrect removal of the PnP cap. DO NOT install a CPU designed for LGA1150 only. ASUS will process Return Merchandise Authorization ...(RMA) requests only if the motherboard comes with a surface mount LGA1150 socket designed for the 4th, New 4th, and 5th generation Intel®...
User Guide
Page 25
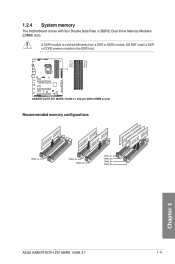
1.2.4 System memory The motherboard comes with four Double Data Rate 3 (DDR3) Dual Inline Memory Modules (DIMM) slots. DO NOT install a DDR or DDR2 memory module to the DDR3 slot. Recommended memory configurations Chapter 1 ASUS SABERTOOTH Z97 MARK 1/USB 3.1 1-11 A DDR3 module is notched differently from a DDR or DDR2 module.
1.2.4 System memory The motherboard comes with four Double Data Rate 3 (DDR3) Dual Inline Memory Modules (DIMM) slots. DO NOT install a DDR or DDR2 memory module to the DDR3 slot. Recommended memory configurations Chapter 1 ASUS SABERTOOTH Z97 MARK 1/USB 3.1 1-11 A DDR3 module is notched differently from a DDR or DDR2 module.
User Guide
Page 26
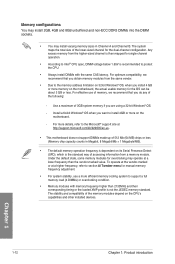
... modules with the same CAS latency. The system maps the total size of accessing information from a memory module. For more memory on the motherboard, the actual usable memory for single-channel operation. • According to Intel® CPU spec, DIMM voltage below 1.65V is not the... when you install 4 GB or more details, refer to protect the CPU. • Always install DIMMs with memory frequency higher than the vendor-marked value. Under the default state, some memory modules for overclocking may install varying memory sizes in Megabit, 8 Megabit/Mb = 1 Megabyte/MB). ...
... modules with the same CAS latency. The system maps the total size of accessing information from a memory module. For more memory on the motherboard, the actual usable memory for single-channel operation. • According to Intel® CPU spec, DIMM voltage below 1.65V is not the... when you install 4 GB or more details, refer to protect the CPU. • Always install DIMMs with memory frequency higher than the vendor-marked value. Under the default state, some memory modules for overclocking may install varying memory sizes in Megabit, 8 Megabit/Mb = 1 Megabyte/MB). ...
User Guide
Page 38
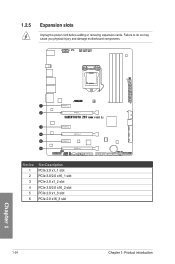
Failure to do so may cause you physical injury and damage motherboard components. Chapter 1 Slot No. 1 2 3 4 5 6 Slot Description PCIe 2.0 x1_1 slot PCIe 3.0/2.0 x16_1 slot PCIe 2.0 x1_2 slot PCIe 3.0/2.0 x16_2 slot PCIe 2.0 x1_3 slot PCIe 2.0 x16_3 slot 1-24 Chapter 1: Product introduction 1.2.5 Expansion slots Unplug the power cord before adding or removing expansion cards.
Failure to do so may cause you physical injury and damage motherboard components. Chapter 1 Slot No. 1 2 3 4 5 6 Slot Description PCIe 2.0 x1_1 slot PCIe 3.0/2.0 x16_1 slot PCIe 2.0 x1_2 slot PCIe 3.0/2.0 x16_2 slot PCIe 2.0 x1_3 slot PCIe 2.0 x16_3 slot 1-24 Chapter 1: Product introduction 1.2.5 Expansion slots Unplug the power cord before adding or removing expansion cards.
User Guide
Page 39
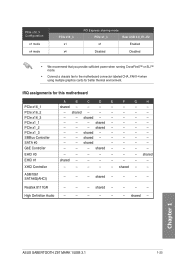
... x1 mode x4 mode PCIe x16_3 x1 x4 PCI Express sharing mode PCIe x1_3 Rear USB 3.0_E1~E2 x1 Enabled Disabled Disabled • We recommend that you provide sufficient power... connector labeled CHA_FAN1-4 when using multiple graphics cards for this motherboard PCIe x16_1 PCIe x16_2 PCIe x16_3 PCIe x1_1 PCIe x1_2 PCIe x1_3 SMBus Controller SATA #0 GbE Controller EHCI #0 EHCI #1 XHCI Controller ASM1061 SATA6G(AHCI) A B C D E F G H shared - - - - - - - - Chapter 1 ASUS SABERTOOTH Z97 MARK 1/USB 3.1 1-25 shared - - - - - shared - - - - - - - - shared - ...
... x1 mode x4 mode PCIe x16_3 x1 x4 PCI Express sharing mode PCIe x1_3 Rear USB 3.0_E1~E2 x1 Enabled Disabled Disabled • We recommend that you provide sufficient power... connector labeled CHA_FAN1-4 when using multiple graphics cards for this motherboard PCIe x16_1 PCIe x16_2 PCIe x16_3 PCIe x1_1 PCIe x1_2 PCIe x1_3 SMBus Controller SATA #0 GbE Controller EHCI #0 EHCI #1 XHCI Controller ASM1061 SATA6G(AHCI) A B C D E F G H shared - - - - - - - - Chapter 1 ASUS SABERTOOTH Z97 MARK 1/USB 3.1 1-25 shared - - - - - shared - - - - - - - - shared - ...
User Guide
Page 40
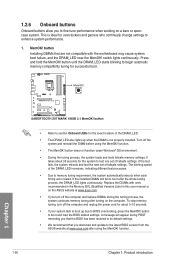
...reinstall the DIMM before using the MemOK! button Installing DIMMs that you download and update to the latest BIOS version from the ASUS website at www.asus.com. • If you turn off the computer and unplug the power cord for overclockers and gamers who continually change settings...asus.com after turning on a bare or opencase system. If the installed DIMMs still fail to boot and load the BIOS default settings. Turn off the computer and replace DIMMs during the tuning process, the system continues memory tuning after using the MemOK! Replace the DIMMs with the motherboard...
...reinstall the DIMM before using the MemOK! button Installing DIMMs that you download and update to the latest BIOS version from the ASUS website at www.asus.com. • If you turn off the computer and unplug the power cord for overclockers and gamers who continually change settings...asus.com after turning on a bare or opencase system. If the installed DIMMs still fail to boot and load the BIOS default settings. Turn off the computer and replace DIMMs during the tuning process, the system continues memory tuning after using the MemOK! Replace the DIMMs with the motherboard...


