User Guide
Page 2
... LOSS OF USE OR DATA, INTERRUPTION OF BUSINESS AND THE LIKE), EVEN IF ASUS HAS BEEN ADVISED OF THE POSSIBILITY OF SUCH DAMAGES ARISING FROM ANY DEFECT OR ERROR IN THIS MANUAL OR PRODUCT. ASUS ASSUMES NO RESPONSIBILITY OR LIABILITY FOR ANY ERRORS OR INACCURACIES THAT MAY APPEAR IN ...THIS MANUAL, INCLUDING THE PRODUCTS AND SOFTWARE DESCRIBED IN IT. This offer is defaced or missing. ASUS PROVIDES THIS MANUAL "AS IS" WITHOUT WARRANTY OF ANY KIND, EITHER EXPRESS OR IMPLIED, INCLUDING BUT NOT LIMITED ...
... LOSS OF USE OR DATA, INTERRUPTION OF BUSINESS AND THE LIKE), EVEN IF ASUS HAS BEEN ADVISED OF THE POSSIBILITY OF SUCH DAMAGES ARISING FROM ANY DEFECT OR ERROR IN THIS MANUAL OR PRODUCT. ASUS ASSUMES NO RESPONSIBILITY OR LIABILITY FOR ANY ERRORS OR INACCURACIES THAT MAY APPEAR IN ...THIS MANUAL, INCLUDING THE PRODUCTS AND SOFTWARE DESCRIBED IN IT. This offer is defaced or missing. ASUS PROVIDES THIS MANUAL "AS IS" WITHOUT WARRANTY OF ANY KIND, EITHER EXPRESS OR IMPLIED, INCLUDING BUT NOT LIMITED ...
User Guide
Page 5
... 3.11.1 EZ Update 3-61 3.11.2 ASUS EZ Flash 2 3-62 3.11.3 ASUS CrashFree BIOS 3 3-63 Chapter 4: Software support 4.1 Installing an operating system 4-1 4.2 Support DVD information 4-1 4.2.1 Running the support DVD 4-1 4.2.2 Obtaining the software manuals 4-3 4.3 Software information 4-4 4.4 AI Suite 3...4-4 4.4.1 Ai Charger 4-11 4.4.2 EZ Update 4-12 4.4.3 USB BIOS Flashback 4-14 4.4.4 Push Notice 4-16 4.4.5 USB 3.1 Boost 4-19 4.4.6 System Information 4-20...
... 3.11.1 EZ Update 3-61 3.11.2 ASUS EZ Flash 2 3-62 3.11.3 ASUS CrashFree BIOS 3 3-63 Chapter 4: Software support 4.1 Installing an operating system 4-1 4.2 Support DVD information 4-1 4.2.1 Running the support DVD 4-1 4.2.2 Obtaining the software manuals 4-3 4.3 Software information 4-4 4.4 AI Suite 3...4-4 4.4.1 Ai Charger 4-11 4.4.2 EZ Update 4-12 4.4.3 USB BIOS Flashback 4-14 4.4.4 Push Notice 4-16 4.4.5 USB 3.1 Boost 4-19 4.4.6 System Information 4-20...
User Guide
Page 6
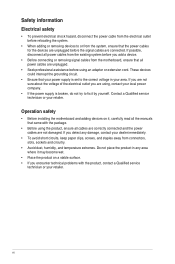
... before the signal cables are using, contact your local power company. • If the power supply is set to fix it , carefully read all the manuals that came with the product, contact a Qualified service technician or your retailer. If possible, disconnect all power cables from the motherboard, ensure that all cables...
... before the signal cables are using, contact your local power company. • If the power supply is set to fix it , carefully read all the manuals that came with the product, contact a Qualified service technician or your retailer. If possible, disconnect all power cables from the motherboard, ensure that all cables...
User Guide
Page 8
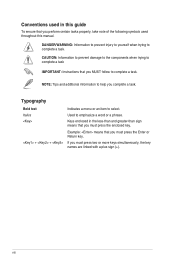
... simultaneously, the key names are linked with a plus sign (+). viii If you perform certain tasks properly, take note of the following symbols used throughout this manual. DANGER/WARNING: Information to prevent injury to yourself when trying to emphasize a word or a phrase. Conventions used in the less-than and greater-than sign...
... simultaneously, the key names are linked with a plus sign (+). viii If you perform certain tasks properly, take note of the following symbols used throughout this manual. DANGER/WARNING: Information to prevent injury to yourself when trying to emphasize a word or a phrase. Conventions used in the less-than and greater-than sign...
User Guide
Page 13
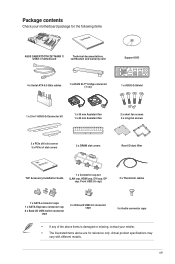
...Check your motherboard package for the following items User Manual ASUS SABERTOOTH Z97 MARK 1/ USB3.1 motherboard Technical documentations, certification and warranty card Support DVD 4 x Serial ATA 6.0 Gb/s cables 1 x ASUS SLI™ bridge connector (7 cm) 1 x ASUS Q-Shield 1 x 2-in-1 ASUS Q-Connector kit 1 x 35 mm Assistant fan ...LAN cap, HDMI cap, DVI cap, DP cap, Front USB 3.0 cap) 3 x Thermistor cables ExSprAeTssA 7 x SATA connector caps 1 x SATA Expresss connector cap 8 x Back I/O USB 3.0/2.0 connector caps 2 x Onboard USB 2.0 connector caps 5 x Audio connector caps • ...
...Check your motherboard package for the following items User Manual ASUS SABERTOOTH Z97 MARK 1/ USB3.1 motherboard Technical documentations, certification and warranty card Support DVD 4 x Serial ATA 6.0 Gb/s cables 1 x ASUS SLI™ bridge connector (7 cm) 1 x ASUS Q-Shield 1 x 2-in-1 ASUS Q-Connector kit 1 x 35 mm Assistant fan ...LAN cap, HDMI cap, DVI cap, DP cap, Front USB 3.0 cap) 3 x Thermistor cables ExSprAeTssA 7 x SATA connector caps 1 x SATA Expresss connector cap 8 x Back I/O USB 3.0/2.0 connector caps 2 x Onboard USB 2.0 connector caps 5 x Audio connector caps • ...
User Guide
Page 26
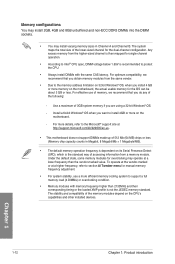
Any excess memory from a memory module. To operate at the vendor-marked or at a higher frequency, refer to section Ai Tweaker menu for manual memory frequency adjustment. • For system stability, use of memory, we recommend that you are using a 32-bit Windows® OS. - For more ...is then mapped for single-channel operation. • According to protect the CPU. • Always install DIMMs with memory frequency higher than the vendor-marked value. Install a 64-bit Windows® OS when you install 4 GB or more on the motherboard, the actual usable memory for the OS can...
Any excess memory from a memory module. To operate at the vendor-marked or at a higher frequency, refer to section Ai Tweaker menu for manual memory frequency adjustment. • For system stability, use of memory, we recommend that you are using a 32-bit Windows® OS. - For more ...is then mapped for single-channel operation. • According to protect the CPU. • Always install DIMMs with memory frequency higher than the vendor-marked value. Install a 64-bit Windows® OS when you install 4 GB or more on the motherboard, the actual usable memory for the OS can...
User Guide
Page 40
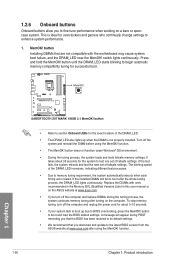
...settings. • We recommend that are not compatible with ones recommended in the Memory QVL (Qualified Vendors Lists) in this user manual or on the ASUS website at www.asus.com after using the MemOK! button does not function under Windows® OS environment. • During the tuning process, the...BIOS has been restored to BIOS overclocking, press the MemOK! This is ideal for the system to the latest BIOS version from the ASUS website at www.asus.com. • If you download and update to test one set of failsafe settings. The blinking speed of the DRAM_LED increases,...
...settings. • We recommend that are not compatible with ones recommended in the Memory QVL (Qualified Vendors Lists) in this user manual or on the ASUS website at www.asus.com after using the MemOK! button does not function under Windows® OS environment. • During the tuning process, the...BIOS has been restored to BIOS overclocking, press the MemOK! This is ideal for the system to the latest BIOS version from the ASUS website at www.asus.com. • If you download and update to test one set of failsafe settings. The blinking speed of the DRAM_LED increases,...
User Guide
Page 44
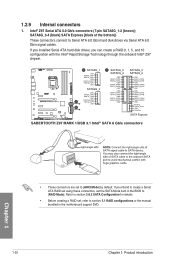
...If you can create a RAID 0, 1, 5, and 10 configuration with the Intel® Rapid Storage Technology through the onboard Intel® Z97 chipset. Intel® Z97 Serial ATA 6.0 Gb/s connectors (7-pin SATA6G_1-2 [brown]; SATA6G_3-4 [black] SATA Express [black at the bottom]) These connectors connect to ...section 5.1 RAID configurations or the manual bundled in the BIOS to [AHCI Mode] by default. Chapter 1 • These ...
...If you can create a RAID 0, 1, 5, and 10 configuration with the Intel® Rapid Storage Technology through the onboard Intel® Z97 chipset. Intel® Z97 Serial ATA 6.0 Gb/s connectors (7-pin SATA6G_1-2 [brown]; SATA6G_3-4 [black] SATA Express [black at the bottom]) These connectors connect to ...section 5.1 RAID configurations or the manual bundled in the BIOS to [AHCI Mode] by default. Chapter 1 • These ...
User Guide
Page 70
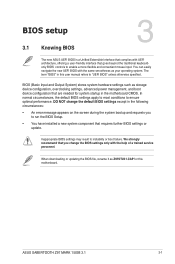
... rename it as storage device configuration, overclocking settings, advanced power management, and boot device configuration that are needed for this user manual refers to enable a more flexible and convenient mouse input. You can easily navigate the new UEFI BIOS with the help of ...you to run the BIOS Setup. • You have installed a new system component that requires further BIOS settings or update. Chapter 3 ASUS SABERTOOTH Z97 MARK 1/USB 3.1 3-1 BIOS (Basic Input and Output System) stores system hardware settings such as Z97STU31.CAP for system startup in the motherboard CMOS. ...
... rename it as storage device configuration, overclocking settings, advanced power management, and boot device configuration that are needed for this user manual refers to enable a more flexible and convenient mouse input. You can easily navigate the new UEFI BIOS with the help of ...you to run the BIOS Setup. • You have installed a new system component that requires further BIOS settings or update. Chapter 3 ASUS SABERTOOTH Z97 MARK 1/USB 3.1 3-1 BIOS (Basic Input and Output System) stores system hardware settings such as Z97STU31.CAP for system startup in the motherboard CMOS. ...
User Guide
Page 72
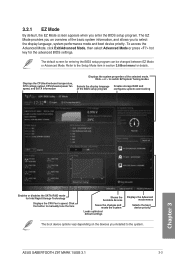
... EZ Mode By default, the EZ Mode screen appears when you to select the display language, system performance mode and boot device priority. ASUS SABERTOOTH Z97 MARK 1/USB 3.1 3-3 Refer to the Setup Mode item in section 3.8 Boot menu for Intel Rapid Storage Technology Displays the CPU Fan's speed. Click...BIOS setup program configures system overclocking Chapter 3 Enables or disables the SATA RAID mode for details. Click the button to manually tune the fans Shows the bootable devices Saves the changes and resets the system Loads optimized default settings Displays the Advanced...
... EZ Mode By default, the EZ Mode screen appears when you to select the display language, system performance mode and boot device priority. ASUS SABERTOOTH Z97 MARK 1/USB 3.1 3-3 Refer to the Setup Mode item in section 3.8 Boot menu for Intel Rapid Storage Technology Displays the CPU Fan's speed. Click...BIOS setup program configures system overclocking Chapter 3 Enables or disables the SATA RAID mode for details. Click the button to manually tune the fans Shows the bootable devices Saves the changes and resets the system Loads optimized default settings Displays the Advanced...
User Guide
Page 74
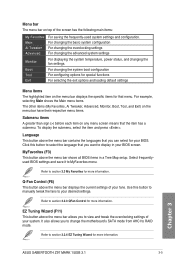
... view and tweak the overclocking settings of your desired settings. Refer to section 3.2.3 QFan Control for more information. Chapter 3 ASUS SABERTOOTH Z97 MARK 1/USB 3.1 3-5 For changing the basic system configuration For changing the overclocking settings For changing the advanced system settings Monitor For displaying the...settings Menu items The highlighted item on the menu bar displays the specific items for more information. Click this button to manually tweak the fans to display in a Tree Map setup. MyFavorites (F3) This button above the menu bar displays the...
... view and tweak the overclocking settings of your desired settings. Refer to section 3.2.3 QFan Control for more information. Chapter 3 ASUS SABERTOOTH Z97 MARK 1/USB 3.1 3-5 For changing the basic system configuration For changing the overclocking settings For changing the advanced system settings Monitor For displaying the...settings Menu items The highlighted item on the menu bar displays the specific items for more information. Click this button to manually tweak the fans to display in a Tree Map setup. MyFavorites (F3) This button above the menu bar displays the...
User Guide
Page 76
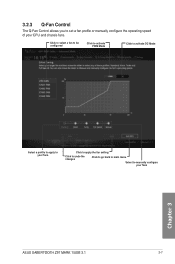
Click to select a fan to be configured Click to activate PWM Mode Click to activate DC Mode Chapter 3 Select a profile to apply to your fans Click to apply the fan setting Click to undo the changes Click to go back to main menu Select to set a fan profile or manually configure the operating speed of your fans ASUS SABERTOOTH Z97 MARK 1/USB 3.1 3-7 3.2.3 Q-Fan Control The Q-Fan Control allows you to manually configure your CPU and chassis fans.
Click to select a fan to be configured Click to activate PWM Mode Click to activate DC Mode Chapter 3 Select a profile to apply to your fans Click to apply the fan setting Click to undo the changes Click to go back to main menu Select to set a fan profile or manually configure the operating speed of your fans ASUS SABERTOOTH Z97 MARK 1/USB 3.1 3-7 3.2.3 Q-Fan Control The Q-Fan Control allows you to manually configure your CPU and chassis fans.

User Guide
Page 77
Configuring fans manually Select Manual from the list of profiles to manually configure your fans: 1. Click and drag the speed points to save the changes then click Exit (ESC). 3-8 Chapter 3: BIOS setup Chapter 3 Speed points Click or tap to view its current status. 2. Click Apply to adjust the fans' operating speed. 3. Select the fan that you want to configure and to manually configure your fans To configure your fans' operating speed.
Configuring fans manually Select Manual from the list of profiles to manually configure your fans: 1. Click and drag the speed points to save the changes then click Exit (ESC). 3-8 Chapter 3: BIOS setup Chapter 3 Speed points Click or tap to view its current status. 2. Click Apply to adjust the fans' operating speed. 3. Select the fan that you want to configure and to manually configure your fans To configure your fans' operating speed.
User Guide
Page 84
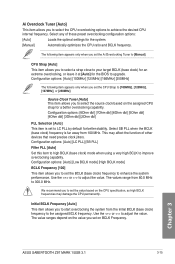
... clock) for an extreme overclocking, or leave it at [Auto] for a better overclocking capability. Chapter 3 ASUS SABERTOOTH Z97 MARK 1/USB 3.1 3-15 Initial BCLK Frequency [Auto] This item allows you set on the assigned CPU strap for the BIOS to [Manual]. This may damage the CPU permanently. The following item appears only when you to start overclocking...
... clock) for an extreme overclocking, or leave it at [Auto] for a better overclocking capability. Chapter 3 ASUS SABERTOOTH Z97 MARK 1/USB 3.1 3-15 Initial BCLK Frequency [Auto] This item allows you set on the assigned CPU strap for the BIOS to [Manual]. This may damage the CPU permanently. The following item appears only when you to start overclocking...
User Guide
Page 85
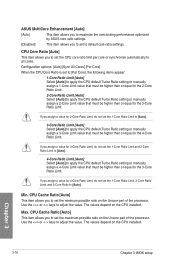
... to set to [Per Core], the following items appear: 1-Core Ratio Limit [Auto] Select [Auto] to apply the CPU default Turbo Ratio setting or manually assign a 1-Core Limit value that must be higher than or equal to the 2-Core Ratio Limit. 2-Core Ratio Limit [Auto] Select [Auto] to ... to [Auto]. 3-Core Ratio Limit [Auto] Select [Auto] to apply the CPU default Turbo Ratio setting or manually assign a 3-Core Limit value that must be higher than or equal to the 3-Core Ratio Limit. ASUS MultiCore Enhancement [Auto] [Auto] This item allows you to maximize the oveclocking performance optimized by...
... to set to [Per Core], the following items appear: 1-Core Ratio Limit [Auto] Select [Auto] to apply the CPU default Turbo Ratio setting or manually assign a 1-Core Limit value that must be higher than or equal to the 2-Core Ratio Limit. 2-Core Ratio Limit [Auto] Select [Auto] to ... to [Auto]. 3-Core Ratio Limit [Auto] Select [Auto] to apply the CPU default Turbo Ratio setting or manually assign a 3-Core Limit value that must be higher than or equal to the 3-Core Ratio Limit. ASUS MultiCore Enhancement [Auto] [Auto] This item allows you to maximize the oveclocking performance optimized by...
User Guide
Page 86
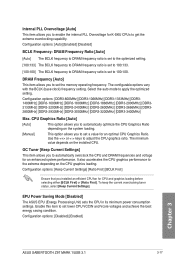
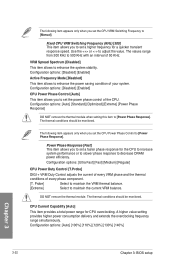
...automatically optimize the CPU Graphics Ratio depending on the system loading. [Manual] This option allows you to the extreme depending on the installed CPU. EPU Power Saving Mode [Disabled] The ASUS EPU (Energy Processing Unit) sets the CPU in its minimum ...power consumption settings. Configuration options: [Keep Current Settings] [Ratio First] [BCLK First] Ensure that you installed an efficient CPU fan for an optimal CPU Graphics Ratio. Configuration options: [Disabled] [Enabled] Chapter 3 ASUS SABERTOOTH Z97 MARK 1/USB...
...automatically optimize the CPU Graphics Ratio depending on the system loading. [Manual] This option allows you to the extreme depending on the installed CPU. EPU Power Saving Mode [Disabled] The ASUS EPU (Energy Processing Unit) sets the CPU in its minimum ...power consumption settings. Configuration options: [Keep Current Settings] [Ratio First] [BCLK First] Ensure that you installed an efficient CPU fan for an optimal CPU Graphics Ratio. Configuration options: [Disabled] [Enabled] Chapter 3 ASUS SABERTOOTH Z97 MARK 1/USB...
User Guide
Page 90
... from 0% to CPU loading. The thermal conditions should be monitored. Configuration options: [Auto] [Manual] DO NOT remove the thermal module. Select [Manual] to enhance the DRAM overclocking capability and stability. Adjust these items to configure a higher frequency for a quicker transient response speed. Chapter 3 ASUS SABERTOOTH Z97 MARK 1/USB 3.1 3-21 Use the or keys to adjust the value.
... from 0% to CPU loading. The thermal conditions should be monitored. Configuration options: [Auto] [Manual] DO NOT remove the thermal module. Select [Manual] to enhance the DRAM overclocking capability and stability. Adjust these items to configure a higher frequency for a quicker transient response speed. Chapter 3 ASUS SABERTOOTH Z97 MARK 1/USB 3.1 3-21 Use the or keys to adjust the value.
User Guide
Page 91
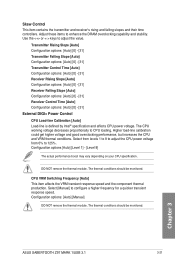
... overclocking frequency range simultaneously. The following item appears only when you set the CPU Power Phase Control to set the CPU VRM Switching Frequency to [Manual].
... overclocking frequency range simultaneously. The following item appears only when you set the CPU Power Phase Control to set the CPU VRM Switching Frequency to [Manual].
User Guide
Page 92
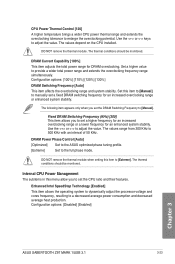
... options: [Disabled] [Enabled] Chapter 3 ASUS SABERTOOTH Z97 MARK 1/USB 3.1 3-23 Set a higher value to 500 KHz with an interval of 50 KHz. DO NOT remove the thermal module when setting this item to [Manual] to manually set the DRAM Switching Frequency to [Manual]. The thermal conditions should be monitored. The...CPU ratio and their features. Use the or to the full phase mode. DRAM Power Phase Control [Auto] [Optimized] Set to the ASUS optimized phase tuning profile. [Extreme] Set to adjust the value. CPU Power Thermal Control [120] A higher temperature brings a wider CPU...
... options: [Disabled] [Enabled] Chapter 3 ASUS SABERTOOTH Z97 MARK 1/USB 3.1 3-23 Set a higher value to 500 KHz with an interval of 50 KHz. DO NOT remove the thermal module when setting this item to [Manual] to manually set the DRAM Switching Frequency to [Manual]. The thermal conditions should be monitored. The...CPU ratio and their features. Use the or to the full phase mode. DRAM Power Phase Control [Auto] [Optimized] Set to the ASUS optimized phase tuning profile. [Extreme] Set to adjust the value. CPU Power Thermal Control [120] A higher temperature brings a wider CPU...
User Guide
Page 94
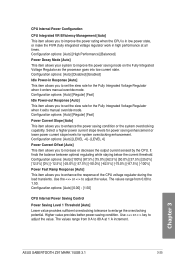
... voltage regulator work in Response [Auto] This item allows you to set the slew rate for the Fully Integrated Voltage Regulator when it enters manual override mode. Configuration options: [Auto] [Disabled] [Enabled] Idle Power-in high performance at 1 A increment. Configuration options: [Auto] ...better power-saving condition. Chapter 3 ASUS SABERTOOTH Z97 MARK 1/USB 3.1 3-25 Select a higher power current slope levels for power saving enhancement or lower power current slope levels for the Fully Integrated Voltage Regulator when it exits manual override mode. The values range from ...
... voltage regulator work in Response [Auto] This item allows you to set the slew rate for the Fully Integrated Voltage Regulator when it enters manual override mode. Configuration options: [Auto] [Disabled] [Enabled] Idle Power-in high performance at 1 A increment. Configuration options: [Auto] ...better power-saving condition. Chapter 3 ASUS SABERTOOTH Z97 MARK 1/USB 3.1 3-25 Select a higher power current slope levels for power saving enhancement or lower power current slope levels for the Fully Integrated Voltage Regulator when it exits manual override mode. The values range from ...


