Sabertooth X58 user's manual
Page 40
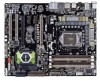
Chapter 2 ® CLRTC 12 23 Normal (Default) SABERTOOTH X58 Clear RTC RAM Clear RTC To erase the RTC RAM 1. Turn ...before rebooting the system. 2-22 Chapter 2: Hardware information You must turn ON the computer. 4. You can automatically reset parameter settings to default values. • Due to clear the Real Time Clock (RTC) RAM in CMOS, ...1-2 (default) to overclocking, use the C.P.R. (CPU Parameter Recall) feature. Hold down and reboot the system so the BIOS can clear the CMOS memory of date, time, and system setup parameters by erasing the CMOS RTC RAM data. Keep ...
Chapter 2 ® CLRTC 12 23 Normal (Default) SABERTOOTH X58 Clear RTC RAM Clear RTC To erase the RTC RAM 1. Turn ...before rebooting the system. 2-22 Chapter 2: Hardware information You must turn ON the computer. 4. You can automatically reset parameter settings to default values. • Due to clear the Real Time Clock (RTC) RAM in CMOS, ...1-2 (default) to overclocking, use the C.P.R. (CPU Parameter Recall) feature. Hold down and reboot the system so the BIOS can clear the CMOS memory of date, time, and system setup parameters by erasing the CMOS RTC RAM data. Keep ...
Sabertooth X58 user's manual
Page 54
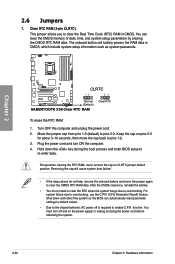
... Chapter 2 • System power LED (2-pin PLED) This 2-pin connector is for the HDD Activity LED. The speaker allows you turn on the BIOS settings. System panel connector (20-8 pin PANEL) This connector supports several chassis-mounted functions. The IDE LED lights up when you to the HDD. ... the power switch for more than four seconds while the system is ON turns the system OFF. • Reset button (2-pin RESET) This 2-pin connector is for the chassis-mounted reset button for system reboot without turning off mode depending on the system power, and blinks when the system is ...
... Chapter 2 • System power LED (2-pin PLED) This 2-pin connector is for the HDD Activity LED. The speaker allows you turn on the BIOS settings. System panel connector (20-8 pin PANEL) This connector supports several chassis-mounted functions. The IDE LED lights up when you to the HDD. ... the power switch for more than four seconds while the system is ON turns the system OFF. • Reset button (2-pin RESET) This 2-pin connector is for the chassis-mounted reset button for system reboot without turning off mode depending on the system power, and blinks when the system is ...

Sabertooth X58 user's manual
Page 62
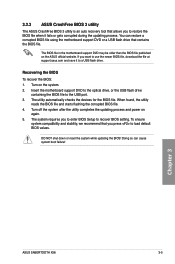
...NOT shut down or reset the system while updating the BIOS to switch between drives until the correct BIOS file is found . Select the Load Setup Defaults item under the Exit menu. To update the BIOS using this utility, download the latest BIOS from the ASUS website at www.asus.com. Press to...8226; Press + during POST to use a bootable floppy disk or an OS‑based utility. ASUSTek EZ Flash 2 BIOS ROM Utility V3.44 FLASH TYPE: WINBOND W25P/X16 Current ROM BOARD: SABERTOOTH X58 VER: 0204 DATE: 06/21/2010 Update ROM BOARD: Unknown VER: Unknown DATE: Unknown PATH: A:\ A: Note [Enter...
...NOT shut down or reset the system while updating the BIOS to switch between drives until the correct BIOS file is found . Select the Load Setup Defaults item under the Exit menu. To update the BIOS using this utility, download the latest BIOS from the ASUS website at www.asus.com. Press to...8226; Press + during POST to use a bootable floppy disk or an OS‑based utility. ASUSTek EZ Flash 2 BIOS ROM Utility V3.44 FLASH TYPE: WINBOND W25P/X16 Current ROM BOARD: SABERTOOTH X58 VER: 0204 DATE: 06/21/2010 Update ROM BOARD: Unknown VER: Unknown DATE: Unknown PATH: A:\ A: Note [Enter...
Sabertooth X58 user's manual
Page 63
... utility completes the updating process and power on again. 5. Insert the motherboard support DVD to the optical drive, or the USB flash drive containing the BIOS file to a USB flash drive. DO NOT shut down or reset the system while updating the BIOS! The utility automatically checks the devices for the BIOS file. Chapter 3 ASUS SABERTOOTH X58 3-5
... utility completes the updating process and power on again. 5. Insert the motherboard support DVD to the optical drive, or the USB flash drive containing the BIOS file to a USB flash drive. DO NOT shut down or reset the system while updating the BIOS! The utility automatically checks the devices for the BIOS file. Chapter 3 ASUS SABERTOOTH X58 3-5
Sabertooth X58 user's manual
Page 64
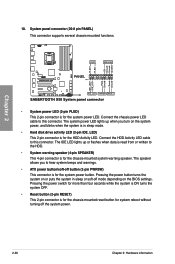
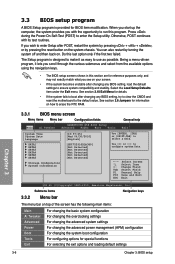
... after changing any BIOS setting, try to clear the CMOS and reset the motherboard to the default value. Select the Load Setup Defaults item under the Exit menu. Chapter 3 3.3.1 BIOS menu screen Menu items Menu bar Configuration fields Main Ai Tweaker SABERTOOTH X58 BIOS Setup Advanced Power...TAB] or [SHIFT-TAB] to enter the Setup utility. Submenu items Navigation keys 3.3.2 Menu bar The menu bar on . 3.3 BIOS setup program A BIOS Setup program is designed to make it lets you scroll through the various submenus and select from the available options using the navigation ...
... after changing any BIOS setting, try to clear the CMOS and reset the motherboard to the default value. Select the Load Setup Defaults item under the Exit menu. Chapter 3 3.3.1 BIOS menu screen Menu items Menu bar Configuration fields Main Ai Tweaker SABERTOOTH X58 BIOS Setup Advanced Power...TAB] or [SHIFT-TAB] to enter the Setup utility. Submenu items Navigation keys 3.3.2 Menu bar The menu bar on . 3.3 BIOS setup program A BIOS Setup program is designed to make it lets you scroll through the various submenus and select from the available options using the navigation ...
Sabertooth X58 user's manual
Page 94
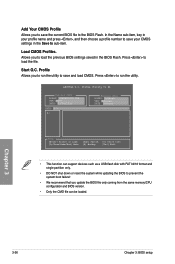
ASUSTek O.C. Chapter 3 3-36 Chapter 3: BIOS setup Press to the BIOS Flash. Profile Allows you to run the utility. Profile Utility V1.44 Current CMOS BOARD: SABERTOOTH X58 VER: 0103 DATE: 03/09/2010 Restore CMOS BOARD: Unknown VER: Unknown DATE: Unknown PATH: A:\ A: Note [Enter] Select or Load [Up/... and single partition only. • DO NOT shut down or reset the system while updating the BIOS to prevent the system boot failure! • We recommend that you to load the previous BIOS settings saved in the BIOS Flash. Press to run the utility to save and load CMOS....
ASUSTek O.C. Chapter 3 3-36 Chapter 3: BIOS setup Press to the BIOS Flash. Profile Allows you to run the utility. Profile Utility V1.44 Current CMOS BOARD: SABERTOOTH X58 VER: 0103 DATE: 03/09/2010 Restore CMOS BOARD: Unknown VER: Unknown DATE: Unknown PATH: A:\ A: Note [Enter] Select or Load [Up/... and single partition only. • DO NOT shut down or reset the system while updating the BIOS to prevent the system boot failure! • We recommend that you to load the previous BIOS settings saved in the BIOS Flash. Press to run the utility to save and load CMOS....
Sabertooth X58 user's manual
Page 105
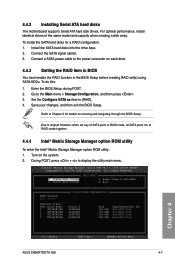
...option ROM utility: 1. Due to chipset limitation, when set (s) using SATA HDDs. Reset Disks to [RAID]. 4. Set the Configure SATA as item to Non-RAID 4. Turn on entering and navigating through the BIOS Setup. During POST, press + to the power connector on each drive. 4.4.3 Setting...) Non-RAID Disk Non-RAID Disk Non-RAID Disk Non-RAID Disk Chapter 4 [↑↓]-Select [ESC]-Exit [ENTER]-Select Menu ASUS SABERTOOTH X58 4-7 4.4.2 Installing Serial ATA hard disks The motherboard supports Serial ATA hard disk drives. For optimal performance, install identical drives of SATA ...
...option ROM utility: 1. Due to chipset limitation, when set (s) using SATA HDDs. Reset Disks to [RAID]. 4. Set the Configure SATA as item to Non-RAID 4. Turn on entering and navigating through the BIOS Setup. During POST, press + to the power connector on each drive. 4.4.3 Setting...) Non-RAID Disk Non-RAID Disk Non-RAID Disk Non-RAID Disk Chapter 4 [↑↓]-Select [ESC]-Exit [ENTER]-Select Menu ASUS SABERTOOTH X58 4-7 4.4.2 Installing Serial ATA hard disks The motherboard supports Serial ATA hard disk drives. For optimal performance, install identical drives of SATA ...


