User Guide
Page 3
... the hardware Setting up the wireless router 10 Setting up a wired connection 10 Setting up a wireless connection 11 Configuring the wireless router 12 Using the web GUI 12 Chapter 3: Configuring the network clients Accessing the wireless router 13 Setting an IP address for wired or wireless client 13 Chapter 4: Configuring... via the web GUI Configuring via the web GUI 21 Using the Network Map 22 Setting up WAN using the Quick Internet Setup (QIS 23 Using ...
... the hardware Setting up the wireless router 10 Setting up a wired connection 10 Setting up a wireless connection 11 Configuring the wireless router 12 Using the web GUI 12 Chapter 3: Configuring the network clients Accessing the wireless router 13 Setting an IP address for wired or wireless client 13 Chapter 4: Configuring... via the web GUI Configuring via the web GUI 21 Using the Network Map 22 Setting up WAN using the Quick Internet Setup (QIS 23 Using ...

User Guide
Page 10
...setup problems due to wireless uncertainty. • For more details on your router and the modem. 2. Turn on WPS, refer to your wireless environment. Setting up a wired connection The ASUS Wireless Router is supplied with proper configurations. You may need to change the wireless router's...Using an Ethernet cable, connect the router's Internet port to meet the requirements in your PC's LAN port. 10 RT-N13U Chapter 2: Setting up the hardware 2 Setting up the hardware Setting up the wireless router The ASUS Wireless Router meets various working scenarios with an Ethernet...
...setup problems due to wireless uncertainty. • For more details on your router and the modem. 2. Turn on WPS, refer to your wireless environment. Setting up a wired connection The ASUS Wireless Router is supplied with proper configurations. You may need to change the wireless router's...Using an Ethernet cable, connect the router's Internet port to meet the requirements in your PC's LAN port. 10 RT-N13U Chapter 2: Setting up the hardware 2 Setting up the hardware Setting up the wireless router The ASUS Wireless Router meets various working scenarios with an Ethernet...
User Guide
Page 14
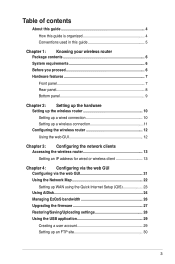
Click Start > Control Panel > Network to automatically obtain an IP address, click Obtain an IP address automatically then click OK. Otherwise, click Specify an IP address, then key in the IP address and Subnet Mask. 14 RT-N13U Chapter 3: Configuring the clients If you want your computer to display the Network setup window. 2. Select TCP/IP then click Properties. 3. Windows® 9x/ME 1.
Click Start > Control Panel > Network to automatically obtain an IP address, click Obtain an IP address automatically then click OK. Otherwise, click Specify an IP address, then key in the IP address and Subnet Mask. 14 RT-N13U Chapter 3: Configuring the clients If you want your computer to display the Network setup window. 2. Select TCP/IP then click Properties. 3. Windows® 9x/ME 1.
User Guide
Page 16
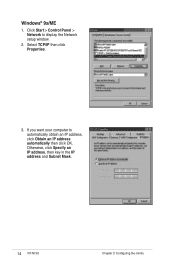
Go to Control Panel > Network to assign IP address automatically. • Manually set up the IP address, subnet mask, and default gateway. 16 RT-N13U Chapter 3: Configuring the clients Select TCP/IP Protocol from the Network Protocols list then click Properties. 3. Windows® NT4.0 1. From the IP Address tab of the Microsoft TCP/IP Properties window, you can: • Select the type of network adapter installed in your system. • Set the router to display the Network setup window then select the Protocols tab. 2.
Go to Control Panel > Network to assign IP address automatically. • Manually set up the IP address, subnet mask, and default gateway. 16 RT-N13U Chapter 3: Configuring the clients Select TCP/IP Protocol from the Network Protocols list then click Properties. 3. Windows® NT4.0 1. From the IP Address tab of the Microsoft TCP/IP Properties window, you can: • Select the type of network adapter installed in your system. • Set the router to display the Network setup window then select the Protocols tab. 2.

User Guide
Page 22
...RT-N13U Chapter 4: Configuring via the web GUI Note: For more details on the QIS feature, refer to display information on the SSID, authentication method, WEP encryption, LAN IP, PIN code, MAC address, or turn the wireless radio on the next page. From the Internet status screen, use the Quick Internet Setup...icon to the section Setting up your Local Area Network (LAN) using the Quick Internet Setup (QIS) on /off. To view the status or configure the settings, click any of the ASUS Wireless Router. Using the Network Map Network Map allows you to quickly set up your Wide Area...
...RT-N13U Chapter 4: Configuring via the web GUI Note: For more details on the QIS feature, refer to display information on the SSID, authentication method, WEP encryption, LAN IP, PIN code, MAC address, or turn the wireless radio on the next page. From the Internet status screen, use the Quick Internet Setup...icon to the section Setting up your Local Area Network (LAN) using the Quick Internet Setup (QIS) on /off. To view the status or configure the settings, click any of the ASUS Wireless Router. Using the Network Map Network Map allows you to quickly set up your Wide Area...
User Guide
Page 23
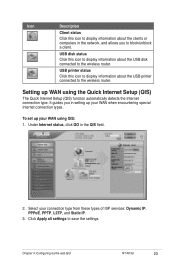
... allows you in setting up your WAN using the Quick Internet Setup (QIS) The Quick Internet Setup (QIS) function automatically detects the Internet connection type. Icon Description Client status Click this icon to display information about the USB printer connected to the wireless router. To set up your connection type from these types of... types. USB disk status Click this icon to display information about the USB disk connected to save the settings. Chapter 4: Configuring via the web GUI RT-N13U 23
... allows you in setting up your WAN using the Quick Internet Setup (QIS) The Quick Internet Setup (QIS) function automatically detects the Internet connection type. Icon Description Client status Click this icon to display information about the USB printer connected to the wireless router. To set up your connection type from these types of... types. USB disk status Click this icon to display information about the USB disk connected to save the settings. Chapter 4: Configuring via the web GUI RT-N13U 23
User Guide
Page 25
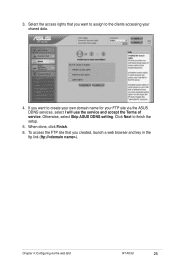
Otherwise, select Skip ASUS DDNS setting. Click Next to create your own domain name for your shared data. 4. If you created, launch a web browser and key in the ftp link (ftp://). When done, click Finish. 6. To access the FTP site that you want to finish the setup. 5. 3. Select the access rights that you want to assign to the clients accessing your FTP site via the web GUI RT-N13U 25 Chapter 4: Configuring via the ASUS DDNS services, select I will use the service and accept the Terms of service.
Otherwise, select Skip ASUS DDNS setting. Click Next to create your own domain name for your shared data. 4. If you created, launch a web browser and key in the ftp link (ftp://). When done, click Finish. 6. To access the FTP site that you want to finish the setup. 5. 3. Select the access rights that you want to assign to the clients accessing your FTP site via the web GUI RT-N13U 25 Chapter 4: Configuring via the ASUS DDNS services, select I will use the service and accept the Terms of service.

User Guide
Page 36
5 Installing the utilities Installing the utilities The support CD contains the utilities for configuring the ASUS Wireless Router. Click Install...Utilities. 2. If Autorun is disabled, run setup.exe from the root directory of the support CD. To install the ASUS WLAN Utilities in Microsoft® Windows, insert the support CD in the CD drive. To install the utilities: 1. Click Next. 36 RT-N13U Chapter 5: Installing the utilities
5 Installing the utilities Installing the utilities The support CD contains the utilities for configuring the ASUS Wireless Router. Click Install...Utilities. 2. If Autorun is disabled, run setup.exe from the root directory of the support CD. To install the ASUS WLAN Utilities in Microsoft® Windows, insert the support CD in the CD drive. To install the utilities: 1. Click Next. 36 RT-N13U Chapter 5: Installing the utilities

User Guide
Page 37
Chapter 5: Installing the utilities RT-N13U 37 Click Finish when setup is completed. Click Next to accept the default destination folder or click Browse to accept the default program folder or enter another path. 4. Click Next to specify another name. 5. 3.
Chapter 5: Installing the utilities RT-N13U 37 Click Finish when setup is completed. Click Next to accept the default destination folder or click Browse to accept the default program folder or enter another path. 4. Click Next to specify another name. 5. 3.
User Guide
Page 39
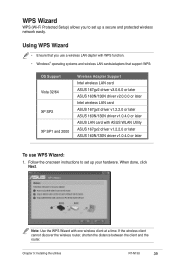
...RT-N13U 39 Note: Use the WPS Wizard with ASUS WLAN Utility ASUS 167gv2 driver v1.2.2.0 or later ASUS 160N/130N driver v1.0.4.0 or later To use a wireless LAN dapter with WPS function. • Windows® operating systems and wireless...ASUS LAN card with one wireless client at a time. WPS Wizard WPS (Wi-Fi Protected Setup) allows you use WPS Wizard: 1. Using WPS Wizard • Ensure that you to set up your hardware. Follow the onscreen instructions to set up a secure and protected wireless network easily. If the wireless client cannot discover the wireless router...
...RT-N13U 39 Note: Use the WPS Wizard with ASUS WLAN Utility ASUS 167gv2 driver v1.2.2.0 or later ASUS 160N/130N driver v1.0.4.0 or later To use a wireless LAN dapter with WPS function. • Windows® operating systems and wireless...ASUS LAN card with one wireless client at a time. WPS Wizard WPS (Wi-Fi Protected Setup) allows you use WPS Wizard: 1. Using WPS Wizard • Ensure that you to set up your hardware. Follow the onscreen instructions to set up a secure and protected wireless network easily. If the wireless client cannot discover the wireless router...
User Guide
Page 42
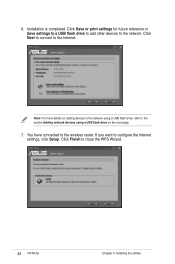
Click Next to connect to the wireless router. You have connected to the Internet. Note: For more details on the next page. 7. Click Save or print settings for future reference or Save settings to a USB flash drive to add other devices to the section Adding network devices using a USB flash drive on adding devices to the network using a USB flash drive, refer to the network. If you want to close the WPS Wizard. 42 RT-N13U Chapter 5: Installing the utilities Installation is completed. 6. Click Finish to configure the Internet settings, click Setup.
Click Next to connect to the wireless router. You have connected to the Internet. Note: For more details on the next page. 7. Click Save or print settings for future reference or Save settings to a USB flash drive to add other devices to the section Adding network devices using a USB flash drive on adding devices to the network using a USB flash drive, refer to the network. If you want to close the WPS Wizard. 42 RT-N13U Chapter 5: Installing the utilities Installation is completed. 6. Click Finish to configure the Internet settings, click Setup.
User Guide
Page 44
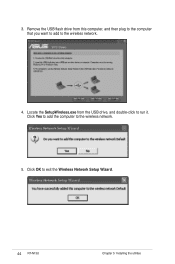
Click OK to the wireless network. 4. Remove the USB flash drive from the USB drive, and double-click to the wireless network. 5. Locate the SetupWireless.exe from this computer, and then plug to the computer that you want to add to exit the Wireless Network Setup Wizard. 44 RT-N13U Chapter 5: Installing the utilities 3. Click Yes to add the computer to run it.
Click OK to the wireless network. 4. Remove the USB flash drive from the USB drive, and double-click to the wireless network. 5. Locate the SetupWireless.exe from this computer, and then plug to the computer that you want to add to exit the Wireless Network Setup Wizard. 44 RT-N13U Chapter 5: Installing the utilities 3. Click Yes to add the computer to run it.


