
User Guide
Page 12
... 4: Configuring via the web GUI. 12 RT-N13U Chapter 2: Setting up the hardware Click Start > Control Panel > Network Connections > Wireless Network Connection. 2. Wait for it to select the network first. To select the network: 1. Select a network from the Choose a wireless network window. Connect to the router using a cable, launch your wireless router using your web browser on configuring...
... 4: Configuring via the web GUI. 12 RT-N13U Chapter 2: Setting up the hardware Click Start > Control Panel > Network Connections > Wireless Network Connection. 2. Wait for it to select the network first. To select the network: 1. Select a network from the Choose a wireless network window. Connect to the router using a cable, launch your wireless router using your web browser on configuring...
User Guide
Page 14
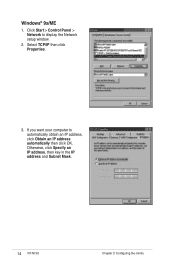
Otherwise, click Specify an IP address, then key in the IP address and Subnet Mask. 14 RT-N13U Chapter 3: Configuring the clients If you want your computer to display the Network setup window. 2. Windows® 9x/ME 1. Select TCP/IP then click Properties. 3. Click Start > Control Panel > Network to automatically obtain an IP address, click Obtain an IP address automatically then click OK.
Otherwise, click Specify an IP address, then key in the IP address and Subnet Mask. 14 RT-N13U Chapter 3: Configuring the clients If you want your computer to display the Network setup window. 2. Windows® 9x/ME 1. Select TCP/IP then click Properties. 3. Click Start > Control Panel > Network to automatically obtain an IP address, click Obtain an IP address automatically then click OK.
User Guide
Page 16
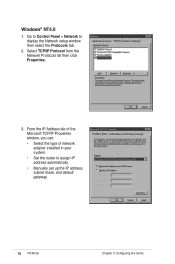
Select TCP/IP Protocol from the Network Protocols list then click Properties. 3. Windows® NT4.0 1. From the IP Address tab of the Microsoft TCP/IP Properties window, you can: • Select the type of network adapter installed in your system. • Set the router to display the Network setup window then select the Protocols tab. 2. Go to Control Panel > Network to assign IP address automatically. • Manually set up the IP address, subnet mask, and default gateway. 16 RT-N13U Chapter 3: Configuring the clients
Select TCP/IP Protocol from the Network Protocols list then click Properties. 3. Windows® NT4.0 1. From the IP Address tab of the Microsoft TCP/IP Properties window, you can: • Select the type of network adapter installed in your system. • Set the router to display the Network setup window then select the Protocols tab. 2. Go to Control Panel > Network to assign IP address automatically. • Manually set up the IP address, subnet mask, and default gateway. 16 RT-N13U Chapter 3: Configuring the clients
User Guide
Page 17
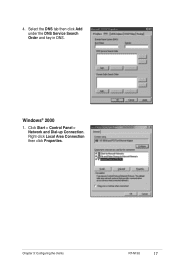
Right-click Local Area Connection then click Properties. Chapter 3: Configuring the clients RT-N13U 17 Windows® 2000 1. Click Start > Control Panel > Network and Dial-up Connection. 4. Select the DNS tab then click Add under the DNS Service Search Order and key in DNS.
Right-click Local Area Connection then click Properties. Chapter 3: Configuring the clients RT-N13U 17 Windows® 2000 1. Click Start > Control Panel > Network and Dial-up Connection. 4. Select the DNS tab then click Add under the DNS Service Search Order and key in DNS.
User Guide
Page 18
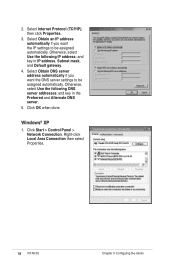
...following DNS server addresses: and key in IP address, Subnet mask, and Default gateway. 4. Right-click Local Area Connection then select Properties. 18 RT-N13U Chapter 3: Configuring the clients 2. Select Obtain DNS server address automatically if you want the DNS server settings to be assigned automatically. Click Start >... to be assigned automatically. Otherwise, select Use the following IP address: and key in the Preferred and Alternate DNS server. 5. Windows® XP 1. Select Internet Protocol (TCP/IP), then click Properties. 3. Click OK when done.
...following DNS server addresses: and key in IP address, Subnet mask, and Default gateway. 4. Right-click Local Area Connection then select Properties. 18 RT-N13U Chapter 3: Configuring the clients 2. Select Obtain DNS server address automatically if you want the DNS server settings to be assigned automatically. Click Start >... to be assigned automatically. Otherwise, select Use the following IP address: and key in the Preferred and Alternate DNS server. 5. Windows® XP 1. Select Internet Protocol (TCP/IP), then click Properties. 3. Click OK when done.

User Guide
Page 20
... the DNS server settings to Start > Control Panel > Network and Internet > Network and Sharing Center. Click View status > Properties > Continue. 2. Click OK when done. 20 RT-N13U Chapter 3: Configuring the clients Windows® Vista 1.
... the DNS server settings to Start > Control Panel > Network and Internet > Network and Sharing Center. Click View status > Properties > Continue. 2. Click OK when done. 20 RT-N13U Chapter 3: Configuring the clients Windows® Vista 1.
User Guide
Page 28
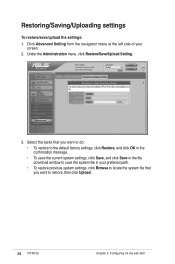
... that you want to save /upload the settings: 1. Restoring/Saving/Uploading settings To restore/save the system file in the file download window to restore, then click Upload. 28 RT-N13U Chapter 4: Configuring via the web GUI Select the tasks that you want to do: • To restore to the default factory settings...
... that you want to save /upload the settings: 1. Restoring/Saving/Uploading settings To restore/save the system file in the file download window to restore, then click Upload. 28 RT-N13U Chapter 4: Configuring via the web GUI Select the tasks that you want to do: • To restore to the default factory settings...
User Guide
Page 31
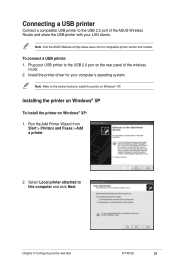
... Windows® XP To install the printer on the rear panel of the ASUS Wireless Router and share the USB printer with your computer's operating system. Select Local printer attached to the USB 2.0 port of the wireless router. 2. Chapter 4: Configuring via the web GUI RT-N13U 31... Run the Add Printer Wizard from Start > Printers and Faxes > Add a printer. 2. Note: Visit the ASUS Website at http://www.asus.com for your LAN clients. Connecting a USB...
... Windows® XP To install the printer on the rear panel of the ASUS Wireless Router and share the USB printer with your computer's operating system. Select Local printer attached to the USB 2.0 port of the wireless router. 2. Chapter 4: Configuring via the web GUI RT-N13U 31... Run the Add Printer Wizard from Start > Printers and Faxes > Add a printer. 2. Note: Visit the ASUS Website at http://www.asus.com for your LAN clients. Connecting a USB...

User Guide
Page 35
... quit the Add Printer Wizard. 14. Select Yes to print. 13. The installation is supported by the ASUS Wireless Router. After connecting your computer, right click the printer icon and select Property > Port tab to use Windows® 98 or ME which does not support Standard TCP/IP port, you can now see the... a standard TCP/IP port. Note: If you use Remote Port which is complete. Click Next to print a test page. Chapter 4: Configuring via the web GUI RT-N13U 35 12. Note: If you have already installed the printer locally on the wireless router's web GUI.
... quit the Add Printer Wizard. 14. Select Yes to print. 13. The installation is supported by the ASUS Wireless Router. After connecting your computer, right click the printer icon and select Property > Port tab to use Windows® 98 or ME which does not support Standard TCP/IP port, you can now see the... a standard TCP/IP port. Note: If you use Remote Port which is complete. Click Next to print a test page. Chapter 4: Configuring via the web GUI RT-N13U 35 12. Note: If you have already installed the printer locally on the wireless router's web GUI.

User Guide
Page 36
To install the utilities: 1. To install the ASUS WLAN Utilities in Microsoft® Windows, insert the support CD in the CD drive. Click Install...Utilities. 2. Click Next. 36 RT-N13U Chapter 5: Installing the utilities 5 Installing the utilities Installing the utilities The support CD contains the utilities for configuring the ASUS Wireless Router. If Autorun is disabled, run setup.exe from the root directory of the support CD.
To install the utilities: 1. To install the ASUS WLAN Utilities in Microsoft® Windows, insert the support CD in the CD drive. Click Install...Utilities. 2. Click Next. 36 RT-N13U Chapter 5: Installing the utilities 5 Installing the utilities Installing the utilities The support CD contains the utilities for configuring the ASUS Wireless Router. If Autorun is disabled, run setup.exe from the root directory of the support CD.
User Guide
Page 39
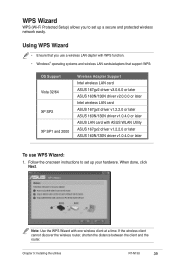
...) allows you use a wireless LAN dapter with WPS function. • Windows® operating systems and wireless LAN cards/adapters that you to set up your hardware. Follow the onscreen instructions to set up a secure and protected wireless network easily. Chapter 5: Installing the utilities RT-N13U 39 If the wireless client cannot discover the wireless router, shorten the distance between...
...) allows you use a wireless LAN dapter with WPS function. • Windows® operating systems and wireless LAN cards/adapters that you to set up your hardware. Follow the onscreen instructions to set up a secure and protected wireless network easily. Chapter 5: Installing the utilities RT-N13U 39 If the wireless client cannot discover the wireless router, shorten the distance between...

