
User Manual
Page 3
... options 10 Setting up the hardware 11 Setting up the wireless router 11 Setting up a wired connection 11 Setting up a wireless connection 12 Configuring the wireless router 12 Using the web GUI 12 Configuring the network clients 14 Accessing the wireless router 14 Setting an IP address for wired or wireless client 14 Configuring via the web GUI 21 Configuring...
... options 10 Setting up the hardware 11 Setting up the wireless router 11 Setting up a wired connection 11 Setting up a wireless connection 12 Configuring the wireless router 12 Using the web GUI 12 Configuring the network clients 14 Accessing the wireless router 14 Setting an IP address for wired or wireless client 14 Configuring via the web GUI 21 Configuring...
User Manual
Page 13
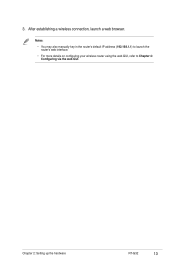
Chapter 2: Setting up the hardware RT-G32 13 After establishing a wireless connection, launch a web browser. 3. Notes: • You may also manually key in the router's default IP address (192.168.1.1) to launch the router's web interface. • For more details on configuring your wireless router using the web GUI, refer to Chapter 4: Configuring via the web GUI.
Chapter 2: Setting up the hardware RT-G32 13 After establishing a wireless connection, launch a web browser. 3. Notes: • You may also manually key in the router's default IP address (192.168.1.1) to launch the router's web interface. • For more details on configuring your wireless router using the web GUI, refer to Chapter 4: Configuring via the web GUI.

User Manual
Page 14
... within the same subnet as the ASUS Wireless Router) • Gateway: 192.168.1.1 (IP address of the clients or computers in your network 14 RT-G32 Chapter 3: Configuring the clients Note: If you may want to manually assign an IP address to manually assign static IP addresses on some of the ASUS Wireless Router) • DNS: 192.168.1.1 (ASUS Wireless Router) or assign a known DNS server in...
... within the same subnet as the ASUS Wireless Router) • Gateway: 192.168.1.1 (IP address of the clients or computers in your network 14 RT-G32 Chapter 3: Configuring the clients Note: If you may want to manually assign an IP address to manually assign static IP addresses on some of the ASUS Wireless Router) • DNS: 192.168.1.1 (ASUS Wireless Router) or assign a known DNS server in...
User Manual
Page 15
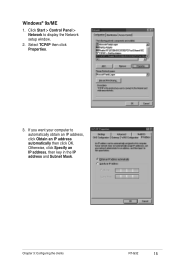
Select TCP/IP then click Properties. 3. Otherwise, click Specify an IP address, then key in the IP address and Subnet Mask. Click Start > Control Panel > Network to automatically obtain an IP address, click Obtain an IP address automatically then click OK. If you want your computer to display the Network setup window. 2. Chapter 3: Configuring the clients RT-G32 15 Windows® 9x/ME 1.
Select TCP/IP then click Properties. 3. Otherwise, click Specify an IP address, then key in the IP address and Subnet Mask. Click Start > Control Panel > Network to automatically obtain an IP address, click Obtain an IP address automatically then click OK. If you want your computer to display the Network setup window. 2. Chapter 3: Configuring the clients RT-G32 15 Windows® 9x/ME 1.
User Manual
Page 17
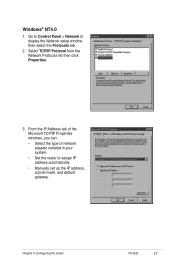
Select TCP/IP Protocol from the Network Protocols list then click Properties. 3. From the IP Address tab of the Microsoft TCP/IP Properties windows, you can: • Select the type of network adapter installed in your system. • Set the router to display the Network setup window then select the Protocols tab. 2. Chapter 3: Configuring the clients RT-G32 17 Go to Control Panel > Network to assign IP address automatically. • Manually set up the IP address, subnet mask, and default gateway. Windows® NT4.0 1.
Select TCP/IP Protocol from the Network Protocols list then click Properties. 3. From the IP Address tab of the Microsoft TCP/IP Properties windows, you can: • Select the type of network adapter installed in your system. • Set the router to display the Network setup window then select the Protocols tab. 2. Chapter 3: Configuring the clients RT-G32 17 Go to Control Panel > Network to assign IP address automatically. • Manually set up the IP address, subnet mask, and default gateway. Windows® NT4.0 1.
User Manual
Page 19
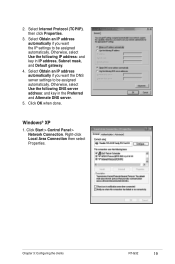
... Use the following DNS server address: and key in IP address, Subnet mask, and Default gateway. 4. Otherwise, select Use the following IP address: and key in the Preferred and Alternate DNS server. 5. Windows® XP 1. Chapter 3: Configuring the clients RT-G32 19 Select Internet Protocol (TCP/IP), then click Properties. 3. Select Obtain an IP address automatically if you want the...
... Use the following DNS server address: and key in IP address, Subnet mask, and Default gateway. 4. Otherwise, select Use the following IP address: and key in the Preferred and Alternate DNS server. 5. Windows® XP 1. Chapter 3: Configuring the clients RT-G32 19 Select Internet Protocol (TCP/IP), then click Properties. 3. Select Obtain an IP address automatically if you want the...
User Manual
Page 20
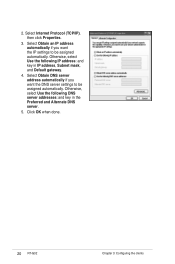
Otherwise, select Use the following DNS server addresses: and key in IP address, Subnet mask, and Default gateway. 4. Select Obtain DNS server address automatically if you want the DNS server settings to be assigned automatically. Otherwise, select Use the following IP address: and key in the Preferred and Alternate DNS server. 5. Select Internet Protocol (TCP/IP), then click Properties. 3. Select Obtain an IP address automatically if you want the IP settings to be assigned automatically. Click OK when done. 20 RT-G32 Chapter 3: Configuring the clients 2.
Otherwise, select Use the following DNS server addresses: and key in IP address, Subnet mask, and Default gateway. 4. Select Obtain DNS server address automatically if you want the DNS server settings to be assigned automatically. Otherwise, select Use the following IP address: and key in the Preferred and Alternate DNS server. 5. Select Internet Protocol (TCP/IP), then click Properties. 3. Select Obtain an IP address automatically if you want the IP settings to be assigned automatically. Click OK when done. 20 RT-G32 Chapter 3: Configuring the clients 2.
User Manual
Page 21
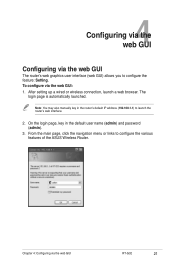
...router's default IP address (192.168.1.1) to launch the router's web interface. 2. From the main page, click the navigation menu or links to configure the feature: Setting. Chapter 4: Configuring via the web GUI: 1. Note: You may also manually key in the default user name (admin) and password (admin). 3. To configure via the web GUI RT-G32... 21 4 Configuring via the web GUI Configuring via the web GUI The router's web graphics user interface (web GUI) allows you to configure the various features of the ASUS Wireless Router. The login page ...
...router's default IP address (192.168.1.1) to launch the router's web interface. 2. From the main page, click the navigation menu or links to configure the feature: Setting. Chapter 4: Configuring via the web GUI: 1. Note: You may also manually key in the default user name (admin) and password (admin). 3. To configure via the web GUI RT-G32... 21 4 Configuring via the web GUI Configuring via the web GUI The router's web graphics user interface (web GUI) allows you to configure the various features of the ASUS Wireless Router. The login page ...
User Manual
Page 27
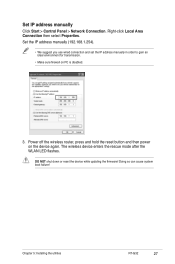
... device again. Doing so can cause system boot failure! Chapter 5: Installing the utilities RT-G32 27 Set IP address manually Click Start > Control Panel > Network Connection. The wireless device enters the rescue mode after the WLAN LED flashes. Power off the wireless router, press and hold the reset button and then power on PC is disabled. 3. DO...
... device again. Doing so can cause system boot failure! Chapter 5: Installing the utilities RT-G32 27 Set IP address manually Click Start > Control Panel > Network Connection. The wireless device enters the rescue mode after the WLAN LED flashes. Power off the wireless router, press and hold the reset button and then power on PC is disabled. 3. DO...

User Manual
Page 34
...ADSL service provider. 34 RT-G32 Chapter 6: Troubleshooting If the ADSL "LINK" light blinks continuously or stays off, Internet access is impossible. Action • Move the router closer to the wireless client. • Check whether the wireless adapter is ON. the Router is unable to the Quick... the status indicators on the ADSL modem and the wireless router. • Check if the WAN LED on the wireless router is ON. • Check the wireless encryption settings. • Check if the computer can get the IP address (via wireless LAN adapter Internet is not accessible When ADSL Modem ...
...ADSL service provider. 34 RT-G32 Chapter 6: Troubleshooting If the ADSL "LINK" light blinks continuously or stays off, Internet access is impossible. Action • Move the router closer to the wireless client. • Check whether the wireless adapter is ON. the Router is unable to the Quick... the status indicators on the ADSL modem and the wireless router. • Check if the WAN LED on the wireless router is ON. • Check the wireless encryption settings. • Check if the computer can get the IP address (via wireless LAN adapter Internet is not accessible When ADSL Modem ...
User Manual
Page 35
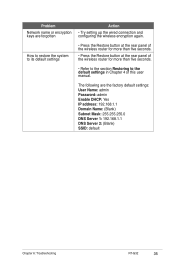
...IP address: 192.168.1.1 Domain Name: (Blank) Subnet Mask: 255.255.255.0 DNS Server 1: 192.168.1.1 DNS Server 2: (Blank) SSID: default Chapter 6: Troubleshooting RT-G32 35 The following are forgotten How to restore the system to its default settings Action • Try setting up the wired connection and configuring the wireless... encryption again. • Press the Restore button at the rear panel of the wireless router for more than five seconds. • Press the Restore button at the rear panel of the wireless router for more than five seconds....
...IP address: 192.168.1.1 Domain Name: (Blank) Subnet Mask: 255.255.255.0 DNS Server 1: 192.168.1.1 DNS Server 2: (Blank) SSID: default Chapter 6: Troubleshooting RT-G32 35 The following are forgotten How to restore the system to its default settings Action • Try setting up the wired connection and configuring the wireless... encryption again. • Press the Restore button at the rear panel of the wireless router for more than five seconds. • Press the Restore button at the rear panel of the wireless router for more than five seconds....


