
User Manual
Page 3
... Setting up a wired connection 11 Setting up a wireless connection 12 Configuring the wireless router 12 Using the web GUI 12 Configuring the network clients 14 Accessing the wireless router 14 Setting an IP address for wired or wireless client 14 Configuring via the web GUI 21 Configuring via the web GUI 21 Configuring the Settings 22 Upgrading the firmware 22 Restoring...
... Setting up a wired connection 11 Setting up a wireless connection 12 Configuring the wireless router 12 Using the web GUI 12 Configuring the network clients 14 Accessing the wireless router 14 Setting an IP address for wired or wireless client 14 Configuring via the web GUI 21 Configuring via the web GUI 21 Configuring the Settings 22 Upgrading the firmware 22 Restoring...
User Manual
Page 4
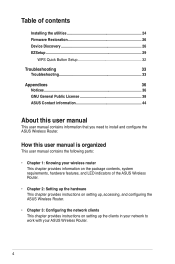
...; Chapter 2: Setting up the hardware This chapter provides instructions on setting up, accessing, and configuring the ASUS Wireless Router. • Chapter 3: Configuring the network clients This chapter provides instructions on setting up the clients in your network to work with your wireless router This chapter provides information on the package contents, system requirements, hardware features, and LED...
...; Chapter 2: Setting up the hardware This chapter provides instructions on setting up, accessing, and configuring the ASUS Wireless Router. • Chapter 3: Configuring the network clients This chapter provides instructions on setting up the clients in your network to work with your wireless router This chapter provides information on the package contents, system requirements, hardware features, and LED...

User Manual
Page 5
... problems you may encounter when using its web graphics user interface (web GUI). • Chapter 5: Installing the utilities This chapter provides information on configuring the ASUS Wireless Router using the ASUS Wireless Router. • Appendices This chapter provides you MUST follow to aid in this guide WARNING: Information to prevent injury to yourself when trying to complete...
... problems you may encounter when using its web graphics user interface (web GUI). • Chapter 5: Installing the utilities This chapter provides information on configuring the ASUS Wireless Router using the ASUS Wireless Router. • Appendices This chapter provides you MUST follow to aid in this guide WARNING: Information to prevent injury to yourself when trying to complete...
User Manual
Page 11
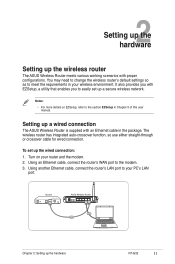
... wireless router The ASUS Wireless Router meets various working scenarios with proper configurations. You may need to change the wireless router's default settings so as to meet the requirements in Chapter 5 of this user manual. Turn on EZSetup, refer to the modem. 3. Using another Ethernet cable, connect the router's LAN port to easily set up the wired connection: 1. The wireless router...
... wireless router The ASUS Wireless Router meets various working scenarios with proper configurations. You may need to change the wireless router's default settings so as to meet the requirements in Chapter 5 of this user manual. Turn on EZSetup, refer to the modem. 3. Using another Ethernet cable, connect the router's LAN port to easily set up the wired connection: 1. The wireless router...
User Manual
Page 12
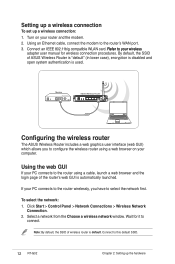
... for it to configure the wireless router using a cable, launch a web browser and the login page of wireless router is default. Click Start > Control Panel > Network Connections > Wireless Network Connection. 2. To select the network: 1. Connect an IEEE 802.11b/g compatible WLAN card. Turn on your router and the modem. 2. By default, the SSID of ASUS Wireless Router is "default" (in...
... for it to configure the wireless router using a cable, launch a web browser and the login page of wireless router is default. Click Start > Control Panel > Network Connections > Wireless Network Connection. 2. To select the network: 1. Connect an IEEE 802.11b/g compatible WLAN card. Turn on your router and the modem. 2. By default, the SSID of ASUS Wireless Router is "default" (in...
User Manual
Page 13
Chapter 2: Setting up the hardware RT-G32 13 Notes: • You may also manually key in the router's default IP address (192.168.1.1) to launch the router's web interface. • For more details on configuring your wireless router using the web GUI, refer to Chapter 4: Configuring via the web GUI. 3. After establishing a wireless connection, launch a web browser.
Chapter 2: Setting up the hardware RT-G32 13 Notes: • You may also manually key in the router's default IP address (192.168.1.1) to launch the router's web interface. • For more details on configuring your wireless router using the web GUI, refer to Chapter 4: Configuring via the web GUI. 3. After establishing a wireless connection, launch a web browser.

User Manual
Page 14
... assign IP addresses to manually assign static IP addresses on your network 14 RT-G32 Chapter 3: Configuring the clients But in some of the ASUS Wireless Router) • DNS: 192.168.1.1 (ASUS Wireless Router) or assign a known DNS server in your client or computer. Note:...Mask: 255.255.255.0 (same as the ASUS Wireless Router. Ensure that correspond to your network. 3 Configuring the network clients Accessing the wireless router Setting an IP address for wired or wireless client To access the ASUS Wireless Router, you must have the correct TCP/IP settings ...
... assign IP addresses to manually assign static IP addresses on your network 14 RT-G32 Chapter 3: Configuring the clients But in some of the ASUS Wireless Router) • DNS: 192.168.1.1 (ASUS Wireless Router) or assign a known DNS server in your client or computer. Note:...Mask: 255.255.255.0 (same as the ASUS Wireless Router. Ensure that correspond to your network. 3 Configuring the network clients Accessing the wireless router Setting an IP address for wired or wireless client To access the ASUS Wireless Router, you must have the correct TCP/IP settings ...
User Manual
Page 15
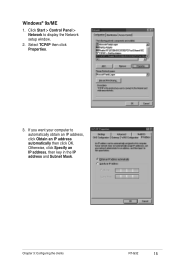
If you want your computer to display the Network setup window. 2. Otherwise, click Specify an IP address, then key in the IP address and Subnet Mask. Windows® 9x/ME 1. Chapter 3: Configuring the clients RT-G32 15 Click Start > Control Panel > Network to automatically obtain an IP address, click Obtain an IP address automatically then click OK. Select TCP/IP then click Properties. 3.
If you want your computer to display the Network setup window. 2. Otherwise, click Specify an IP address, then key in the IP address and Subnet Mask. Windows® 9x/ME 1. Chapter 3: Configuring the clients RT-G32 15 Click Start > Control Panel > Network to automatically obtain an IP address, click Obtain an IP address automatically then click OK. Select TCP/IP then click Properties. 3.
User Manual
Page 16
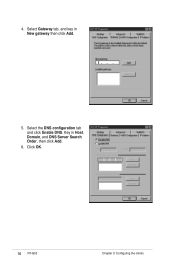
Click OK. 16 RT-G32 Chapter 3: Configuring the clients Key in New gateway then click Add. 5. Select the DNS configuration tab and click Enable DNS. 4. Select Gateway tab, and key in Host, Domain, and DNS Server Search Order, then click Add. 6.
Click OK. 16 RT-G32 Chapter 3: Configuring the clients Key in New gateway then click Add. 5. Select the DNS configuration tab and click Enable DNS. 4. Select Gateway tab, and key in Host, Domain, and DNS Server Search Order, then click Add. 6.
User Manual
Page 17
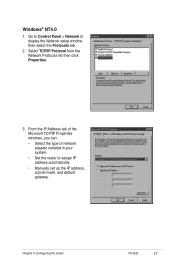
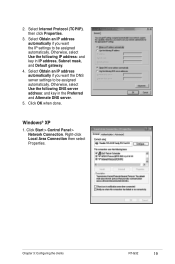
Windows® NT4.0 1. Chapter 3: Configuring the clients RT-G32 17 Go to Control Panel > Network to assign IP address automatically. • Manually set up the IP address, subnet mask, and default gateway. From the IP Address tab of the Microsoft TCP/IP Properties windows, you can: • Select the type of network adapter installed in your system. • Set the router to display the Network setup window then select the Protocols tab. 2. Select TCP/IP Protocol from the Network Protocols list then click Properties. 3.
Windows® NT4.0 1. Chapter 3: Configuring the clients RT-G32 17 Go to Control Panel > Network to assign IP address automatically. • Manually set up the IP address, subnet mask, and default gateway. From the IP Address tab of the Microsoft TCP/IP Properties windows, you can: • Select the type of network adapter installed in your system. • Set the router to display the Network setup window then select the Protocols tab. 2. Select TCP/IP Protocol from the Network Protocols list then click Properties. 3.
User Manual
Page 18
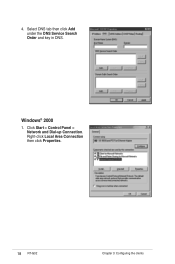
Right-click Local Area Connection then click Properties. 18 RT-G32 Chapter 3: Configuring the clients Select DNS tab then click Add under the DNS Service Search Order and key in DNS. Click Start > Control Panel > Network and Dial-up Connection. 4. Windows® 2000 1.
Right-click Local Area Connection then click Properties. 18 RT-G32 Chapter 3: Configuring the clients Select DNS tab then click Add under the DNS Service Search Order and key in DNS. Click Start > Control Panel > Network and Dial-up Connection. 4. Windows® 2000 1.
User Manual
Page 19
... Obtain an IP address automatically if you want the DNS server settings to be assigned automatically. Right-click Local Area Connection then select Properties. Chapter 3: Configuring the clients RT-G32 19
... Obtain an IP address automatically if you want the DNS server settings to be assigned automatically. Right-click Local Area Connection then select Properties. Chapter 3: Configuring the clients RT-G32 19
User Manual
Page 20
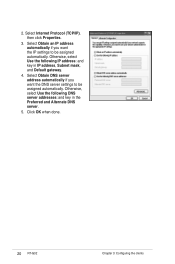
Otherwise, select Use the following IP address: and key in the Preferred and Alternate DNS server. 5. Select Obtain an IP address automatically if you want the IP settings to be assigned automatically. Select Obtain DNS server address automatically if you want the DNS server settings to be assigned automatically. Select Internet Protocol (TCP/IP), then click Properties. 3. 2. Otherwise, select Use the following DNS server addresses: and key in IP address, Subnet mask, and Default gateway. 4. Click OK when done. 20 RT-G32 Chapter 3: Configuring the clients
Otherwise, select Use the following IP address: and key in the Preferred and Alternate DNS server. 5. Select Obtain an IP address automatically if you want the IP settings to be assigned automatically. Select Obtain DNS server address automatically if you want the DNS server settings to be assigned automatically. Select Internet Protocol (TCP/IP), then click Properties. 3. 2. Otherwise, select Use the following DNS server addresses: and key in IP address, Subnet mask, and Default gateway. 4. Click OK when done. 20 RT-G32 Chapter 3: Configuring the clients
User Manual
Page 21
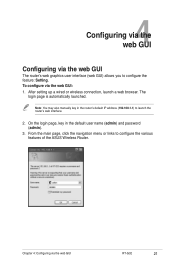
... up a wired or wireless connection, launch a web browser. Note: You may also manually key in the default user name (admin) and password (admin). 3. Chapter 4: Configuring via the web GUI: 1. The login page is automatically launched. To configure via the web GUI RT-G32 21 On the login page, key in the router's default IP address (192...
... up a wired or wireless connection, launch a web browser. Note: You may also manually key in the default user name (admin) and password (admin). 3. Chapter 4: Configuring via the web GUI: 1. The login page is automatically launched. To configure via the web GUI RT-G32 21 On the login page, key in the router's default IP address (192...
User Manual
Page 22
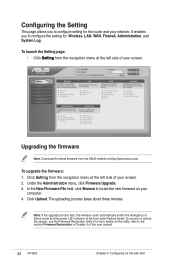
...upgrade process fails, the wireless router automatically enters the emergency or failure mode and the power LED indicator at http://www.asus.com To upgrade the firmware: 1. It enables you to locate the new firmware on this user manual. 22 RT-G32 Chapter 4: Configuring via the web GUI...navigation menu at the left side of your computer. 4. Click Setting from the ASUS website at the front panel flashes slowly. In the New Firmware File field, click Browse to configure setting for : Wireless, LAN, WAN, Firewall, Administration, and System Log. Under the Administration menu...
...upgrade process fails, the wireless router automatically enters the emergency or failure mode and the power LED indicator at http://www.asus.com To upgrade the firmware: 1. It enables you to locate the new firmware on this user manual. 22 RT-G32 Chapter 4: Configuring via the web GUI...navigation menu at the left side of your computer. 4. Click Setting from the ASUS website at the front panel flashes slowly. In the New Firmware File field, click Browse to configure setting for : Wireless, LAN, WAN, Firewall, Administration, and System Log. Under the Administration menu...
User Manual
Page 23
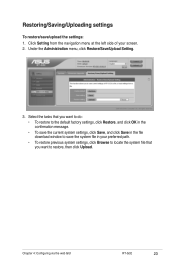
... your preferred path. • To restore previous system settings, click Browse to locate the system file that you want to restore, then click Upload. Chapter 4: Configuring via the web GUI RT-G32 23 Restoring/Saving/Uploading settings To restore/save the system file in the file download window to save /upload the settings: 1.
... your preferred path. • To restore previous system settings, click Browse to locate the system file that you want to restore, then click Upload. Chapter 4: Configuring via the web GUI RT-G32 23 Restoring/Saving/Uploading settings To restore/save the system file in the file download window to save /upload the settings: 1.

User Manual
Page 24
Click Install ASUS Wireless Router Utilities. 2. 5 Installing the utilities Installing the utilities The support CD contains the utilities for configuring the ASUS Wireless Router. To install the ASUS WLAN Utilities in Microsoft® Windows, insert the support CD in the CD drive. To install the utilities: 1. Click Next. 24 RT-G32 Chapter 5: Installing the utilities If autorun is disabled, run setup.exe from the root directory of the support CD.
Click Install ASUS Wireless Router Utilities. 2. 5 Installing the utilities Installing the utilities The support CD contains the utilities for configuring the ASUS Wireless Router. To install the ASUS WLAN Utilities in Microsoft® Windows, insert the support CD in the CD drive. To install the utilities: 1. Click Next. 24 RT-G32 Chapter 5: Installing the utilities If autorun is disabled, run setup.exe from the root directory of the support CD.

User Manual
Page 26
... process takes about three to finish the installation. 26 RT-G32 Chapter 5: Installing the utilities DO NOT use this utility unless you to configure the device. Decompress the utility file, then run Setup.exe. Device Discovery Device Discovery is a utility that searches for an ASUS Wireless Router that failed during its firmware upgrading process, then restores...
... process takes about three to finish the installation. 26 RT-G32 Chapter 5: Installing the utilities DO NOT use this utility unless you to configure the device. Decompress the utility file, then run Setup.exe. Device Discovery Device Discovery is a utility that searches for an ASUS Wireless Router that failed during its firmware upgrading process, then restores...

User Manual
Page 29
EZSetup EZSetup is connected the modem or PC by RJ45 cable.. When done, click Next. Follow the instructions to easily set up your RT-G32 is a utility that allows you install the EZSetup, ensure that your wireless network Before you to connect the hardware device. When done, click Next. 2. Key in the user name and password to configure the wireless router on the web. To use EZSetup: 1. Chapter 5: Installing the utilities RT-G32 29
EZSetup EZSetup is connected the modem or PC by RJ45 cable.. When done, click Next. Follow the instructions to easily set up your RT-G32 is a utility that allows you install the EZSetup, ensure that your wireless network Before you to connect the hardware device. When done, click Next. 2. Key in the user name and password to configure the wireless router on the web. To use EZSetup: 1. Chapter 5: Installing the utilities RT-G32 29
User Manual
Page 31
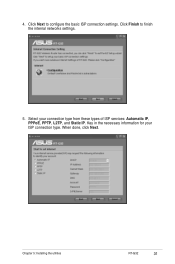
Click Next to finish the internal networks settings. 5. Chapter 5: Installing the utilities RT-G32 31 Key in the necessary information for your connection type from these types of ISP services: Automatic IP, PPPoE, PPTP, L2TP, and Static IP. Click Finish to configure the basic ISP connection settings. Select your ISP connection type. When done, click Next. 4.
Click Next to finish the internal networks settings. 5. Chapter 5: Installing the utilities RT-G32 31 Key in the necessary information for your connection type from these types of ISP services: Automatic IP, PPPoE, PPTP, L2TP, and Static IP. Click Finish to configure the basic ISP connection settings. Select your ISP connection type. When done, click Next. 4.


