
User Guide
Page 15
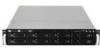
... HDD 4 HDD 8 1.5 Rear panel features The rear panel includes the expansion slots, system power socket, and rear fans. 1.4 Front panel features The barebone server displays a simple yet stylish front panel with openings for the rear panel connectors on the motherboard. 3 Expansion slots LAN port 2 LAN port 1... on the rear panel if motherboard is not present. • *The port is for the LED descriptions. ASUS RS520-E6/RS8 1-5 Refer to section 1.7.1 Front panel LEDs for ASUS ASMB4-iKVM controller card only. The middle part includes the I/O shield with easily accessible features.
... HDD 4 HDD 8 1.5 Rear panel features The rear panel includes the expansion slots, system power socket, and rear fans. 1.4 Front panel features The barebone server displays a simple yet stylish front panel with openings for the rear panel connectors on the motherboard. 3 Expansion slots LAN port 2 LAN port 1... on the rear panel if motherboard is not present. • *The port is for the LED descriptions. ASUS RS520-E6/RS8 1-5 Refer to section 1.7.1 Front panel LEDs for ASUS ASMB4-iKVM controller card only. The middle part includes the I/O shield with easily accessible features.
User Guide
Page 41
ASUS RS520-E6/RS8 2- Installation options Chapter 3 This chapter describes how to install the optional components and devices into the barebone server.
ASUS RS520-E6/RS8 2- Installation options Chapter 3 This chapter describes how to install the optional components and devices into the barebone server.

User Guide
Page 43
... Secure the rear end of the rail with two rack screws. 9. Repeat steps 5 to 8 to the other side of the two hooks to install the barebone server. 2. Attach the rear end of the server rail to the side of the chassis, matching each of the chassis. 3.3 Attaching the rack rails To...4. Then slide the rail toward the front panel until it fits the rack. 6. Install the nuts on the holes of the chassis with one screw. 5. ASUS RS520-E6/RS8 3-3 3. Secure the rear end of the server rail to determine the length of space (2U) on the rack front. 3. Select two units of the ...
... Secure the rear end of the rail with two rack screws. 9. Repeat steps 5 to 8 to the other side of the two hooks to install the barebone server. 2. Attach the rear end of the server rail to the side of the chassis, matching each of the chassis. 3.3 Attaching the rack rails To...4. Then slide the rail toward the front panel until it fits the rack. 6. Install the nuts on the holes of the chassis with one screw. 5. ASUS RS520-E6/RS8 3-3 3. Secure the rear end of the server rail to determine the length of space (2U) on the rack front. 3. Select two units of the ...

