
User Manual
Page 13
... x 444 mm (w) x 43.6 mm (h) ASUS RS161-E2/PA2 1-3 1.2 System specifications The ASUS RS161-E2 (PA2) is a 1U barebone server system featuring the ASUS K8N-DRE motherboard. The server supports dual 940-pin AMD Opteron™ 64 processors..., and includes the latest technologies through the chipsets embedded on this motherboard due to 4 GB DDR availability) LAN 2 x Broadcom® BCM5721 Gigabit PCI-E LAN controllers VGA ATI RAGE-XL PCI-based VGA controller with 8 MB...
... x 444 mm (w) x 43.6 mm (h) ASUS RS161-E2/PA2 1-3 1.2 System specifications The ASUS RS161-E2 (PA2) is a 1U barebone server system featuring the ASUS K8N-DRE motherboard. The server supports dual 940-pin AMD Opteron™ 64 processors..., and includes the latest technologies through the chipsets embedded on this motherboard due to 4 GB DDR availability) LAN 2 x Broadcom® BCM5721 Gigabit PCI-E LAN controllers VGA ATI RAGE-XL PCI-based VGA controller with 8 MB...
User Manual
Page 15
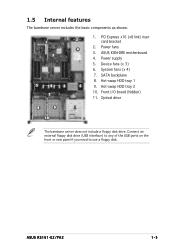
... (hidden) 7 11. Device fans (x 3) 6. Hot-swap HDD tray 2 10. 1.5 Internal features The barebone server includes the basic components as shown. 1. Optical drive 8 9 11 10 The barebone server does not include a floppy disk drive. Hot-swap HDD tray 1 5 9. Connect an external floppy disk drive (USB... interface) to any of the USB ports on the front or rear panel if you need to use a floppy disk. System fans (x 4) 7. ASUS RS161-E2/PA2 1-5 ASUS ...
... (hidden) 7 11. Device fans (x 3) 6. Hot-swap HDD tray 2 10. 1.5 Internal features The barebone server includes the basic components as shown. 1. Optical drive 8 9 11 10 The barebone server does not include a floppy disk drive. Hot-swap HDD tray 1 5 9. Connect an external floppy disk drive (USB... interface) to any of the USB ports on the front or rear panel if you need to use a floppy disk. System fans (x 4) 7. ASUS RS161-E2/PA2 1-5 ASUS ...

User Manual
Page 43
ASUS RS161-E2/PA2 2-1 Installation options Chapter 3 This chapter describes how to install the optional components and devices into the barebone server.
ASUS RS161-E2/PA2 2-1 Installation options Chapter 3 This chapter describes how to install the optional components and devices into the barebone server.

User Manual
Page 45
... on the outer holes to secure the front end. 1U space 5. ASUS RS161-E2 (PA2) 3-3 Drive in two screws on the rack front. 3. Repeat steps 2 to 7 to the 1U space. 4. 3.3 Attaching the rails to the rack To attach the rails to install the barebone server. 2. Find the r e a r 1 U s p a c e that corresponds to the f r o n t 1 U s p a c e where you wish to...
... on the outer holes to secure the front end. 1U space 5. ASUS RS161-E2 (PA2) 3-3 Drive in two screws on the rack front. 3. Repeat steps 2 to 7 to the 1U space. 4. 3.3 Attaching the rails to the rack To attach the rails to install the barebone server. 2. Find the r e a r 1 U s p a c e that corresponds to the f r o n t 1 U s p a c e where you wish to...

User Manual
Page 47
This chapter includes the motherboard layout, jumper settings, and connector locations ASUS RS161-E2/PA2 2-1 Motherboard info Chapter 4 This chapter gives information about the motherboard that comes with the server.
This chapter includes the motherboard layout, jumper settings, and connector locations ASUS RS161-E2/PA2 2-1 Motherboard info Chapter 4 This chapter gives information about the motherboard that comes with the server.

User Manual
Page 61
... SMBus devices using the SMBus interface. Devices communicate with an intrusion detection feature. System panel auxiliary connector (20-pin AUX_PANEL1) This connector supports several server system functions. ASUS RS161-E2 (PA2) 4-15 This requires an external detection mechanism such as a chassis intrusion sensor or microswitch. Connect the Locator LED 1 cable to this lead to this...
... SMBus devices using the SMBus interface. Devices communicate with an intrusion detection feature. System panel auxiliary connector (20-pin AUX_PANEL1) This connector supports several server system functions. ASUS RS161-E2 (PA2) 4-15 This requires an external detection mechanism such as a chassis intrusion sensor or microswitch. Connect the Locator LED 1 cable to this lead to this...

User Manual
Page 95
..." appears after you to change the user password. ASUS RS161-E2/PA2 5-33 Change User Password Select this item shows I n s t a l l e d. L i m i t e d allows changes only to the Setup utility. F u l l A c c e s s allows viewing and changing all the fields in the Setup utility. Confirm the password when prompted. Main Advanced Server BIOS SETUP UTILITY Security Boot Exit Supervisor Password : Not...
..." appears after you to change the user password. ASUS RS161-E2/PA2 5-33 Change User Password Select this item shows I n s t a l l e d. L i m i t e d allows changes only to the Setup utility. F u l l A c c e s s allows viewing and changing all the fields in the Setup utility. Confirm the password when prompted. Main Advanced Server BIOS SETUP UTILITY Security Boot Exit Supervisor Password : Not...

User Manual
Page 97
...v8.1.5] →← Select Screen ↑↓ Select Item +- 5.7 Boot menu The Boot menu items allow you to display the sub-menu. Main Advanced Server BIOS SETUP UTILITY Security Boot Exit Boot Device Priority Boot Settings Configuration Specifies the Boot Device Priority sequence. →← Select Screen ↑↓ Select...The number of device items that appears on the screen depends on the number of devices installed in the system. Configuration options: [xxxxx Drive] [Disabled] ASUS RS161-E2/PA2 5-35 Select an item then press to change the system boot options.
...v8.1.5] →← Select Screen ↑↓ Select Item +- 5.7 Boot menu The Boot menu items allow you to display the sub-menu. Main Advanced Server BIOS SETUP UTILITY Security Boot Exit Boot Device Priority Boot Settings Configuration Specifies the Boot Device Priority sequence. →← Select Screen ↑↓ Select...The number of device items that appears on the screen depends on the number of devices installed in the system. Configuration options: [xxxxx Drive] [Disabled] ASUS RS161-E2/PA2 5-35 Select an item then press to change the system boot options.

User Manual
Page 121
Install ASWM for details. Refer to the application help file for Windows 2000 Installs the ASUS System Web-base Management utility. 7.4.3 Management Software The M a n a g e m e n t S o f t w a r e menu shows the available server management software applications. Install ASUS Network Utility Installs the ASUS Network Utility. ASUS RS161-E2/PA2 7-7 Refer to the application help file for details.
Install ASWM for details. Refer to the application help file for Windows 2000 Installs the ASUS System Web-base Management utility. 7.4.3 Management Software The M a n a g e m e n t S o f t w a r e menu shows the available server management software applications. Install ASUS Network Utility Installs the ASUS Network Utility. ASUS RS161-E2/PA2 7-7 Refer to the application help file for details.