
User Guide
Page 4
... 4-2 4.2 Jumpers 4-4 4.3 Connectors 4-9 Chapter 5: BIOS setup 5.1 Managing and updating your BIOS 5-2 5.1.1 Creating a bootable floppy disk 5-2 5.1.2 AFUDOS utility 5-3 5.1.3 ASUS CrashFree BIOS 2 utility 5-6 5.1.4 ASUS Update utility 5-8 5.2 BIOS setup program 5-11 5.2.1 BIOS menu screen 5-12 5.2.2 Menu bar 5-12 5.2.3 Navigation keys 5-12 5.2.4 Menu items 5-13 5.2.5 Sub-menu items 5-13 5.2.6 Configuration fields 5-13 5.2.7 Pop-up window 5-13 5.2.8 Scroll bar...
... 4-2 4.2 Jumpers 4-4 4.3 Connectors 4-9 Chapter 5: BIOS setup 5.1 Managing and updating your BIOS 5-2 5.1.1 Creating a bootable floppy disk 5-2 5.1.2 AFUDOS utility 5-3 5.1.3 ASUS CrashFree BIOS 2 utility 5-6 5.1.4 ASUS Update utility 5-8 5.2 BIOS setup program 5-11 5.2.1 BIOS menu screen 5-12 5.2.2 Menu bar 5-12 5.2.3 Navigation keys 5-12 5.2.4 Menu items 5-13 5.2.5 Sub-menu items 5-13 5.2.6 Configuration fields 5-13 5.2.7 Pop-up window 5-13 5.2.8 Scroll bar...
User Guide
Page 10
... used throughout this manual. I M P O R T A N T : Instructions that you must press the enclosed key. Example: At the DOS prompt, type the command line: format A:/S Refer to complete a task. ASUS Server Web-based Management (ASWM) user guide This manual tells how to the ASUS contact information. N O T E : Tips and information to emphasize a word or a phrase. x Used to...
... used throughout this manual. I M P O R T A N T : Instructions that you must press the enclosed key. Example: At the DOS prompt, type the command line: format A:/S Refer to complete a task. ASUS Server Web-based Management (ASWM) user guide This manual tells how to the ASUS contact information. N O T E : Tips and information to emphasize a word or a phrase. x Used to...
User Guide
Page 21
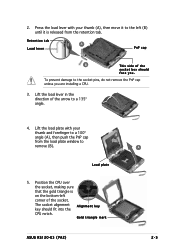
... A l i g n m e n t k e y key should face you are installing a CPU. 3. Load plate 5. To prevent damage to a 100º angle (A), then push the PnP cap B from the retention tab. Position the CPU over the socket, making sure that the gold triangle is released from the load plate window to a 135º angle. 4. Gold triangle mark ASUS RS120-E3 (PA2...
... A l i g n m e n t k e y key should face you are installing a CPU. 3. Load plate 5. To prevent damage to a 100º angle (A), then push the PnP cap B from the retention tab. Position the CPU over the socket, making sure that the gold triangle is released from the load plate window to a 135º angle. 4. Gold triangle mark ASUS RS120-E3 (PA2...
User Guide
Page 25
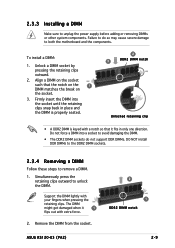
... when it fits in place and the DIMM is properly seated. 2 3 DDR2 DIMM notch Unlocked retaining clip • A DDR2 DIMM is keyed with your fingers when pressing the retaining clips. ASUS RS120-E3 (PA2) 2 1 DDR2 DIMM notch 2-9 Simultaneously press the retaining clips outward to unplug the power supply before adding or removing DIMMs or other...
... when it fits in place and the DIMM is properly seated. 2 3 DDR2 DIMM notch Unlocked retaining clip • A DDR2 DIMM is keyed with your fingers when pressing the retaining clips. ASUS RS120-E3 (PA2) 2 1 DDR2 DIMM notch 2-9 Simultaneously press the retaining clips outward to unplug the power supply before adding or removing DIMMs or other...
User Guide
Page 50
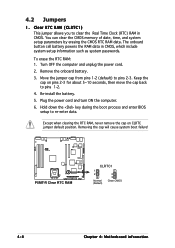
Turn OFF the computer and unplug the power cord. 2. Move the jumper cap from pins 1-2 (default) to re-enter data. Hold down the key during the boot process and enter BIOS setup to pins 2-3. Clear RTC RAM (CLRTC1) This jumper allows you to pins 1-2. 4. Re-install the battery. 5. Plug ...
Turn OFF the computer and unplug the power cord. 2. Move the jumper cap from pins 1-2 (default) to re-enter data. Hold down the key during the boot process and enter BIOS setup to pins 2-3. Clear RTC RAM (CLRTC1) This jumper allows you to pins 1-2. 4. Re-install the battery. 5. Plug ...
User Guide
Page 51
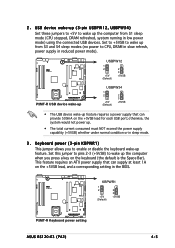
...(no power to CPU, DRAM in slow refresh, power supply in the BIOS. ® P5MT-R KBPWR1 1 2 +5V (Default) 2 3 +5VSB P5MT-R Keyboard power setting ASUS RS120-E3 (PA2) 4-5 Set to +5VSB to enable or disable the keyboard wake-up feature requires a power supply that can provide 500mA on the keyboard (the default is... the Space Bar). Keyboard power (3-pin KBPWR1) This jumper allows you press a key on the +5VSB lead for each USB port; This feature requires an ATX power supply that can supply at least 1A on the +5VSB lead...
...(no power to CPU, DRAM in slow refresh, power supply in the BIOS. ® P5MT-R KBPWR1 1 2 +5V (Default) 2 3 +5VSB P5MT-R Keyboard power setting ASUS RS120-E3 (PA2) 4-5 Set to +5VSB to enable or disable the keyboard wake-up feature requires a power supply that can provide 500mA on the keyboard (the default is... the Space Bar). Keyboard power (3-pin KBPWR1) This jumper allows you press a key on the +5VSB lead for each USB port; This feature requires an ATX power supply that can supply at least 1A on the +5VSB lead...
User Guide
Page 75
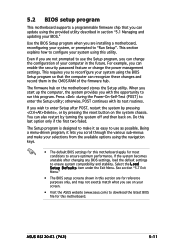
...program, you are not prompted to enter Setup after changing any BIOS settings, load the default settings to reconfigure your system using the navigation keys. • The default BIOS settings for this motherboard apply for most conditions to run this program. Even if you can change the ..."5.7 Exit Menu." • The BIOS setup screens shown in this utility. You can also restart by pressing the reset button on your BIOS." ASUS RS120-E3 (PA2) 5-11 Press during the Power-On-Self-Test (POST) to download the latest BIOS file for reference purposes only, and may not exactly match...
...program, you are not prompted to enter Setup after changing any BIOS settings, load the default settings to reconfigure your system using the navigation keys. • The default BIOS settings for this motherboard apply for most conditions to run this program. Even if you can change the ..."5.7 Exit Menu." • The BIOS setup screens shown in this utility. You can also restart by pressing the reset button on your BIOS." ASUS RS120-E3 (PA2) 5-11 Press during the Power-On-Self-Test (POST) to download the latest BIOS file for reference purposes only, and may not exactly match...
User Guide
Page 76
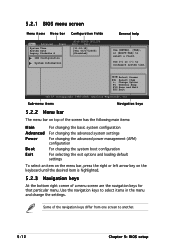
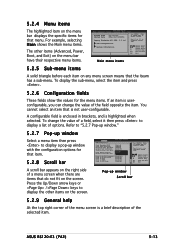
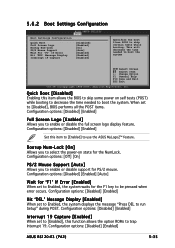
...2005] [Disabled] General help Use [ENTER]. [TAB], or [SHIFT-TAB] to select items in the menu and change the settings. Sub-menu items Navigation keys 5.2.2 Menu bar The menu bar on top of the screen has the following main items: Main Advanced Power Boot Exit For changing the basic system... settings To select an item on the menu bar, press the right or left arrow key on the keyboard until the desired item is highlighted. 5.2.3 Navigation keys At the bottom right corner of the navigation keys differ from one screen to configure system time. Change Option F1 General Help F10 Save ...
...2005] [Disabled] General help Use [ENTER]. [TAB], or [SHIFT-TAB] to select items in the menu and change the settings. Sub-menu items Navigation keys 5.2.2 Menu bar The menu bar on top of the screen has the following main items: Main Advanced Power Boot Exit For changing the basic system... settings To select an item on the menu bar, press the right or left arrow key on the keyboard until the desired item is highlighted. 5.2.3 Navigation keys At the bottom right corner of the navigation keys differ from one screen to configure system time. Change Option F1 General Help F10 Save ...
User Guide
Page 77
...The highlighted item on the menu bar displays the specific items for that the iteam has a sub-menu. Press the Up/Down arrow keys or / keys to display the other items (Advanced, Power, Boot, and Exit) on the menu bar have their respective menu items. Main Advanced ..., 3.5 in brackets, and is enclosed in ] IDE Configuration System Information Exit Use [ENTER], [TAB], or [SHIFT-TAB] to select a field. ASUS RS120-E3 (PA2) 5-13 Advanced APM Configuration Power Management/APM Video Power Down Mode Hard Disk Power Down Mode Suspend Time Out(Minute) Throttle Slow Clock Ratio Power...
...The highlighted item on the menu bar displays the specific items for that the iteam has a sub-menu. Press the Up/Down arrow keys or / keys to display the other items (Advanced, Power, Boot, and Exit) on the menu bar have their respective menu items. Main Advanced ..., 3.5 in brackets, and is enclosed in ] IDE Configuration System Information Exit Use [ENTER], [TAB], or [SHIFT-TAB] to select a field. ASUS RS120-E3 (PA2) 5-13 Advanced APM Configuration Power Management/APM Video Power Down Mode Hard Disk Power Down Mode Suspend Time Out(Minute) Throttle Slow Clock Ratio Power...
User Guide
Page 84
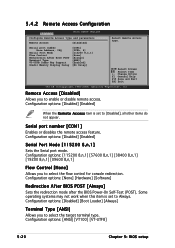
... and parameters Remote Access [Disabled] Serial port number Base Address, IRQ Serial Port Mode Flow Control Redirection After BIOS POST Terminal Type VT-UTFB Combo Key Support Sredir Memory Display Delay [COM1] [3F8h, 4] [115200 8,n,1] [None] [Always] [ANSI] [Enabled] [No Delay] Select Remote Access type...
... and parameters Remote Access [Disabled] Serial port number Base Address, IRQ Serial Port Mode Flow Control Redirection After BIOS POST Terminal Type VT-UTFB Combo Key Support Sredir Memory Display Delay [COM1] [3F8h, 4] [115200 8,n,1] [None] [Always] [ANSI] [Enabled] [No Delay] Select Remote Access type...

User Guide
Page 85
...Inc. Ratio CMOS Setting [16] Sets the ratio between CPU Core Clock and the FSB Frequency. Use the < + > or < - > keys to boot even without support for ANSI or VT100 terminals. Configuration options: [No Delay] [Delay 1 Sec] [Delay 2 Sec] [Delay 4...Enabled] [Disabled] [Disabled] [Automatic] Select Screen Select Item +- Configuration options: [Disabled] [Enabled] ASUS RS120-E3 (PA2) 5-21 VT-UTF8 Combo Key Support [Enabled] Enables or disables the VT-UTF8 combo key support for CPUs with extended CPUID functions. Configuration options: [Disabled] [Enabled] Sredir Memory Display Delay [...
...Inc. Ratio CMOS Setting [16] Sets the ratio between CPU Core Clock and the FSB Frequency. Use the < + > or < - > keys to boot even without support for ANSI or VT100 terminals. Configuration options: [No Delay] [Delay 1 Sec] [Delay 2 Sec] [Delay 4...Enabled] [Disabled] [Disabled] [Automatic] Select Screen Select Item +- Configuration options: [Disabled] [Enabled] ASUS RS120-E3 (PA2) 5-21 VT-UTF8 Combo Key Support [Enabled] Enables or disables the VT-UTF8 combo key support for CPUs with extended CPUID functions. Configuration options: [Disabled] [Enabled] Sredir Memory Display Delay [...
User Guide
Page 96
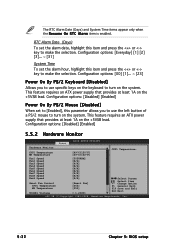
... [060] [050] [ 1.236V] Select Screen Select Item +- Configuration options: [Everyday] [1] [2] [3]... ~ [31] System Time To set the alarm date, highlight this item and press the or key to turn on the system. Configuration options: [00] [1]... ~ [23] Power On By PS/2 Keyboard [Disabled] Allows you to use specific... keys on the system. This feature requires an ATX power supply that provides at least 1A on the +5VSB lead. Change Option F1 General Help ...
... [060] [050] [ 1.236V] Select Screen Select Item +- Configuration options: [Everyday] [1] [2] [3]... ~ [31] System Time To set the alarm date, highlight this item and press the or key to turn on the system. Configuration options: [00] [1]... ~ [23] Power On By PS/2 Keyboard [Disabled] Allows you to use specific... keys on the system. This feature requires an ATX power supply that provides at least 1A on the +5VSB lead. Change Option F1 General Help ...
User Guide
Page 97
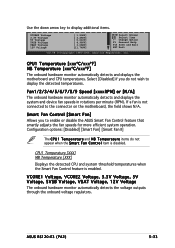
Use the down arrow key to enable or disable the ASUS Smart Fan Control feature that smartly adjusts the fan speeds for more efficient system operation. Fan1/2/3/4/5/6/7/8/9 Speed [xxxxRPM] or [N/A] The onboard hardware monitor.... CPU1 Temperature [xxxºC/xxxºF] MB Temperature [xxxºC/xxxºF] The onboard hardware monitor automatically detects and displays the motherboard and CPU temperatures. ASUS RS120-E3 (PA2) 5-33 Smart Fan Control [Smart Fan] Allows you do not appear when the S m a r t F a n C o n t r o l item is enabled. If a fan is not connected to ...
Use the down arrow key to enable or disable the ASUS Smart Fan Control feature that smartly adjusts the fan speeds for more efficient system operation. Fan1/2/3/4/5/6/7/8/9 Speed [xxxxRPM] or [N/A] The onboard hardware monitor.... CPU1 Temperature [xxxºC/xxxºF] MB Temperature [xxxºC/xxxºF] The onboard hardware monitor automatically detects and displays the motherboard and CPU temperatures. ASUS RS120-E3 (PA2) 5-33 Smart Fan Control [Smart Fan] Allows you do not appear when the S m a r t F a n C o n t r o l item is enabled. If a fan is not connected to ...
User Guide
Page 99
... occurs. Configuration options: [Disabled] [Enabled] Interrupt 19 Capture [Enabled] When set to Enabled, the system waits for the F1 key to trap Interrupt 19. Change Option F1 General Help F10 Save and Exit ESC Exit v02.58 (C)Copyright 1985-2004, American Megatrends,... [Off] [On] PS/2 Mouse Support [Auto] Allows you to enable or disable support for the NumLock. Configuration options: [Disabled] [Enabled] ASUS RS120-E3 (PA2) 5-35 This will decrease the time needed to enable or disable the full screen logo display feature. Configuration options: [Disabled] [Enabled] Hit '...
... occurs. Configuration options: [Disabled] [Enabled] Interrupt 19 Capture [Enabled] When set to Enabled, the system waits for the F1 key to trap Interrupt 19. Change Option F1 General Help F10 Save and Exit ESC Exit v02.58 (C)Copyright 1985-2004, American Megatrends,... [Off] [On] PS/2 Mouse Support [Auto] Allows you to enable or disable support for the NumLock. Configuration options: [Disabled] [Enabled] ASUS RS120-E3 (PA2) 5-35 This will decrease the time needed to enable or disable the full screen logo display feature. Configuration options: [Disabled] [Enabled] Hit '...
User Guide
Page 103
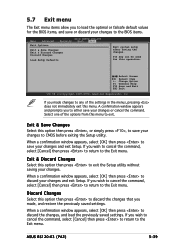
F10 key can be used for the BIOS items, and save your changes. If you wish to cancel the command, select [Cancel] then press to return to ..., select [OK] then press to save or discard your changes and exit Setup. When a confirmation window appears, select [OK] then press to the Exit menu. ASUS RS120-E3 (PA2) 5-39 5.7 Exit menu The Exit menu items allow you to load the optimal or failsafe default values for this option then press to exit. If...
F10 key can be used for the BIOS items, and save your changes. If you wish to cancel the command, select [Cancel] then press to return to ..., select [OK] then press to save or discard your changes and exit Setup. When a confirmation window appears, select [OK] then press to the Exit menu. ASUS RS120-E3 (PA2) 5-39 5.7 Exit menu The Exit menu items allow you to load the optimal or failsafe default values for this option then press to exit. If...
User Guide
Page 108
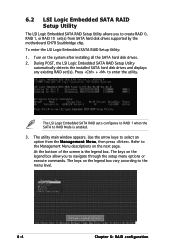
... options or execute commands. The LSI Logic Embedded SATA RAID auto configures to RAID 1 when the SATA to the menu level. 6-4 Chapter 6: RAID configuration The keys on the legend box vary according to RAID Mode is the legend box. Turn on the next page. Use the arrow... keys to the Management Menu descriptions on the system after installing all the SATA hard disk drives. 2. Refer to select an option from SATA hard disk ...
... options or execute commands. The LSI Logic Embedded SATA RAID auto configures to RAID 1 when the SATA to the menu level. 6-4 Chapter 6: RAID configuration The keys on the legend box vary according to RAID Mode is the legend box. Turn on the next page. Use the arrow... keys to the Management Menu descriptions on the system after installing all the SATA hard disk drives. 2. Refer to select an option from SATA hard disk ...
User Guide
Page 109
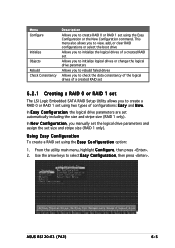
In E a s y C o n f i g u r a t i o n, the logical drive parameters are set size and stripe size (RAID 1 only). ASUS RS120-E3 (PA2) 6-5 Menu Configure Initialize Objects Rebuild Check Consistency Description Allows you to select Easy Configuration, then press . Use the arrow keys to create RAID 0 or RAID 1 set using the E a s y C o n f i g u r a t i o n option: 1. In N e w C o n f i g u r a t i o n, you to check the data consistency of the logical...
In E a s y C o n f i g u r a t i o n, the logical drive parameters are set size and stripe size (RAID 1 only). ASUS RS120-E3 (PA2) 6-5 Menu Configure Initialize Objects Rebuild Check Consistency Description Allows you to select Easy Configuration, then press . Use the arrow keys to create RAID 0 or RAID 1 set using the E a s y C o n f i g u r a t i o n option: 1. In N e w C o n f i g u r a t i o n, you to check the data consistency of the logical...
User Guide
Page 112
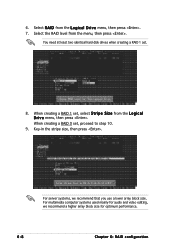
... menu, then press . You need at least two identical hard disk drives when creating a RAID 1 set. 8. Select the RAID level from the L o g i c a l D r i v e menu, then press . 7. Key-in the stripe size, then press . For multimedia computer systems used mainly for audio and video editing, we recommend that you use a lower array block...
... menu, then press . You need at least two identical hard disk drives when creating a RAID 1 set. 8. Select the RAID level from the L o g i c a l D r i v e menu, then press . 7. Key-in the stripe size, then press . For multimedia computer systems used mainly for audio and video editing, we recommend that you use a lower array block...
User Guide
Page 114
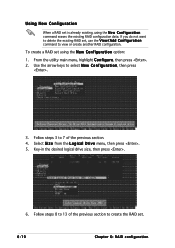
Use the arrow keys to 7 of the previous section to create the RAID set , use the V i e w / A d d C o n f i g u r a t i o n command to delete the existing RAID set . 6-10 Chapter 6: RAID configuration Follow ...create another RAID configuration. Follow steps 8 to 13 of the previous section. 4. Using New Configuration When a RAID set is already existing, using the N e w C o n f i g u r a t i o n option: 1. Key-in the desired logical drive size, then press . 6. To create a RAID set using the N e w C o n f i g u r a t i o n command erases the existing RAID configuration data.
Use the arrow keys to 7 of the previous section to create the RAID set , use the V i e w / A d d C o n f i g u r a t i o n command to delete the existing RAID set . 6-10 Chapter 6: RAID configuration Follow ...create another RAID configuration. Follow steps 8 to 13 of the previous section. 4. Using New Configuration When a RAID set is already existing, using the N e w C o n f i g u r a t i o n option: 1. Key-in the desired logical drive size, then press . 6. To create a RAID set using the N e w C o n f i g u r a t i o n command erases the existing RAID configuration data.

User Guide
Page 115
ASUS RS120-E3 (PA2) 6-11 Select the drive(s) you want to select Easy Configuration, then press . 3. When selected, the drive indicator changes from R E A D Y to the SATA ports. The A R R A Y S E L E C T I O N M E N U displays ... hard disk drive displays at the bottom of the screen. 6.2.2 Creating a RAID 10 set You can create a RAID 10 set , then press . Use the arrow keys to include in the RAID set using the E a s y C o n f i g u r a t i o n option: 1. To create a RAID 10 set using four identical hard disk drives...
ASUS RS120-E3 (PA2) 6-11 Select the drive(s) you want to select Easy Configuration, then press . 3. When selected, the drive indicator changes from R E A D Y to the SATA ports. The A R R A Y S E L E C T I O N M E N U displays ... hard disk drive displays at the bottom of the screen. 6.2.2 Creating a RAID 10 set You can create a RAID 10 set , then press . Use the arrow keys to include in the RAID set using the E a s y C o n f i g u r a t i o n option: 1. To create a RAID 10 set using four identical hard disk drives...