User Manual
Page 19
... I/O modules Cables Accessories Application DVD Documentation ASUS P9X79 WS 1 x 2-port USB 2.0 + 1-port eSATA3.0 module 4 x Serial ATA 6.0 Gb/s cables 2 x Serial ATA 3.0 Gb/s power cables 2 x Serial ATA 3.0 Gb/s cables 1 x COM port cable 1 x ASUS Q-Shield (I/O shield) 1 x ASUS 2-in the long line of new features...it , check the items in your package with the list below. 1.2 Package contents Check your motherboard package for buying an ASUS P9X79 WS motherboard! Thank you start installing the motherboard, and hardware devices on it another standout in -1 Q-Connector Kit (Retail version only...
... I/O modules Cables Accessories Application DVD Documentation ASUS P9X79 WS 1 x 2-port USB 2.0 + 1-port eSATA3.0 module 4 x Serial ATA 6.0 Gb/s cables 2 x Serial ATA 3.0 Gb/s power cables 2 x Serial ATA 3.0 Gb/s cables 1 x COM port cable 1 x ASUS Q-Shield (I/O shield) 1 x ASUS 2-in the long line of new features...it , check the items in your package with the list below. 1.2 Package contents Check your motherboard package for buying an ASUS P9X79 WS motherboard! Thank you start installing the motherboard, and hardware devices on it another standout in -1 Q-Connector Kit (Retail version only...
User Manual
Page 21
...Gigabit LAN To enhance network reliability, the P9X79 WS is an essential and convenient tool to let users know more efficiently. Quad-GPU CrossFireX Support! The P9X79 WS affords greater convenience to high speed connectivity. 1.3.2 ASUS Workstation Exclusive Features Best graphics performance for ... also support teaming and faulttolerance functions, the two LAN ports provide double the bandwidth and network redundancy. P9X79 WS brings you 've never experienced before! ASUS P9X79 WS 1-3 Extra SATA 6.0 Gb/s Support The Intel® X79 Express Chipset natively supports the next-generation ...
...Gigabit LAN To enhance network reliability, the P9X79 WS is an essential and convenient tool to let users know more efficiently. Quad-GPU CrossFireX Support! The P9X79 WS affords greater convenience to high speed connectivity. 1.3.2 ASUS Workstation Exclusive Features Best graphics performance for ... also support teaming and faulttolerance functions, the two LAN ports provide double the bandwidth and network redundancy. P9X79 WS brings you 've never experienced before! ASUS P9X79 WS 1-3 Extra SATA 6.0 Gb/s Support The Intel® X79 Express Chipset natively supports the next-generation ...
User Manual
Page 23
...optimize the system for fast,yet stable clock speeds, while TurboV enables unlimited freedom to switch back and forth between different utilities. ASUS P9X79 WS 1-5 This also reduces fan noise and extends component longevity. MemOK! EPU Tap into one click, no need to adjust CPU ... MemOK! Furthermore, high quality power components can effectively lower system temperature to use . AI Suite II With its user-friendly interface, ASUS AI Suite II consolidates all -inone software offers diverse and easy to ensure longer component lifespan. At 3X faster, this motherboard has ...
...optimize the system for fast,yet stable clock speeds, while TurboV enables unlimited freedom to switch back and forth between different utilities. ASUS P9X79 WS 1-5 This also reduces fan noise and extends component longevity. MemOK! EPU Tap into one click, no need to adjust CPU ... MemOK! Furthermore, high quality power components can effectively lower system temperature to use . AI Suite II With its user-friendly interface, ASUS AI Suite II consolidates all -inone software offers diverse and easy to ensure longer component lifespan. At 3X faster, this motherboard has ...

User Manual
Page 25
...accessed info - New F3 Shortcut for sharing UEFI setup info and troubleshooting - ASUS P9X79 WS 1-7 It also natively supports fully-utilized hard drives larger than 2.2TB in 64-bit operating systems. ASUS exclusive interface EZ Mode displays frequently-accessed info. Quick and easy info for...-controlled graphical BIOS designed with difficult POST situations. New upgrade! ASUS Q-Shield The specially designed ASUS Q-Shield does without using a bootable floppy disk or an OS-based utility. ASUS EZ DIY ASUS EZ DIY feature collection provides you to easily connect or disconnect ...
...accessed info - New F3 Shortcut for sharing UEFI setup info and troubleshooting - ASUS P9X79 WS 1-7 It also natively supports fully-utilized hard drives larger than 2.2TB in 64-bit operating systems. ASUS exclusive interface EZ Mode displays frequently-accessed info. Quick and easy info for...-controlled graphical BIOS designed with difficult POST situations. New upgrade! ASUS Q-Shield The specially designed ASUS Q-Shield does without using a bootable floppy disk or an OS-based utility. ASUS EZ DIY ASUS EZ DIY feature collection provides you to easily connect or disconnect ...
User Manual
Page 28
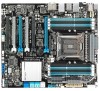
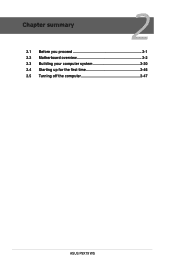
Chapter summary 2 2.1 Before you proceed 2-1 2.2 Motherboard overview 2-2 2.3 Building your computer system 2-30 2.4 Starting up for the first time 2-46 2.5 Turning off the computer 2-47 ASUS P9X79 WS
Chapter summary 2 2.1 Before you proceed 2-1 2.2 Motherboard overview 2-2 2.3 Building your computer system 2-30 2.4 Starting up for the first time 2-46 2.5 Turning off the computer 2-47 ASUS P9X79 WS
User Manual
Page 29
... wall socket before touching any component, ensure that the ATX power supply is switched off or the power cord is detached from the power supply. ASUS P9X79 WS 2-1
... wall socket before touching any component, ensure that the ATX power supply is switched off or the power cord is detached from the power supply. ASUS P9X79 WS 2-1
User Manual
Page 31
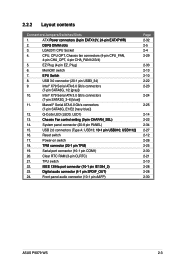
...-1 pin AAFP) Page 2-32 2-5 2-4 2-29 2-33 2-13 2-10 2-22 2-23 2-24 2-25 2-14 2-22 2-34 2-27 2-12 2-26 2-25 2-30 2-21 2-10 2-28 2-28 2-30 ASUS P9X79 WS 2-3 USB 3.0 connector (20-1 pin USB3_34) 9.
...-1 pin AAFP) Page 2-32 2-5 2-4 2-29 2-33 2-13 2-10 2-22 2-23 2-24 2-25 2-14 2-22 2-34 2-27 2-12 2-26 2-25 2-30 2-21 2-10 2-28 2-28 2-30 ASUS P9X79 WS 2-3 USB 3.0 connector (20-1 pin USB3_34) 9.
User Manual
Page 33
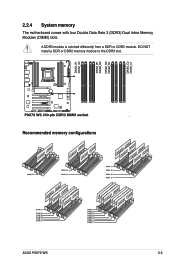
DO NOT install a DDR or DDR2 memory module to the DDR3 slot. ® ® Recommended memory configurations ASUS P9X79 WS 2-5 A DDR3 module is notched differently from a DDR or DDR2 module. 2.2.4 System memory The motherboard comes with four Double Data Rate 3 (DDR3) Dual Inline Memory Modules (DIMM) slots.
DO NOT install a DDR or DDR2 memory module to the DDR3 slot. ® ® Recommended memory configurations ASUS P9X79 WS 2-5 A DDR3 module is notched differently from a DDR or DDR2 module. 2.2.4 System memory The motherboard comes with four Double Data Rate 3 (DDR3) Dual Inline Memory Modules (DIMM) slots.
User Manual
Page 35
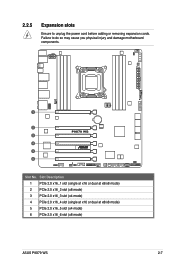
Failure to unplug the power cord before adding or removing expansion cards. 2.2.5 Expansion slots Ensure to do so may cause you physical injury and damage motherboard components. Slot No. Slot Description 1 PCIe 2.0 x16_1 slot (single at x16 or dual at x8/x8 mode) 2 PCIe 2.0 x16_2 slot (x8 mode) 3 PCIe 2.0 x16_3 slot (x4 mode) 4 PCIe 2.0 x16_4 slot (single at x16 or dual at x8/x8 mode) 5 PCIe 2.0 x16_5 slot (x4 mode) 6 PCIe 2.0 x16_6 slot (x8 mode) ASUS P9X79 WS 2-7
Failure to unplug the power cord before adding or removing expansion cards. 2.2.5 Expansion slots Ensure to do so may cause you physical injury and damage motherboard components. Slot No. Slot Description 1 PCIe 2.0 x16_1 slot (single at x16 or dual at x8/x8 mode) 2 PCIe 2.0 x16_2 slot (x8 mode) 3 PCIe 2.0 x16_3 slot (x4 mode) 4 PCIe 2.0 x16_4 slot (single at x16 or dual at x8/x8 mode) 5 PCIe 2.0 x16_5 slot (x4 mode) 6 PCIe 2.0 x16_6 slot (x8 mode) ASUS P9X79 WS 2-7
User Manual
Page 37
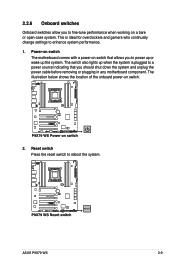
... system and unplug the power cable before removing or plugging in any motherboard component. Reset switch Press the reset switch to reboot the system. ® ASUS P9X79 WS 2-9 This is plugged to a power source indicating that allows you to fine-tune performance when working on a bare or open-case system. 2.2.6 Onboard switches Onboard...
... system and unplug the power cable before removing or plugging in any motherboard component. Reset switch Press the reset switch to reboot the system. ® ASUS P9X79 WS 2-9 This is plugged to a power source indicating that allows you to fine-tune performance when working on a bare or open-case system. 2.2.6 Onboard switches Onboard...
User Manual
Page 39
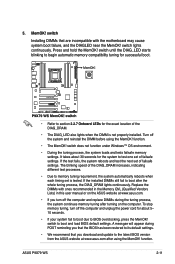
... you download and update to the latest BIOS version from the ASUS website at www.asus.com. • If you that the BIOS has been restored to boot after turning on the ASUS website at www.asus.com after using the MemOK! Turn off the computer and replace...; We recommend that are incompatible with ones recommended in the Memory QVL (Qualified Vendors Lists) in this user manual or on the computer. ASUS P9X79 WS 2-11 A messgae will appear during the tuning process, the system continues memory tuning after the whole tuning process, the DIAG_DRAM lights continuously. ...
... you download and update to the latest BIOS version from the ASUS website at www.asus.com. • If you that the BIOS has been restored to boot after turning on the ASUS website at www.asus.com after using the MemOK! Turn off the computer and replace...; We recommend that are incompatible with ones recommended in the Memory QVL (Qualified Vendors Lists) in this user manual or on the computer. ASUS P9X79 WS 2-11 A messgae will appear during the tuning process, the system continues memory tuning after the whole tuning process, the DIAG_DRAM lights continuously. ...
User Manual
Page 41
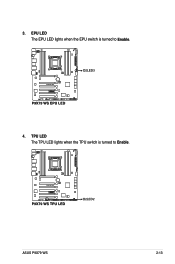
3. EPU LED The EPU LED lights when the EPU switch is turned to Enable. ® 4. TPU LED The TPU LED lights when the TPU switch is turned to Enable. ® ASUS P9X79 WS 2-13
3. EPU LED The EPU LED lights when the EPU switch is turned to Enable. ® 4. TPU LED The TPU LED lights when the TPU switch is turned to Enable. ® ASUS P9X79 WS 2-13
User Manual
Page 43
... Agent initialization is started Pre-memory PCH initialization is started Pre-memory initialization codes Memory initialization Reserved for ASL (see ASL Status Codes section below) ASUS P9X79 WS 2-15
... Agent initialization is started Pre-memory PCH initialization is started Pre-memory initialization codes Memory initialization Reserved for ASL (see ASL Status Codes section below) ASUS P9X79 WS 2-15
User Manual
Page 45
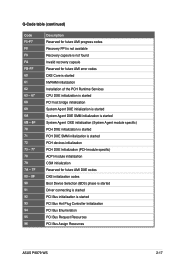
... connecting is started PCI Bus initialization is started PCI Bus Hot Plug Controller Initialization PCI Bus Enumeration PCI Bus Request Resources PCI Bus Assign Resources ASUS P9X79 WS 2-17
... connecting is started PCI Bus initialization is started PCI Bus Hot Plug Controller Initialization PCI Bus Enumeration PCI Bus Request Resources PCI Bus Assign Resources ASUS P9X79 WS 2-17
User Manual
Page 47
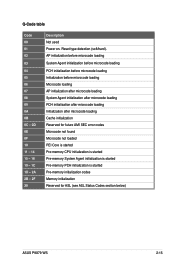
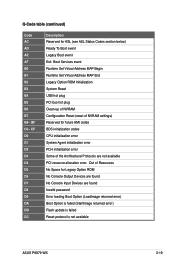
... Invalid password Error loading Boot Option (LoadImage returned error) Boot Option is failed (StartImage returned error) Flash update is failed Reset protocol is not available ASUS P9X79 WS 2-19 BF C0- Q-Code table (continued) Code AC AD AE AF B0 B1 B2 B3 B4 B5 B6 B7 B8-
... Invalid password Error loading Boot Option (LoadImage returned error) Boot Option is failed (StartImage returned error) Flash update is failed Reset protocol is not available ASUS P9X79 WS 2-19 BF C0- Q-Code table (continued) Code AC AD AE AF B0 B1 B2 B3 B4 B5 B6 B7 B8-
User Manual
Page 49
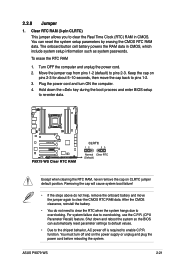
... include system setup information such as system passwords. You must turn ON the computer. 4. Plug the power cord and turn off is required to pins 1-2. 3. ASUS P9X79 WS 2-21 For system failure due to clear the CMOS RTC RAM data. 2.2.8 Jumper 1.
... include system setup information such as system passwords. You must turn ON the computer. 4. Plug the power cord and turn off is required to pins 1-2. 3. ASUS P9X79 WS 2-21 For system failure due to clear the CMOS RTC RAM data. 2.2.8 Jumper 1.

User Manual
Page 51
... for the system to detect the Optical Disk Drive (the ODD should be connected to the SATA_3G port), or else the ODD will not run. ASUS P9X79 WS 2-23 If you are set the SATA Mode in the BIOS to [IDE Mode] by default. Intel® X79 Serial ATA 6.0 Gb/s connectors (7-pin SATA6G_1...
... for the system to detect the Optical Disk Drive (the ODD should be connected to the SATA_3G port), or else the ODD will not run. ASUS P9X79 WS 2-23 If you are set the SATA Mode in the BIOS to [IDE Mode] by default. Intel® X79 Serial ATA 6.0 Gb/s connectors (7-pin SATA6G_1...
User Manual
Page 53
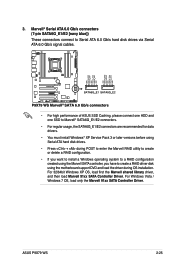
3. ASUS P9X79 WS 2-25 For 32/64bit Windows XP OS, load first the Marvell shared library driver, and then load Marvell 91xx SATA Controller Driver. Marvell® Serial .../E2 [navy blue]) These connectors connect to Serial ATA 6.0 Gb/s hard disk drives via Serial ATA 6.0 Gb/s signal cables. ® • For high performance of ASUS SSD Caching, please connect one HDD and one SSD to Marvell® SATA6G_E1/E2 connectors. • For regular usage, the SATA6G_E1/E2 connectors are recommended...
3. ASUS P9X79 WS 2-25 For 32/64bit Windows XP OS, load first the Marvell shared library driver, and then load Marvell 91xx SATA Controller Driver. Marvell® Serial .../E2 [navy blue]) These connectors connect to Serial ATA 6.0 Gb/s hard disk drives via Serial ATA 6.0 Gb/s signal cables. ® • For high performance of ASUS SSD Caching, please connect one HDD and one SSD to Marvell® SATA6G_E1/E2 connectors. • For regular usage, the SATA6G_E1/E2 connectors are recommended...
User Manual
Page 55
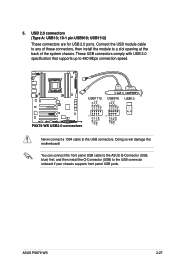
You can connect the front panel USB cable to the ASUS Q-Connector (USB, blue) first, and then install the Q-Connector (USB) to the USB connectors. USB1112) These connectors are for USB 2.0 ports. These USB connectors comply ... the USB connector onboard if your chassis supports front panel USB ports. USB 2.0 connectors (Type A: USB13; 10-1 pin USB910; Doing so will damage the motherboard! ASUS P9X79 WS 2-27 5. Connect the USB module cable to any of these connectors, then install the module to a slot opening at the back of the system chassis.
You can connect the front panel USB cable to the ASUS Q-Connector (USB, blue) first, and then install the Q-Connector (USB) to the USB connectors. USB1112) These connectors are for USB 2.0 ports. These USB connectors comply ... the USB connector onboard if your chassis supports front panel USB ports. USB 2.0 connectors (Type A: USB13; 10-1 pin USB910; Doing so will damage the motherboard! ASUS P9X79 WS 2-27 5. Connect the USB module cable to any of these connectors, then install the module to a slot opening at the back of the system chassis.
User Manual
Page 57
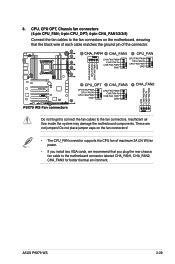
... may damage the motherboard components. Do not forget to connect the fan cables to the motherboard connector labeled CHA_FAN1, CHA_FAN2, CHA_FAN3 for better thermal environment. ASUS P9X79 WS 2-29 CPU, CPU OPT, Chassis fan connectors (4-pin CPU_FAN; 4-pin CPU_OPT; 4-pin CHA_FAN1/2/3/4) Connect the fan cables to the fan connectors on the fan connectors...
... may damage the motherboard components. Do not forget to connect the fan cables to the motherboard connector labeled CHA_FAN1, CHA_FAN2, CHA_FAN3 for better thermal environment. ASUS P9X79 WS 2-29 CPU, CPU OPT, Chassis fan connectors (4-pin CPU_FAN; 4-pin CPU_OPT; 4-pin CHA_FAN1/2/3/4) Connect the fan cables to the fan connectors on the fan connectors...


