
User Manual
Page 159
Download the latest driver from the AMD website (www.amd.com). • We recommend that your system. Select your computer. For Windows Vista, select Uninstall. 5. Turn off your current graphics card driver/s. 4. ASUS P9X79 PRO 5-1 Follow the installation procedures in this section. 5.1.1 Requirements ... XP, select Add/Remove. Close all existing graphics card drivers before installing AMD CrossFireX graphics cards to your graphics card driver supports the AMD CrossFireX technology. To uninstall existing graphics card drivers: 1. For Windows XP, go to Control Panel > Add...
Download the latest driver from the AMD website (www.amd.com). • We recommend that your system. Select your computer. For Windows Vista, select Uninstall. 5. Turn off your current graphics card driver/s. 4. ASUS P9X79 PRO 5-1 Follow the installation procedures in this section. 5.1.1 Requirements ... XP, select Add/Remove. Close all existing graphics card drivers before installing AMD CrossFireX graphics cards to your graphics card driver supports the AMD CrossFireX technology. To uninstall existing graphics card drivers: 1. For Windows XP, go to Control Panel > Add...
User Manual
Page 161
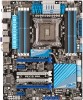
...VISION Engine Control Center: 1. Select Enable CrossFireXTM. 4. Click Go to continue to act as the display GPU. 3. Download the latest driver from the AMD website (www.amd.com). 5.1.5 Enabling the AMD® CrossFireX™ technology After installing your graphics cards...Apply, and then click OK to install the device drivers. In the Catalyst Control Center window, click Graphics Settings > Performance > AMD CrossFireXTM Configuration. 2. Ensure that came with your graphics card package to exit the window. 1 ASUS P9X79 PRO 2 3 4 5-3 You can also right-click the...
...VISION Engine Control Center: 1. Select Enable CrossFireXTM. 4. Click Go to continue to act as the display GPU. 3. Download the latest driver from the AMD website (www.amd.com). 5.1.5 Enabling the AMD® CrossFireX™ technology After installing your graphics cards...Apply, and then click OK to install the device drivers. In the Catalyst Control Center window, click Graphics Settings > Performance > AMD CrossFireXTM Configuration. 2. Ensure that came with your graphics card package to exit the window. 1 ASUS P9X79 PRO 2 3 4 5-3 You can also right-click the...
User Manual
Page 162
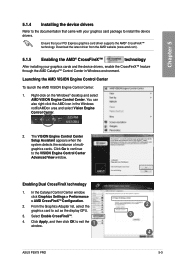
... this user manual for the locations of the PCIEX16 slots recommended for reference only. Prepare two SLI-ready graphics cards. 2. Ensure that your system. Download the latest driver from the NVIDIA website (www.nvidia.com). • Ensure that your power supply unit (PSU) can provide at least the minimum power required by...
... this user manual for the locations of the PCIEX16 slots recommended for reference only. Prepare two SLI-ready graphics cards. 2. Ensure that your system. Download the latest driver from the NVIDIA website (www.nvidia.com). • Ensure that your power supply unit (PSU) can provide at least the minimum power required by...
User Manual
Page 163
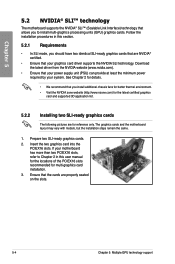
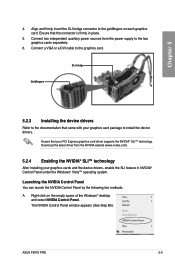
...the documentation that your PCI Express graphics card driver supports the NVIDIA® SLI™ technology. Chapter 5 4. ASUS P9X79 PRO 5-5 Launching the NVIDIA Control Panel You can launch the NVIDIA Control Panel by the following two methods. Download the latest driver from the power supply to the graphics card.... the empty space of the Windows® desktop and select NVIDIA Control Panel. Ensure that came with your graphics cards and the device drivers, enable the SLI feature in place. 5. The NVIDIA Control Panel window appears (See Step B5). Connect a VGA or a DVI ...
...the documentation that your PCI Express graphics card driver supports the NVIDIA® SLI™ technology. Chapter 5 4. ASUS P9X79 PRO 5-5 Launching the NVIDIA Control Panel You can launch the NVIDIA Control Panel by the following two methods. Download the latest driver from the power supply to the graphics card.... the empty space of the Windows® desktop and select NVIDIA Control Panel. Ensure that came with your graphics cards and the device drivers, enable the SLI feature in place. 5. The NVIDIA Control Panel window appears (See Step B5). Connect a VGA or a DVI ...
