User Manual
Page 4
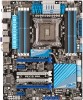
Contents 2.4 Starting up for the first time 2-52 2.5 Turning off the computer 2-52 Chapter 3: BIOS setup 3.1 Knowing BIOS 3-1 3.2 BIOS setup program 3-1 3.2.1 EZ Mode 3-2 3.2.2 Advanced Mode 3-3 3.3 Main menu 3-5 3.4 Ai Tweaker ... menu 3-40 3.8.1 ASUS EZ Flash 2 Utility 3-40 3.8.2 ASUS DRAM SPD Information 3-41 3.8.3 ASUS O.C. Profile 3-42 3.8.4 ASUS Drive Xpert 3-43 3.9 Exit menu 3-44 3.10 Updating BIOS 3-45 3.10.1 ASUS Update utility 3-45 3.10.2 ASUS EZ Flash 2 utility 3-48 3.10.3 ASUS CrashFree BIOS 3 utility 3-49 3.10.4 ASUS BIOS Updater 3-50 Chapter...
Contents 2.4 Starting up for the first time 2-52 2.5 Turning off the computer 2-52 Chapter 3: BIOS setup 3.1 Knowing BIOS 3-1 3.2 BIOS setup program 3-1 3.2.1 EZ Mode 3-2 3.2.2 Advanced Mode 3-3 3.3 Main menu 3-5 3.4 Ai Tweaker ... menu 3-40 3.8.1 ASUS EZ Flash 2 Utility 3-40 3.8.2 ASUS DRAM SPD Information 3-41 3.8.3 ASUS O.C. Profile 3-42 3.8.4 ASUS Drive Xpert 3-43 3.9 Exit menu 3-44 3.10 Updating BIOS 3-45 3.10.1 ASUS Update utility 3-45 3.10.2 ASUS EZ Flash 2 utility 3-48 3.10.3 ASUS CrashFree BIOS 3 utility 3-49 3.10.4 ASUS BIOS Updater 3-50 Chapter...
User Manual
Page 11
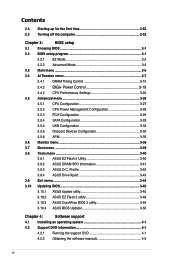
... to Net, Music Player, Personal Manager, BT Turbo Remote ASUS Exclusive Features: - ASUS Q-Slot - P9X79 PRO specifications summary ASUS unique features ASUS Dual Intelligent Processors 3 with New DIGI+ Power Control: CPU Power - ASUS SSD Caching - ASUS Q-DIMM - ASUS UEFI BIOS EZ Mode featuring friendly graphics user interface - ASUS Fan Xpert+ ASUS EZ DIY: - ASUS EZ Flash 2 - ASUS Q-Connector (continued on the next page) xi Industry...
... to Net, Music Player, Personal Manager, BT Turbo Remote ASUS Exclusive Features: - ASUS Q-Slot - P9X79 PRO specifications summary ASUS unique features ASUS Dual Intelligent Processors 3 with New DIGI+ Power Control: CPU Power - ASUS SSD Caching - ASUS Q-DIMM - ASUS UEFI BIOS EZ Mode featuring friendly graphics user interface - ASUS Fan Xpert+ ASUS EZ DIY: - ASUS EZ Flash 2 - ASUS Q-Connector (continued on the next page) xi Industry...
User Manual
Page 12
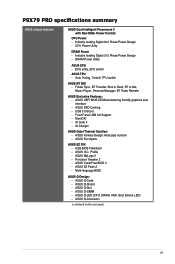
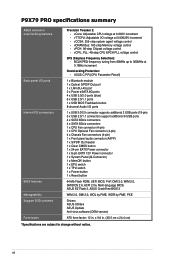
...Flash ROM, UEFI BIOS, PnP, DMI 2.0, WfM 2.0, SM BIOS 2.6, ACPI 2.0a, Multi-language BIOS, ASUS EZ Flash 2, ASUS CrashFree BIOS 3 WfM 2.0, DMI 2.0, WOL by PME, WOR by PME, PXE Drivers ASUS Utilities ASUS Update Anti-virus software (OEM version) ATX form factor: 12 in . (30.5 cm x 24.4 cm) *Specifications are subject to 300MHz at 0.1MHz increment Overclocking Protection: - P9X79 PRO specifications summary ASUS...- vTTCPU: Adjustable I /O connectors BIOS features Manageability Support DVD contents Form factor Precision Tweaker 2: - x 9.6 in . ASUS C.P.R.(CPU Parameter Recall) 1 x ...
...Flash ROM, UEFI BIOS, PnP, DMI 2.0, WfM 2.0, SM BIOS 2.6, ACPI 2.0a, Multi-language BIOS, ASUS EZ Flash 2, ASUS CrashFree BIOS 3 WfM 2.0, DMI 2.0, WOL by PME, WOR by PME, PXE Drivers ASUS Utilities ASUS Update Anti-virus software (OEM version) ATX form factor: 12 in . (30.5 cm x 24.4 cm) *Specifications are subject to 300MHz at 0.1MHz increment Overclocking Protection: - P9X79 PRO specifications summary ASUS...- vTTCPU: Adjustable I /O connectors BIOS features Manageability Support DVD contents Form factor Precision Tweaker 2: - x 9.6 in . ASUS C.P.R.(CPU Parameter Recall) 1 x ...

User Manual
Page 18
... avoiding wrong cable connections. ASUS EZ-Flash 2 ASUS EZ Flash 2 is automatically flashed using a bootable floppy disk or an OS-based utility. 1-6 Chapter 1: Product Introduction ASUS DRAM SPD (Serial Presence Detect) Information for 3 seconds, and the BIOS is a user-friendly utility that goes beyond traditional keyboard-only controls. Chapter 1 1.3.5 ASUS EZ DIY ASUS UEFI BIOS ASUS UEFI BIOS offers the first mouse...
... avoiding wrong cable connections. ASUS EZ-Flash 2 ASUS EZ Flash 2 is automatically flashed using a bootable floppy disk or an OS-based utility. 1-6 Chapter 1: Product Introduction ASUS DRAM SPD (Serial Presence Detect) Information for 3 seconds, and the BIOS is a user-friendly utility that goes beyond traditional keyboard-only controls. Chapter 1 1.3.5 ASUS EZ DIY ASUS UEFI BIOS ASUS UEFI BIOS offers the first mouse...
User Manual
Page 46
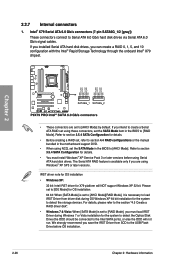
... SP3 or later versions. Chapter 2 • These connectors are using these connectors, set the SATA Mode in the BIOS to the USB Flash Drive before using NCQ, set the SATA Mode item in the BIOS to [AHCI Mode] by default. If you installed Serial ATA hard disk drives, you save the IRST Driver...
... SP3 or later versions. Chapter 2 • These connectors are using these connectors, set the SATA Mode in the BIOS to the USB Flash Drive before using NCQ, set the SATA Mode item in the BIOS to [AHCI Mode] by default. If you installed Serial ATA hard disk drives, you save the IRST Driver...
User Manual
Page 47
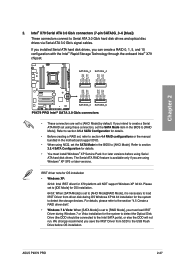
...later versions before OS installation. The Serial ATA RAID feature is available only if you are set the SATA Mode in the BIOS to the USB Flash Drive before using Windows® XP SP3 or later versions. For details, please refer to the section "4.5 Create a RAID ... you can create a RAID 0, 1, 5, and 10 configuration with the Intel® Rapid Storage Technology through the onboard Intel® X79 chipset. ASUS P9X79 PRO 2-27 Refer to section 3.5.4 SATA Configuration for details. • Before creating a RAID set, refer to section 4.4 RAID configurations or the manual bundled...
...later versions before OS installation. The Serial ATA RAID feature is available only if you are set the SATA Mode in the BIOS to the USB Flash Drive before using Windows® XP SP3 or later versions. For details, please refer to the section "4.5 Create a RAID ... you can create a RAID 0, 1, 5, and 10 configuration with the Intel® Rapid Storage Technology through the onboard Intel® X79 chipset. ASUS P9X79 PRO 2-27 Refer to section 3.5.4 SATA Configuration for details. • Before creating a RAID set, refer to section 4.4 RAID configurations or the manual bundled...
User Manual
Page 55
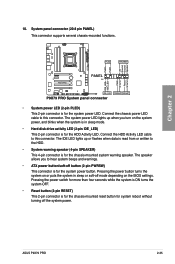
System panel connector (20-8 pin PANEL) This connector supports several chassis-mounted functions. The system power LED lights up or flashes when data is for the chassis-mounted system warning speaker. Connect the HDD Activity LED cable to the HDD. • System warning ...system OFF. • Reset button (2-pin RESET) This 2-pin connector is in sleep or soft-off the system power. ASUS P9X79 PRO 2-35 10. The speaker allows you turn on the BIOS settings. Chapter 2 • System power LED (2-pin PLED) This 2-pin connector is for system reboot without turning off mode...
System panel connector (20-8 pin PANEL) This connector supports several chassis-mounted functions. The system power LED lights up or flashes when data is for the chassis-mounted system warning speaker. Connect the HDD Activity LED cable to the HDD. • System warning ...system OFF. • Reset button (2-pin RESET) This 2-pin connector is in sleep or soft-off the system power. ASUS P9X79 PRO 2-35 10. The speaker allows you turn on the BIOS settings. Chapter 2 • System power LED (2-pin PLED) This 2-pin connector is for system reboot without turning off mode...

User Manual
Page 67
..., please restart the system to flash (on the third second). 4 The Flashback function is automatically flashed using standby power. This may have risks. ASUS P9X79 PRO 2-47 Improper installation of the portable disk.2. It allows overclockers to try new BIOS versions easily without having to flash the BIOS. Chapter 2 2.3.10 USB BIOS Flashback USB BIOS Flashback offers the most convenient...
..., please restart the system to flash (on the third second). 4 The Flashback function is automatically flashed using standby power. This may have risks. ASUS P9X79 PRO 2-47 Improper installation of the portable disk.2. It allows overclockers to try new BIOS versions easily without having to flash the BIOS. Chapter 2 2.3.10 USB BIOS Flashback USB BIOS Flashback offers the most convenient...

User Manual
Page 112
... selected device. 3.8 Tools menu The Tools menu items allow you to update BIOS Chapter 3 3.8.1 ASUS EZ Flash 2 Utility Allows you press , a confirmation message appears. Profile > ASUS Drive Xpert Monitor Boot Tool Be used to configure options for entering the BIOS setup program. UEFI BIOS Utility - Setup Mode [EZ Mode] [Advanced Mode] Sets Advanced Mode as the...
... selected device. 3.8 Tools menu The Tools menu items allow you to update BIOS Chapter 3 3.8.1 ASUS EZ Flash 2 Utility Allows you press , a confirmation message appears. Profile > ASUS Drive Xpert Monitor Boot Tool Be used to configure options for entering the BIOS setup program. UEFI BIOS Utility - Setup Mode [EZ Mode] [Advanced Mode] Sets Advanced Mode as the...

User Manual
Page 114
... same memory/CPU configuration and BIOS version. UEFI BIOS Utility - Profile > Advanced Monitor O.C. Save to Profile Allows you to load the previous BIOS settings saved in the BIOS Flash. �K�e��...BIOS file only coming from Profile 1 Boot Tool Save BIOS settings to store or load multiple BIOS settings. Advanced Mode Exit Main Back Ai Tweaker Tool\ ASUS O.C. Chapter 3 3-42 Chapter 3: BIOS setup Key in ��t�h�e���p�r�o�f�i�le� number that you to the BIOS Flash...
... same memory/CPU configuration and BIOS version. UEFI BIOS Utility - Profile > Advanced Monitor O.C. Save to Profile Allows you to load the previous BIOS settings saved in the BIOS Flash. �K�e��...BIOS file only coming from Profile 1 Boot Tool Save BIOS settings to store or load multiple BIOS settings. Advanced Mode Exit Main Back Ai Tweaker Tool\ ASUS O.C. Chapter 3 3-42 Chapter 3: BIOS setup Key in ��t�h�e���p�r�o�f�i�le� number that you to the BIOS Flash...
User Manual
Page 117
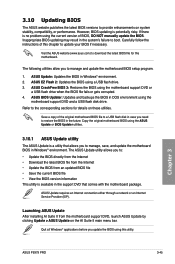
... this motherboard. ASUS BIOS Updater: Updates and backups the BIOS in the support DVD that allows you to provide enhancements on the AI Suite II main menu bar. The ASUS Update utility allows you to manage, save, and update the motherboard BIOS in the system's failure to restore the BIOS in Windows® environment. 2. Chapter 3 ASUS P9X79 PRO 3-45
... this motherboard. ASUS BIOS Updater: Updates and backups the BIOS in the support DVD that allows you to provide enhancements on the AI Suite II main menu bar. The ASUS Update utility allows you to manage, save, and update the motherboard BIOS in the system's failure to restore the BIOS in Windows® environment. 2. Chapter 3 ASUS P9X79 PRO 3-45

User Manual
Page 120
...to switch to ��p��e�r�fo��r�m� the BIOS update process. Chapter 3 3-48 Chapter 3: BIOS setup ASUSTek EZ Flash 2 BIOS ROM Utility V00.75 Flash Info MODEL: P9X79 PRO fs0:\ Drive 79 fs0:\ fs1:\ VER: 0220 Folder Info 08/05/10 10:23p...; Tool menu to select ASUS EZ Flash Utility and press to enable it. 3.10.2 ASUS EZ Flash 2 utility The ASUS EZ Flash 2 feature allows you start using EZ Flash 2: 1. To update the BIOS using this utility, download the latest BIOS from the ASUS website at www.asus.com. Press to switch ...
...to switch to ��p��e�r�fo��r�m� the BIOS update process. Chapter 3 3-48 Chapter 3: BIOS setup ASUSTek EZ Flash 2 BIOS ROM Utility V00.75 Flash Info MODEL: P9X79 PRO fs0:\ Drive 79 fs0:\ fs1:\ VER: 0220 Folder Info 08/05/10 10:23p...; Tool menu to select ASUS EZ Flash Utility and press to enable it. 3.10.2 ASUS EZ Flash 2 utility The ASUS EZ Flash 2 feature allows you start using EZ Flash 2: 1. To update the BIOS using this utility, download the latest BIOS from the ASUS website at www.asus.com. Press to switch ...
User Manual
Page 121
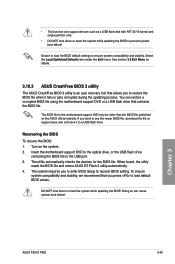
... the USB flash drive containing the BIOS file to ensure system compatibility and stability. Doing so can cause system boot failure! Recovering the BIOS To recover the BIOS: 1. When found, the utility reads the BIOS file and enters ASUS EZ Flash 2 utility ...BIOS file, download the file at support.asus.com and save it fails or gets corrupted during the updating process. DO NOT shut down or reset the system while updating the BIOS to a USB flash drive. See section 3.9 Exit Menu for the BIOS file. The system requires you want to recover BIOS setting. Chapter 3 ASUS P9X79 PRO...
... the USB flash drive containing the BIOS file to ensure system compatibility and stability. Doing so can cause system boot failure! Recovering the BIOS To recover the BIOS: 1. When found, the utility reads the BIOS file and enters ASUS EZ Flash 2 utility ...BIOS file, download the file at support.asus.com and save it fails or gets corrupted during the updating process. DO NOT shut down or reset the system while updating the BIOS to a USB flash drive. See section 3.9 Exit Menu for the BIOS file. The system requires you want to recover BIOS setting. Chapter 3 ASUS P9X79 PRO...

User Manual
Page 122
... and press to switch the disk from the ASUS website at http:// support.asus.com and save the BIOS file to a floppy disk due to a hard disk drive or USB flash drive in DOS environment 1. C:\>d: D:\> Chapter 3 3-50 Chapter 3: BIOS setup The actual utility screen displays may not be... same as the boot device. When the ASUS Logo appears, press to Drive D (USB flash drive). The succeeding utility screens are for ...
... and press to switch the disk from the ASUS website at http:// support.asus.com and save the BIOS file to a floppy disk due to a hard disk drive or USB flash drive in DOS environment 1. C:\>d: D:\> Chapter 3 3-50 Chapter 3: BIOS setup The actual utility screen displays may not be... same as the boot device. When the ASUS Logo appears, press to Drive D (USB flash drive). The succeeding utility screens are for ...

User Manual
Page 123
...the file. 1. Backing up the current BIOS To backup the current BIOS file using the BIOS Updater Ensure that the USB flash drive is done, press any key to return to the DOS prompt. The BIOS Updater backup screen appears indicating the BIOS backup process. At the FreeDOS prompt, type... DOS V1.18 [2011/04/29] Current ROM BOARD: P9X79 PRO VER: 0220 DATE: 08/09/2011 Update ROM BOARD: Unknown VER: Unknown DATE: Unknown PATH: A:\ BIOS backup is done! D:\>bupdater /oOLDBIOS1.rom Filename Extension The [filename] is any key to continue. Note Saving BIOS: Chapter 3 ASUS P9X79 PRO 3-51
...the file. 1. Backing up the current BIOS To backup the current BIOS file using the BIOS Updater Ensure that the USB flash drive is done, press any key to return to the DOS prompt. The BIOS Updater backup screen appears indicating the BIOS backup process. At the FreeDOS prompt, type... DOS V1.18 [2011/04/29] Current ROM BOARD: P9X79 PRO VER: 0220 DATE: 08/09/2011 Update ROM BOARD: Unknown VER: Unknown DATE: Unknown PATH: A:\ BIOS backup is done! D:\>bupdater /oOLDBIOS1.rom Filename Extension The [filename] is any key to continue. Note Saving BIOS: Chapter 3 ASUS P9X79 PRO 3-51
User Manual
Page 143
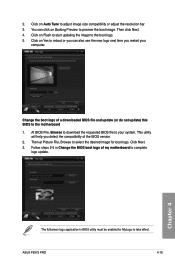
.... Click on Flash to start updating the image to adjust image size compatibility or adjust the resolution bar. 3. This utility will help you restart your system. ASUS P9X79 PRO 4-19 Then click Next. 4. Click on Yes to reboot or you can click on Auto Tune to the boot logo. 5. Follow steps 2-5 in BIOS utility must...
.... Click on Flash to start updating the image to adjust image size compatibility or adjust the resolution bar. 3. This utility will help you restart your system. ASUS P9X79 PRO 4-19 Then click Next. 4. Click on Yes to reboot or you can click on Auto Tune to the boot logo. 5. Follow steps 2-5 in BIOS utility must...


