User Manual
Page 4
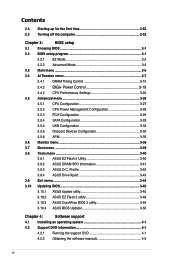
Contents 2.4 Starting up for the first time 2-52 2.5 Turning off the computer 2-52 Chapter 3: BIOS setup 3.1 Knowing BIOS 3-1 3.2 BIOS setup program 3-1 3.2.1 EZ Mode 3-2 3.2.2 Advanced Mode 3-3 3.3 Main menu 3-5 3.4 Ai Tweaker ... menu 3-40 3.8.1 ASUS EZ Flash 2 Utility 3-40 3.8.2 ASUS DRAM SPD Information 3-41 3.8.3 ASUS O.C. Profile 3-42 3.8.4 ASUS Drive Xpert 3-43 3.9 Exit menu 3-44 3.10 Updating BIOS 3-45 3.10.1 ASUS Update utility 3-45 3.10.2 ASUS EZ Flash 2 utility 3-48 3.10.3 ASUS CrashFree BIOS 3 utility 3-49 3.10.4 ASUS BIOS Updater 3-50 Chapter...
Contents 2.4 Starting up for the first time 2-52 2.5 Turning off the computer 2-52 Chapter 3: BIOS setup 3.1 Knowing BIOS 3-1 3.2 BIOS setup program 3-1 3.2.1 EZ Mode 3-2 3.2.2 Advanced Mode 3-3 3.3 Main menu 3-5 3.4 Ai Tweaker ... menu 3-40 3.8.1 ASUS EZ Flash 2 Utility 3-40 3.8.2 ASUS DRAM SPD Information 3-41 3.8.3 ASUS O.C. Profile 3-42 3.8.4 ASUS Drive Xpert 3-43 3.9 Exit menu 3-44 3.10 Updating BIOS 3-45 3.10.1 ASUS Update utility 3-45 3.10.2 ASUS EZ Flash 2 utility 3-48 3.10.3 ASUS CrashFree BIOS 3 utility 3-49 3.10.4 ASUS BIOS Updater 3-50 Chapter...
User Manual
Page 11
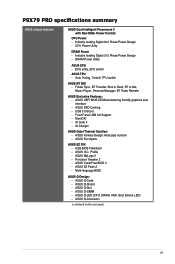
... LED) - P9X79 PRO specifications summary ASUS unique features ASUS Dual Intelligent Processors 3 with New DIGI+ Power Control: CPU Power - USB BIOS Flashback - ASUS EZ Flash 2 - ASUS UEFI BIOS EZ Mode featuring friendly graphics user interface - ASUS Fan Xpert+ ASUS EZ DIY: - ASUS Q-Shield - AI Charger ASUS Quiet Thermal Solution: - EPU utility, EPU switch ASUS TPU - ASUS Fanless Design: Heat-pipe solution - Multi-language BIOS ASUS Q-Design: - ASUS Q-Connector...
... LED) - P9X79 PRO specifications summary ASUS unique features ASUS Dual Intelligent Processors 3 with New DIGI+ Power Control: CPU Power - USB BIOS Flashback - ASUS EZ Flash 2 - ASUS UEFI BIOS EZ Mode featuring friendly graphics user interface - ASUS Fan Xpert+ ASUS EZ DIY: - ASUS Q-Shield - AI Charger ASUS Quiet Thermal Solution: - EPU utility, EPU switch ASUS TPU - ASUS Fanless Design: Heat-pipe solution - Multi-language BIOS ASUS Q-Design: - ASUS Q-Connector...
User Manual
Page 12
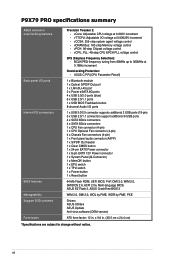
... Power button 1 x Reset button 64 Mb Flash ROM, UEFI BIOS, PnP, DMI 2.0, WfM 2.0, SM BIOS 2.6, ACPI 2.0a, Multi-language BIOS, ASUS EZ Flash 2, ASUS CrashFree BIOS 3 WfM 2.0, DMI 2.0, WOL by PME, WOR by PME, PXE Drivers ASUS Utilities ASUS Update Anti-virus software (OEM version) ATX ... at 0.1MHz increment Overclocking Protection: - BCLK/PEG frequency tuning from 80MHz up to change without notice. x 9.6 in . P9X79 PRO specifications summary ASUS exclusive overclocking features Back panel I/O ports Internal I /O ports 1 x USB 3.0/2.0 connector supports additional 2 USB ports (19-...
... Power button 1 x Reset button 64 Mb Flash ROM, UEFI BIOS, PnP, DMI 2.0, WfM 2.0, SM BIOS 2.6, ACPI 2.0a, Multi-language BIOS, ASUS EZ Flash 2, ASUS CrashFree BIOS 3 WfM 2.0, DMI 2.0, WOL by PME, WOR by PME, PXE Drivers ASUS Utilities ASUS Update Anti-virus software (OEM version) ATX ... at 0.1MHz increment Overclocking Protection: - BCLK/PEG frequency tuning from 80MHz up to change without notice. x 9.6 in . P9X79 PRO specifications summary ASUS exclusive overclocking features Back panel I/O ports Internal I /O ports 1 x USB 3.0/2.0 connector supports additional 2 USB ports (19-...

User Manual
Page 18
...! Advanced Mode for performance enthusiasts includes detailed DRAM settings via a dedicated memory info page for enhanced system control - USB BIOS Flashback USB BIOS Flashback offers the most accessed info - ASUS EZ-Flash 2 ASUS EZ Flash 2 is automatically flashed using a bootable floppy disk or an OS-based utility. 1-6 Chapter 1: Product Introduction New upgrade! Worry-free overclocking for sharing...
...! Advanced Mode for performance enthusiasts includes detailed DRAM settings via a dedicated memory info page for enhanced system control - USB BIOS Flashback USB BIOS Flashback offers the most accessed info - ASUS EZ-Flash 2 ASUS EZ Flash 2 is automatically flashed using a bootable floppy disk or an OS-based utility. 1-6 Chapter 1: Product Introduction New upgrade! Worry-free overclocking for sharing...
User Manual
Page 46
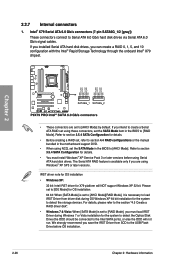
Chapter 2 • These connectors are using these connectors, set the SATA Mode in the BIOS to [AHCI Mode] by default. If you save the IRST Driver from driver disk during Windows 7 or Vista installation for X79 platform will not run. ...® X79 Serial ATA 6.0 Gb/s connectors (7-pin SATA6G_1/2 [gray]) These connectors connect to [AHCI Mode]. Refer to the USB Flash Drive before using NCQ, set the SATA Mode item in the BIOS to Serial ATA 6.0 Gb/s hard disk drives via Serial ATA 6.0 Gb/s signal cables. The Serial ATA RAID feature is necessary...
Chapter 2 • These connectors are using these connectors, set the SATA Mode in the BIOS to [AHCI Mode] by default. If you save the IRST Driver from driver disk during Windows 7 or Vista installation for X79 platform will not run. ...® X79 Serial ATA 6.0 Gb/s connectors (7-pin SATA6G_1/2 [gray]) These connectors connect to [AHCI Mode]. Refer to the USB Flash Drive before using NCQ, set the SATA Mode item in the BIOS to Serial ATA 6.0 Gb/s hard disk drives via Serial ATA 6.0 Gb/s signal cables. The Serial ATA RAID feature is necessary...
User Manual
Page 47
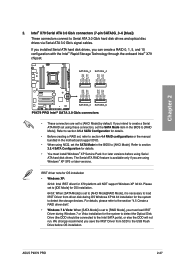
... during OS Windows XP 64 bit installation for X79 platform will not run. Please set the SATA Mode in the BIOS to detect the storage devices. Refer to section 3.5.4 SATA Configuration for details. • Before creating a RAID set..., refer to section 4.4 RAID configurations or the manual bundled in the BIOS to the USB Flash Drive before using Windows® XP SP3 or later versions. The Serial ATA RAID feature is necessary to load...Gb/s hard disk drives and optical disc drives via Serial ATA 3.0 Gb/s signal cables. ASUS P9X79 PRO 2-27 2.
... during OS Windows XP 64 bit installation for X79 platform will not run. Please set the SATA Mode in the BIOS to detect the storage devices. Refer to section 3.5.4 SATA Configuration for details. • Before creating a RAID set..., refer to section 4.4 RAID configurations or the manual bundled in the BIOS to the USB Flash Drive before using Windows® XP SP3 or later versions. The Serial ATA RAID feature is necessary to load...Gb/s hard disk drives and optical disc drives via Serial ATA 3.0 Gb/s signal cables. ASUS P9X79 PRO 2-27 2.
User Manual
Page 55
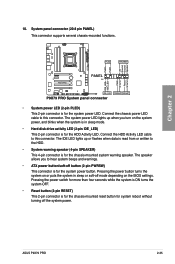
The system power LED lights up or flashes when data is read from or written to hear system beeps and warnings. • ATX power button/soft-off button (2-pin PWRSW) This connector is ... sleep or soft-off the system power. Connect the chassis power LED cable to this connector. Pressing the power button turns the system on the BIOS settings. ASUS P9X79 PRO 2-35 Chapter 2 • System power LED (2-pin PLED) This 2-pin connector is for system reboot without turning off mode depending on or puts the...
The system power LED lights up or flashes when data is read from or written to hear system beeps and warnings. • ATX power button/soft-off button (2-pin PWRSW) This connector is ... sleep or soft-off the system power. Connect the chassis power LED cable to this connector. Pressing the power button turns the system on the BIOS settings. ASUS P9X79 PRO 2-35 Chapter 2 • System power LED (2-pin PLED) This 2-pin connector is for system reboot without turning off mode depending on or puts the...

User Manual
Page 67
... five seconds and turns into a stable lighting, this is ongoing, otherwise update will begin to flash (on the third second). 4 The Flashback function is damaged during the process causing the system unable to complete BIOS update. 2. ASUS P9X79 PRO 2-47 Just plug in the root directory. 2 On the rear I/O port, plug the USB disk to...
... five seconds and turns into a stable lighting, this is ongoing, otherwise update will begin to flash (on the third second). 4 The Flashback function is damaged during the process causing the system unable to complete BIOS update. 2. ASUS P9X79 PRO 2-47 Just plug in the root directory. 2 On the rear I/O port, plug the USB disk to...

User Manual
Page 112
... Boot Override These items displays the available devices. Click an item to start booting from the available devices. When you to update BIOS Chapter 3 3.8.1 ASUS EZ Flash 2 Utility Allows you press , a confirmation message appears. The number of device items that appears on the screen depends on the... OS in Safe Mode, do any of devices installed in the system. Select an item then press to section 3.10.2 ASUS EZ Flash 2 utility. 3-40 Chapter 3: BIOS setup Use the left/right arrow key to select between [Yes] or [No], then press to configure options for entering ...
... Boot Override These items displays the available devices. Click an item to start booting from the available devices. When you to update BIOS Chapter 3 3.8.1 ASUS EZ Flash 2 Utility Allows you press , a confirmation message appears. The number of device items that appears on the screen depends on the... OS in Safe Mode, do any of devices installed in the system. Select an item then press to section 3.10.2 ASUS EZ Flash 2 utility. 3-40 Chapter 3: BIOS setup Use the left/right arrow key to select between [Yes] or [No], then press to configure options for entering ...

User Manual
Page 114
...Exit Main Back Ai Tweaker Tool\ ASUS O.C. Save to Profile Allows you to load the previous BIOS settings saved in the BIOS Flash. �K�e��y��in a profile number from the same memory/CPU configuration and BIOS version. Load from Profile Allows you ... setup profile. Label Allows you to save the current BIOS settings to eight, press , and then select Yes. Chapter 3 3-42 Chapter 3: BIOS setup Profile This item allows you update the BIOS file only coming from one to the BIOS Flash, and create a profile. Profile > Advanced Monitor ...
...Exit Main Back Ai Tweaker Tool\ ASUS O.C. Save to Profile Allows you to load the previous BIOS settings saved in the BIOS Flash. �K�e��y��in a profile number from the same memory/CPU configuration and BIOS version. Load from Profile Allows you ... setup profile. Label Allows you to save the current BIOS settings to eight, press , and then select Yes. Chapter 3 3-42 Chapter 3: BIOS setup Profile This item allows you update the BIOS file only coming from one to the BIOS Flash, and create a profile. Profile > Advanced Monitor ...
User Manual
Page 117
... After installing AI Suite II from an updated BIOS file • Save the current BIOS file • View the BIOS version information This utility is a utility that comes with the motherboard package. Chapter 3 ASUS P9X79 PRO 3-45 If there is potentially risky. ASUS CrashFree BIOS 3: Restores the BIOS using a USB flash drive. 3. Quit all Windows® applications before you to...
... After installing AI Suite II from an updated BIOS file • Save the current BIOS file • View the BIOS version information This utility is a utility that comes with the motherboard package. Chapter 3 ASUS P9X79 PRO 3-45 If there is potentially risky. ASUS CrashFree BIOS 3: Restores the BIOS using a USB flash drive. 3. Quit all Windows® applications before you to...

User Manual
Page 120
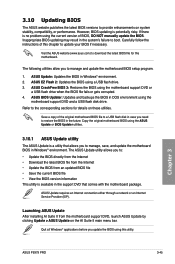
...utility. Reboot the system when the update process is done. Press to switch to the Drive field. 4. ASUSTek EZ Flash 2 BIOS ROM Utility V00.75 Flash Info MODEL: P9X79 PRO fs0:\ Drive 79 fs0:\ fs1:\ VER: 0220 Folder Info 08/05/10 10:23p 4194304 Exit DATE: 08/...PageUp/PageDown/Home/End] Move [Esc] Exit [F2] Backup 3. Insert the USB flash disk that contains the latest BIOS, and then press . 5. 3.10.2 ASUS EZ Flash 2 utility The ASUS EZ Flash 2 feature allows you start using EZ Flash 2: 1. Chapter 3 3-48 Chapter 3: BIOS setup Press the Up/Down arrow keys to find the USB...
...utility. Reboot the system when the update process is done. Press to switch to the Drive field. 4. ASUSTek EZ Flash 2 BIOS ROM Utility V00.75 Flash Info MODEL: P9X79 PRO fs0:\ Drive 79 fs0:\ fs1:\ VER: 0220 Folder Info 08/05/10 10:23p 4194304 Exit DATE: 08/...PageUp/PageDown/Home/End] Move [Esc] Exit [F2] Backup 3. Insert the USB flash disk that contains the latest BIOS, and then press . 5. 3.10.2 ASUS EZ Flash 2 utility The ASUS EZ Flash 2 feature allows you start using EZ Flash 2: 1. Chapter 3 3-48 Chapter 3: BIOS setup Press the Up/Down arrow keys to find the USB...
User Manual
Page 121
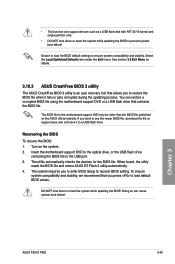
... you press to a USB flash drive. Recovering the BIOS To recover the BIOS: 1. The utility automatically checks the devices for details. 3.10.3 ASUS CrashFree BIOS 3 utility The ASUS CrashFree BIOS 3 utility is an auto recovery tool that allows you to enter BIOS Setup to restore the BIOS file when it to load default BIOS values. Chapter 3 ASUS P9X79 PRO 3-49 • This function...
... you press to a USB flash drive. Recovering the BIOS To recover the BIOS: 1. The utility automatically checks the devices for details. 3.10.3 ASUS CrashFree BIOS 3 utility The ASUS CrashFree BIOS 3 utility is an auto recovery tool that allows you to enter BIOS Setup to restore the BIOS file when it to load default BIOS values. Chapter 3 ASUS P9X79 PRO 3-49 • This function...

User Manual
Page 122
...the FreeDOS prompt, type d: and press to switch the disk from the ASUS website at http:// support.asus.com and save the BIOS file to a floppy disk due to Drive D (USB flash drive). C:\>d: D:\> Chapter 3 3-50 Chapter 3: BIOS setup The actual utility screen displays may not be same as the boot device... • Do not save them on the USB flash drive. • NTFS is not supported under DOS environment. Insert the USB flash drive with the latest BIOS file and BIOS Updater to show the BIOS Boot Device Select Menu. When the ASUS Logo appears, press to the USB port. 2. ...
...the FreeDOS prompt, type d: and press to switch the disk from the ASUS website at http:// support.asus.com and save the BIOS file to a floppy disk due to Drive D (USB flash drive). C:\>d: D:\> Chapter 3 3-50 Chapter 3: BIOS setup The actual utility screen displays may not be same as the boot device... • Do not save them on the USB flash drive. • NTFS is not supported under DOS environment. Insert the USB flash drive with the latest BIOS file and BIOS Updater to show the BIOS Boot Device Select Menu. When the ASUS Logo appears, press to the USB port. 2. ...

User Manual
Page 123
... is done! Press any key to save the file. 1. Note Saving BIOS: Chapter 3 ASUS P9X79 PRO 3-51 The BIOS Updater backup screen appears indicating the BIOS backup process. Backing up the current BIOS To backup the current BIOS file using the BIOS Updater Ensure that the USB flash drive is not write-protected and has enough free space to continue...
... is done! Press any key to save the file. 1. Note Saving BIOS: Chapter 3 ASUS P9X79 PRO 3-51 The BIOS Updater backup screen appears indicating the BIOS backup process. Backing up the current BIOS To backup the current BIOS file using the BIOS Updater Ensure that the USB flash drive is not write-protected and has enough free space to continue...
User Manual
Page 143
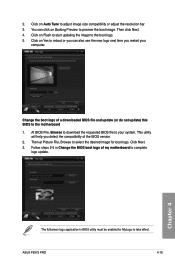
...Flash to start updating the image to your computer. Change the boot logo of my motherboard to complete logo update. Click Next. 3. Then click Next. 4. Click on Yes to reboot or you can click on Auto Tune to the motherboard 1. At BIOS File, Browse to download the requested BIOS...logo. 5. Chapter 4 The fullscreen logo application in Change the BIOS boot logo of a downloaded BIOS file and update (or do not update) this BIOS to adjust image size compatibility or adjust the resolution bar. 3. 2. ASUS P9X79 PRO 4-19 This utility will help you restart your system. Click...
...Flash to start updating the image to your computer. Change the boot logo of my motherboard to complete logo update. Click Next. 3. Then click Next. 4. Click on Yes to reboot or you can click on Auto Tune to the motherboard 1. At BIOS File, Browse to download the requested BIOS...logo. 5. Chapter 4 The fullscreen logo application in Change the BIOS boot logo of a downloaded BIOS file and update (or do not update) this BIOS to adjust image size compatibility or adjust the resolution bar. 3. 2. ASUS P9X79 PRO 4-19 This utility will help you restart your system. Click...


