User Manual
Page 5
... 4-15 4.3.10 ASUS SSD Caching 4-16 4.3.11 ASUS Update 4-17 4.3.11 MyLogo2 4-18 4.3.12 Audio configurations 4-20 4.4 RAID configurations 4-21 4.4.1 RAID definitions 4-21 4.4.2 Installing Serial ATA hard disks 4-22 4.4.3 Setting the RAID item in BIOS 4-22 4.4.4 Intel® Rapid Storage Technology Option ROM utility 4-22 4.4.5 Marvell RAID utility 4-26 4.5 Creating a RAID driver disk 4-30 4.5.1 Creating a RAID driver disk without...
... 4-15 4.3.10 ASUS SSD Caching 4-16 4.3.11 ASUS Update 4-17 4.3.11 MyLogo2 4-18 4.3.12 Audio configurations 4-20 4.4 RAID configurations 4-21 4.4.1 RAID definitions 4-21 4.4.2 Installing Serial ATA hard disks 4-22 4.4.3 Setting the RAID item in BIOS 4-22 4.4.4 Intel® Rapid Storage Technology Option ROM utility 4-22 4.4.5 Marvell RAID utility 4-26 4.5 Creating a RAID driver disk 4-30 4.5.1 Creating a RAID driver disk without...
User Manual
Page 10
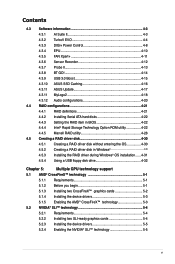
...65533;lo�g��y Supports AMD® Quad-GPU CrossFireX™ Technology Intel® X79 Express Chipset - 2 x SATA 6Gb/s ports with RAID 0, 1, 5, 10 support - 4 x SATA 3Gb/s ports with 1 x additional VIA SuperSpeed USB hub controller (blue) Intel® X79 Express ...(Dual at back panel with RAID 0, 1, 5, 10 support Marvell® 9128 SATA controllers - 2 x SATA 6Gb/s ports ASMedia® 1061 SATA controllers - 2 x Power eSATA 6Gb/s ports Intel® 82579V Gigabit LAN controller Bluetooth v2.1 + EDR ASUS BT GO! P9X79 PRO specifications summary CPU Chipset Memory...
...65533;lo�g��y Supports AMD® Quad-GPU CrossFireX™ Technology Intel® X79 Express Chipset - 2 x SATA 6Gb/s ports with RAID 0, 1, 5, 10 support - 4 x SATA 3Gb/s ports with 1 x additional VIA SuperSpeed USB hub controller (blue) Intel® X79 Express ...(Dual at back panel with RAID 0, 1, 5, 10 support Marvell® 9128 SATA controllers - 2 x SATA 6Gb/s ports ASMedia® 1061 SATA controllers - 2 x Power eSATA 6Gb/s ports Intel® 82579V Gigabit LAN controller Bluetooth v2.1 + EDR ASUS BT GO! P9X79 PRO specifications summary CPU Chipset Memory...
User Manual
Page 35
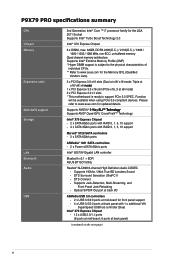
...; mode, use the PCIe 3.0 x16_1, PCIe 3.0 x16_2 and PCIe 3.0 x16_4 slots for better thermal environment. ASM 1042 USB3.0 #1 - - shared - - - - Marvell 9128 Hardware RAID Controller - - - PCIE x 1_2 shared - - - - - - - - - - - shared - - - - - - - - - - - - - - - shared - - - - - - PCIE x16_3 shared - - - - ASUS P9X79 PRO 2-15 shared - See page 2-30 for this motherboard Intel PCH SATA Controller #0 SMBUS Controller On Chip USB #1 On Chip USB...
...; mode, use the PCIe 3.0 x16_1, PCIe 3.0 x16_2 and PCIe 3.0 x16_4 slots for better thermal environment. ASM 1042 USB3.0 #1 - - shared - - - - Marvell 9128 Hardware RAID Controller - - - PCIE x 1_2 shared - - - - - - - - - - - shared - - - - - - - - - - - - - - - shared - - - - - - PCIE x16_3 shared - - - - ASUS P9X79 PRO 2-15 shared - See page 2-30 for this motherboard Intel PCH SATA Controller #0 SMBUS Controller On Chip USB #1 On Chip USB...

User Manual
Page 48
... the driver during OS installation. Chapter 2 3. For 32/64bit Windows XP OS, load first the Marvell shared library driver, and then load Marvell 91xx SATA Controller Driver. Marvell® Serial ATA 6.0 Gb/s connectors (7-pin SATA6G_E1/E2 [grey]) These connectors connect to Serial ATA... during POST to enter the Marvell RAID utility to create or delete a RAID configuration. • If you want to install a Windows operating system to a RAID configuration created using the Marvell SATA controller, you have to create a RAID driver disk using NCQ, set the Marvell Storage Controller item in the ...
... the driver during OS installation. Chapter 2 3. For 32/64bit Windows XP OS, load first the Marvell shared library driver, and then load Marvell 91xx SATA Controller Driver. Marvell® Serial ATA 6.0 Gb/s connectors (7-pin SATA6G_E1/E2 [grey]) These connectors connect to Serial ATA... during POST to enter the Marvell RAID utility to create or delete a RAID configuration. • If you want to install a Windows operating system to a RAID configuration created using the Marvell SATA controller, you have to create a RAID driver disk using NCQ, set the Marvell Storage Controller item in the ...

User Manual
Page 106
...to [IDE Mode] or [AHCI Mode] and allows you to [Enabled] when you to enable or disable the OptionRom of Marvell RAID. Marvell Storage OPROM [Enabled] This item appears only when you set this item to [AHCI Mode] and install the ASM1061 Controller Driver...Asmedia USB 3.0 Controller [Enabled] This item allows user to use the function of the Marvell storage controller. SPDIF Out Type [SPDIF] [SPDIF] Sets to [SPDIF] for HDMI audio output. Bluetooth Controller [Enabled] [Enabled] ASUS BT GO! is disabled. Configuration options: [Disabled] [Enabled] ASM1061 Storage Controller [...
...to [IDE Mode] or [AHCI Mode] and allows you to [Enabled] when you to enable or disable the OptionRom of Marvell RAID. Marvell Storage OPROM [Enabled] This item appears only when you set this item to [AHCI Mode] and install the ASM1061 Controller Driver...Asmedia USB 3.0 Controller [Enabled] This item allows user to use the function of the Marvell storage controller. SPDIF Out Type [SPDIF] [SPDIF] Sets to [SPDIF] for HDMI audio output. Bluetooth Controller [Enabled] [Enabled] ASUS BT GO! is disabled. Configuration options: [Disabled] [Enabled] ASM1061 Storage Controller [...
User Manual
Page 150
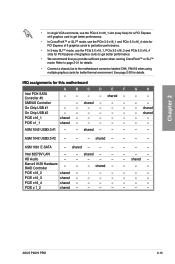
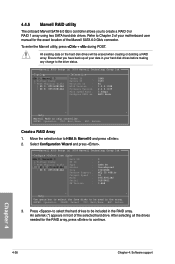
... : Device ID : Revision ID : BIOS Version : Firmware Version: PCIe Speed Rate : Configure SATA as: 1B4B 9130 B1 1.0.0.1028 2.2.0.1105 5.0Gbps AHCI Mode ▶ ▶ Help Marvell RAID on the hard disk drives will be included in the array. Move the selection bar to the drive status. An asterisk (*) appears in your motherboard...
... : Device ID : Revision ID : BIOS Version : Firmware Version: PCIe Speed Rate : Configure SATA as: 1B4B 9130 B1 1.0.0.1028 2.2.0.1105 5.0Gbps AHCI Mode ▶ ▶ Help Marvell RAID on the hard disk drives will be included in the array. Move the selection bar to the drive status. An asterisk (*) appears in your motherboard...
User Manual
Page 151
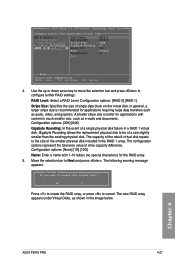
... message appears: Create Virtual Disk Do you want to configure further RAID settings. Yes No Press to create the RAID array, or press to Next and press . Marvell BIOS Setup (c) 2009 Marvell Technology Group Ltd. RAID Level: Select a RAID Level. Configuration options: [None] [1G] [10G] Name: Enter...as e-mails and documents. In general, a larger stripe size is better for the RAID array. 5. The capacity of the rebuilt virtual disk equals to be of drive capacity difference. Chapter 4 ASUS P9X79 PRO 4-27 ENTER: Select F10: Exit/Save ESC: Return 4. A smaller stripe size...
... message appears: Create Virtual Disk Do you want to configure further RAID settings. Yes No Press to create the RAID array, or press to Next and press . Marvell BIOS Setup (c) 2009 Marvell Technology Group Ltd. RAID Level: Select a RAID Level. Configuration options: [None] [1G] [10G] Name: Enter...as e-mails and documents. In general, a larger stripe size is better for the RAID array. 5. The capacity of the rebuilt virtual disk equals to be of drive capacity difference. Chapter 4 ASUS P9X79 PRO 4-27 ENTER: Select F10: Exit/Save ESC: Return 4. A smaller stripe size...
User Manual
Page 152
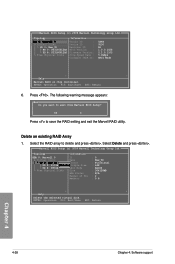
Yes No Press to delete and press . Marvell BIOS Setup (c) 2009 Marvell Technology Group Ltd. Press . Select the RAID array to save the RAID setting and exit the Marvell RAID utility. Topology HBA 0: Marvell 0 ├ Virtual Disks │ └ VD 0: New_VD │ ├ PD 0: ... : Configure SATA as: 1B4B 9130 B1 1.0.0.1028 2.2.0.1105 5.0Gbps AHCI Mode ▶ ▶ Help Marvell RAID on chip controller. Delete an existing RAID Array 1. Topology Information HBA 0: Marvell 0 ID ├ Virtual Disks Name │ └ VD 0: New_VD Status │ ├ ...
Yes No Press to delete and press . Marvell BIOS Setup (c) 2009 Marvell Technology Group Ltd. Press . Select the RAID array to save the RAID setting and exit the Marvell RAID utility. Topology HBA 0: Marvell 0 ├ Virtual Disks │ └ VD 0: New_VD │ ├ PD 0: ... : Configure SATA as: 1B4B 9130 B1 1.0.0.1028 2.2.0.1105 5.0Gbps AHCI Mode ▶ ▶ Help Marvell RAID on chip controller. Delete an existing RAID Array 1. Topology Information HBA 0: Marvell 0 ID ├ Virtual Disks Name │ └ VD 0: New_VD Status │ ├ ...

User Manual
Page 153
Yes No Press to delete MBR from this virtual disk ? Chapter 4 ASUS P9X79 PRO 4-29 2. The following warning message appears: Delete MBR Do you want to delete the Master Boot Record (MBR) from Marvell BIOS Setup? Yes No Press to exit from the selected RAID array. 3. The following warning message appears: Delete Virtual Disk Do you want to delete the selected RAID array. Yes No Press to delete this virtual disk ? Press . The following warning message appears: Exit Do you want to save the RAID setting and exit the Marvell RAID utility.
Yes No Press to delete MBR from this virtual disk ? Chapter 4 ASUS P9X79 PRO 4-29 2. The following warning message appears: Delete MBR Do you want to delete the Master Boot Record (MBR) from Marvell BIOS Setup? Yes No Press to exit from the selected RAID array. 3. The following warning message appears: Delete Virtual Disk Do you want to delete the selected RAID array. Yes No Press to delete this virtual disk ? Press . The following warning message appears: Exit Do you want to save the RAID setting and exit the Marvell RAID utility.


