User Manual
Page 6
... and can be determined by turning the equipment off and on a circuit different from digital apparatus set out in our products at ASUS REACH website at http://csr.asus.com/english/REACH.htm. If this equipment does cause harmful interference to radio or television reception, which the receiver is no guarantee that... not expressly approved by the party responsible for help. vi This product has been designed to Part 15 of electronic products. This equipment has been tested and found to comply with FCC regulations.
... and can be determined by turning the equipment off and on a circuit different from digital apparatus set out in our products at ASUS REACH website at http://csr.asus.com/english/REACH.htm. If this equipment does cause harmful interference to radio or television reception, which the receiver is no guarantee that... not expressly approved by the party responsible for help. vi This product has been designed to Part 15 of electronic products. This equipment has been tested and found to comply with FCC regulations.
User Manual
Page 34
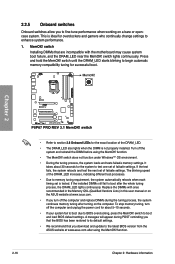
... seconds for successful boot. switch Installing DIMMs that you download and update to the latest BIOS version from the ASUS website at www.asus.com. • If you to test one set of failsafe settings. switch does not function under Windows™ OS environment. • During the tuning...process, the system loads and tests failsafe memory settings. MemOK! Press and hold the MemOK! switch until the DRAM_LED starts blinking to begin automatic memory compatibility tuning for the system to fine-tune performance when working on the ASUS website at www.asus.com after the whole tuning...
... seconds for successful boot. switch Installing DIMMs that you download and update to the latest BIOS version from the ASUS website at www.asus.com. • If you to test one set of failsafe settings. switch does not function under Windows™ OS environment. • During the tuning...process, the system loads and tests failsafe memory settings. MemOK! Press and hold the MemOK! switch until the DRAM_LED starts blinking to begin automatic memory compatibility tuning for the system to fine-tune performance when working on the ASUS website at www.asus.com after the whole tuning...
User Manual
Page 37
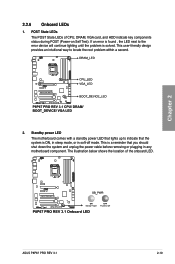
... any motherboard component. The illustration below shows the location of CPU, DRAM, VGA card, and HDD indicate key components status during POST (Power-on Self Test). Chapter 2 ASUS P8P67 PRO REV 3.1 2-19 POST State LEDs The POST State LEDs of the onboard LED.
... any motherboard component. The illustration below shows the location of CPU, DRAM, VGA card, and HDD indicate key components status during POST (Power-on Self Test). Chapter 2 ASUS P8P67 PRO REV 3.1 2-19 POST State LEDs The POST State LEDs of the onboard LED.
User Manual
Page 65
...power-on the BIOS setting. After applying power, the system power LED on the chain) c. ASUS P8P67 PRO REV 3.1 2-47 Connect the power cord to enter the BIOS Setup. For systems with a surge protector. 5. While the tests are off. 3. System power 6. BIOS Beep One short beep One continuous beep followed by ... the power-on . If you do not see anything within 30 seconds from orange to green after the system LED turns on self tests or POST. Follow the instructions in the following order: a. Connect the power cord to disabled No keyboard detected No memory detected No ...
...power-on the BIOS setting. After applying power, the system power LED on the chain) c. ASUS P8P67 PRO REV 3.1 2-47 Connect the power cord to enter the BIOS Setup. For systems with a surge protector. 5. While the tests are off. 3. System power 6. BIOS Beep One short beep One continuous beep followed by ... the power-on . If you do not see anything within 30 seconds from orange to green after the system LED turns on self tests or POST. Follow the instructions in the following order: a. Connect the power cord to disabled No keyboard detected No memory detected No ...
User Manual
Page 67
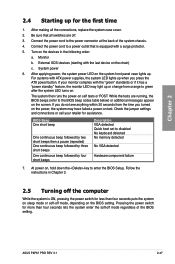
...a menu-driven program, it lets you with uEFI architecture, offering a user-friendly interface that are for BIOS item modification. Chapter 3 ASUS P8P67 PRO REV 3.1 3-1 BIOS (Basic Input and Output System) stores system hardware settings such as storage device configuration, overclocking settings, advanced power management...: • An error message appears on to restart the system. You can easily navigate the new EFI BIOS with its test routines. In normal circumstances, the default BIOS settings apply to most conditions to run this user manual refers to "EFI BIOS...
...a menu-driven program, it lets you with uEFI architecture, offering a user-friendly interface that are for BIOS item modification. Chapter 3 ASUS P8P67 PRO REV 3.1 3-1 BIOS (Basic Input and Output System) stores system hardware settings such as storage device configuration, overclocking settings, advanced power management...: • An error message appears on to restart the system. You can easily navigate the new EFI BIOS with its test routines. In normal circumstances, the default BIOS settings apply to most conditions to run this user manual refers to "EFI BIOS...
User Manual
Page 97
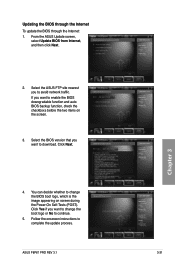
... 2. You can decide whether to complete the update process. Follow the onscreen instructions to change the boot logo or No to download. ASUS P8P67 PRO REV 3.1 3-31 Select the ASUS FTP site nearest you want to change the BIOS boot logo, which is the image appearing on the screen. 3. If you to enable... the BIOS downgradable function and auto BIOS backup function, check the checkboxs before the two items on screen during the Power‑On Self-Tests (...
... 2. You can decide whether to complete the update process. Follow the onscreen instructions to change the boot logo or No to download. ASUS P8P67 PRO REV 3.1 3-31 Select the ASUS FTP site nearest you want to change the BIOS boot logo, which is the image appearing on the screen. 3. If you to enable... the BIOS downgradable function and auto BIOS backup function, check the checkboxs before the two items on screen during the Power‑On Self-Tests (...
User Manual
Page 113
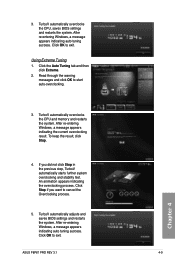
... Stop in the previous step, TurboV automatically starts further system overclocking and stability test. Click the Auto Tuning tab and then click Extreme. 2. TurboV automatically adjusts and saves BIOS settings and restarts the system. 3. TurboV automatically overclocks the CPU, saves BIOS settings and restarts the system. Using Extreme Tuning 1. ASUS P8P67 PRO REV 3.1 4-9 Chapter 4
... Stop in the previous step, TurboV automatically starts further system overclocking and stability test. Click the Auto Tuning tab and then click Extreme. 2. TurboV automatically adjusts and saves BIOS settings and restarts the system. 3. TurboV automatically overclocks the CPU, saves BIOS settings and restarts the system. Using Extreme Tuning 1. ASUS P8P67 PRO REV 3.1 4-9 Chapter 4

