User Manual
Page 10
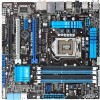
... at the back panel) 100% All High-quality Conductive Polymer Capacitors TPU ASUS TurboV Auto Tuning ASUS Anti-Surge Protection MemOK! P8P67-M PRO specifications summary Audio USB ASUS unique features ASUS exclusive overclocking features Rear panel ports Realtek® ALC892 8-channel High Definition Audio CODEC - ASUS C.P.R. (CPU Parameter Recall) 1 x PS/2 Mouse port (green) 1 x PS/2 Keyboard port (purple) 1 x Optical...
... at the back panel) 100% All High-quality Conductive Polymer Capacitors TPU ASUS TurboV Auto Tuning ASUS Anti-Surge Protection MemOK! P8P67-M PRO specifications summary Audio USB ASUS unique features ASUS exclusive overclocking features Rear panel ports Realtek® ALC892 8-channel High Definition Audio CODEC - ASUS C.P.R. (CPU Parameter Recall) 1 x PS/2 Mouse port (green) 1 x PS/2 Keyboard port (purple) 1 x Optical...

User Manual
Page 16
...ASUS P8P67-M PRO Fan Xpert ASUS Fan Xpert intelligently allows you to achieve a quiet and cool environment. Auto Tuning Auto Tuning is an intelligent tool that detects the current system loadings and adjusts the power consumption in real time. ASUS EPU ASUS EPU is a unique power saving technology that automates overclocking... to use software package. This tool also provides stability testing. Even O.C. This all the exclusive ASUS features into a 256-color ...
...ASUS P8P67-M PRO Fan Xpert ASUS Fan Xpert intelligently allows you to achieve a quiet and cool environment. Auto Tuning Auto Tuning is an intelligent tool that detects the current system loadings and adjusts the power consumption in real time. ASUS EPU ASUS EPU is a unique power saving technology that automates overclocking... to use software package. This tool also provides stability testing. Even O.C. This all the exclusive ASUS features into a 256-color ...
User Manual
Page 36
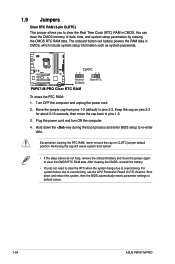
... cap on CLRTC jumper default position. Hold down and reboot the system, then the BIOS automatically resets parameter settings to default values. 1-24 ASUS P8P67-M PRO After clearing the CMOS, reinstall the battery. • You do not help, remove the onboard battery and move the cap back to pins... 12 23 Normal (Default) Clear RTC P8P67-M PRO Clear RTC RAM To erase the RTC RAM: 1. Plug the power cord and turn ON the computer. 4. Move the jumper cap from pins 1-2 (default) to overclocking, use the CPU Parameter Recall (C.P.R.) feature. Removing the cap will cause system boot ...
... cap on CLRTC jumper default position. Hold down and reboot the system, then the BIOS automatically resets parameter settings to default values. 1-24 ASUS P8P67-M PRO After clearing the CMOS, reinstall the battery. • You do not help, remove the onboard battery and move the cap back to pins... 12 23 Normal (Default) Clear RTC P8P67-M PRO Clear RTC RAM To erase the RTC RAM: 1. Plug the power cord and turn ON the computer. 4. Move the jumper cap from pins 1-2 (default) to overclocking, use the CPU Parameter Recall (C.P.R.) feature. Removing the cap will cause system boot ...
User Manual
Page 46
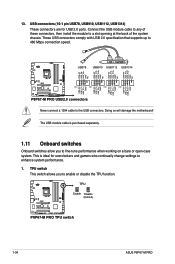
... when working on a bare or open-case system. The USB module cable is ideal for USB 2.0 ports. TPU P8P67-M PRO P8P67-M PRO TPU switch 1-34 ASUS P8P67-M PRO TPU switch This switch allows you to 480 Mbps connection speed. USB78 USB910 USB1112 USB1314 USB+5V USB_P8USB_P8+ GND NC USB...USB module cable to any of the system chassis. USB connectors (10-1 pin USB78, USB910, USB1112, USB1314) These connectors are for overclockers and gamers who continually change settings to a slot opening at the back of these connectors, then install the module to enhance system performance...
... when working on a bare or open-case system. The USB module cable is ideal for USB 2.0 ports. TPU P8P67-M PRO P8P67-M PRO TPU switch 1-34 ASUS P8P67-M PRO TPU switch This switch allows you to 480 Mbps connection speed. USB78 USB910 USB1112 USB1314 USB+5V USB_P8USB_P8+ GND NC USB...USB module cable to any of the system chassis. USB connectors (10-1 pin USB78, USB910, USB1112, USB1314) These connectors are for overclockers and gamers who continually change settings to a slot opening at the back of these connectors, then install the module to enhance system performance...
User Manual
Page 47
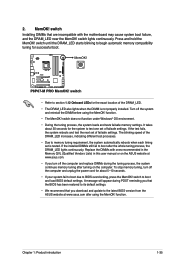
It takes about 5-10 seconds. • If your system fail to boot due to BIOS overclocking, press the MemOK! Replace the DIMMs with the motherboard may cause system boot failure, and the ...until the DRAM_LED starts blinking to begin automatic memory compatibility tuning for the system to boot after turning on the ASUS website at www.asus.com after using the MemOK! function. • The MemOK! If the installed DIMMs still fail to test one.... • Due to boot and load BIOS default settings. 2. Press and hold the MemOK! P8P67-M PRO P8P67-M PRO MemOK!
It takes about 5-10 seconds. • If your system fail to boot due to BIOS overclocking, press the MemOK! Replace the DIMMs with the motherboard may cause system boot failure, and the ...until the DRAM_LED starts blinking to begin automatic memory compatibility tuning for the system to boot after turning on the ASUS website at www.asus.com after using the MemOK! function. • The MemOK! If the installed DIMMs still fail to test one.... • Due to boot and load BIOS default settings. 2. Press and hold the MemOK! P8P67-M PRO P8P67-M PRO MemOK!
User Manual
Page 64
... Mode] [Max Power Saving Mode] 2.4.5 DRAM Timing Control The sub-items in decreased average consumption and decreased average heat production. 2-14 ASUS P8P67-M PRO Enhanced Intel SpeedStep Technology [Enabled] Allows you to enable or disable the Enhanced Intel® SpeedStep Technology (EIST). [Disabled] Disables this ... voltage and core frequency which may cause the system to the default setting. 2.4.3 OC Tuner [Disabled] OC Tuner automatically overclocks the frequency and voltage of CPU and DRAM for enhancing the system performance. CPU Ratio [Auto] Allows you to adjust the...
... Mode] [Max Power Saving Mode] 2.4.5 DRAM Timing Control The sub-items in decreased average consumption and decreased average heat production. 2-14 ASUS P8P67-M PRO Enhanced Intel SpeedStep Technology [Enabled] Allows you to enable or disable the Enhanced Intel® SpeedStep Technology (EIST). [Disabled] Disables this ... voltage and core frequency which may cause the system to the default setting. 2.4.3 OC Tuner [Disabled] OC Tuner automatically overclocks the frequency and voltage of CPU and DRAM for enhancing the system performance. CPU Ratio [Auto] Allows you to adjust the...
User Manual
Page 66
...Hub voltage. The values range from 0.7350V to 1.6850V with a 0.005V interval. Higher load-line calibration would get higher voltage and better overclocking performance, but increase the CPU and VRM thermal. Configuration options: [Auto] [0% Calibration] [25% Calibration] [50% Calibration] [75% ... Mode Sign [+] To offset the voltage by Intel VRM specification and affects CPU voltage. Refer to [Enabled] for EMI control. 2-16 ASUS P8P67-M PRO Setting a high voltage may damage the CPU permanently, and setting a low voltage may make the system unstable. 2.4.8 DRAM Voltage [Auto]...
...Hub voltage. The values range from 0.7350V to 1.6850V with a 0.005V interval. Higher load-line calibration would get higher voltage and better overclocking performance, but increase the CPU and VRM thermal. Configuration options: [Auto] [0% Calibration] [25% Calibration] [50% Calibration] [75% ... Mode Sign [+] To offset the voltage by Intel VRM specification and affects CPU voltage. Refer to [Enabled] for EMI control. 2-16 ASUS P8P67-M PRO Setting a high voltage may damage the CPU permanently, and setting a low voltage may make the system unstable. 2.4.8 DRAM Voltage [Auto]...


