User Manual
Page 13
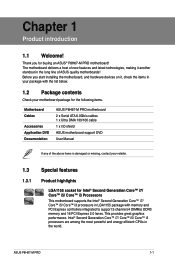
...in the world. ASUS P8H67-M PRO 1-1 Before you for the following items. Motherboard Cables Accessories Application DVD Documentation ASUS P8H67-M PRO motherboard 2 x Serial ATA 6.0Gb/s cables 1 x Ultra DMA 133/100 cable 1 x I/O shield ASUS motherboard support DVD User Manual If any of ASUS quality motherboards! Intel...; i3 processors in LGA1155 package with the list below. 1.2 Package contents Check your motherboard package for buying an ASUS® P8H67-M PRO motherboard! The motherboard delivers a host of new features and latest technologies, making it , check the items in ...
...in the world. ASUS P8H67-M PRO 1-1 Before you for the following items. Motherboard Cables Accessories Application DVD Documentation ASUS P8H67-M PRO motherboard 2 x Serial ATA 6.0Gb/s cables 1 x Ultra DMA 133/100 cable 1 x I/O shield ASUS motherboard support DVD User Manual If any of ASUS quality motherboards! Intel...; i3 processors in LGA1155 package with the list below. 1.2 Package contents Check your motherboard package for buying an ASUS® P8H67-M PRO motherboard! The motherboard delivers a host of new features and latest technologies, making it , check the items in ...
User Manual
Page 15
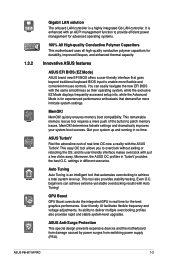
...adjustments. and its user-friendly interface makes overclock with Auto Tuning! ASUS P8H67-M PRO 1-3 determines failsafe settings and dramatically improves your system up . Auto Tuning Auto Tuning is enhanced with the ASUS TurboV. beginners can easily navigate the new EFI BIOS with the ... expensive devices and the motherboard from damage caused by power surges from switching power supply (PSU). Innovative ASUS features ASUS EFI BIOS (EZ Mode) ASUS brand new EFI BIOS offers a user-friendly interface that automates overclocking to provide efficient power management for ...
...adjustments. and its user-friendly interface makes overclock with Auto Tuning! ASUS P8H67-M PRO 1-3 determines failsafe settings and dramatically improves your system up . Auto Tuning Auto Tuning is enhanced with the ASUS TurboV. beginners can easily navigate the new EFI BIOS with the ... expensive devices and the motherboard from damage caused by power surges from switching power supply (PSU). Innovative ASUS features ASUS EFI BIOS (EZ Mode) ASUS brand new EFI BIOS offers a user-friendly interface that automates overclocking to provide efficient power management for ...
User Manual
Page 17
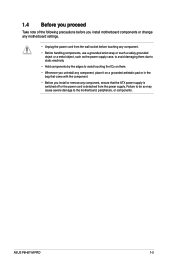
ASUS P8H67-M PRO 1-5 Failure to do so may cause severe damage to avoid touching the ICs on them. • Whenever you uninstall any component, place it on a grounded ...
ASUS P8H67-M PRO 1-5 Failure to do so may cause severe damage to avoid touching the ICs on them. • Whenever you uninstall any component, place it on a grounded ...
User Manual
Page 21
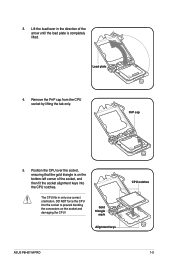
3. PnP cap 5. Gold triangle mark Alignment keys CPU notches ASUS P8H67-M PRO 1-9 Remove the PnP cap from the CPU socket by lifting the tab only. The CPU fits in the direction of the socket, and then fit ...
3. PnP cap 5. Gold triangle mark Alignment keys CPU notches ASUS P8H67-M PRO 1-9 Remove the PnP cap from the CPU socket by lifting the tab only. The CPU fits in the direction of the socket, and then fit ...
User Manual
Page 23
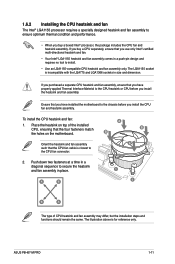
... heatsink and fan assembly in a push-pin design and requires no tool to install. • Use an LGA1155-compatible CPU heatsink and fan assembly only. ASUS P8H67-M PRO 1-11 If you purchased a separate CPU heatsink and fan assembly, ensure that you have properly applied Thermal Interface Material to the CPU heatsink or CPU...
... heatsink and fan assembly in a push-pin design and requires no tool to install. • Use an LGA1155-compatible CPU heatsink and fan assembly only. ASUS P8H67-M PRO 1-11 If you purchased a separate CPU heatsink and fan assembly, ensure that you have properly applied Thermal Interface Material to the CPU heatsink or CPU...
User Manual
Page 25
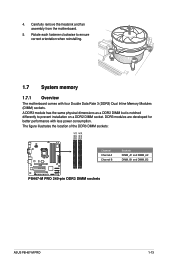
... from the motherboard. 5. 4. The figure illustrates the location of the DDR3 DIMM sockets: DIMM_A1 DIMM_A2 DIMM_B1 DIMM_B2 P8H67-M PRO Channel Channel A Channel B P8H67-M PRO 240-pin DDR3 DIMM sockets Sockets DIMM_A1 and DIMM_A2 DIMM_B1 and DIMM_B2 ASUS P8H67-M PRO 1-13 A DDR3 module has the same physical dimensions as a DDR2 DIMM but is notched differently to ensure correct...
... from the motherboard. 5. 4. The figure illustrates the location of the DDR3 DIMM sockets: DIMM_A1 DIMM_A2 DIMM_B1 DIMM_B2 P8H67-M PRO Channel Channel A Channel B P8H67-M PRO 240-pin DDR3 DIMM sockets Sockets DIMM_A1 and DIMM_A2 DIMM_B1 and DIMM_B2 ASUS P8H67-M PRO 1-13 A DDR3 module has the same physical dimensions as a DDR2 DIMM but is notched differently to ensure correct...
User Manual
Page 27
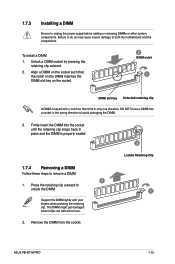
.... 2 1. Remove the DIMM from the socket. To install a DIMM 1. Press the retaining clip outward to unlock the DIMM. 1 Support the DIMM lightly with extra force. 2. ASUS P8H67-M PRO 1-15 Align a DIMM on the socket such that the notch on the DIMM matches the DIMM slot key on the socket. 2 DIMM notch 1 DIMM slot...
.... 2 1. Remove the DIMM from the socket. To install a DIMM 1. Press the retaining clip outward to unlock the DIMM. 1 Support the DIMM lightly with extra force. 2. ASUS P8H67-M PRO 1-15 Align a DIMM on the socket such that the notch on the DIMM matches the DIMM slot key on the socket. 2 DIMM notch 1 DIMM slot...
User Manual
Page 29
... include system setup information such as system passwords. The onboard button cell battery powers the RAM data in CMOS. CLRTC 12 23 P8H67-M PRO Normal (Default) P8H67-M PRO Clear RTC RAM Clear RTC To erase the RTC RAM: 1. Removing the cap will cause system boot failure! • If ... down the key during the boot process and enter BIOS setup to default values. Turn OFF the computer and unplug the power cord. 2. ASUS P8H67-M PRO 1-17 Keep the cap on CLRTC jumper default position. For system failure due to overclocking. Hold down and reboot the system, then the ...
... include system setup information such as system passwords. The onboard button cell battery powers the RAM data in CMOS. CLRTC 12 23 P8H67-M PRO Normal (Default) P8H67-M PRO Clear RTC RAM Clear RTC To erase the RTC RAM: 1. Removing the cap will cause system boot failure! • If ... down the key during the boot process and enter BIOS setup to default values. Turn OFF the computer and unplug the power cord. 2. ASUS P8H67-M PRO 1-17 Keep the cap on CLRTC jumper default position. For system failure due to overclocking. Hold down and reboot the system, then the ...
User Manual
Page 31
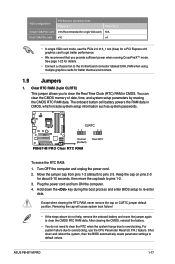
... only be used under Windows. • This motherboard also supports two add-on graphics card and two onboard VGA output at the same time. 15. ASUS P8H67-M PRO 1-19 This port is HDCP compliant allowing playback of HD DVD, Blu-Ray and other protected content. USB 3.0 ports 1 and 2. DVI-D can't be used as...
... only be used under Windows. • This motherboard also supports two add-on graphics card and two onboard VGA output at the same time. 15. ASUS P8H67-M PRO 1-19 This port is HDCP compliant allowing playback of HD DVD, Blu-Ray and other protected content. USB 3.0 ports 1 and 2. DVI-D can't be used as...
User Manual
Page 33
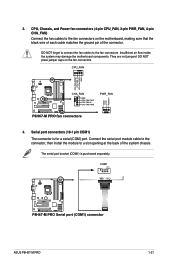
... connectors 4. DO NOT forget to connect the fan cables to the fan connectors on the fan connectors. COM1 PIN 1 P8H67-M PRO P8H67-M PRO Serial port (COM1) connector ASUS P8H67-M PRO 1-21 CPU, Chassis, and Power fan connectors (4-pin CPU_FAN, 3-pin PWR_FAN, 4-pin CHA_FAN) Connect the fan cables to the fan connectors. 3. The serial port bracket (...
... connectors 4. DO NOT forget to connect the fan cables to the fan connectors on the fan connectors. COM1 PIN 1 P8H67-M PRO P8H67-M PRO Serial port (COM1) connector ASUS P8H67-M PRO 1-21 CPU, Chassis, and Power fan connectors (4-pin CPU_FAN, 3-pin PWR_FAN, 4-pin CHA_FAN) Connect the fan cables to the fan connectors. 3. The serial port bracket (...
User Manual
Page 35
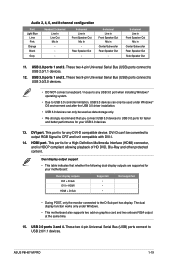
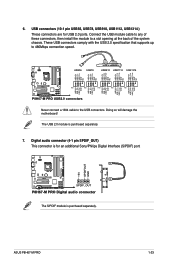
...! ASUS P8H67-M PRO 1-23 Digital audio connector (4-1 pin SPDIF_OUT) This connector is for USB 2.0 ports. USB connectors (10-1 pin USB56, USB78, USB910, USB1112, USB1314 ) These connectors are for an additional Sony/Philips Digital Interface (S/PDIF) port. +5V SPDIFOUT GND P8H67-M PRO SPDIF_OUT P8H67-M PRO Digital...USB+5V USB_P5USB_P5+ GND USB+5V USB_P7USB_P7+ GND USB+5V USB_P9USB_P9+ GND USB+5V USB_P11USB_P11+ GND USB+5V USB_P13USB_P13+ GND P8H67-M PRO PIN 1 PIN 1 P8H67-M PRO USB2.0 connectors PIN 1 PIN 1 PIN 1 Never connect a 1394 cable to a slot opening at the back of the...
...! ASUS P8H67-M PRO 1-23 Digital audio connector (4-1 pin SPDIF_OUT) This connector is for USB 2.0 ports. USB connectors (10-1 pin USB56, USB78, USB910, USB1112, USB1314 ) These connectors are for an additional Sony/Philips Digital Interface (S/PDIF) port. +5V SPDIFOUT GND P8H67-M PRO SPDIF_OUT P8H67-M PRO Digital...USB+5V USB_P5USB_P5+ GND USB+5V USB_P7USB_P7+ GND USB+5V USB_P9USB_P9+ GND USB+5V USB_P11USB_P11+ GND USB+5V USB_P13USB_P13+ GND P8H67-M PRO PIN 1 PIN 1 P8H67-M PRO USB2.0 connectors PIN 1 PIN 1 PIN 1 Never connect a 1394 cable to a slot opening at the back of the...
User Manual
Page 37
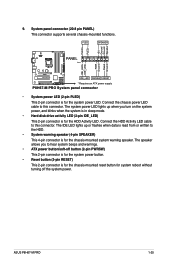
... the system power LED. System panel connector (20-8 pin PANEL) This connector supports several chassis-mounted functions. PWR Ground Reset Ground P8H67-M PRO IDE_LED PWRSW RESET * Requires an ATX power supply P8H67-M PRO System panel connector • System power LED (2-pin PLED) This 2-pin connector is for the chassis-mounted system warning speaker. 9. Connect... (2-pin PWRSW) This 2-pin connector is for the system power button. • Reset button (2-pin RESET) This 2-pin connector is for the HDD Activity LED. ASUS P8H67-M PRO 1-25
... the system power LED. System panel connector (20-8 pin PANEL) This connector supports several chassis-mounted functions. PWR Ground Reset Ground P8H67-M PRO IDE_LED PWRSW RESET * Requires an ATX power supply P8H67-M PRO System panel connector • System power LED (2-pin PLED) This 2-pin connector is for the chassis-mounted system warning speaker. 9. Connect... (2-pin PWRSW) This 2-pin connector is for the system power button. • Reset button (2-pin RESET) This 2-pin connector is for the HDD Activity LED. ASUS P8H67-M PRO 1-25
User Manual
Page 39
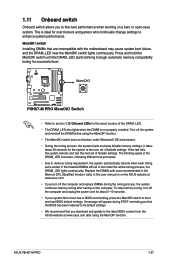
switch until the DRAM_LED starts blinking to section 1.12 Onboard LEDs for successful boot. ASUS P8H67-M PRO 1-27 switch lights continuously. Switch • Refer to begin automatic memory compatibility tuning for the exact location of the DRAM_LED increases, ...a bare or open-case system. If the installed DIMMs still fail to fine-tune performance when working on the ASUS website at www.asus.com after using the MemOK! P8H67-M PRO P8H67-M PRO MemOK! 1.11 Onboard switch Onboard switch allows you to boot after the whole tuning process, the DRAM_LED lights continuously....
switch until the DRAM_LED starts blinking to section 1.12 Onboard LEDs for successful boot. ASUS P8H67-M PRO 1-27 switch lights continuously. Switch • Refer to begin automatic memory compatibility tuning for the exact location of the DRAM_LED increases, ...a bare or open-case system. If the installed DIMMs still fail to fine-tune performance when working on the ASUS website at www.asus.com after using the MemOK! P8H67-M PRO P8H67-M PRO MemOK! 1.11 Onboard switch Onboard switch allows you to boot after the whole tuning process, the DRAM_LED lights continuously....
User Manual
Page 41
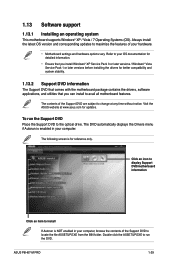
...options vary. To run the DVD. Click an icon to display Support DVD/motherboard information Click an item to the optical drive. ASUS P8H67-M PRO 1-29 Always install the latest OS version and corresponding updates to maximize the features of your computer, browse the contents of the Support...that comes with the motherboard package contains the drivers, software applications, and utilities that you can install to change at www.asus.com for reference only. 1.13 Software support 1.13.1 Installing an operating system This motherboard supports Windows® XP / Vista / 7 Operating Systems...
...options vary. To run the DVD. Click an icon to display Support DVD/motherboard information Click an item to the optical drive. ASUS P8H67-M PRO 1-29 Always install the latest OS version and corresponding updates to maximize the features of your computer, browse the contents of the Support...that comes with the motherboard package contains the drivers, software applications, and utilities that you can install to change at www.asus.com for reference only. 1.13 Software support 1.13.1 Installing an operating system This motherboard supports Windows® XP / Vista / 7 Operating Systems...
User Manual
Page 44
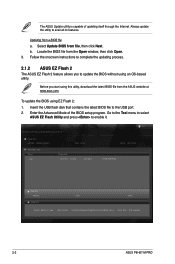
...without using an OS‑based utility. Go to the Tool menu to select ASUS EZ Flash Utility and press to avail all its features. Updating from file, then...ASUS website at www.asus.com. Before you to the USB port. 2. Enter the Advanced Mode of updating itself through the Internet. b. To update the BIOS using this utility, download the latest BIOS file from the Open window, then click Open. 3. ASUSTek EZ Flash 2 BIOS ROM Utility V00.75 Flash Info MODEL: P8H67-M PRO... [Esc] Exit [F2] Backup 2-2 ASUS P8H67-M PRO The ASUS Update utility is capable of the BIOS setup program.
...without using an OS‑based utility. Go to the Tool menu to select ASUS EZ Flash Utility and press to avail all its features. Updating from file, then...ASUS website at www.asus.com. Before you to the USB port. 2. Enter the Advanced Mode of updating itself through the Internet. b. To update the BIOS using this utility, download the latest BIOS file from the Open window, then click Open. 3. ASUSTek EZ Flash 2 BIOS ROM Utility V00.75 Flash Info MODEL: P8H67-M PRO... [Esc] Exit [F2] Backup 2-2 ASUS P8H67-M PRO The ASUS Update utility is capable of the BIOS setup program.
User Manual
Page 46
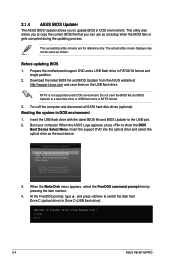
.... The succeeding utility screens are for reference only. Booting the system in FAT32/16 format and single partition. 2. 2.1.4 ASUS BIOS Updater The ASUS BIOS Updater allows you to copy the current BIOS file that you to update BIOS in DOS environment. Turn off the ... the FreeDOS prompt, type d: and press to switch the disk from the ASUS website at http://support.asus.com and save the BIOS file and BIOS Updater to Drive D (USB flash drive). C:\>d: D:\> 2-4 ASUS P8H67-M PRO When the ASUS Logo appears, press to boot using defaults 3. Please select boot device: SATA...
.... The succeeding utility screens are for reference only. Booting the system in FAT32/16 format and single partition. 2. 2.1.4 ASUS BIOS Updater The ASUS BIOS Updater allows you to copy the current BIOS file that you to update BIOS in DOS environment. Turn off the ... the FreeDOS prompt, type d: and press to switch the disk from the ASUS website at http://support.asus.com and save the BIOS file and BIOS Updater to Drive D (USB flash drive). C:\>d: D:\> 2-4 ASUS P8H67-M PRO When the ASUS Logo appears, press to boot using defaults 3. Please select boot device: SATA...
User Manual
Page 48
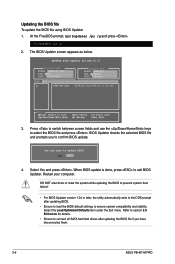
... 1. At the FreeDOS prompt, type bupdater /pc /g and press . The BIOS Updater screen appears as below. Are you have disconnected them. 2-6 ASUS P8H67-M PRO DO NOT shut down or reset the system while updating the BIOS to prevent system boot failure! • For BIOS Updater version 1.04 or later... Yes and press . Restart your computer. D:\>bupdater /pc /g 2. Yes No 4. Refer to section 2.9 Exit menu for DOS V1.07 Current ROM BOARD: P8H67-M PRO VER: 0217 DATE: 09/25/2010 Update ROM BOARD: Unknown VER: Unknown DATE: Unknown PATH: A:\ A: P8H67MP.ROM 4194304 2010-09-20 17:30:48 ...
... 1. At the FreeDOS prompt, type bupdater /pc /g and press . The BIOS Updater screen appears as below. Are you have disconnected them. 2-6 ASUS P8H67-M PRO DO NOT shut down or reset the system while updating the BIOS to prevent system boot failure! • For BIOS Updater version 1.04 or later... Yes and press . Restart your computer. D:\>bupdater /pc /g 2. Yes No 4. Refer to section 2.9 Exit menu for DOS V1.07 Current ROM BOARD: P8H67-M PRO VER: 0217 DATE: 09/25/2010 Update ROM BOARD: Unknown VER: Unknown DATE: Unknown PATH: A:\ A: P8H67MP.ROM 4194304 2010-09-20 17:30:48 ...
User Manual
Page 50
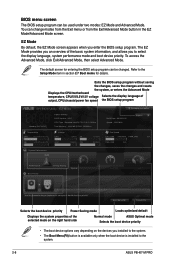
... of the selected mode on the right hand side Normal mode ASUS Optimal mode Selects the boot device priority • The boot device options vary depending on the devices you enter the BIOS setup program. EZ Mode Monday [9/27/2010] P8H67-M PRO BIOS Version : 0217 CPU Type : Genuine Intel(R) CPU 0 @... speed the BIOS setup program EFI BIOS Utility - BIOS menu screen The BIOS setup program can be changed. Refer to the system. 2-8 ASUS P8H67-M PRO You can change modes from the Exit menu or from the Exit/Advanced Mode button in section 2.7 Boot memu for entering the BIOS setup ...
... of the selected mode on the right hand side Normal mode ASUS Optimal mode Selects the boot device priority • The boot device options vary depending on the devices you enter the BIOS setup program. EZ Mode Monday [9/27/2010] P8H67-M PRO BIOS Version : 0217 CPU Type : Genuine Intel(R) CPU 0 @... speed the BIOS setup program EFI BIOS Utility - BIOS menu screen The BIOS setup program can be changed. Refer to the system. 2-8 ASUS P8H67-M PRO You can change modes from the Exit menu or from the Exit/Advanced Mode button in section 2.7 Boot memu for entering the BIOS setup ...
User Manual
Page 52
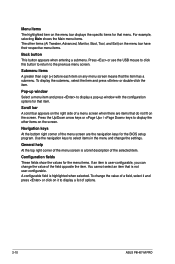
... click on the screen. To change the settings. Use the navigation keys to select items in the menu and change the value of options. 2-10 ASUS P8H67-M PRO A configurable field is a brief description of the menu screen are items that do not fit on the menu bar displays the specific items for the...
... click on the screen. To change the settings. Use the navigation keys to select items in the menu and change the value of options. 2-10 ASUS P8H67-M PRO A configurable field is a brief description of the menu screen are items that do not fit on the menu bar displays the specific items for the...
User Manual
Page 54
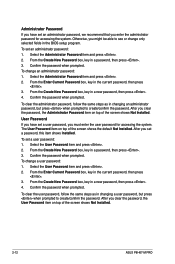
...: 1. Select the User Password item and press . 2. Otherwise, you clear the password, the User Password item on top of the screen shows Not Installed. 2-12 ASUS P8H67-M PRO Select the Administrator Password item and press . 2. Select the Administrator Password item and press . 2. After you set a password, this item shows Installed. From the Create...
...: 1. Select the User Password item and press . 2. Otherwise, you clear the password, the User Password item on top of the screen shows Not Installed. 2-12 ASUS P8H67-M PRO Select the Administrator Password item and press . 2. Select the Administrator Password item and press . 2. After you set a password, this item shows Installed. From the Create...


