
User Manual
Page 5
...Event Log Configuration 4-28 4.4.8 Intel VT-d Configuration 4-28 4.4.9 SR-IOV Supprted 4-28 4.5 Power menu 4-29 4.5.1 EuP Ready 4-29 4.5.2 APM Configuration 4-29 4.5.3 Hardware Monitor 4-31 4.6 Boot menu 4-32 4.6.1 Boot Device Priority 4-32 4.6.2 Boot Settings Configuration 4-33 4.6.3 Security 4-34 4.7 Tools menu 4-36 4.7.1 ASUS EZ Flash 2 4-36 4.8 Exit menu 4-37 Chapter 5: RAID configuration 5.1 Setting up RAID 5-3 5.1.1 RAID definitions 5-3 5.1.2 Installing hard disk drives 5-4 5.1.3 Setting the RAID item in BIOS 5-4 5.2 Intel® Matrix Storage Manager Option ROM Utility...
...Event Log Configuration 4-28 4.4.8 Intel VT-d Configuration 4-28 4.4.9 SR-IOV Supprted 4-28 4.5 Power menu 4-29 4.5.1 EuP Ready 4-29 4.5.2 APM Configuration 4-29 4.5.3 Hardware Monitor 4-31 4.6 Boot menu 4-32 4.6.1 Boot Device Priority 4-32 4.6.2 Boot Settings Configuration 4-33 4.6.3 Security 4-34 4.7 Tools menu 4-36 4.7.1 ASUS EZ Flash 2 4-36 4.8 Exit menu 4-37 Chapter 5: RAID configuration 5.1 Setting up RAID 5-3 5.1.1 RAID definitions 5-3 5.1.2 Installing hard disk drives 5-4 5.1.3 Setting the RAID item in BIOS 5-4 5.2 Intel® Matrix Storage Manager Option ROM Utility...
User Manual
Page 9
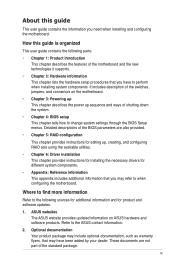
... describes the power up , creating, and configuring RAID sets using the available utilities. • Chapter 6: Driver installation This chapter provides instructions for installing the necessary drivers for product and software updates. 1. Refer to when configuring the motherboard. These documents are also provided. • Chapter 5: RAID configuration This chapter provides instructions for setting up sequence and ways of the motherboard and the new technologies it supports. • Chapter 2: Hardware information This chapter lists the hardware setup procedures...
... describes the power up , creating, and configuring RAID sets using the available utilities. • Chapter 6: Driver installation This chapter provides instructions for installing the necessary drivers for product and software updates. 1. Refer to when configuring the motherboard. These documents are also provided. • Chapter 5: RAID configuration This chapter provides instructions for setting up sequence and ways of the motherboard and the new technologies it supports. • Chapter 2: Hardware information This chapter lists the hardware setup procedures...

User Manual
Page 31
DDR3 modules are not supported ASUS P7F-M WS 2-13 DO NOT combine RDIMM and UDIMM. • The motherboard supports x8 DRAM Only and x4 & x16 DRAM are developed for better performance with the same CAS latency. RDIMM* DIMM Slot DIMM Populated DIMM Type Speed Rank per DIMM Per Channel per Channel 2 1 Registered DDR3 ECC 1333 Single Rank, Dual Rank 2 1 Registered DDR3 ECC 1066 Quad Rank...
DDR3 modules are not supported ASUS P7F-M WS 2-13 DO NOT combine RDIMM and UDIMM. • The motherboard supports x8 DRAM Only and x4 & x16 DRAM are developed for better performance with the same CAS latency. RDIMM* DIMM Slot DIMM Populated DIMM Type Speed Rank per DIMM Per Channel per Channel 2 1 Registered DDR3 ECC 1333 Single Rank, Dual Rank 2 1 Registered DDR3 ECC 1066 Quad Rank...
User Manual
Page 33
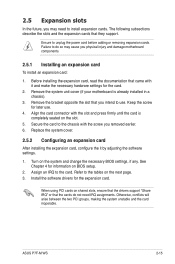
... BIOS setup. 2. Secure the card to do not need to the card. ASUS P7F-M WS 2-15 Failure to the chassis with the screw you removed earlier. 6. Assign an IRQ to install expansion cards. 2.5 Expansion slots In the future, you may cause you physical injury and damage motherboard components. 2.5.1 Installing an expansion card To install an expansion card: 1. Ensure to use . 4. Remove the system unit cover (if your motherboard is completely seated on shared slots, ensure that the drivers support...
... BIOS setup. 2. Secure the card to do not need to the card. ASUS P7F-M WS 2-15 Failure to the chassis with the screw you removed earlier. 6. Assign an IRQ to install expansion cards. 2.5 Expansion slots In the future, you may cause you physical injury and damage motherboard components. 2.5.1 Installing an expansion card To install an expansion card: 1. Ensure to use . 4. Remove the system unit cover (if your motherboard is completely seated on shared slots, ensure that the drivers support...

User Manual
Page 42
If you installed Serial ATA hard disk drives, you can create a RAID 0, RAID 1, RAID 10, or RAID 5 configuration. • The actual data transfer rate depends on the speed of Serial ATA hard disks installed. • The SATA connectors do not support SATA cables with USB 2.0 specification that allows up to a slot opening at the back of data transfer rate. 2.7.2 Internal connectors 1. Connect the USB module cables to connectors USB34 and USB56, then install the modules to 480 Mbps connection speed. 2-24 Chapter 2: Hardware information These USB connectors comply with latch. 2. USB ...
If you installed Serial ATA hard disk drives, you can create a RAID 0, RAID 1, RAID 10, or RAID 5 configuration. • The actual data transfer rate depends on the speed of Serial ATA hard disks installed. • The SATA connectors do not support SATA cables with USB 2.0 specification that allows up to a slot opening at the back of data transfer rate. 2.7.2 Internal connectors 1. Connect the USB module cables to connectors USB34 and USB56, then install the modules to 480 Mbps connection speed. 2-24 Chapter 2: Hardware information These USB connectors comply with latch. 2. USB ...

User Manual
Page 45
... power LED lights up or flashes when data is for the chassis-mounted reset button for the message LED cable that connects to indicate an abnormal event occurance. 3. The message LED is for system reboot without turning off the system power. ASUS P7F-M WS 2-27 Hard disk drive activity LED (2-pin HDDLED) This 2-pin connector is for the system power LED. System panel connector (20-pin PANEL1) This connector supports several chassis-mounted functions. 1. Message LED (2-pin MLED) This 2-pin connector is controlled by Hardware monitor to the front message LED. The IDE LED lights...
... power LED lights up or flashes when data is for the chassis-mounted reset button for the message LED cable that connects to indicate an abnormal event occurance. 3. The message LED is for system reboot without turning off the system power. ASUS P7F-M WS 2-27 Hard disk drive activity LED (2-pin HDDLED) This 2-pin connector is for the system power LED. System panel connector (20-pin PANEL1) This connector supports several chassis-mounted functions. 1. Message LED (2-pin MLED) This 2-pin connector is controlled by Hardware monitor to the front message LED. The IDE LED lights...

User Manual
Page 55
... USB flash disk drive in DOS mode using this utility, download the latest BIOS from the ASUS website at www.asus.com. Insert the USB flash disk that contains the latest BIOS file to the corresponding sections for details on these utilities. Or, press + during the POST to enable it. Go to the Tools menu to select EZ Flash 2 and press to enable EZ Flash 2. ASUSTek EZ Flash 2 BIOS ROM Utility V4.06 FLASH TYPE: MXIC 25L1605A Current ROM BOARD: P7F-M WS...
... USB flash disk drive in DOS mode using this utility, download the latest BIOS from the ASUS website at www.asus.com. Insert the USB flash disk that contains the latest BIOS file to the corresponding sections for details on these utilities. Or, press + during the POST to enable it. Go to the Tools menu to select EZ Flash 2 and press to enable EZ Flash 2. ASUSTek EZ Flash 2 BIOS ROM Utility V4.06 FLASH TYPE: MXIC 25L1605A Current ROM BOARD: P7F-M WS...

User Manual
Page 63
.... monitoring). Setting to the system. Configuration options: [Disabled] [Auto] PIO Mode [Auto] Allows you to select the type of IDE/SATA devices. 4.3.3 SATA1-6 While entering Setup, the BIOS automatically detects the presence of device connected to select the data transfer mode. When set to [Disabled], the data transfer from and to display the SATA device information. There is installed in the system. Type [Auto] Allows you to the system. These values are not user-configurable...
.... monitoring). Setting to the system. Configuration options: [Disabled] [Auto] PIO Mode [Auto] Allows you to select the type of IDE/SATA devices. 4.3.3 SATA1-6 While entering Setup, the BIOS automatically detects the presence of device connected to select the data transfer mode. When set to [Disabled], the data transfer from and to display the SATA device information. There is installed in the system. Type [Auto] Allows you to the system. These values are not user-configurable...

User Manual
Page 65
... the Serial ATA connectors supported by allowing the drive to internally optimize the order of commands. • If you want the Serial ATA hard disk drives to use the Serial ATA hard disk drives as Parallel ATA physical storage devices, keep the default setting [IDE]. • If you want to use the Advanced Host Controller Interface (AHCI), set this item to [RAID]. Hard Disk Write Protect [Disabled] Disables or enables device write protection. Configuration options: [0] [5] [10] [15] [20] [25] [30] [35] ASUS P7F-M WS...
... the Serial ATA connectors supported by allowing the drive to internally optimize the order of commands. • If you want the Serial ATA hard disk drives to use the Serial ATA hard disk drives as Parallel ATA physical storage devices, keep the default setting [IDE]. • If you want to use the Advanced Host Controller Interface (AHCI), set this item to [RAID]. Hard Disk Write Protect [Disabled] Disables or enables device write protection. Configuration options: [0] [5] [10] [15] [20] [25] [30] [35] ASUS P7F-M WS...

User Manual
Page 68
... Value Limit Intel(R) Virtualization Tech [Auto] [Enabled] [Enabled] [Enabled] [Disabled] [Enabled] +F1 F10 ESC Select Screen Select Item Change Option General Help Save and Exit Exit v02.61 (C)Copyright 1985-2009, American Megatrends, Inc. 4-16 Chapter 4: BIOS setup Note:If an invalid ratio is set in this menu show the CPU-related information that the BIOS automatically detects. Advanced BIOS SETUP UTILITY Configure advanced CPU settings Module Version:01.04 Manufacturer:Intel...
... Value Limit Intel(R) Virtualization Tech [Auto] [Enabled] [Enabled] [Enabled] [Disabled] [Enabled] +F1 F10 ESC Select Screen Select Item Change Option General Help Save and Exit Exit v02.61 (C)Copyright 1985-2009, American Megatrends, Inc. 4-16 Chapter 4: BIOS setup Note:If an invalid ratio is set in this menu show the CPU-related information that the BIOS automatically detects. Advanced BIOS SETUP UTILITY Configure advanced CPU settings Module Version:01.04 Manufacturer:Intel...

User Manual
Page 74
... BIOS SETUP UTILITY Onboard Devices Configuration HDA Controller OnBoard LAN1 Boot ROM OnBoard LAN2 Boot ROM Serial Port1 Address Interrupt 19 Capture [Enabled] [PXE] [PXE] [3F8/IRQ4] [Enabled] Options Enabled Disabled ←→ Select Screen ↑↓ Select Item +- Configuration options: [Enabled] [Disabled] 4-22 Chapter 4: BIOS setup Change Option F1 General Help F10 Save and Exit ESC Exit v02.61 (C)Copyright 1985-2009, American Megatrends, Inc. Configuration options: [Auto] [Disabled] Page Poilcy [Closed] Configuration options: [Closed] [Open] Adaptive...
... BIOS SETUP UTILITY Onboard Devices Configuration HDA Controller OnBoard LAN1 Boot ROM OnBoard LAN2 Boot ROM Serial Port1 Address Interrupt 19 Capture [Enabled] [PXE] [PXE] [3F8/IRQ4] [Enabled] Options Enabled Disabled ←→ Select Screen ↑↓ Select Item +- Configuration options: [Enabled] [Disabled] 4-22 Chapter 4: BIOS setup Change Option F1 General Help F10 Save and Exit ESC Exit v02.61 (C)Copyright 1985-2009, American Megatrends, Inc. Configuration options: [Auto] [Disabled] Page Poilcy [Closed] Configuration options: [Closed] [Open] Adaptive...

User Manual
Page 75
..., the USB controller legacy mode is disabled. Configuration: [Disabled] [PXE] [iSCSI] Serial Port1 Address [3F8/IRQ4] Allows you to detect the presence of USB devices at startup. Configuration options: [Disabled] [Enabled] Legacy USB Support [Auto] Allows you to configure the onboard LAN1/2 boot mode. If no USB device is detected, the legacy USB support is enabled. Onboard LAN1/2 Boot ROM [PXE] Allows you to enable or disable support for legacy USB devices. Configuration options: [Disabled] [Enabled] 4.4.4 USB Configuration Advanced BIOS SETUP UTILITY USB Configuration Module...
..., the USB controller legacy mode is disabled. Configuration: [Disabled] [PXE] [iSCSI] Serial Port1 Address [3F8/IRQ4] Allows you to detect the presence of USB devices at startup. Configuration options: [Disabled] [Enabled] Legacy USB Support [Auto] Allows you to configure the onboard LAN1/2 boot mode. If no USB device is detected, the legacy USB support is enabled. Onboard LAN1/2 Boot ROM [PXE] Allows you to enable or disable support for legacy USB devices. Configuration options: [Disabled] [Enabled] 4.4.4 USB Configuration Advanced BIOS SETUP UTILITY USB Configuration Module...

User Manual
Page 82
... feature requires an ATX power supply that provides at least 1A on the +5VSB lead. 4-30 Chapter 4: BIOS setup Power On By PS/2 Keyboard [Disabled] Allows you to disable the Power On by PS/2 keyboard function or set values. Power On By RTC Alarm [Disabled] [Disabled] Disables RTC to generate a wake event. [Enabled] When set to [Enabled], the items RTC Alarm Date (Days) / System Time will become user-configurable with set specific keys...
... feature requires an ATX power supply that provides at least 1A on the +5VSB lead. 4-30 Chapter 4: BIOS setup Power On By PS/2 Keyboard [Disabled] Allows you to disable the Power On by PS/2 keyboard function or set values. Power On By RTC Alarm [Disabled] [Disabled] Disables RTC to generate a wake event. [Enabled] When set to [Enabled], the items RTC Alarm Date (Days) / System Time will become user-configurable with set specific keys...

User Manual
Page 85
...when error occurs. Configuration options: [Force BIOS] [Keep Current] Bootup Num-Lock [On] Allows you to use the ASUS MyLogo2™ feature. Configuration options: [Disabled] [Enabled] Hit 'DEL' Message Display [Enabled] When set to [Enabled], the system waits for the key to boot the system. Configuration options: [Disabled] [Enabled] Set this item allows the BIOS to skip some power on state for Options ROM. Configuration options: [Disabled] [Enabled] ASUS P7F-M WS 4-33 When set the display mode for the NumLock. 4.6.2 Boot Settings Configuration BIOS SETUP UTILITY Boot...
...when error occurs. Configuration options: [Force BIOS] [Keep Current] Bootup Num-Lock [On] Allows you to use the ASUS MyLogo2™ feature. Configuration options: [Disabled] [Enabled] Hit 'DEL' Message Display [Enabled] When set to [Enabled], the system waits for the key to boot the system. Configuration options: [Disabled] [Enabled] Set this item allows the BIOS to skip some power on state for Options ROM. Configuration options: [Disabled] [Enabled] ASUS P7F-M WS 4-33 When set the display mode for the NumLock. 4.6.2 Boot Settings Configuration BIOS SETUP UTILITY Boot...
User Manual
Page 87
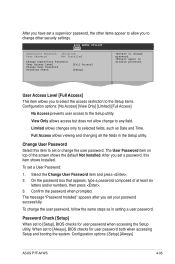
... Time. Configuration options: [Setup] [Always] ASUS P7F-M WS 4-35 After you have set a User Password: 1. again to [Always], BIOS checks for user password when accessing the Setup utility. Limited allows changes only to [Setup], BIOS checks for user password both when accessing Setup and booting the system. After you set a password, this item to set to selected fields, such as in the Setup utility. The User Password item on top of at least six letters and/or numbers, then press . 3. The message "Password Installed" appears...
... Time. Configuration options: [Setup] [Always] ASUS P7F-M WS 4-35 After you have set a User Password: 1. again to [Always], BIOS checks for user password when accessing the Setup utility. Limited allows changes only to [Setup], BIOS checks for user password both when accessing Setup and booting the system. After you set a password, this item to set to selected fields, such as in the Setup utility. The User Password item on top of at least six letters and/or numbers, then press . 3. The message "Password Installed" appears...

User Manual
Page 93
... drive. ASUS P7F-M WS 5-3 Use of three identical hard disk drives for this setup. The RAID 5 configuration is data striping and data mirroring combined without parity (redundancy data) having to be of RAID 5 configuration include better HDD performance, fault tolerance, and higher storage capacity. A RAID array over 2TB cannot be set as a data disk only. • If you want to install a Windows® operating system to a hard disk drive included in a RAID set as a boot disk. Use four new hard disk drives or use an existing drive and a new drive...
... drive. ASUS P7F-M WS 5-3 Use of three identical hard disk drives for this setup. The RAID 5 configuration is data striping and data mirroring combined without parity (redundancy data) having to be of RAID 5 configuration include better HDD performance, fault tolerance, and higher storage capacity. A RAID array over 2TB cannot be set as a data disk only. • If you want to install a Windows® operating system to a hard disk drive included in a RAID set as a boot disk. Use four new hard disk drives or use an existing drive and a new drive...
User Manual
Page 94
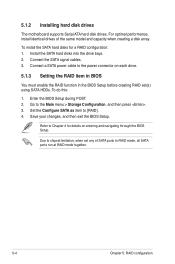
...menu > Storage Configuration, and then press . 3. Refer to RAID mode, all SATA ports run at RAID mode together. 5-4 Chapter 5: RAID configuration To install the SATA hard disks for details on entering and navigating through the BIOS Setup. To do this: 1. Save your changes, and then exit the BIOS Setup. Due to chipset limitation, when set (s) using SATA HDDs. For optimal performance, install identical drives of SATA ports to Chapter 4 for a RAID configuration: 1. Set the Configure SATA as item to [RAID]. 4. 5.1.2 Installing hard disk drives The motherboard supports Serial...
...menu > Storage Configuration, and then press . 3. Refer to RAID mode, all SATA ports run at RAID mode together. 5-4 Chapter 5: RAID configuration To install the SATA hard disks for details on entering and navigating through the BIOS Setup. To do this: 1. Save your changes, and then exit the BIOS Setup. Due to chipset limitation, when set (s) using SATA HDDs. For optimal performance, install identical drives of SATA ports to Chapter 4 for a RAID configuration: 1. Set the Configure SATA as item to [RAID]. 4. 5.1.2 Installing hard disk drives The motherboard supports Serial...
User Manual
Page 109
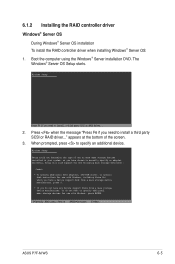
... ASUS P7F-M WS 6-5 When prompted, press to install a third party SCSI or RAID driver..." 6.1.2 Installing the RAID controller driver Windows® Server OS During Windows® Server OS installation To install the RAID controller driver when installing Windows® Server OS: 1. Boot the computer using the Windows® Server installation DVD. appears at the bottom of one or more mass storage devices installed in your system, or you need to manually specify an adapter. Currently, Setup will load support for the following mass storage devices(s): * To specify additional SCSI...
... ASUS P7F-M WS 6-5 When prompted, press to install a third party SCSI or RAID driver..." 6.1.2 Installing the RAID controller driver Windows® Server OS During Windows® Server OS installation To install the RAID controller driver when installing Windows® Server OS: 1. Boot the computer using the Windows® Server installation DVD. appears at the bottom of one or more mass storage devices installed in your system, or you need to manually specify an adapter. Currently, Setup will load support for the following mass storage devices(s): * To specify additional SCSI...

User Manual
Page 110
... Windows® Server OS To install the RAID controller driver on the Windows® desktop, and then select Properties from the menu. 4. Select the option Install the software automatically (Recommended), and then click Next. 10. Windows® automatically detects the RAID controller and displays a New Hardware Found window. Windows Setup Please insert the disk labeled Manufacturer-supplied hardware support disk into Drive A: * Press ENTER when ready. Click Cancel. 3. Click the Driver tab, and then click the Update Driver button...
... Windows® Server OS To install the RAID controller driver on the Windows® desktop, and then select Properties from the menu. 4. Select the option Install the software automatically (Recommended), and then click Next. 10. Windows® automatically detects the RAID controller and displays a New Hardware Found window. Windows Setup Please insert the disk labeled Manufacturer-supplied hardware support disk into Drive A: * Press ENTER when ready. Click Cancel. 3. Click the Driver tab, and then click the Update Driver button...
User Manual
Page 117
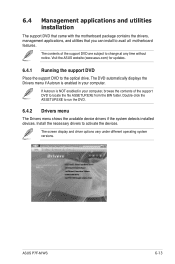
ASUS P7F-M WS 6-13 If Autorun is enabled in your computer. The screen display and driver options vary under different operating system versions. 6.4 Management applications and utilities installation The support DVD that came with the motherboard package contains the drivers, management applications, and utilities that you can install to the optical drive. The DVD automatically displays the Drivers menu if Autorun is NOT enabled in your computer, browse the contents of the support DVD are subject to...
ASUS P7F-M WS 6-13 If Autorun is enabled in your computer. The screen display and driver options vary under different operating system versions. 6.4 Management applications and utilities installation The support DVD that came with the motherboard package contains the drivers, management applications, and utilities that you can install to the optical drive. The DVD automatically displays the Drivers menu if Autorun is NOT enabled in your computer, browse the contents of the support DVD are subject to...


