User Guide
Page 4
... 2.8.2 Internal connectors 2-29 2.9 Installing the additional heatsink fan 2-40 2.10 Starting up for the first time 2-41 2.11 Turning off the computer 2-42 2.11.1 Using the OS shut down function 2-42 2.11.2 Using the dual function power switch 2-...42 Chapter 3: BIOS setup 3.1 Managing and updating your BIOS 3-1 3.1.1 ASUS Update utility 3-1 3.1.2 ASUS EZ Flash 2 utility 3-4 3.1.3 Creating a bootable floppy disk 3-5 3.1.4 AFUDOS utility 3-6 3.1.5 ASUS CrashFree BIOS 3 utility 3-8 3.2 BIOS setup program 3-9 3.2.1 BIOS menu screen 3-10 3.2.2 Menu bar...
... 2.8.2 Internal connectors 2-29 2.9 Installing the additional heatsink fan 2-40 2.10 Starting up for the first time 2-41 2.11 Turning off the computer 2-42 2.11.1 Using the OS shut down function 2-42 2.11.2 Using the dual function power switch 2-...42 Chapter 3: BIOS setup 3.1 Managing and updating your BIOS 3-1 3.1.1 ASUS Update utility 3-1 3.1.2 ASUS EZ Flash 2 utility 3-4 3.1.3 Creating a bootable floppy disk 3-5 3.1.4 AFUDOS utility 3-6 3.1.5 ASUS CrashFree BIOS 3 utility 3-8 3.2 BIOS setup program 3-9 3.2.1 BIOS menu screen 3-10 3.2.2 Menu bar...

User Guide
Page 8
... device must accept any interference received including interference that interference will not occur in a particular installation. This equipment generates, uses and can be determined by turning the equipment off and on a circuit different from digital apparatus set out in accordance with Canadian ICES-003. However, there is connected. • Consult the...
... device must accept any interference received including interference that interference will not occur in a particular installation. This equipment generates, uses and can be determined by turning the equipment off and on a circuit different from digital apparatus set out in accordance with Canadian ICES-003. However, there is connected. • Consult the...

User Guide
Page 26
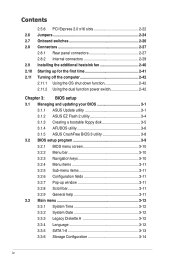
Chapter summary 2 2.1 Before you proceed 2-1 2.2 Motherboard overview 2-2 2.3 Central Processing Unit (CPU 2-5 2.4 System memory 2-12 2.5 Expansion slots 2-20 2.6 Jumpers 2-24 2.7 Onboard switches 2-26 2.8 Connectors 2-27 2.9 Installing the additional heatsink fan 2-40 2.10 Starting up for the first time 2-41 2.11 Turning off the computer 2-42 ASUS P6T Deluxe V2
Chapter summary 2 2.1 Before you proceed 2-1 2.2 Motherboard overview 2-2 2.3 Central Processing Unit (CPU 2-5 2.4 System memory 2-12 2.5 Expansion slots 2-20 2.6 Jumpers 2-24 2.7 Onboard switches 2-26 2.8 Connectors 2-27 2.9 Installing the additional heatsink fan 2-40 2.10 Starting up for the first time 2-41 2.11 Turning off the computer 2-42 ASUS P6T Deluxe V2

User Guide
Page 46
... cards. When using PCI cards on the slot. 5. Otherwise, conflicts will arise between the two PCI groups, making the system unstable and the card inoperable. Turn on the next page. 3. See Chapter 3 for later use . Make sure to the chassis with the screw you removed earlier. 6. Before installing the expansion card...
... cards. When using PCI cards on the slot. 5. Otherwise, conflicts will arise between the two PCI groups, making the system unstable and the card inoperable. Turn on the next page. 3. See Chapter 3 for later use . Make sure to the chassis with the screw you removed earlier. 6. Before installing the expansion card...

User Guide
Page 50
... clearing the RTC RAM, never remove the cap on pins 2-3 for about 5-10 seconds, then move the jumper again to overclocking. function. You must turn ON the computer. 4. Move the jumper cap from pins 1-2 (default) to overclocking, use the C.P.R. (CPU Parameter Recall) feature. Removing the cap ...onboard button cell battery powers the RAM data in CMOS. Shut down the key during the boot process and enter BIOS setup to enable C.P.R. Turn OFF the computer and unplug the power cord. 2. You can automatically reset parameter settings to default values. • Due to the chipset ...
... clearing the RTC RAM, never remove the cap on pins 2-3 for about 5-10 seconds, then move the jumper again to overclocking. function. You must turn ON the computer. 4. Move the jumper cap from pins 1-2 (default) to overclocking, use the C.P.R. (CPU Parameter Recall) feature. Removing the cap ...onboard button cell battery powers the RAM data in CMOS. Shut down the key during the boot process and enter BIOS setup to enable C.P.R. Turn OFF the computer and unplug the power cord. 2. You can automatically reset parameter settings to default values. • Due to the chipset ...
User Guide
Page 64
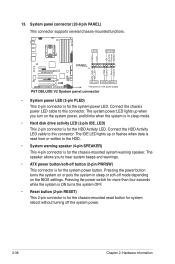
... (4-pin SPEAKER) This 4-pin connector is for the HDD Activity LED. The IDE LED lights up when you to this connector. The speaker allows you turn on the system power, and blinks when the system is for the system power LED. Pressing the power switch for more than four seconds while... the system is ON turns the system OFF. • Reset button (2-pin RESET) This 2-pin connector is for system reboot without turning off mode depending on or puts the system in sleep mode. • Hard disk drive activity LED...
... (4-pin SPEAKER) This 4-pin connector is for the HDD Activity LED. The IDE LED lights up when you to this connector. The speaker allows you turn on the system power, and blinks when the system is for the system power LED. Pressing the power switch for more than four seconds while... the system is ON turns the system OFF. • Reset button (2-pin RESET) This 2-pin connector is for system reboot without turning off mode depending on or puts the system in sleep mode. • Hard disk drive activity LED...

User Guide
Page 67
...up or switch between orange and green after the system LED turns on , hold down the key to a power outlet that all the connections, replace the system case cover. 2. Follow the instructions in the following order: a. ASUS P6T Deluxe V2 2-41 Connect the power cord to disabled No keyboard detected ...with "green" standards or if it has a "power standby" feature, the monitor LED may have failed a power-on the devices in Chapter 3. Turn on test. If you do not see BIOS beep codes table below) or additional messages appear on the chain) c. System power 6. Be sure that...
...up or switch between orange and green after the system LED turns on , hold down the key to a power outlet that all the connections, replace the system case cover. 2. Follow the instructions in the following order: a. ASUS P6T Deluxe V2 2-41 Connect the power cord to disabled No keyboard detected ...with "green" standards or if it has a "power standby" feature, the monitor LED may have failed a power-on the devices in Chapter 3. Turn on test. If you do not see BIOS beep codes table below) or additional messages appear on the chain) c. System power 6. Be sure that...

User Guide
Page 68
... you are using Windows® XP: 1. Refer to shut down . Click the Start button then select Turn Off Computer. 2. Click the Start button then select Shut Down. 2. Click the Turn Off button to section 3.6 Power Menu in Chapter 3 for less than four seconds lets the system enter...Using the dual function power switch While the system is ON, pressing the power switch for details. 2-42 Chapter 2: Hardware information 2.11 Turning off mode regardless of the BIOS setting. The power supply should turn off after Windows® shuts down the computer. 3. The power supply should...
... you are using Windows® XP: 1. Refer to shut down . Click the Start button then select Turn Off Computer. 2. Click the Start button then select Shut Down. 2. Click the Turn Off button to section 3.6 Power Menu in Chapter 3 for less than four seconds lets the system enter...Using the dual function power switch While the system is ON, pressing the power switch for details. 2-42 Chapter 2: Hardware information 2.11 Turning off mode regardless of the BIOS setting. The power supply should turn off after Windows® shuts down the computer. 3. The power supply should...

User Guide
Page 77
...(03.11.24BB)) Copyright (C) 2002 American Megatrends, Inc. Do not turn off power during flash BIOS Reading file ....... Erasing flash ...... done Please restart your computer A:\> ASUS P6T Deluxe V2 3-7 You need to the bootable floppy disk you created earlier. 3. Copy the AFUDOS utility (afudos.exe... DOS prompt. 2. All rights reserved. The utility returns to prevent system boot failure! 5. done Verifying flash .... Version 1.19(ASUS V2.07(03.11.24BB)) Copyright (C) 2002 American Megatrends, Inc. Write the BIOS filename on the bootable floppy disk. The utility verifies...
...(03.11.24BB)) Copyright (C) 2002 American Megatrends, Inc. Do not turn off power during flash BIOS Reading file ....... Erasing flash ...... done Please restart your computer A:\> ASUS P6T Deluxe V2 3-7 You need to the bootable floppy disk you created earlier. 3. Copy the AFUDOS utility (afudos.exe... DOS prompt. 2. All rights reserved. The utility returns to prevent system boot failure! 5. done Verifying flash .... Version 1.19(ASUS V2.07(03.11.24BB)) Copyright (C) 2002 American Megatrends, Inc. Write the BIOS filename on the bootable floppy disk. The utility verifies...

User Guide
Page 78
... NOT shut down or reset the system while updating the BIOS! Doing so can update a corrupted BIOS file using this utility. 3.1.5 ASUS CrashFree BIOS 3 utility The ASUS CrashFree BIOS 3 is an auto recovery tool that contains BIOS file to the floppy disk drive or USB port. 2. The utility displays... BIOS 3. Recovering the BIOS from the support DVD To recover the BIOS from the floppy disk or USB flash disk: 1. Turn on the system. 3. Start flashing... 4. Turn on the system. 2. Checking for the BIOS file When found, the utility reads the BIOS file and starts flashing the corrupted ...
... NOT shut down or reset the system while updating the BIOS! Doing so can update a corrupted BIOS file using this utility. 3.1.5 ASUS CrashFree BIOS 3 utility The ASUS CrashFree BIOS 3 is an auto recovery tool that contains BIOS file to the floppy disk drive or USB port. 2. The utility displays... BIOS 3. Recovering the BIOS from the support DVD To recover the BIOS from the floppy disk or USB flash disk: 1. Turn on the system. 3. Start flashing... 4. Turn on the system. 2. Checking for the BIOS file When found, the utility reads the BIOS file and starts flashing the corrupted ...
User Guide
Page 79
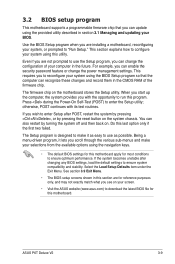
... Press during the Power-On Self-Test (POST) to ensure system compatibility and stability. Being a menu-driven program, it as possible. ASUS P6T Deluxe V2 3-9 Do this utility. 3.2 BIOS setup program This motherboard supports a programmable firmware chip that you can update using the provided utility described... system becomes unstable after POST, restart the system by pressing , or by turning the system off and then back on your screen. • Visit the ASUS website (www.asus.com) to download the latest BIOS file for most conditions to configure your computer...
... Press during the Power-On Self-Test (POST) to ensure system compatibility and stability. Being a menu-driven program, it as possible. ASUS P6T Deluxe V2 3-9 Do this utility. 3.2 BIOS setup program This motherboard supports a programmable firmware chip that you can update using the provided utility described... system becomes unstable after POST, restart the system by pressing , or by turning the system off and then back on your screen. • Visit the ASUS website (www.asus.com) to download the latest BIOS file for most conditions to configure your computer...

User Guide
Page 103
... generate a wake event. Configuration options: [Disabled] [Space Bar] [Ctrl-Esc] [Power Key] ASUS P6T Deluxe V2 3-33 Configuration options: [Power Off] [Power On] [Last State] Power On By RTC Alarm [Disabled] Allows you to enable or disable the PCIE devices to turn on state, whatever the system state was before the AC power loss. Restore...
... generate a wake event. Configuration options: [Disabled] [Space Bar] [Ctrl-Esc] [Power Key] ASUS P6T Deluxe V2 3-33 Configuration options: [Power Off] [Power On] [Last State] Power On By RTC Alarm [Disabled] Allows you to enable or disable the PCIE devices to turn on state, whatever the system state was before the AC power loss. Restore...
User Guide
Page 114
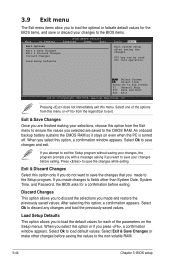
... bar to save changes and exit. When you select this option, a confirmation window appears. Select one of the parameters on even when the PC is turned off. If you attempt to exit the Setup program without saving your changes before exiting. If you to load the optimal or failsafe default values...
... bar to save changes and exit. When you select this option, a confirmation window appears. Select one of the parameters on even when the PC is turned off. If you attempt to exit the Setup program without saving your changes before exiting. If you to load the optimal or failsafe default values...
User Guide
Page 128
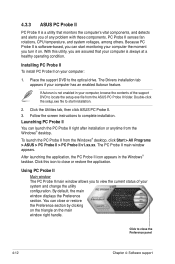
.... Click the Utilities tab, then click ASUS PC Probe II. 3. With this icon to view the current status of any problem with these components. To launch the PC Probe II from the Windows® desktop. If Autorun is software-based, you turn it on your computer has an enabled ... the utility configuration. You can launch the PC Probe II right after installation or anytime from the Windows® desktop, click Start > All Programs > ASUS > PC Probe II > PC Probe II v1.xx.xx. Click this utility, you to close the Preference panel 4-12 Chapter 4: Software support The ...
.... Click the Utilities tab, then click ASUS PC Probe II. 3. With this icon to view the current status of any problem with these components. To launch the PC Probe II from the Windows® desktop. If Autorun is software-based, you turn it on your computer has an enabled ... the utility configuration. You can launch the PC Probe II right after installation or anytime from the Windows® desktop, click Start > All Programs > ASUS > PC Probe II > PC Probe II v1.xx.xx. Click this utility, you to close the Preference panel 4-12 Chapter 4: Software support The ...
User Guide
Page 129
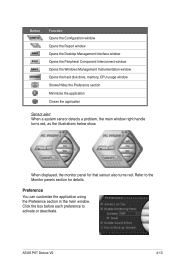
... the application using the Preference section in the main window. Click the box before each preference to the Monitor panels section for that sensor also turns red. ASUS P6T Deluxe V2 4-13 Refer to activate or deactivate. When displayed, the monitor panel for details. Button Function Opens the Configuration window Opens the Report window Opens... usage window Shows/Hides the Preference section Minimizes the application Closes the application Sensor alert When a system sensor detects a problem, the main window right handle turns red, as the illustrations below show.
... the application using the Preference section in the main window. Click the box before each preference to the Monitor panels section for that sensor also turns red. ASUS P6T Deluxe V2 4-13 Refer to activate or deactivate. When displayed, the monitor panel for details. Button Function Opens the Configuration window Opens the Report window Opens... usage window Shows/Hides the Preference section Minimizes the application Closes the application Sensor alert When a system sensor detects a problem, the main window right handle turns red, as the illustrations below show.

User Guide
Page 131
...) browser. This browser displays various desktop and system information. This browser displays various Windows® management information. ASUS P6T Deluxe V2 4-15 DMI browser Click to display on the right panel. Monitoring sensor alert The monitor panel turns red when a component value exceeds or is lower than the threshold value. You can enlarge or reduce...
...) browser. This browser displays various desktop and system information. This browser displays various Windows® management information. ASUS P6T Deluxe V2 4-15 DMI browser Click to display on the right panel. Monitoring sensor alert The monitor panel turns red when a component value exceeds or is lower than the threshold value. You can enlarge or reduce...

User Guide
Page 141
... highest level for CPU power saving. • Small: Downgrades voltage to the minimum level. • Chipset Voltage Downgrade: Turns on/off chipset voltage. • Turn Off hard disks: Turns off hard disk drives when they are not accessed after a certain time. • CPU Loadline: Sets up the CPU ... level. • Heavy: Saves CPU power to display configuration options in certain modes are dimmed, meaning that they are not available. ASUS P6T Deluxe V2 4-25 Advanced settings menu Click Setting ( ) from the 6 Engine main menu to the highest level. Some options in each mode.
... highest level for CPU power saving. • Small: Downgrades voltage to the minimum level. • Chipset Voltage Downgrade: Turns on/off chipset voltage. • Turn Off hard disks: Turns off hard disk drives when they are not accessed after a certain time. • CPU Loadline: Sets up the CPU ... level. • Heavy: Saves CPU power to display configuration options in certain modes are dimmed, meaning that they are not available. ASUS P6T Deluxe V2 4-25 Advanced settings menu Click Setting ( ) from the 6 Engine main menu to the highest level. Some options in each mode.
User Guide
Page 142
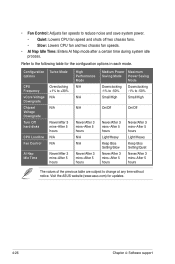
Configuration Turbo Mode options CPU Frequency vCore Voltage Downgrade Chipset Voltage Downgrade Turn Off hard disks CPU Loadline Fan Control Overclocking +1% to +30% N/A N/A Never/After 3 mins-After 5 hours N/A N/A AI Nap Idle Time Never/After 3 mins-After 5 hours ... 3 mins-After 5 hours The values of the previous table are subject to the following table for updates. 4-26 Chapter 4: Software support Visit the ASUS website (www.asus.com) for the configuration options in each mode. Refer to change at any time without notice. • Fan Control: Adjusts fan speeds to reduce...
Configuration Turbo Mode options CPU Frequency vCore Voltage Downgrade Chipset Voltage Downgrade Turn Off hard disks CPU Loadline Fan Control Overclocking +1% to +30% N/A N/A Never/After 3 mins-After 5 hours N/A N/A AI Nap Idle Time Never/After 3 mins-After 5 hours ... 3 mins-After 5 hours The values of the previous table are subject to the following table for updates. 4-26 Chapter 4: Software support Visit the ASUS website (www.asus.com) for the configuration options in each mode. Refer to change at any time without notice. • Fan Control: Adjusts fan speeds to reduce...

User Guide
Page 144
... item to Intel's Dynamic Speed Technology of automatic CPU ratio overclocking. See page 3-26 for details. • The value shown in CPU Ratio Mode may turn off this feature in TurboV. See page 3-27 for CPU/chip voltage, DRAM Reference voltage, and CPU ratio. Advanced settings menu Click More Setting from...
... item to Intel's Dynamic Speed Technology of automatic CPU ratio overclocking. See page 3-26 for details. • The value shown in CPU Ratio Mode may turn off this feature in TurboV. See page 3-27 for CPU/chip voltage, DRAM Reference voltage, and CPU ratio. Advanced settings menu Click More Setting from...
User Guide
Page 162
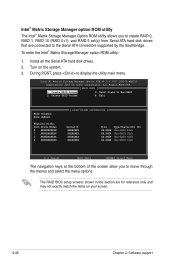
Install all the Serial ATA hard disk drives. 2. Turn on your screen. 4-46 Chapter 4: Software support All Rights Reserved. [ MAIN MENU ] 1. Exit RAID Volumes: None defined. [ DISK/VOLUME INFORMATION ] Physical Disks: Port Drive Model ...
Install all the Serial ATA hard disk drives. 2. Turn on your screen. 4-46 Chapter 4: Software support All Rights Reserved. [ MAIN MENU ] 1. Exit RAID Volumes: None defined. [ DISK/VOLUME INFORMATION ] Physical Disks: Port Drive Model ...


