User Guide
Page 9
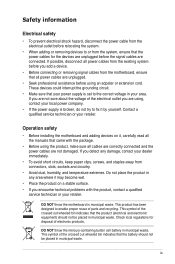
... place the product in any damage, contact your dealer immediately. • To avoid short circuits, keep paper clips, screws, and staples away from connectors, slots, sockets and circuitry. • Avoid dust, humidity, and temperature extremes. Check local regulations for the devices are unplugged before the signal cables are not damaged. This...
... place the product in any damage, contact your dealer immediately. • To avoid short circuits, keep paper clips, screws, and staples away from connectors, slots, sockets and circuitry. • Avoid dust, humidity, and temperature extremes. Check local regulations for the devices are unplugged before the signal cables are not damaged. This...
User Guide
Page 12
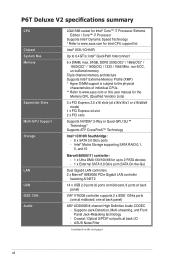
... for up to 6.4GT/s; P6T Deluxe V2 specifications summary CPU Chipset System Bus Memory Expansion Slots Multi-GPU Support Storage LAN USB IEEE 1394 Audio LGA1366 socket for Intel® Core™ i7 Processor Extreme Edition / Core™ i7 Processor Supports Intel® Dynamic Speed Technology * Refer to www.asus.com for Intel CPU support...
... for up to 6.4GT/s; P6T Deluxe V2 specifications summary CPU Chipset System Bus Memory Expansion Slots Multi-GPU Support Storage LAN USB IEEE 1394 Audio LGA1366 socket for Intel® Core™ i7 Processor Extreme Edition / Core™ i7 Processor Supports Intel® Dynamic Speed Technology * Refer to www.asus.com for Intel CPU support...

User Guide
Page 27
... the wall socket before touching any component. • Use a grounded wrist strap or touch a safely grounded object or a metal object, such as the power supply case, before handling components to avoid damaging them due to static electricity. • Hold components by the edges to the motherboard, peripherals, and/or components. ASUS P6T Deluxe V2 2-1 Failure...
... the wall socket before touching any component. • Use a grounded wrist strap or touch a safely grounded object or a metal object, such as the power supply case, before handling components to avoid damaging them due to static electricity. • Hold components by the edges to the motherboard, peripherals, and/or components. ASUS P6T Deluxe V2 2-1 Failure...

User Guide
Page 29
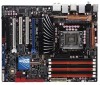
... Page 2-36 2-6 2-34 2-12 2-25 2-30 2-31 2-24 2-38 2-29 2-26 2-35 2-32 2-33 2-29 2-37 2-35 2-37 4-35 ASUS P6T Deluxe V2 2-3 CPU / DRAM Bus / QPI DRAM overvoltage settings (3-pin OV_CPU; 3-pin OV_DRAM_BUS; 3-pin OV_QPI_DRAM) 6. IEEE 1394a port connector (10-1 pin IE1394_2) 15...USB910, USB1112, USB1314) 14. Floppy disk drive connector (34-1 pin FLOPPY) 16. Front panel audio connector (10-1 pin AAFP) 18. LGA1366 CPU Socket 3. CPU, chassis, and power fan connectors (4-pin CPU_FAN, 3-pin CHA_FAN1-3, 3-pin PWR_FAN) 4. Chassis intrusion connector (4-1 pin CHASSIS) 13. 2.2.2 ...
... Page 2-36 2-6 2-34 2-12 2-25 2-30 2-31 2-24 2-38 2-29 2-26 2-35 2-32 2-33 2-29 2-37 2-35 2-37 4-35 ASUS P6T Deluxe V2 2-3 CPU / DRAM Bus / QPI DRAM overvoltage settings (3-pin OV_CPU; 3-pin OV_DRAM_BUS; 3-pin OV_QPI_DRAM) 6. IEEE 1394a port connector (10-1 pin IE1394_2) 15...USB910, USB1112, USB1314) 14. Floppy disk drive connector (34-1 pin FLOPPY) 16. Front panel audio connector (10-1 pin AAFP) 18. LGA1366 CPU Socket 3. CPU, chassis, and power fan connectors (4-pin CPU_FAN, 3-pin CHA_FAN1-3, 3-pin PWR_FAN) 4. Chassis intrusion connector (4-1 pin CHASSIS) 13. 2.2.2 ...

User Guide
Page 31
... that the PnP cap is shipment/transit-related. • Keep the cap after installing the motherboard. ASUS will process Return Merchandise Authorization (RMA) requests only if the motherboard comes with a surface mount LGA1366 socket designed for the Intel® Core™ i7 Processor Extreme Edition / Core™ i7 Processor.... are not bent. Contact your retailer immediately if the PnP cap is missing, or if you see any damage to the socket contacts resulting from incorrect CPU installation/removal, or misplacement/loss/ incorrect removal of the PnP cap. ASUS P6T Deluxe V2 2-5
... that the PnP cap is shipment/transit-related. • Keep the cap after installing the motherboard. ASUS will process Return Merchandise Authorization (RMA) requests only if the motherboard comes with a surface mount LGA1366 socket designed for the Intel® Core™ i7 Processor Extreme Edition / Core™ i7 Processor.... are not bent. Contact your retailer immediately if the PnP cap is missing, or if you see any damage to the socket contacts resulting from incorrect CPU installation/removal, or misplacement/loss/ incorrect removal of the PnP cap. ASUS P6T Deluxe V2 2-5

User Guide
Page 32
2.3.1 Installing the CPU To install a CPU: 1. Press the load lever with your thumb and forefinger to the socket pins, do not remove the PnP cap unless you and the load lever is released from the retention tab. Lift the load lever in the ... facing towards you are installing a CPU. Retention tab A B Load lever 3. Load plate 4 3 2-6 Chapter 2: Hardware information To prevent damage to a 100º angle. Locate the CPU socket on your thumb (A), then move it is on the motherboard.
2.3.1 Installing the CPU To install a CPU: 1. Press the load lever with your thumb and forefinger to the socket pins, do not remove the PnP cap unless you and the load lever is released from the retention tab. Lift the load lever in the ... facing towards you are installing a CPU. Retention tab A B Load lever 3. Load plate 4 3 2-6 Chapter 2: Hardware information To prevent damage to a 100º angle. Locate the CPU socket on your thumb (A), then move it is on the motherboard.

User Guide
Page 33
... into your eyes or touches your finger directly. If it is spread in an even thin layer. 5. Position the CPU over the socket, making sure that it gets into the socket to the exposed area of thermal paste to prevent bending the connectors on the bottom‑left corner of the... socket, and then fit the socket alignment key into the CPU notch. If so, skip this step. The CPU fits in contact with, ensuring that the gold triangle is toxic and inedible. ASUS P6T Deluxe V2 2-7 Some heatsinks come with your skin, ensure to wash ...
... into your eyes or touches your finger directly. If it is spread in an even thin layer. 5. Position the CPU over the socket, making sure that it gets into the socket to the exposed area of thermal paste to prevent bending the connectors on the bottom‑left corner of the... socket, and then fit the socket alignment key into the CPU notch. If so, skip this step. The CPU fits in contact with, ensuring that the gold triangle is toxic and inedible. ASUS P6T Deluxe V2 2-7 Some heatsinks come with your skin, ensure to wash ...

User Guide
Page 38
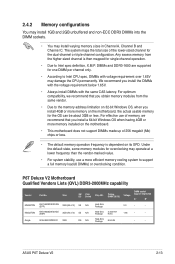
... DIMM_C1 Populated Populated Populated Due to prevent installation on a DDR2 DIMM socket. The figure illustrates the location of the DDR3 DIMM sockets: Channel Channel A Channel B Channel C Sockets DIMM_A1 and DIMM_A2 DIMM_B1 and DIMM_B2 DIMM_C1 and DIMM_C2 Recommended memory configuration ...for better performance with six Double Data Rate 3 (DDR3) Dual Inline Memory Modules (DIMM) sockets. Follow the table above for recommended memory configuration. 2-12 Chapter 2: Hardware information A DDR3 module has the same physical dimensions...
... DIMM_C1 Populated Populated Populated Due to prevent installation on a DDR2 DIMM socket. The figure illustrates the location of the DDR3 DIMM sockets: Channel Channel A Channel B Channel C Sockets DIMM_A1 and DIMM_A2 DIMM_B1 and DIMM_B2 DIMM_C1 and DIMM_C2 Recommended memory configuration ...for better performance with six Double Data Rate 3 (DDR3) Dual Inline Memory Modules (DIMM) sockets. Follow the table above for recommended memory configuration. 2-12 Chapter 2: Hardware information A DDR3 module has the same physical dimensions...
User Guide
Page 39
... permanently. For optimum compatibility, we recommend that you obtain memory modules from the higher-sized channel is dependent on its SPD. DIMM socket Size SS/ Chip DS Brand Chip NO. For effective use a more efficient memory cooling system to support a full memory load (6... of 3) SS N/A Heat-Sink (1333-9-9Package 9-24) 1.65 • • 9CAASS37AZZ01D1 2GB DS N/A Heat-Sink Package 9-9-9-24 • • ASUS P6T Deluxe V2 2-13 The system maps the total size of the lower-sized channel for one DIMM per channel only. • According to Intel CPU spec, DIMMs...
... permanently. For optimum compatibility, we recommend that you obtain memory modules from the higher-sized channel is dependent on its SPD. DIMM socket Size SS/ Chip DS Brand Chip NO. For effective use a more efficient memory cooling system to support a full memory load (6... of 3) SS N/A Heat-Sink (1333-9-9Package 9-24) 1.65 • • 9CAASS37AZZ01D1 2GB DS N/A Heat-Sink Package 9-9-9-24 • • ASUS P6T Deluxe V2 2-13 The system maps the total size of the lower-sized channel for one DIMM per channel only. • According to Intel CPU spec, DIMMs...
User Guide
Page 40
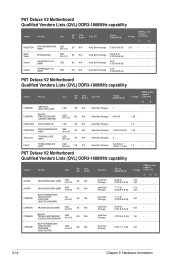
...(1333-9-9-9-24) CL10 (1333-8-8-8-24) CL10 (1333-8-8-8-24) Voltage DIMM socket support (Optional) A* B* 1.65 • • • • • • • • P6T Deluxe V2 Motherboard Qualified Vendors Lists (QVL) DDR3-1800MHz capability Vendor Part No. ... 2) SS N/A Heat-Sink Package CL8-8-8-20 (1066-7-7-7-20) 1.9 • • P6T Deluxe V2 Motherboard Qualified Vendors Lists (QVL) DDR3-1600MHz capability Vendor Part No. Timing DIMM (BIOS) Voltage DIMM socket support (Optional) A* B* 1GB SS N/A Heat-Sink Package 7 • • ...
...(1333-9-9-9-24) CL10 (1333-8-8-8-24) CL10 (1333-8-8-8-24) Voltage DIMM socket support (Optional) A* B* 1.65 • • • • • • • • P6T Deluxe V2 Motherboard Qualified Vendors Lists (QVL) DDR3-1800MHz capability Vendor Part No. ... 2) SS N/A Heat-Sink Package CL8-8-8-20 (1066-7-7-7-20) 1.9 • • P6T Deluxe V2 Motherboard Qualified Vendors Lists (QVL) DDR3-1600MHz capability Vendor Part No. Timing DIMM (BIOS) Voltage DIMM socket support (Optional) A* B* 1GB SS N/A Heat-Sink Package 7 • • ...

User Guide
Page 41
... Heat-Sink Package 9-9-9-24 (1066-7-7-7-20) DS SAMSUNG K4B1G08460 9-9-9-24 (1333-9-9-9-24) SS N/A Heat-Sink Package 7-7-7-21 (1333-8-8-824) Voltage DIMM socket support (Optional) A* B* D* 1.65 ••• 1.65 ••• 1.8 ••• 1.9 •••...;• 2.0 ••• 1.65 ••• ••• 1.751.85 ••• ASUS P6T Deluxe V2 2-15 Size CORSAIR TR3X6G1600C8D (XMP) CORSAIR Crucial G.SKILL TR3X6G1600C9 (XMP) BL12864BA1608.8SFB (XMP) F3-12800CL7D-2GBHZ G.SKILL F3-...
... Heat-Sink Package 9-9-9-24 (1066-7-7-7-20) DS SAMSUNG K4B1G08460 9-9-9-24 (1333-9-9-9-24) SS N/A Heat-Sink Package 7-7-7-21 (1333-8-8-824) Voltage DIMM socket support (Optional) A* B* D* 1.65 ••• 1.65 ••• 1.8 ••• 1.9 •••...;• 2.0 ••• 1.65 ••• ••• 1.751.85 ••• ASUS P6T Deluxe V2 2-15 Size CORSAIR TR3X6G1600C8D (XMP) CORSAIR Crucial G.SKILL TR3X6G1600C9 (XMP) BL12864BA1608.8SFB (XMP) F3-12800CL7D-2GBHZ G.SKILL F3-...

User Guide
Page 42
...SS N/A Heat-Sink Package (1333-9-9-9-24) 1.65 •••• 2-16 Chapter 2: Hardware information ASUS exclusively provides two DDR3-1600 DIMM support for one DIMM per channel only. Size SS/ Chip DS Brand ...Chip NO. Timing DIMM (BIOS) Voltage DIMM socket support (Optional) A* B* C* D* KINGSTON KVR1333D3N9/1G 1GB SS ELPIDA J1108BASE-DJ-E (1333-9-9-9-24) 1.5 ...1600 is supported for each memory channel. P6T Deluxe V2 Motherboard Qualified Vendors Lists (QVL) DDR3-1333MHz capability Vendor Part No.
...SS N/A Heat-Sink Package (1333-9-9-9-24) 1.65 •••• 2-16 Chapter 2: Hardware information ASUS exclusively provides two DDR3-1600 DIMM support for one DIMM per channel only. Size SS/ Chip DS Brand ...Chip NO. Timing DIMM (BIOS) Voltage DIMM socket support (Optional) A* B* C* D* KINGSTON KVR1333D3N9/1G 1GB SS ELPIDA J1108BASE-DJ-E (1333-9-9-9-24) 1.5 ...1600 is supported for each memory channel. P6T Deluxe V2 Motherboard Qualified Vendors Lists (QVL) DDR3-1333MHz capability Vendor Part No.

User Guide
Page 43
Timing DIMM (BIOS) Voltage DIMM socket support (Optional) A* B* C* D* G.SKILL F3-10666CL9D-4GBPK 4GB (kit of 2) DS N/A Heat-Sink Package (1333-9-9-9-24) 1.65 •••• G.SKILL F3-10666CL9T-6GBNQ 6GB (... 6GB (kit of 3) DS N/A Heat-Sink Package CL9-9-9-24 (1066-7-7-7-20) 1.65 • PQI MFACR322LA0105 1GB DS PQI PQC3648S15R (1333-9-9-9-24) •••• ASUS P6T Deluxe V2 2-17 Size SS/ Chip DS Brand Chip NO. P6T Deluxe V2 Motherboard Qualified Vendors Lists (QVL) DDR3-1333MHz capability (continued) Vendor Part No.
Timing DIMM (BIOS) Voltage DIMM socket support (Optional) A* B* C* D* G.SKILL F3-10666CL9D-4GBPK 4GB (kit of 2) DS N/A Heat-Sink Package (1333-9-9-9-24) 1.65 •••• G.SKILL F3-10666CL9T-6GBNQ 6GB (... 6GB (kit of 3) DS N/A Heat-Sink Package CL9-9-9-24 (1066-7-7-7-20) 1.65 • PQI MFACR322LA0105 1GB DS PQI PQC3648S15R (1333-9-9-9-24) •••• ASUS P6T Deluxe V2 2-17 Size SS/ Chip DS Brand Chip NO. P6T Deluxe V2 Motherboard Qualified Vendors Lists (QVL) DDR3-1333MHz capability (continued) Vendor Part No.

User Guide
Page 44
...1GB 2GB 2GB (kit of Triple-channel memory configuration. Single-sided DS - Visit the ASUS website for the latest QVL. 2-18 Chapter 2: Hardware information Double-sided DIMM support: &#...1GB 1GB 2GB 2GB 1GB 1GB 2GB 2GB SS/ Chip DS Brand Chip NO. P6T Deluxe V2 Motherboard Qualified Vendors Lists (QVL) DDR3-1067MHz capability Vendor Part No. DS N/A ...-AC-E (ECC) J5308BASE-AC-E J1108BABG-DJ-E Timing DIMM (BIOS) 7 7 7 7 CL7 (1066-7-7-7-20) Voltage DIMM socket support (Optional) A* B* C* D* 1.1 ••• •••• •••• •...
...1GB 2GB 2GB (kit of Triple-channel memory configuration. Single-sided DS - Visit the ASUS website for the latest QVL. 2-18 Chapter 2: Hardware information Double-sided DIMM support: &#...1GB 1GB 2GB 2GB 1GB 1GB 2GB 2GB SS/ Chip DS Brand Chip NO. P6T Deluxe V2 Motherboard Qualified Vendors Lists (QVL) DDR3-1067MHz capability Vendor Part No. DS N/A ...-AC-E (ECC) J5308BASE-AC-E J1108BABG-DJ-E Timing DIMM (BIOS) 7 7 7 7 CL7 (1066-7-7-7-20) Voltage DIMM socket support (Optional) A* B* C* D* 1.1 ••• •••• •••• •...

User Guide
Page 45
...retaining clips snap back in only one direction. ASUS P6T Deluxe V2 2-19 Unlock a DIMM socket by pressing the retaining clips outward. 2. Locked Retaining Clip 2.4.4 Removing a DIMM Follow these steps to avoid damaging the DIMM. 3. Align a DIMM on the socket such that it flips out with a notch so... that the notch on the DIMM matches the break on the socket. 1 2 DIMM notch 1 Unlocked retaining clip A DIMM is properly seated. Remove the DIMM from the socket. 2.4.3 Installing a DIMM Make sure to unlock the DIMM. 1 1 DIMM notch Support the...
...retaining clips snap back in only one direction. ASUS P6T Deluxe V2 2-19 Unlock a DIMM socket by pressing the retaining clips outward. 2. Locked Retaining Clip 2.4.4 Removing a DIMM Follow these steps to avoid damaging the DIMM. 3. Align a DIMM on the socket such that it flips out with a notch so... that the notch on the DIMM matches the break on the socket. 1 2 DIMM notch 1 Unlocked retaining clip A DIMM is properly seated. Remove the DIMM from the socket. 2.4.3 Installing a DIMM Make sure to unlock the DIMM. 1 1 DIMM notch Support the...


