
Motherboard Installation Guide
Page 24
A B B A B A A B P5V800-MX CPU_FAN GND CPU FAN PWR CPU FAN IN CPU FAN PWM ® P5V800-MX CPU fan connector 1-12
A B B A B A A B P5V800-MX CPU_FAN GND CPU FAN PWR CPU FAN IN CPU FAN PWM ® P5V800-MX CPU fan connector 1-12

Motherboard Installation Guide
Page 39
CPU_FAN GND CPU FAN PWR CPU FAN IN CPU FAN PWM P5V800-MX CHA_FAN GND +12V ® Rotation P5V800-MX Fan connectors P5V800-MX SPDIF_OUT ® GND SPDIFOUT +5V P5V800-MX Digital audio connector 1-27
CPU_FAN GND CPU FAN PWR CPU FAN IN CPU FAN PWM P5V800-MX CHA_FAN GND +12V ® Rotation P5V800-MX Fan connectors P5V800-MX SPDIF_OUT ® GND SPDIFOUT +5V P5V800-MX Digital audio connector 1-27

Motherboard Installation Guide
Page 60
AMIBIOS Version : 0005 Build Date : 09/08/05 Processor Type Speed Count : Genuine Intel(R) CPU 3.20GHz : 2800 MHz : 1 System Memory Size : 512MB 2-16
AMIBIOS Version : 0005 Build Date : 09/08/05 Processor Type Speed Count : Genuine Intel(R) CPU 3.20GHz : 2800 MHz : 1 System Memory Size : 512MB 2-16

Motherboard Installation Guide
Page 72
Hardware Monitor CPU Temperature MB Temperature CPU Fan Speed Chassis Fan Speed VCORE Voltage 3.3V Voltage 5V Voltage 12V Voltage Q-FAN Function [51ºC/122.5ºF] [41ºC/105.5ºF] [3813 RPM] [N/A] [ 1.320V] [ 3.345V] [ 5.094V] [11.880V] [Disabled] 2-28
Hardware Monitor CPU Temperature MB Temperature CPU Fan Speed Chassis Fan Speed VCORE Voltage 3.3V Voltage 5V Voltage 12V Voltage Q-FAN Function [51ºC/122.5ºF] [41ºC/105.5ºF] [3813 RPM] [N/A] [ 1.320V] [ 3.345V] [ 5.094V] [11.880V] [Disabled] 2-28

P5V800-MX User's Manual for English Edition
Page 3
... information vii About this guide viii P5V800-MX specifications summary x Chapter 1: Product introduction 1.1 1.2 1.3 1.4 1.5 1.6 1.7 1.8 1.9 1.10 Welcome 1-2 Package contents 1-2 Special features 1-2 1.3.1 Product highlights 1-2 1.3.2 Innovative ASUS features 1-4 Before you proceed 1-5 Motherboard overview 1-6 1.5.1 Placement direction 1-6 1.5.2 Screw holes 1-6 1.5.3 Motherboard layout 1-7 Central Processing Unit (CPU 1-8 1.6.1 Installling the CPU 1-8 1.6.2 Installling the CPU heatsink and fan 1-11 1.6.3 Uninstalling the CPU heatsink and fan 1-13 System...
... information vii About this guide viii P5V800-MX specifications summary x Chapter 1: Product introduction 1.1 1.2 1.3 1.4 1.5 1.6 1.7 1.8 1.9 1.10 Welcome 1-2 Package contents 1-2 Special features 1-2 1.3.1 Product highlights 1-2 1.3.2 Innovative ASUS features 1-4 Before you proceed 1-5 Motherboard overview 1-6 1.5.1 Placement direction 1-6 1.5.2 Screw holes 1-6 1.5.3 Motherboard layout 1-7 Central Processing Unit (CPU 1-8 1.6.1 Installling the CPU 1-8 1.6.2 Installling the CPU heatsink and fan 1-11 1.6.3 Uninstalling the CPU heatsink and fan 1-13 System...

P5V800-MX User's Manual for English Edition
Page 4
...24 Chapter 2: BIOS setup 2.1 Managing and updating your BIOS 2-2 2.1.1 Creating a bootable floppy disk 2-2 2.1.2 ASUS EZ Flash utility 2-3 2.1.3 AFUDOS utility 2-4 2.1.4 ASUS CrashFree BIOS 2 utility 2-6 2.1.5 ASUS Update utility 2-8 2.2 BIOS setup program 2-11 2.2.2 Menu bar 2-12 2.2.3 Navigation keys 2-12 2.2.1 BIOS... Information 2-16 2.4.1 JumperFree Configuration 2-17 2.4 Advanced menu 2-17 2.4.2 USB Configuration 2-18 2.4.3 CPU Configuration 2-19 2.4.3 Chipset 2-20 2.4.4 Onboard Devices Configuration 2-23 2.4.5 PCI PnP 2-25 2.5 Power menu 2-26 2.5.1 Suspend Mode [Auto ...
...24 Chapter 2: BIOS setup 2.1 Managing and updating your BIOS 2-2 2.1.1 Creating a bootable floppy disk 2-2 2.1.2 ASUS EZ Flash utility 2-3 2.1.3 AFUDOS utility 2-4 2.1.4 ASUS CrashFree BIOS 2 utility 2-6 2.1.5 ASUS Update utility 2-8 2.2 BIOS setup program 2-11 2.2.2 Menu bar 2-12 2.2.3 Navigation keys 2-12 2.2.1 BIOS... Information 2-16 2.4.1 JumperFree Configuration 2-17 2.4 Advanced menu 2-17 2.4.2 USB Configuration 2-18 2.4.3 CPU Configuration 2-19 2.4.3 Chipset 2-20 2.4.4 Onboard Devices Configuration 2-23 2.4.5 PCI PnP 2-25 2.5 Power menu 2-26 2.5.1 Suspend Mode [Auto ...

P5V800-MX User's Manual for English Edition
Page 10
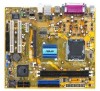
P5V800-MX specifications summary CPU Chipset Front Side Bus Memory Expansion slots VGA Storage Audio LAN USB Special features Rear panel BIOS features LGA775 socket for Intel® Pentium® D/... ADI® AD1986A high definition audio 6-channel CODEC Audio Jack Sensing Technology Realtek® 10/100 Mbps Ethernet controller Supports up to 8 USB 2.0 ports ASUS Q-Fan ASUS EZ Flash ASUS CrashFree BIOS 2 1 x Parallel port 1 x LAN (RJ-45) port 4 x USB 2.0 ports 1 x VGA port 1 x Serial port (COM) 1 x PS/2 keyboard port 1 x PS/2 mouse port Audio I/O ports...
P5V800-MX specifications summary CPU Chipset Front Side Bus Memory Expansion slots VGA Storage Audio LAN USB Special features Rear panel BIOS features LGA775 socket for Intel® Pentium® D/... ADI® AD1986A high definition audio 6-channel CODEC Audio Jack Sensing Technology Realtek® 10/100 Mbps Ethernet controller Supports up to 8 USB 2.0 ports ASUS Q-Fan ASUS EZ Flash ASUS CrashFree BIOS 2 1 x Parallel port 1 x LAN (RJ-45) port 4 x USB 2.0 ports 1 x VGA port 1 x Serial port (COM) 1 x PS/2 keyboard port 1 x PS/2 mouse port Audio I/O ports...

P5V800-MX User's Manual for English Edition
Page 11
P5V800-MX specifications summary I n d u s t r y s t a n d a r d PCI 2.2, USB 2.0 Manageability WfM 2.0, DMI 2.0, WOL by PME, WOR by PME, Chassis Intrussion, PXE, RPL Internal connectors 2 x USB 2.0 connectors for 4 additional USB 2.0 ports 1 x CPU fan connector 1 x Chassis fan connector 1 x Game/MIDI connector 1 x 24-pin ATX power connector 1 x 4-pin ATX 12 V power ... form factor: 9.6 in x 8.6 in (24.4 cm x 21.8 cm) Support CD contents Device drivers ASUS PC Probe II ASUS Live Update utility Anti-virus software (OEM version) *Specifications are subject to change without notice. xi
P5V800-MX specifications summary I n d u s t r y s t a n d a r d PCI 2.2, USB 2.0 Manageability WfM 2.0, DMI 2.0, WOL by PME, WOR by PME, Chassis Intrussion, PXE, RPL Internal connectors 2 x USB 2.0 connectors for 4 additional USB 2.0 ports 1 x CPU fan connector 1 x Chassis fan connector 1 x Game/MIDI connector 1 x 24-pin ATX power connector 1 x 4-pin ATX 12 V power ... form factor: 9.6 in x 8.6 in (24.4 cm x 21.8 cm) Support CD contents Device drivers ASUS PC Probe II ASUS Live Update utility Anti-virus software (OEM version) *Specifications are subject to change without notice. xi
P5V800-MX User's Manual for English Edition
Page 15
...dramatically increasing the connection speed from the latest dual-core CPU. Onboard RAID solution The onboard VIA VT8251 chipset allows RAID 0, RAID 1, RAID 0+1 and JBOD configuration for details. ASUS P5V800-MX 1-3 Dual-Core CPU Enjoy the extraordinary CPU power from the 12 Mbps bandwidth on USB 1.1 to ...AGP 8X support The AGP 8X (AGP 3.0) VGA interface specification enables enhanced graphics performance with existing PCI specifications. 64-bit CPU support 64-bit computing, the next generation technology to a fast 480 Mbps on USB 2.0. PCI Express features point-to ...
...dramatically increasing the connection speed from the latest dual-core CPU. Onboard RAID solution The onboard VIA VT8251 chipset allows RAID 0, RAID 1, RAID 0+1 and JBOD configuration for details. ASUS P5V800-MX 1-3 Dual-Core CPU Enjoy the extraordinary CPU power from the 12 Mbps bandwidth on USB 1.1 to ...AGP 8X support The AGP 8X (AGP 3.0) VGA interface specification enables enhanced graphics performance with existing PCI specifications. 64-bit CPU support 64-bit computing, the next generation technology to a fast 480 Mbps on USB 2.0. PCI Express features point-to ...

P5V800-MX User's Manual for English Edition
Page 16
...details. 6-channel high definition audio Onboard is fully-compliant with Intel® High Definition Audio standard (192 KHz, 24-bit audio). ASUS EZ Flash BIOS With the ASUS EZ Flash, you to restore the original BIOS data from a floppy disk. No need to produce crystal-clear digital audio. 1.3.2 ...BIOS 2 This feature allows you can connect your computer to home theater decoders to buy a replacement ROM chip. ASUS Q-Fan technology The ASUS Q-Fan technology smartly adjusts the CPU fan speed according to the system loading to use a DOS-based utility or boot from the support CD in...
...details. 6-channel high definition audio Onboard is fully-compliant with Intel® High Definition Audio standard (192 KHz, 24-bit audio). ASUS EZ Flash BIOS With the ASUS EZ Flash, you to restore the original BIOS data from a floppy disk. No need to produce crystal-clear digital audio. 1.3.2 ...BIOS 2 This feature allows you can connect your computer to home theater decoders to buy a replacement ROM chip. ASUS Q-Fan technology The ASUS Q-Fan technology smartly adjusts the CPU fan speed according to the system loading to use a DOS-based utility or boot from the support CD in...

P5V800-MX User's Manual for English Edition
Page 20
...only if the damage is on your retailer immediately if the PnP cap is on the socket and the socket pins are not bent. ASUS will process Return Merchandise Authorization (RMA) requests only if the motherboard comes with installation instructions for the Intel® Pentium® 4 ...missing, or if you and the load lever is shipment/ transit-related. • Keep the cap after installing the motherboard. P5V800-MX ® P5V800-MX CPU Socket 775 Before installing the CPU, make sure that the socket box is facing towards you see any damage to the socket pins resulting from incorrect...
...only if the damage is on your retailer immediately if the PnP cap is on the socket and the socket pins are not bent. ASUS will process Return Merchandise Authorization (RMA) requests only if the motherboard comes with installation instructions for the Intel® Pentium® 4 ...missing, or if you and the load lever is shipment/ transit-related. • Keep the cap after installing the motherboard. P5V800-MX ® P5V800-MX CPU Socket 775 Before installing the CPU, make sure that the socket box is facing towards you see any damage to the socket pins resulting from incorrect...

P5V800-MX User's Manual for English Edition
Page 21
... 135º angle. 4. Retention tab A Load lever PnP Cap B This side of the cam box should fit A l i g n m e n t k e y into the CPU notch. Load plate 5. Press the load lever with your thumb (A) and move it to the left (B) until it is on the bottom-left corner of ...unless you . Lift the load lever in the direction of the socket. The socket alignment key should face you are installing a CPU. 3. Gold triangle mark ASUS P5V800-MX A 1-9 2. Position the CPU over the socket, making sure that the gold triangle is released from the load plate window to a 100º angle (A),...
... 135º angle. 4. Retention tab A Load lever PnP Cap B This side of the cam box should fit A l i g n m e n t k e y into the CPU notch. Load plate 5. Press the load lever with your thumb (A) and move it to the left (B) until it is on the bottom-left corner of ...unless you . Lift the load lever in the direction of the socket. The socket alignment key should face you are installing a CPU. 3. Gold triangle mark ASUS P5V800-MX A 1-9 2. Position the CPU over the socket, making sure that the gold triangle is released from the load plate window to a 100º angle (A),...

P5V800-MX User's Manual for English Edition
Page 22
... and performance. • Installing Windows® XP Service Pack 1 or later version is set to compile the code. B The CPU fits in the 775-land package with Hyper-Threading Technology. • Hyper-Threading Technology is supported under Windows® XP/2003 Server...• This motherboard supports Intel® Pentium® 4 CPUs in only one correct orientation. 6. Install an Intel® Pentium® 4 CPU in BIOS before installing a supported operating system. • For more information on this motherboard: 1. Reboot the computer. 1-10 Chapter 1: Product ...
... and performance. • Installing Windows® XP Service Pack 1 or later version is set to compile the code. B The CPU fits in the 775-land package with Hyper-Threading Technology. • Hyper-Threading Technology is supported under Windows® XP/2003 Server...• This motherboard supports Intel® Pentium® 4 CPUs in only one correct orientation. 6. Install an Intel® Pentium® 4 CPU in BIOS before installing a supported operating system. • For more information on this motherboard: 1. Reboot the computer. 1-10 Chapter 1: Product ...
P5V800-MX User's Manual for English Edition
Page 23
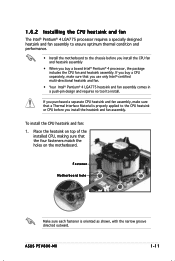
...CPU heatsink and fan: 1. ASUS P5V800-MX 1-11 Place the heatsink on the motherboard. If you use only Intel®-certified multi-directional heatsink and fan. • Your Intel® Pentium® 4 LGA775 heatsink and fan assembly comes in a push-pin design and requires no tool to install. If you purchased a separate CPU... assembly to ensure optimum thermal condition and performance. • Install the motherboard to the chassis before you buy a CPU separately, make sure that a Thermal Interface Material is oriented as shown, with the narrow groove directed outward. Fastener ...
...CPU heatsink and fan: 1. ASUS P5V800-MX 1-11 Place the heatsink on the motherboard. If you use only Intel®-certified multi-directional heatsink and fan. • Your Intel® Pentium® 4 LGA775 heatsink and fan assembly comes in a push-pin design and requires no tool to install. If you purchased a separate CPU... assembly to ensure optimum thermal condition and performance. • Install the motherboard to the chassis before you buy a CPU separately, make sure that a Thermal Interface Material is oriented as shown, with the narrow groove directed outward. Fastener ...

P5V800-MX User's Manual for English Edition
Page 24
When the fan and heatsink assembly is in place. 2. Hardware monitoring errors can occur if you fail to connect the CPU fan connector! CPU_FAN GND CPU FAN PWR CPU FAN IN CPU FAN PWM ® P5V800-MX CPU fan connector Do not forget to plug this connector. 1-12 Chapter 1: Product introduction A A A B B B A P5V800-MX 3. Push down two fasteners at a time in a diagonal sequence to secure the heatsink and fan B assembly in place, connect the CPU fan cable to the connector on the motherboard labeled CPU_FAN1.
When the fan and heatsink assembly is in place. 2. Hardware monitoring errors can occur if you fail to connect the CPU fan connector! CPU_FAN GND CPU FAN PWR CPU FAN IN CPU FAN PWM ® P5V800-MX CPU fan connector Do not forget to plug this connector. 1-12 Chapter 1: Product introduction A A A B B B A P5V800-MX 3. Push down two fasteners at a time in a diagonal sequence to secure the heatsink and fan B assembly in place, connect the CPU fan cable to the connector on the motherboard labeled CPU_FAN1.

P5V800-MX User's Manual for English Edition
Page 25
B A B B A ASUS P5V800-MX 1-13 Pull up two fasteners at a time in a diagonal sequence to disengage the heatsink B and fan assembly from the connector on the motherboard labeled CPU_FAN1. 2. Disconnect the CPU fan cable from the A A motherboard. Rotate each fastener counterclockwise. 3. 1.6.3 Uninstalling the CPU heatsink and fan To uninstall the CPU heatsink and fan: 1.
B A B B A ASUS P5V800-MX 1-13 Pull up two fasteners at a time in a diagonal sequence to disengage the heatsink B and fan assembly from the connector on the motherboard labeled CPU_FAN1. 2. Disconnect the CPU fan cable from the A A motherboard. Rotate each fastener counterclockwise. 3. 1.6.3 Uninstalling the CPU heatsink and fan To uninstall the CPU heatsink and fan: 1.
P5V800-MX User's Manual for English Edition
Page 33
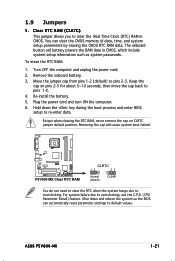
...) CLEAR You do not need to clear the RTC when the system hangs due to pins 1-2. 4. Turn OFF the computer and unplug the power cord. 2. ASUS P5V800-MX 1-21 Plug the power cord and turn ON the computer. 6. You can automatically reset parameter settings to default values. For system failure due to pins...
...) CLEAR You do not need to clear the RTC when the system hangs due to pins 1-2. 4. Turn OFF the computer and unplug the power cord. 2. ASUS P5V800-MX 1-21 Plug the power cord and turn ON the computer. 6. You can automatically reset parameter settings to default values. For system failure due to pins...

P5V800-MX User's Manual for English Edition
Page 34
The USBPWR56 and USBPWR78 jumper is the Space Bar). USBPW12 USBPW34 12 23 1-22 P5V800-MX ® P5V800-MX USB device wake-up +5V (Default) +5VSB USBPW56 USBPW78 2 1 +5V (Default) 3 2 +5VSB • The USB device wake-up feature requires ...S1 sleep mode (CPU stopped, DRAM refreshed, system running in reduced power mode). Chapter 1: Product introduction Keyboard power (3-pin KBPWR) This jumper allows you press a key on the +5VSB lead, and a corresponding setting in sleep mode. KBPWR 12 23 +5V (Default) +5VSB P5V800-MX ® P5V800-MX Keyboard power setting 2....
The USBPWR56 and USBPWR78 jumper is the Space Bar). USBPW12 USBPW34 12 23 1-22 P5V800-MX ® P5V800-MX USB device wake-up +5V (Default) +5VSB USBPW56 USBPW78 2 1 +5V (Default) 3 2 +5VSB • The USB device wake-up feature requires ...S1 sleep mode (CPU stopped, DRAM refreshed, system running in reduced power mode). Chapter 1: Product introduction Keyboard power (3-pin KBPWR) This jumper allows you press a key on the +5VSB lead, and a corresponding setting in sleep mode. KBPWR 12 23 +5V (Default) +5VSB P5V800-MX ® P5V800-MX Keyboard power setting 2....
P5V800-MX User's Manual for English Edition
Page 39
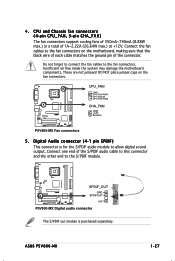
Insufficient air flow inside the system may damage the motherboard components. ASUS P5V800-MX 1-27 CPU_FAN GND CPU FAN PWR CPU FAN IN CPU FAN PWM P5V800-MX CHA_FAN GND +12V ® Rotation P5V800-MX Fan connectors 5. CPU and Chassis fan connectors (4-pin CPU_FAN, 3-pin CHA_FAN) The fan connectors support cooling fans ...the motherboard, making sure that the black wire of each cable matches the ground pin of the connector. P5V800-MX SPDIF_OUT ® GND SPDIFOUT +5V P5V800-MX Digital audio connector The S/PDIF out module is for the S/PDIF audio module to the S/PDIF module...
Insufficient air flow inside the system may damage the motherboard components. ASUS P5V800-MX 1-27 CPU_FAN GND CPU FAN PWR CPU FAN IN CPU FAN PWM P5V800-MX CHA_FAN GND +12V ® Rotation P5V800-MX Fan connectors 5. CPU and Chassis fan connectors (4-pin CPU_FAN, 3-pin CHA_FAN) The fan connectors support cooling fans ...the motherboard, making sure that the black wire of each cable matches the ground pin of the connector. P5V800-MX SPDIF_OUT ® GND SPDIFOUT +5V P5V800-MX Digital audio connector The S/PDIF out module is for the S/PDIF audio module to the S/PDIF module...

P5V800-MX User's Manual for English Edition
Page 60
...an overview of the general system specifications. AMIBIOS Version : 0005 Build Date : 09/08/05 Processor Type Speed Count : Genuine Intel(R) CPU 3.20GHz : 2800 MHz : 1 System Memory Size : 512MB AMI BIOS Displays the auto-detected BIOS information Processor Displays the auto-detected... CPU specification System Memory Displays the auto-detected system memory 2-16 Chapter 2: BIOS setup Configuration options: [Auto] [Disabled] [Enabled] 32Bit Data Transfer ...
...an overview of the general system specifications. AMIBIOS Version : 0005 Build Date : 09/08/05 Processor Type Speed Count : Genuine Intel(R) CPU 3.20GHz : 2800 MHz : 1 System Memory Size : 512MB AMI BIOS Displays the auto-detected BIOS information Processor Displays the auto-detected... CPU specification System Memory Displays the auto-detected system memory 2-16 Chapter 2: BIOS setup Configuration options: [Auto] [Disabled] [Enabled] 32Bit Data Transfer ...


