
P5V800-MX User's Manual for English Edition
Page 5
...2.5.2 Repost Video on S3 Resume [No 2-26 2.5.3 ACPI 2.0 Support [No 2-27 2.5.4 ACPI APIC Support [Enabled 2-27 2.5.5 APM Configuration 2-27 2.5.6 Hardware Monitor 2-28 2.6 Boot menu 2-29 2.6.1 Boot Device Priority 2-30 2.6.2 Boot Settings Configuration 2-30 2.6.3 Security 2-31 2.7 Exit menu 2-34 Chapter 3: Software support 3.1 Installing an operating system 3-2 3.2 Support CD information 3-2 3.2.1 Running the support CD 3-2 3.2.2 Drivers menu 3-3 3.2.3 Utilities menu 3-4 3.2.4 Make Disk menu 3-5 3.2.5 Manuals menu 3-5 3.2.6 ASUS Contact information 3-6 3.3 RAID configurations...
...2.5.2 Repost Video on S3 Resume [No 2-26 2.5.3 ACPI 2.0 Support [No 2-27 2.5.4 ACPI APIC Support [Enabled 2-27 2.5.5 APM Configuration 2-27 2.5.6 Hardware Monitor 2-28 2.6 Boot menu 2-29 2.6.1 Boot Device Priority 2-30 2.6.2 Boot Settings Configuration 2-30 2.6.3 Security 2-31 2.7 Exit menu 2-34 Chapter 3: Software support 3.1 Installing an operating system 3-2 3.2 Support CD information 3-2 3.2.1 Running the support CD 3-2 3.2.2 Drivers menu 3-3 3.2.3 Utilities menu 3-4 3.2.4 Make Disk menu 3-5 3.2.5 Manuals menu 3-5 3.2.6 ASUS Contact information 3-6 3.3 RAID configurations...
P5V800-MX User's Manual for English Edition
Page 15
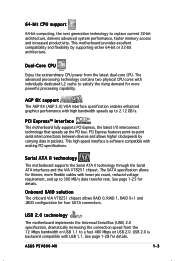
... high bandwidth speeds up to 2.12 GB/s. ASUS P5V800-MX 1-3 Dual-Core CPU Enjoy the extraordinary CPU power from the 12 Mbps bandwidth on USB 2.0. AGP 8X support The AGP 8X (AGP 3.0) VGA interface specification enables enhanced graphics performance with individually dedicated L2 cache to satisfy the rising demand for more flexible cables with lower pin count, reduced voltage requirement, and up the PCI bus. See page 1-25 for four SATA connectors. This motherboard...
... high bandwidth speeds up to 2.12 GB/s. ASUS P5V800-MX 1-3 Dual-Core CPU Enjoy the extraordinary CPU power from the 12 Mbps bandwidth on USB 2.0. AGP 8X support The AGP 8X (AGP 3.0) VGA interface specification enables enhanced graphics performance with individually dedicated L2 cache to satisfy the rising demand for more flexible cables with lower pin count, reduced voltage requirement, and up the PCI bus. See page 1-25 for four SATA connectors. This motherboard...

P5V800-MX User's Manual for English Edition
Page 16
... 1: Product introduction See details on page 2-6. This CODEC is the ADI AD1986A High Definition Audio 6-channel audio CODEC. 6-channel high definition audio Onboard is fully-compliant with Intel® High Definition Audio standard (192 KHz, 24-bit audio). This protection eliminates the need to restore the original BIOS data from a floppy disk. See page 2-3 for details. ASUS Q-Fan technology The ASUS Q-Fan technology smartly adjusts the CPU fan speed according to the system loading to buy a replacement ROM chip.
... 1: Product introduction See details on page 2-6. This CODEC is the ADI AD1986A High Definition Audio 6-channel audio CODEC. 6-channel high definition audio Onboard is fully-compliant with Intel® High Definition Audio standard (192 KHz, 24-bit audio). This protection eliminates the need to restore the original BIOS data from a floppy disk. See page 2-3 for details. ASUS Q-Fan technology The ASUS Q-Fan technology smartly adjusts the CPU fan speed according to the system loading to buy a replacement ROM chip.

P5V800-MX User's Manual for English Edition
Page 30
... removed earlier. 6. Align the card connector with it by adjusting the software settings. 1. See Chapter 2 for the card. 2. The following sub-sections describe the slots and the expansion cards that came with the slot and press firmly until the card is already installed in a chassis). 3. Assign an IRQ to the tables on the system and change the necessary BIOS settings, if any. Install the software drivers for later use...
... removed earlier. 6. Align the card connector with it by adjusting the software settings. 1. See Chapter 2 for the card. 2. The following sub-sections describe the slots and the expansion cards that came with the slot and press firmly until the card is already installed in a chassis). 3. Assign an IRQ to the tables on the system and change the necessary BIOS settings, if any. Install the software drivers for later use...

P5V800-MX User's Manual for English Edition
Page 34
... +5V (Default) +5VSB P5V800-MX ® P5V800-MX Keyboard power setting 2. Set to +5VSB to enable or disable the keyboard wake-up . • The total current consumed must NOT exceed the power supply capability (+5VSB) whether under normal condition or in low power mode) using the connected USB devices. The USBPWR12 and USBPWR34 jumpers are for the rear USB ports. USB device wake-up (3-pin USBPW12, USBPW34, USBPW56, USBPW78) Set these jumpers to +5V to wake up from S1 sleep mode (CPU stopped, DRAM refreshed...
... +5V (Default) +5VSB P5V800-MX ® P5V800-MX Keyboard power setting 2. Set to +5VSB to enable or disable the keyboard wake-up . • The total current consumed must NOT exceed the power supply capability (+5VSB) whether under normal condition or in low power mode) using the connected USB devices. The USBPWR12 and USBPWR34 jumpers are for the rear USB ports. USB device wake-up (3-pin USBPW12, USBPW34, USBPW56, USBPW78) Set these jumpers to +5V to wake up from S1 sleep mode (CPU stopped, DRAM refreshed...
P5V800-MX User's Manual for English Edition
Page 35
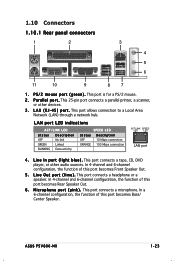
... Area Network (LAN) through a network hub. M i c r o p h o n e p o r t ( p i n k ) . This 25-pin port connects a parallel printer, a scanner, or other audio sources. This port connects a microphone. P S / 2 m o u s e p o r t ( g r e e n ) . L A N ( R J - 4 5 ) p o r t . This port connects a tape, CD, DVD player, or other devices. 3 . This port is for a PS/2 mouse. 2 . In a 6-channel configuration, the function of this port becomes Front Speaker Out. 5 . In 4-channel and 6-channel configuration, the function of this port becomes Rear Speaker Out. 6 . ASUS P5V800-MX 1-23...
... Area Network (LAN) through a network hub. M i c r o p h o n e p o r t ( p i n k ) . This 25-pin port connects a parallel printer, a scanner, or other audio sources. This port connects a microphone. P S / 2 m o u s e p o r t ( g r e e n ) . L A N ( R J - 4 5 ) p o r t . This port connects a tape, CD, DVD player, or other devices. 3 . This port is for a PS/2 mouse. 2 . In a 6-channel configuration, the function of this port becomes Front Speaker Out. 5 . In 4-channel and 6-channel configuration, the function of this port becomes Rear Speaker Out. 6 . ASUS P5V800-MX 1-23...

P5V800-MX User's Manual for English Edition
Page 43
... sleep mode. • Hard disk drive activity (Red 2-pin IDE_LED) This 2-pin connector is color-coded for the chassis-mounted system warning speaker. Connect the HDD Activity LED cable to hear system beeps and warnings. • Power/Soft-off the system power. The IDE LED lights up when you to this connector. Refer to the HDD. • System warning speaker (Orange 4-pin SPEAKER) This 4-pin connector is for the system power button. The speaker allows you turn on the BIOS settings. ASUS P5V800-MX 1-31 The system power LED lights...
... sleep mode. • Hard disk drive activity (Red 2-pin IDE_LED) This 2-pin connector is color-coded for the chassis-mounted system warning speaker. Connect the HDD Activity LED cable to hear system beeps and warnings. • Power/Soft-off the system power. The IDE LED lights up when you to this connector. Refer to the HDD. • System warning speaker (Orange 4-pin SPEAKER) This 4-pin connector is for the system power button. The speaker allows you turn on the BIOS settings. ASUS P5V800-MX 1-31 The system power LED lights...
P5V800-MX User's Manual for English Edition
Page 47
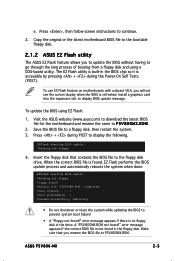
... the Power-On Self Tests (POST). Insert the floppy disk that you to update the BIOS without having to P5V800MX.ROM. Floppy found !" ASUS P5V800-MX 2-3 Install a graphics card into the expansion slot to prevent system boot failure! • A "Floppy not found!" Start erasing.......| Start programming...| Flashed successfully. Rebooting. • Do not shutdown or reset the system while updating the BIOS to display BIOS update message. Press , then follow screen instructions to a floppy disk, then restart the system. 3. When the correct BIOS file...
... the Power-On Self Tests (POST). Insert the floppy disk that you to update the BIOS without having to P5V800MX.ROM. Floppy found !" ASUS P5V800-MX 2-3 Install a graphics card into the expansion slot to prevent system boot failure! • A "Floppy not found!" Start erasing.......| Start programming...| Flashed successfully. Rebooting. • Do not shutdown or reset the system while updating the BIOS to display BIOS update message. Press , then follow screen instructions to a floppy disk, then restart the system. 3. When the correct BIOS file...

P5V800-MX User's Manual for English Edition
Page 52
... connection either through a network or an Internet Service Provider (ISP). Place the support CD in Windows® environment. X X. X X . Installing ASUS Update To install ASUS Update: 1. The ASUS Update utility allows you to your system. The ASUS Update utility is copied to : • Save the current BIOS file • Download the latest BIOS file from the Internet • Update the BIOS from an updated BIOS file • Update the BIOS directly from the Internet, and • View the BIOS version information. The D r i v e r s menu...
... connection either through a network or an Internet Service Provider (ISP). Place the support CD in Windows® environment. X X. X X . Installing ASUS Update To install ASUS Update: 1. The ASUS Update utility allows you to your system. The ASUS Update utility is copied to : • Save the current BIOS file • Download the latest BIOS file from the Internet • Update the BIOS from an updated BIOS file • Update the BIOS directly from the Internet, and • View the BIOS version information. The D r i v e r s menu...

P5V800-MX User's Manual for English Edition
Page 57
...] :[Not Detected] :[Not Detected] :[Not Detected] :[Not Detected] Main menu items Use [ENTER], [TAB] or [SHIFT-TAB] to display a pop-up window Scroll bar ASUS P5V800-MX 2-13 Configure DRAM Timing by SPD Memory Acceleration Mode DRAM Idle Timer DRAm Refresh Rate [Enabled] [Auto] [Auto] [Auto] Graphic Adapter Priority Graphics Aperture Size Spread Spectrum [AGP/PCI] [ 64 MB] [Enabled] ICH Delayed Transaction [Enabled] MPS Revision [1.4] Select Screen Select Item +- You cannot select an item that the...
...] :[Not Detected] :[Not Detected] :[Not Detected] :[Not Detected] Main menu items Use [ENTER], [TAB] or [SHIFT-TAB] to display a pop-up window Scroll bar ASUS P5V800-MX 2-13 Configure DRAM Timing by SPD Memory Acceleration Mode DRAM Idle Timer DRAm Refresh Rate [Enabled] [Auto] [Auto] [Auto] Graphic Adapter Priority Graphics Aperture Size Spread Spectrum [AGP/PCI] [ 64 MB] [Enabled] ICH Delayed Transaction [Enabled] MPS Revision [1.4] Select Screen Select Item +- You cannot select an item that the...

P5V800-MX User's Manual for English Edition
Page 59
... Removable Media Device) if your device is installed in the system. Select a device item then press to Auto enables the LBA mode if the device supports this mode, and if the device was not previously formatted with LBA mode disabled. These values are specifically configuring a CD-ROM drive. There is a separate sub-menu for each IDE device. Setting to the device occurs multiple sectors at a time. Configuration options: [Disabled] [Auto] ASUS P5V800-MX 2-15 Select CDROM if you are not user-configurable...
... Removable Media Device) if your device is installed in the system. Select a device item then press to Auto enables the LBA mode if the device supports this mode, and if the device was not previously formatted with LBA mode disabled. These values are specifically configuring a CD-ROM drive. There is a separate sub-menu for each IDE device. Setting to the device occurs multiple sectors at a time. Configuration options: [Disabled] [Auto] ASUS P5V800-MX 2-15 Select CDROM if you are not user-configurable...

P5V800-MX User's Manual for English Edition
Page 60
... Memory Size : 512MB AMI BIOS Displays the auto-detected BIOS information Processor Displays the auto-detected CPU specification System Memory Displays the auto-detected system memory 2-16 Chapter 2: BIOS setup PIO Mode [Auto] Selects the PIO mode. The BIOS automatically detects the items in this menu. Configuration options: [Disabled] [Enabled] 2.3.5 System Information This menu gives you an overview of the general system specifications. Configuration options: [Auto] SMART Monitoring [Auto] Sets the Smart Monitoring, Analysis, and Reporting Technology. Configuration options: [Auto...
... Memory Size : 512MB AMI BIOS Displays the auto-detected BIOS information Processor Displays the auto-detected CPU specification System Memory Displays the auto-detected system memory 2-16 Chapter 2: BIOS setup PIO Mode [Auto] Selects the PIO mode. The BIOS automatically detects the items in this menu. Configuration options: [Disabled] [Enabled] 2.3.5 System Information This menu gives you an overview of the general system specifications. Configuration options: [Auto] SMART Monitoring [Auto] Sets the Smart Monitoring, Analysis, and Reporting Technology. Configuration options: [Auto...

P5V800-MX User's Manual for English Edition
Page 62
Advanced BIOS SETUP UTILITY USB Configuration Module Version - 2.24.0-11.4 USB Devices Enabled: None USB 1.1 Ports Configuration USB 2.0 Ports Enable Legacy USB Support USB 2.0 Controller Mode BIOS EHCI Hand-Off [Enabled] [Enable] [Auto] [FullSpeed] [Enabled] Enables 1.1 USB host controllers. Select Screen Select Item +- If no USB device is detected, the legacy USB support is disabled. Configuration options: [Disabled] [Enable] Legacy USB Support [Auto] Allows you to enable. If detected, the USB controller legacy mode is detected, the item shows None. Setting to Auto allows the ...
Advanced BIOS SETUP UTILITY USB Configuration Module Version - 2.24.0-11.4 USB Devices Enabled: None USB 1.1 Ports Configuration USB 2.0 Ports Enable Legacy USB Support USB 2.0 Controller Mode BIOS EHCI Hand-Off [Enabled] [Enable] [Auto] [FullSpeed] [Enabled] Enables 1.1 USB host controllers. Select Screen Select Item +- If no USB device is detected, the legacy USB support is disabled. Configuration options: [Disabled] [Enable] Legacy USB Support [Auto] Allows you to enable. If detected, the USB controller legacy mode is detected, the item shows None. Setting to Auto allows the ...

P5V800-MX User's Manual for English Edition
Page 64
Configuration options: [Disabled] [Enabled] Hyper-Threading Technology [Enabled] This item allows you install a processor with the Execute Disable function or Hyper-Threading. NorthBridge Configuration Advanced NorthBridge Configuration BIOS SETUP UTILITY DRAM Clock/Timing Configuration AGP & P2P Bridge Configuration Options for VIA P4M800 Northbridge Configuration Southbridge Configuration Select Screen Select Item Enter Go to Subscreen F1 General Help F10 Save and Exit ESC Exit v02.58 (C)Copyright 1985-2004, American Megatrends, Inc. Options for DRAM 2-20 Chapter...
Configuration options: [Disabled] [Enabled] Hyper-Threading Technology [Enabled] This item allows you install a processor with the Execute Disable function or Hyper-Threading. NorthBridge Configuration Advanced NorthBridge Configuration BIOS SETUP UTILITY DRAM Clock/Timing Configuration AGP & P2P Bridge Configuration Options for VIA P4M800 Northbridge Configuration Southbridge Configuration Select Screen Select Item Enter Go to Subscreen F1 General Help F10 Save and Exit ESC Exit v02.58 (C)Copyright 1985-2004, American Megatrends, Inc. Options for DRAM 2-20 Chapter...
P5V800-MX User's Manual for English Edition
Page 67
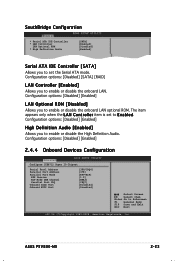
.... ASUS P5V800-MX 2-23 SouthBridge Configuration * Serial ATA IDE Controller * LAN Controller LAN Optional ROM * High Definition Audio [SATA] [Enabled] [Disabled] [Enabled] Serial ATA IDE Controller [SATA] Allows you to enable or disable the onboard LAN optional ROM. The item appears only when the L A N C o n t r o l l e r item is set the Serial ATA mode. Configuration options: [Disabled] [Enabled] 2.4.4 Onboard Devices Configuration Advanced BIOS SETUP UTILITY Configure ITE8712 Super IO Chipset Serial Port1 Address Parallel Port Address Parallel Port Mode EPP Version ECP Mode DMA...
.... ASUS P5V800-MX 2-23 SouthBridge Configuration * Serial ATA IDE Controller * LAN Controller LAN Optional ROM * High Definition Audio [SATA] [Enabled] [Disabled] [Enabled] Serial ATA IDE Controller [SATA] Allows you to enable or disable the onboard LAN optional ROM. The item appears only when the L A N C o n t r o l l e r item is set the Serial ATA mode. Configuration options: [Disabled] [Enabled] 2.4.4 Onboard Devices Configuration Advanced BIOS SETUP UTILITY Configure ITE8712 Super IO Chipset Serial Port1 Address Parallel Port Address Parallel Port Mode EPP Version ECP Mode DMA...
P5V800-MX User's Manual for English Edition
Page 70
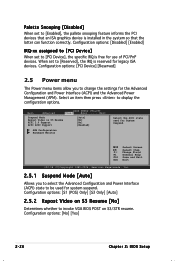
... invoke VGA BIOS POST on S3 Resume ACPI 2.0 Support ACPI APIC Support [Auto] [No] [No] [Enabled] APM Configuration Hardware Monitor Select the ACPI state used for the Advanced Configuration and Power Interface (ACPI) and the Advanced Power Management (APM). Change Field F1 General Help F10 Save and Exit ESC Exit v02.58 (C)Copyright 1985-2004, American Megatrends, Inc. 2.5.1 Suspend Mode [Auto] Allows you to display the configuration options. Configuration options: [No] [Yes] 2-26 Chapter 2: BIOS Setup Main Advanced BIOS SETUP UTILITY Power Boot...
... invoke VGA BIOS POST on S3 Resume ACPI 2.0 Support ACPI APIC Support [Auto] [No] [No] [Enabled] APM Configuration Hardware Monitor Select the ACPI state used for the Advanced Configuration and Power Interface (ACPI) and the Advanced Power Management (APM). Change Field F1 General Help F10 Save and Exit ESC Exit v02.58 (C)Copyright 1985-2004, American Megatrends, Inc. 2.5.1 Suspend Mode [Auto] Allows you to display the configuration options. Configuration options: [No] [Yes] 2-26 Chapter 2: BIOS Setup Main Advanced BIOS SETUP UTILITY Power Boot...

P5V800-MX User's Manual for English Edition
Page 75
.... Configuration options: [Disabled] [Enabled] Interrupt 19 Capture [Disabled] When set to [Enabled], this function allows the option ROMs to change the system security settings. Configuration options: [Off] [On] Wait for the NumLock. Configuration options: [Disabled] [Enabled] Hit 'DEL' Message Display [Enabled] When set to Enabled, the system waits for option ROM. again to display the configuration options. ASUS P5V800-MX 2-31 Select an item then press to disabled password. Add On ROM Display Mode [Force BIOS] Sets the display mode for the F1 key to run Setup" during POST...
.... Configuration options: [Disabled] [Enabled] Interrupt 19 Capture [Disabled] When set to [Enabled], this function allows the option ROMs to change the system security settings. Configuration options: [Off] [On] Wait for the NumLock. Configuration options: [Disabled] [Enabled] Hit 'DEL' Message Display [Enabled] When set to Enabled, the system waits for option ROM. again to display the configuration options. ASUS P5V800-MX 2-31 Select an item then press to disabled password. Add On ROM Display Mode [Force BIOS] Sets the display mode for the F1 key to run Setup" during POST...

P5V800-MX User's Manual for English Edition
Page 80
... Service Pack 1 or later versions before installing the drivers for reference only. Use the setup procedures presented in your hardware. • Motherboard settings and hardware options vary. Always install the latest OS version and corresponding updates to maximize the features of your computer, browse the contents of the support CD are subject to avail all motherboard features. Double-click the A S S E T U P . The CD automatically displays the D r i v e r s menu...
... Service Pack 1 or later versions before installing the drivers for reference only. Use the setup procedures presented in your hardware. • Motherboard settings and hardware options vary. Always install the latest OS version and corresponding updates to maximize the features of your computer, browse the contents of the support CD are subject to avail all motherboard features. Double-click the A S S E T U P . The CD automatically displays the D r i v e r s menu...

P5V800-MX User's Manual for English Edition
Page 82
ASUS Screen Saver Installs the ASUS screen saver. Microsoft DirectX 9.0c Installs the Microsoft® DirectX 9.0c driver. Anti-Virus Utility Installs the anti-virus program. ASUS PC Probe II This smart utility monitors the fan speed, CPU temperature, and system voltages, and alerts you of any detected problems. This utility helps you to update the motherboard BIOS in healthy operating condition. ADOBE Reader V7.0 Installs the Adobe® Acrobat® Reader V7.0. View the...
ASUS Screen Saver Installs the ASUS screen saver. Microsoft DirectX 9.0c Installs the Microsoft® DirectX 9.0c driver. Anti-Virus Utility Installs the anti-virus program. ASUS PC Probe II This smart utility monitors the fan speed, CPU temperature, and system voltages, and alerts you of any detected problems. This utility helps you to update the motherboard BIOS in healthy operating condition. ADOBE Reader V7.0 Installs the Adobe® Acrobat® Reader V7.0. View the...

P5V800-MX User's Manual for English Edition
Page 90
... the support CD to locate the driver disk utility and go to \ D r i v e r s \ C h i p s e t \ E I A 4 i n 1 \ D i s k for the VIA RAID driver disk utility Refer to section "3.2.2 Drivers menu" for details. 3 Insert floppy disk to install third-party SCSI or RAID driver. 2. Press then insert the floppy disk with the RAID driver is required when installing Windows® 2000/XP operating system on a hard disk drive that is included in a RAID set. To install the RAID driver: 1. Place the motherboard support CD into the floppy disk drive. 3. Follow the succeeding screen instructions...
... the support CD to locate the driver disk utility and go to \ D r i v e r s \ C h i p s e t \ E I A 4 i n 1 \ D i s k for the VIA RAID driver disk utility Refer to section "3.2.2 Drivers menu" for details. 3 Insert floppy disk to install third-party SCSI or RAID driver. 2. Press then insert the floppy disk with the RAID driver is required when installing Windows® 2000/XP operating system on a hard disk drive that is included in a RAID set. To install the RAID driver: 1. Place the motherboard support CD into the floppy disk drive. 3. Follow the succeeding screen instructions...


