User Manual
Page 11
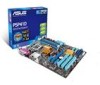
...174; LGA775 Core™ 2 Extreme / Core™ 2 Quad/ Core™ 2 Duo processors, which are excellent for buying an ASUS® P5P41D motherboard! Before you for multitasking, multimedia, and enthusiastic gamers with the list below. 1.2 Package contents Check your retailer. Thank you start ...installing the motherboard, and hardware devices on it another standout in the 45nm manufacturing process. ASUS P5P41D 1-1 This motherboard also supports Intel® CPUs in the long line of the above items is damaged or missing, contact your...
...174; LGA775 Core™ 2 Extreme / Core™ 2 Quad/ Core™ 2 Duo processors, which are excellent for buying an ASUS® P5P41D motherboard! Before you for multitasking, multimedia, and enthusiastic gamers with the list below. 1.2 Package contents Check your retailer. Thank you start ...installing the motherboard, and hardware devices on it another standout in the 45nm manufacturing process. ASUS P5P41D 1-1 This motherboard also supports Intel® CPUs in the long line of the above items is damaged or missing, contact your...

User Manual
Page 13
...without using the bundled support DVD or USB flash disk that allows you to restore a corrupted BIOS file using an OS-based utility. ASUS EZ Flash 2 ASUS EZ Flash 2 is an auto-recovery tool that allows you to update the BIOS without entering the Windows OS. •.... Five seconds after turning on the system, and any faulty cable connections are reported back up to their default settings. ASUS P5P41D 1-3 ASUS Express Gate Express Gate is in line with the ASUS vision of Hazardous Substances (RoHS). It supports file downloading to USB devices only. • The actrual boot time is...
...without using the bundled support DVD or USB flash disk that allows you to restore a corrupted BIOS file using an OS-based utility. ASUS EZ Flash 2 ASUS EZ Flash 2 is an auto-recovery tool that allows you to update the BIOS without entering the Windows OS. •.... Five seconds after turning on the system, and any faulty cable connections are reported back up to their default settings. ASUS P5P41D 1-3 ASUS Express Gate Express Gate is in line with the ASUS vision of Hazardous Substances (RoHS). It supports file downloading to USB devices only. • The actrual boot time is...
User Manual
Page 15
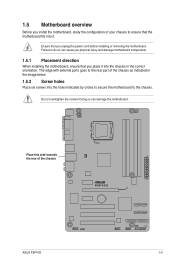
... rear part of the chassis as indicated in the correct orientation. Do not overtighten the screws! Place this side towards the rear of the chassis ASUS P5P41D 1-5 Failure to do so can damage the motherboard. Ensure that you place it into the chassis in the image below. 1.5.2 Screw holes Place six screws...
... rear part of the chassis as indicated in the correct orientation. Do not overtighten the screws! Place this side towards the rear of the chassis ASUS P5P41D 1-5 Failure to do so can damage the motherboard. Ensure that you place it into the chassis in the image below. 1.5.2 Screw holes Place six screws...
User Manual
Page 17
ASUS P5P41D 1-7 ASUS will shoulder the cost of repair only if the damage is on the LGA775 socket. • The product warranty does not cover damage to the PnP cap/socket contacts/motherboard components. ASUS will process Return Merchandise Authorization (RMA) requests only if the motherboard comes with the Intel® Enhanced Intel SpeedStep®...
ASUS P5P41D 1-7 ASUS will shoulder the cost of repair only if the damage is on the LGA775 socket. • The product warranty does not cover damage to the PnP cap/socket contacts/motherboard components. ASUS will process Return Merchandise Authorization (RMA) requests only if the motherboard comes with the Intel® Enhanced Intel SpeedStep®...
User Manual
Page 19
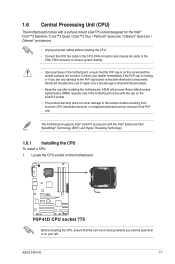
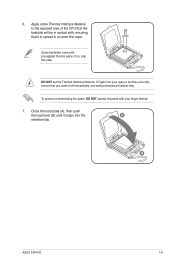
... NOT spread the paste with pre-applied thermal paste. 6. If so, skip this step. If it gets into your eyes or touches your finger directly. 7. B ASUS P5P41D 1-9 Close the load plate (A), then push the load lever (B) until it off immediately, and seek professional medical help. Some heatsinks come with your skin, ensure...
... NOT spread the paste with pre-applied thermal paste. 6. If so, skip this step. If it gets into your eyes or touches your finger directly. 7. B ASUS P5P41D 1-9 Close the load plate (A), then push the load lever (B) until it off immediately, and seek professional medical help. Some heatsinks come with your skin, ensure...
User Manual
Page 21
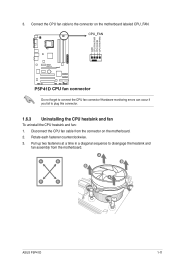
Rotate each fastener counterclockwise. 3. Pull up two fasteners at a time in a diagonal sequence to the connector on the motherboard. 2. Connect the CPU fan cable to disengage the heatsink and fan assembly from the connector on the motherboard labeled CPU_FAN. Do not forget to plug this connector. 1.6.3 Uninstalling the CPU heatsink and fan To uninstall the CPU heatsink and fan: 1. A B A B B A B A ASUS P5P41D 1-11 Hardware monitoring errors can occur if you fail to connect the CPU fan connector! Disconnect the CPU fan cable from the motherboard. 3.
Rotate each fastener counterclockwise. 3. Pull up two fasteners at a time in a diagonal sequence to the connector on the motherboard. 2. Connect the CPU fan cable to disengage the heatsink and fan assembly from the connector on the motherboard labeled CPU_FAN. Do not forget to plug this connector. 1.6.3 Uninstalling the CPU heatsink and fan To uninstall the CPU heatsink and fan: 1. A B A B B A B A ASUS P5P41D 1-11 Hardware monitoring errors can occur if you fail to connect the CPU fan connector! Disconnect the CPU fan cable from the motherboard. 3.
User Manual
Page 23
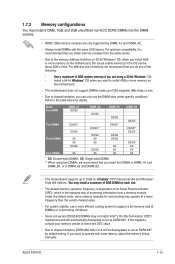
.../SS DS/SS** DS/SS DS/SS SS SS SS DS/SS DS/SS** DS/SS DS/SS SS SS SS * DS: Double-sided DIMM; ASUS P5P41D 1-13 For optimum compatibility, it is dependent on the motherboard, the actual usable memory for details. For effective use the DIMM slots under specific conditions...
.../SS DS/SS** DS/SS DS/SS SS SS SS DS/SS DS/SS** DS/SS DS/SS SS SS SS * DS: Double-sided DIMM; ASUS P5P41D 1-13 For optimum compatibility, it is dependent on the motherboard, the actual usable memory for details. For effective use the DIMM slots under specific conditions...
User Manual
Page 25
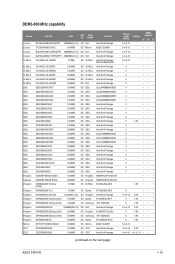
...; • 5 1.8V • • 6 1.8V • • 6 1.8V • • 6-6-6-12 •• 4-5-5-15 2.0V • • 4-4-4-15 1.9 - 2.1 V • • (continued on the next page) ASUS P5P41D 1-15 Size SS/ Chip DS Brand Chip No.
...; • 5 1.8V • • 6 1.8V • • 6 1.8V • • 6-6-6-12 •• 4-5-5-15 2.0V • • 4-4-4-15 1.9 - 2.1 V • • (continued on the next page) ASUS P5P41D 1-15 Size SS/ Chip DS Brand Chip No.
User Manual
Page 27
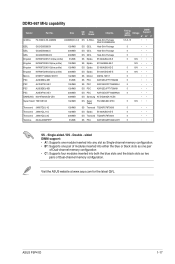
...;• •• 5 1.8V • • 5 •• 5 •• 5 •• 5 •• • SS - Size SS/ Chip DS Brand Chip No. Visit the ASUS website at www.asus.com for the latest QVL. Single-sided / DS - Double - ASUS P5P41D 1-17 DDR2-667 MHz capability Vendor Part No.
...;• •• 5 1.8V • • 5 •• 5 •• 5 •• 5 •• • SS - Size SS/ Chip DS Brand Chip No. Visit the ASUS website at www.asus.com for the latest QVL. Single-sided / DS - Double - ASUS P5P41D 1-17 DDR2-667 MHz capability Vendor Part No.
User Manual
Page 29
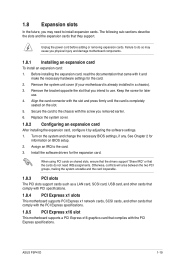
..., and other cards that comply with the PCI Express specifications. 1.8.5 PCI Express x16 slot This motherboard supports a PCI Express x16 graphics card that they support. ASUS P5P41D 1-19 Assign an IRQ to the card. 3. The following sub‑sections describe the slots and the expansion cards that complies with the slot and...
..., and other cards that comply with the PCI Express specifications. 1.8.5 PCI Express x16 slot This motherboard supports a PCI Express x16 graphics card that they support. ASUS P5P41D 1-19 Assign an IRQ to the card. 3. The following sub‑sections describe the slots and the expansion cards that complies with the slot and...
User Manual
Page 31
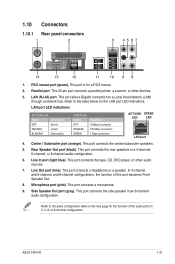
... port connects a microphone. 9. This port connects the side speaker in a 4-channel, 6-channel, or 8-channel audio configuration. 6. Refer to a Local Area Network (LAN) through a network hub. ASUS P5P41D 1-21 PS/2 mouse port (green). This port connects the tape, CD, DVD player, or other devices. 3. LAN (RJ-45) port. Microphone port (pink). Center / Subwoofer...
... port connects a microphone. 9. This port connects the side speaker in a 4-channel, 6-channel, or 8-channel audio configuration. 6. Refer to a Local Area Network (LAN) through a network hub. ASUS P5P41D 1-21 PS/2 mouse port (green). This port connects the tape, CD, DVD player, or other devices. 3. LAN (RJ-45) port. Microphone port (pink). Center / Subwoofer...
User Manual
Page 33
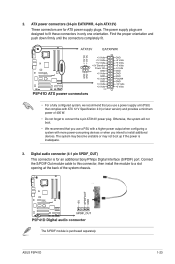
... power output when configuring a system with ATX 12 V Specification 2.0 (or later version) and provides a minimum power of the system chassis. The S/PDIF module is inadequate. 3. ASUS P5P41D 1-23 The power supply plugs are for an additional Sony/Philips Digital Interface (S/PDIF) port. ATX power connectors (24-pin EATXPWR, 4-pin ATX12V) These connectors...
... power output when configuring a system with ATX 12 V Specification 2.0 (or later version) and provides a minimum power of the system chassis. The S/PDIF module is inadequate. 3. ASUS P5P41D 1-23 The power supply plugs are for an additional Sony/Philips Digital Interface (S/PDIF) port. ATX power connectors (24-pin EATXPWR, 4-pin ATX12V) These connectors...
User Manual
Page 35
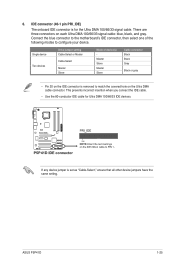
... Master Slave Mode of the following modes to match the covered hole on each Ultra DMA 100/66/33 signal cable: blue, black, and gray. ASUS P5P41D 1-25 Connect the blue connector to the motherboard's IDE connector, then select one of device(s) Master Slave Master Slave Cable connector Black Black Gray Black...
... Master Slave Mode of the following modes to match the covered hole on each Ultra DMA 100/66/33 signal cable: blue, black, and gray. ASUS P5P41D 1-25 Connect the blue connector to the motherboard's IDE connector, then select one of device(s) Master Slave Master Slave Cable connector Black Black Gray Black...
User Manual
Page 37
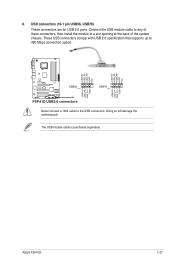
Never connect a 1394 cable to 480 Mbps connection speed. USB connectors (10-1 pin USB56, USB78) These connectors are for USB 2.0 ports. Doing so will damage the motherboard! These USB connectors comply with USB 2.0 specification that supports up to the USB connectors. Connect the USB module cable to any of these connectors, then install the module to a slot opening at the back of the system chassis. ASUS P5P41D 1-27 The USB module cable is purchased separately. 8.
Never connect a 1394 cable to 480 Mbps connection speed. USB connectors (10-1 pin USB56, USB78) These connectors are for USB 2.0 ports. Doing so will damage the motherboard! These USB connectors comply with USB 2.0 specification that supports up to the USB connectors. Connect the USB module cable to any of these connectors, then install the module to a slot opening at the back of the system chassis. ASUS P5P41D 1-27 The USB module cable is purchased separately. 8.
User Manual
Page 39
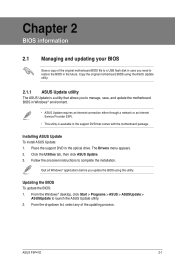
...® applications before you need to restore the BIOS in the future. Installing ASUS Update To install ASUS Update: 1. From the dropdown list, select any of the original motherboard BIOS ...ASUS Update. 3. Follow the onscreen instructions to launch the ASUS Update utility. 2. Updating the BIOS To update the BIOS: 1. From the Windows® desktop, click Start > Programs > ASUS > ASUSUpdate > ASUSUpdate to complete the installation. The Drivers menu appears. 2. Chapter 2 BIOS information 2.1 Managing and updating your BIOS Save a copy of the updating process: ASUS P5P41D...
...® applications before you need to restore the BIOS in the future. Installing ASUS Update To install ASUS Update: 1. From the dropdown list, select any of the original motherboard BIOS ...ASUS Update. 3. Follow the onscreen instructions to launch the ASUS Update utility. 2. Updating the BIOS To update the BIOS: 1. From the Windows® desktop, click Start > Programs > ASUS > ASUSUpdate > ASUSUpdate to complete the installation. The Drivers menu appears. 2. Chapter 2 BIOS information 2.1 Managing and updating your BIOS Save a copy of the updating process: ASUS P5P41D...
User Manual
Page 41
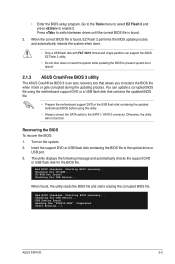
...BIOS file. Turn on the system. 2. Bad BIOS checksum. When found . 2. USB Device found ! Reading file "P5P41D.ROM". • Enter the BIOS setup program. Otherwise, the utility will not function. Insert the support DVD or ... Do not shut down or reset the system while updating the BIOS to prevent system boot failure! 2.1.3 ASUS CrashFree BIOS 3 utility The ASUS CrashFree BIOS 3 is found, EZ Flash 2 performs the BIOS update process and automatically reboots the system ...and press to the optical drive or USB port. 3. Start Erasing...\ ASUS P5P41D 2-3 Checking for CD-ROM...
...BIOS file. Turn on the system. 2. Bad BIOS checksum. When found . 2. USB Device found ! Reading file "P5P41D.ROM". • Enter the BIOS setup program. Otherwise, the utility will not function. Insert the support DVD or ... Do not shut down or reset the system while updating the BIOS to prevent system boot failure! 2.1.3 ASUS CrashFree BIOS 3 utility The ASUS CrashFree BIOS 3 is found, EZ Flash 2 performs the BIOS update process and automatically reboots the system ...and press to the optical drive or USB port. 3. Start Erasing...\ ASUS P5P41D 2-3 Checking for CD-ROM...
User Manual
Page 43
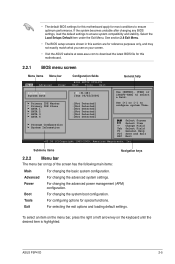
... only, and may not exactly match what you see on your screen. • Visit the ASUS website at www.asus.com to download the latest BIOS file for special functions. Boot For changing the system boot configuration. ASUS P5P41D 2-5 Select Screen Select Item +- Tools For configuring options for this motherboard apply for most conditions...
... only, and may not exactly match what you see on your screen. • Visit the ASUS website at www.asus.com to download the latest BIOS file for special functions. Boot For changing the system boot configuration. ASUS P5P41D 2-5 Select Screen Select Item +- Tools For configuring options for this motherboard apply for most conditions...
User Manual
Page 45
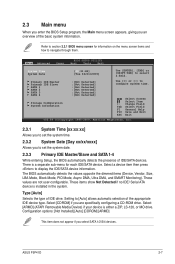
... automatic selection of IDE drive. 2.3 Main menu When you enter the BIOS Setup program, the Main menu screen appears, giving you are not user-configurable. ASUS P5P41D 2-7 The BIOS automatically detects the values opposite the dimmed items (Device, Vendor, Size, LBA Mode, Block Mode, PIO Mode, Async DMA, Ultra DMA, and SMART...
... automatic selection of IDE drive. 2.3 Main menu When you enter the BIOS Setup program, the Main menu screen appears, giving you are not user-configurable. ASUS P5P41D 2-7 The BIOS automatically detects the values opposite the dimmed items (Device, Vendor, Size, LBA Mode, Block Mode, PIO Mode, Async DMA, Ultra DMA, and SMART...
User Manual
Page 47
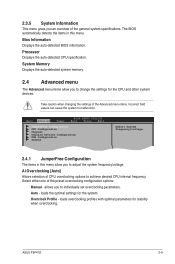
... auto-detected CPU specification. 2.3.5 System Information This menu gives you to individually set overclocking parameters. loads overclocking profiles with optimal parameters for stability when overclocking. ASUS P5P41D 2-9 Bios Information Displays the auto-detected BIOS information. AI Overclocking [Auto] Allows selection of the preset overclocking configuration options: Manual -
... auto-detected CPU specification. 2.3.5 System Information This menu gives you to individually set overclocking parameters. loads overclocking profiles with optimal parameters for stability when overclocking. ASUS P5P41D 2-9 Bios Information Displays the auto-detected BIOS information. AI Overclocking [Auto] Allows selection of the preset overclocking configuration options: Manual -
User Manual
Page 49
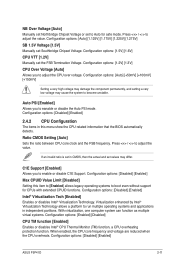
... options: [Disabled] [Enabled] Max CPUID Value Limit [Disabled] Setting this menu show the CPU-related information that the BIOS automatically detects. Configuration options: [Disabled] [Enabled] ASUS P5P41D 2-11 NB Over Voltage [Auto] Manually set Northbridge Chipset Voltage or set to Auto for CPUs with extended CPUID functions. C1E Support [Enabled] Allows you...
... options: [Disabled] [Enabled] Max CPUID Value Limit [Disabled] Setting this menu show the CPU-related information that the BIOS automatically detects. Configuration options: [Disabled] [Enabled] ASUS P5P41D 2-11 NB Over Voltage [Auto] Manually set Northbridge Chipset Voltage or set to Auto for CPUs with extended CPUID functions. C1E Support [Enabled] Allows you...


