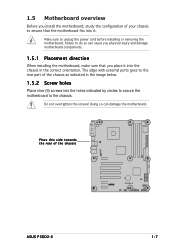
P5GD2-X User's Manual for English Edition
Page 13
This chapter describes the motherboard features and the new technologies it supports. 1Product introduction ASUS P5GD2-X 1-1
P5GD2-X User's Manual for English Edition
Page 14
... features 1.3.1 Product highlights Latest processor technology The motherboard comes with a 775-pin surface mount Land Grid Array (LGA) socket designed for the following items. Motherboard ASUS P5GD2-X motherboard Cables 1 x Serial ATA signal cables 1 x Serial ATA power cables 1 x Ultra DMA cables 1 x Floppy disk drive cable Accessories I/O shield...
P5GD2-X User's Manual for English Edition
Page 15
... to boost system performance, eliminating bottlenecks with existing PCI specifications. PCI Express™ interface The motherboard fully supports PCI Express, the latest I /O Controller Hub (ICH6). ASUS P5GD2-X 1-3 Serial ATA technology The motherboard supports the Serial ATA technology through the Serial ATA interfaces and the Intel® ICH6. Intel® 915P The Intel...
P5GD2-X User's Manual for English Edition
Page 17
...technology optimizes the full potential of the Ethernet cable(s) connected to the LAN (RJ-45) port(s). See details on page 2-6. ASUS P5GD2-X 1-5 See page 1-16 for eliminating system bottlenecks when running system-intensive applications. CrashFree BIOS 2 This feature allows you to ...ensure superior system performance. See page 2-30 for details. 1.3.3 Innovative ASUS features Native DDR2-600 support This motherboard offers native DDR2-600 memory support to restore the original BIOS data from the support ...
P5GD2-X User's Manual for English Edition
Page 19
... the correct orientation. Make sure to unplug the power cord before installing or removing the motherboard. Place this side towards the rear of the chassis P5GD2-X ® ASUS P5GD2-X 1-7 1.5 Motherboard overview Before you install the motherboard, study the configuration of your chassis to ensure that you physical injury and damage motherboard components. 1.5.1 Placement...
P5GD2-X User's Manual for English Edition
Page 21
... on the LGA775 socket. • The product warranty does not cover damage to the PnP cap/socket pins/motherboard components. P5GD2-X ® P5GD2-X Socket 775 Before installing the CPU, make sure that the socket box is facing towards you and the load lever is ...incorrect CPU installation/removal, or misplacement/ loss/incorrect removal of the PnP cap. 1.6.1 Installling the CPU To install a CPU: 1. Contact your left. ASUS P5GD2-X 1-9 Locate the CPU socket on the motherboard. 1.6 Central Processing Unit (CPU) The motherboard comes with a surface mount LGA775 socket designed for the...
P5GD2-X User's Manual for English Edition
Page 23
Refer to prevent bending the connectors on these CPU features. Close the load plate (A), then A push the load lever (B) until it snaps into the socket to the Appendix for more information on the socket and damaging the CPU! DO NOT force the CPU into the retention tab. 6. B The CPU fits in only one correct orientation. The motherboard supports Intel® Pentium® 4 LGA775 processors with the Intel® Enhanced Memory 64 Technology (EM64T), Enhanced Intel SpeedStep® Technology (EIST), and Hyper-Threading Technology. ASUS P5GD2-X 1-11
P5GD2-X User's Manual for English Edition
Page 25
A A A B B B A 3. Hardware monitoring errors can occur if you fail to the connector on the motherboard labeled CPU_FAN. When the fan and heatsink assembly is in place, connect the CPU fan cable to plug this connector. ASUS P5GD2-X 1-13 CPU_FAN P5GD2-X GND CPU FAN PWR CPU FAN IN CPU FAN PWM ® P5GD2-X CPU Fan connector Do not forget to secure the heatsink and fan B assembly in a diagonal sequence to connect the CPU fan connector! Push down two fasteners at a time in place. 2.
P5GD2-X User's Manual for English Edition
Page 27
When reset, each fastener clockwise to reset the orientation. ASUS P5GD2-X 1-15 Rotate each fastener should be oriented as shown, with the narrow groove directed outward. Remove the heatsink and fan assembly from the motherboard. 5. 4.
P5GD2-X User's Manual for English Edition
Page 29
B - ASUS P5GD2-X 1-17 supports on pair of modules inserted into either slot, in a Single-channel memory configuration. support for 4 modules inserted into the yellow and black slots ...
P5GD2-X User's Manual for English Edition
Page 31
Align a DIMM on 1 the socket. 3. Support the DIMM lightly with extra force. 1 2 1 DDR2 DIMM notch 2. Unlock a DIMM socket by pressing the retaining clips outward. 2. ASUS P5GD2-X 1-19 Do not force a DIMM into the socket until the retaining clips snap back in only one direction. 1.7.3 Installing a DIMM Unplug the power supply before ...
P5GD2-X User's Manual for English Edition
Page 33
..., ensure that the drivers support "Share IRQ" or that the cards do not need IRQ assignments. shared - - shared - - - - shared shared shared - shared shared shared shared - -- - - - ASUS P5GD2-X 1-21 shared shared - -- 1.8.3 Interrupt assignments Standard interrupt assignments IRQ Priority 0 1 1 2 2 • 4 12 5 13 6 14 7 15 8 3 9 4 10 5 11 6 12 7 13 8 14 9 Standard Function System Timer Keyboard...
P5GD2-X User's Manual for English Edition
Page 35
... powers the RAM data in CMOS. Move the jumper cap from pins 1-2 (default) to overclocking. Plug the power cord and turn ON the computer. 6. P5GD2-X ® P5GD2-X Clear RTC RAM CLRTC 12 23 Normal (Default) Clear CMOS You do not need to clear the RTC when the system hangs due to pins... 2-3. Turn OFF the computer and unplug the power cord. 2. Remove the onboard battery. 3. ASUS P5GD2-X 1-23 Re-install the battery. 5. Shut down the key during the boot process and enter BIOS setup to re-enter data. To erase the RTC...
P5GD2-X User's Manual for English Edition
Page 37
3. Keyboard power (3-pin KBPWR) This jumper allows you press a key on the +5VSB lead, and a corresponding setting in the BIOS. KBPWR 12 23 P5GD2-X +5V +5VSB (Default) ® P5GD2-X Keyboard power setting ASUS P5GD2-X 1-25 This feature requires an ATX power supply that can supply at least 1A on the keyboard (the default is the Space Bar). Set this jumper to pins 2-3 (+5VSB) if you wish to wake up the computer when you to enable or disable the keyboard wake-up feature.
P5GD2-X User's Manual for English Edition
Page 39
... 8-channel configuration. P S / 2 m o u s e p o r t ( g r e e n ) . Floppy disk drive connector (34-1 pin FLOPPY) This connector is for a PS/2 keyboard. 1 3 . Pin 5 on the floppy ribbon cable to PIN 1. P5GD2-X ® P5GD2-X Floppy disk drive connector ASUS P5GD2-X 1-27 U S B 2 . 0 p o r t s 1 a n d 2 . P S / 2 k e y b o a r d p o r t ( p u r p l e ) . PIN 1 FLOPPY NOTE: Orient the red markings on the connector is for a PS/2 mouse. 1.10.2 Internal connectors 1 . Line In Front Speaker...
P5GD2-X User's Manual for English Edition
Page 41
... the system may damage the motherboard components. GND CPU FAN PWR CPU FAN IN CPU FAN PWM CPU_FAN P5GD2-X ® P5GD2-X Fan connectors PWR_FAN GND +12V Rotation GND +12V Rotation CHA_FAN2 CHA_FAN1 Rotation +12V GND ASUS P5GD2-X 1-29 These are not jumpers! DO NOT place jumper caps on the motherboard, making sure that the...
P5GD2-X User's Manual for English Edition
Page 43
... Right Audio Channel Ground Ground Left Audio Channel P5GD2-X CD audio connector Enable the CD-IN function in the audio utility when using this connector. 7 . These USB connectors comply with USB 2.0 specification that connects to 480 Mbps connection speed. 6 . P5GD2-X USB+5V USB_P8USB_P8+ GND NC USB+5V ...USB78) These connectors are for the 4-pin audio cable that supports up to the audio connector at the back of the optical drive. ASUS P5GD2-X 1-31 Connect the optional USB/GAME module cable to any of these connectors, then install the module to the USB connectors. The ...
P5GD2-X User's Manual for English Edition
Page 45
... a slot opening at the back of the system chassis. P5GD2-X COM1 ® PIN 1 P5GD2-X COM port connectors The Serial (COM1) port module is purchased separately. ASUS P5GD2-X +5V J1B1 J1CX GND GND J1CY J1B2 +5V 1-33 P5GD2-X ® +5V J2B1 J2CX MIDI_OUT J2CY J2B2 MIDI_IN P5GD2-X Game connector GAME The GAME/MIDI port module is purchased...
P5GD2-X User's Manual for English Edition
Page 47
Detailed descriptions of the BIOS parameters are also provided. 2 BIOS setup ASUS P5GD2-X 2-1 This chapter tells how to change the system settings through the BIOS Setup menus.
P5GD2-X User's Manual for English Edition
Page 49
Visit the ASUS website (www.asus.com) to download the latest BIOS file for the motherboard and rename the same to go through the long process of booting from a floppy disk ... the BIOS file to a floppy disk, then restart the system. 3. R O M. 2. EZFlash starting BIOS update Checking for floppy... Reading file "P5GD2X.ROM". A "P5GD2X.ROM not found ! ASUS P5GD2-X 2-3 Press , then follow screen instructions to the floppy disk drive. EZFlash starting BIOS update Checking for floppy... 4. Insert the floppy disk that contains the BIOS...