
P5GD1-VM User's manual English Edition E1881
Page 14
... the system BIOS even before loading the operating system. This protection eliminates the need to buy a replacement ROM chip. ASUS Q-Fan technology The ASUS Q-Fan technology smartly adjusts the fan speeds according to the system loading to produce crystal-clear digital audio....channel audio CODEC. See pages 1-24 and 1-29 for details. 1-4 Chapter 1: Product introduction See page 2-32 for details. 1.3.2 Innovative ASUS features CrashFree BIOS 2 This feature allows you can connect your computer into a high-end entertainment system with digital connectivity to a fast 480 ...
... the system BIOS even before loading the operating system. This protection eliminates the need to buy a replacement ROM chip. ASUS Q-Fan technology The ASUS Q-Fan technology smartly adjusts the fan speeds according to the system loading to produce crystal-clear digital audio....channel audio CODEC. See pages 1-24 and 1-29 for details. 1-4 Chapter 1: Product introduction See page 2-32 for details. 1.3.2 Innovative ASUS features CrashFree BIOS 2 This feature allows you can connect your computer into a high-end entertainment system with digital connectivity to a fast 480 ...
P5GD1-VM User's manual English Edition E1881
Page 40
... 512 MB DDR2 (x 4) PCI Express x16 Nvidia EN5900 IDE hard disk drive (x 2) SATA hard disk drive CD-ROM (x 2) • You must install a PSU with a minimum 350 W power rating. ATX12V1 EATXPWR1 P5GD1-VM GND +12V DC ® P5GD1-VM ATX power connectors GND +3 Volts +12V DC +12 Volts +12 Volts +5V Standby Power OK Ground +5 Volts...
... 512 MB DDR2 (x 4) PCI Express x16 Nvidia EN5900 IDE hard disk drive (x 2) SATA hard disk drive CD-ROM (x 2) • You must install a PSU with a minimum 350 W power rating. ATX12V1 EATXPWR1 P5GD1-VM GND +12V DC ® P5GD1-VM ATX power connectors GND +3 Volts +12V DC +12 Volts +12 Volts +5V Standby Power OK Ground +5 Volts...
P5GD1-VM User's manual English Edition E1881
Page 47
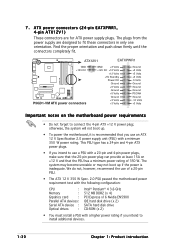
... a bootable floppy disk with the updated BIOS file. Copy the AFUDOS utility (afudos.exe) from the motherboard support CD to continue. 2. e. A:\>afudos /oOLDBIOS1.ROM Main filename Extension name ASUS P5GD1-VM 2-3 From the Open field, type D:\bootdisk\makeboot a: assuming that you to save the file. • The succeeding BIOS screens are for the extension...
... a bootable floppy disk with the updated BIOS file. Copy the AFUDOS utility (afudos.exe) from the motherboard support CD to continue. 2. e. A:\>afudos /oOLDBIOS1.ROM Main filename Extension name ASUS P5GD1-VM 2-3 From the Open field, type D:\bootdisk\makeboot a: assuming that you to save the file. • The succeeding BIOS screens are for the extension...

P5GD1-VM User's manual English Edition E1881
Page 48
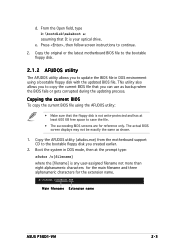
... Version 1.10 Copyright (C) 2002 American Megatrends, Inc. Write the BIOS filename on the bootable floppy disk. A:\>afudos /iP5GD1-VM.ROM 4. Reading flash ..... A:\>afudos /oOLDBIOS1.ROM AMI Firmware Update Utility - Boot the system in DOS mode, then at the DOS prompt. 2. Reading file ..... done ...Erasing flash .... Visit the ASUS website (www.asus.com) and download the latest BIOS file for the motherboard. Save ...
... Version 1.10 Copyright (C) 2002 American Megatrends, Inc. Write the BIOS filename on the bootable floppy disk. A:\>afudos /iP5GD1-VM.ROM 4. Reading flash ..... A:\>afudos /oOLDBIOS1.ROM AMI Firmware Update Utility - Boot the system in DOS mode, then at the DOS prompt. 2. Reading file ..... done ...Erasing flash .... Visit the ASUS website (www.asus.com) and download the latest BIOS file for the motherboard. Save ...
P5GD1-VM User's manual English Edition E1881
Page 49
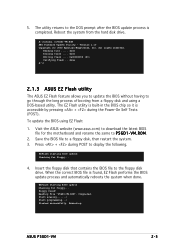
...American Megatrends, Inc. done Erasing flash .... V M . Save the BIOS file to P 5 G D 1 - When the correct BIOS file is completed. Rebooting. ASUS P5GD1-VM 2-5 Reboot the system from a floppy disk and using EZ Flash: 1. To update the BIOS using a DOS-based utility. Press + during the Power-On Self ... + during POST to the DOS prompt after the BIOS update process is found ! All rights reserved. Reading file "P5GD1-VM.ROM". A:\>afudos /iP5GD1-VM.ROM AMI Firmware Update Utility - Completed. done Writing flash .... 0x0008CC00 (9%) Verifying flash .. 5.
...American Megatrends, Inc. done Erasing flash .... V M . Save the BIOS file to P 5 G D 1 - When the correct BIOS file is completed. Rebooting. ASUS P5GD1-VM 2-5 Reboot the system from a floppy disk and using EZ Flash: 1. To update the BIOS using a DOS-based utility. Press + during the Power-On Self ... + during POST to the DOS prompt after the BIOS update process is found ! All rights reserved. Reading file "P5GD1-VM.ROM". A:\>afudos /iP5GD1-VM.ROM AMI Firmware Update Utility - Completed. done Writing flash .... 0x0008CC00 (9%) Verifying flash .. 5.
P5GD1-VM User's manual English Edition E1881
Page 50
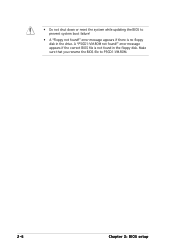
error message appears if there is not found in the drive. Make sure that you rename the BIOS file to prevent system boot failure! • A "Floppy not found !" error message appears if the correct BIOS file is no floppy disk in the floppy disk. A "P5GD1-VM.ROM not found !" • Do not shut down or reset the system while updating the BIOS to P5GD1-VM.ROM. 2-6 Chapter 2: BIOS setup
error message appears if there is not found in the drive. Make sure that you rename the BIOS file to prevent system boot failure! • A "Floppy not found !" error message appears if the correct BIOS file is no floppy disk in the floppy disk. A "P5GD1-VM.ROM not found !" • Do not shut down or reset the system while updating the BIOS to P5GD1-VM.ROM. 2-6 Chapter 2: BIOS setup

P5GD1-VM User's manual English Edition E1881
Page 51
.... Recovering the BIOS from a floppy disk To recover the BIOS from a floppy disk: 1. Turn on the system. 2. Starting BIOS recovery... Bad BIOS checksum. Reading file "P5GD1-VM.ROM". ASUS P5GD1-VM 2-7 You can cause system boot failure! 4. Starting BIOS recovery... Floppy found , the utility reads the BIOS file and starts flashing the corrupted BIOS file. Start...
.... Recovering the BIOS from a floppy disk To recover the BIOS from a floppy disk: 1. Turn on the system. 2. Starting BIOS recovery... Bad BIOS checksum. Reading file "P5GD1-VM.ROM". ASUS P5GD1-VM 2-7 You can cause system boot failure! 4. Starting BIOS recovery... Floppy found , the utility reads the BIOS file and starts flashing the corrupted BIOS file. Start...

P5GD1-VM User's manual English Edition E1881
Page 52
... boot failure! 4. The recovered BIOS may not be the latest BIOS version for CD-ROM... Starting BIOS recovery... Completed. The utility then updates the corrupted BIOS file. CD-ROM found ! Reading file "P5GD1-VM.ROM". Start flashing... DO NOT shut down or reset the system while updating the BIOS!... message and automatically checks the floppy disk for floppy... Restart the system after the utility completes the updating process. Visit the ASUS website (www.asus.com) to the optical drive. 3. Recovering the BIOS from the support CD To recover the BIOS from the floppy disk drive...
... boot failure! 4. The recovered BIOS may not be the latest BIOS version for CD-ROM... Starting BIOS recovery... Completed. The utility then updates the corrupted BIOS file. CD-ROM found ! Reading file "P5GD1-VM.ROM". Start flashing... DO NOT shut down or reset the system while updating the BIOS!... message and automatically checks the floppy disk for floppy... Restart the system after the utility completes the updating process. Visit the ASUS website (www.asus.com) to the optical drive. 3. Recovering the BIOS from the support CD To recover the BIOS from the floppy disk drive...

P5GD1-VM User's manual English Edition E1881
Page 57
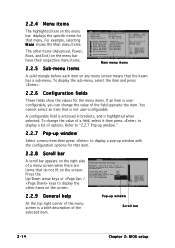
Use [+] or [-] to select a field. ASUS P5GD1-VM 2-13 Some of a menu screen are the navigation keys for that particular menu. Sub-menu items Navigation keys 2.2.2 Menu bar The menu bar on top ... the bottom right corner of the navigation keys differ from one screen to another. Use the navigation keys to select items in ] : [ST320413A] : [Pioneer CD-ROM ATA] : [Not Detected] : [Not Detected] : [Not Detected] : [Not Detected] Use [ENTER], [TAB] or [SHIFT-TAB] to configure the System time. 2.2.1 BIOS menu screen Menu items...
Use [+] or [-] to select a field. ASUS P5GD1-VM 2-13 Some of a menu screen are the navigation keys for that particular menu. Sub-menu items Navigation keys 2.2.2 Menu bar The menu bar on top ... the bottom right corner of the navigation keys differ from one screen to another. Use the navigation keys to select items in ] : [ST320413A] : [Pioneer CD-ROM ATA] : [Not Detected] : [Not Detected] : [Not Detected] : [Not Detected] Use [ENTER], [TAB] or [SHIFT-TAB] to configure the System time. 2.2.1 BIOS menu screen Menu items...
P5GD1-VM User's manual English Edition E1881
Page 58
... items System Time System Date Legacy Diskette A [11:51:19] [Thu 06/10/2004] [1.44M, 3.5 in] Primary IDE Master : [ST320413A] Primary IDE Slave : [Pioneer CD-ROM ATA] Third IDE Master : [Not Detected] Third IDE Slave : [Not Detected] Fourth IDE Master : [Not Detected] Fourth IDE Slave : [Not Detected] IDE Configuration System Information...
... items System Time System Date Legacy Diskette A [11:51:19] [Thu 06/10/2004] [1.44M, 3.5 in] Primary IDE Master : [ST320413A] Primary IDE Slave : [Pioneer CD-ROM ATA] Third IDE Master : [Not Detected] Third IDE Slave : [Not Detected] Fourth IDE Master : [Not Detected] Fourth IDE Slave : [Not Detected] IDE Configuration System Information...

P5GD1-VM User's manual English Edition E1881
Page 59
... System time. 2.3.1 System Time [xx:xx:xx] Allows you to set the system date. 2.3.3 Legacy Diskette A [1.44M, 3.5 in ] : [ST320413A] : [Pioneer CD-ROM ATA] : [Not Detected] : [Not Detected] : [Not Detected] : [Not Detected] Use [ENTER], [TAB] or [SHIFT-TAB] to select a field. Refer to section... system information. Configuration options: [Disabled] [360K, 5.25 in.] [1.2M , 5.25 in.] [720K , 3.5 in.] [1.44M, 3.5 in.] [2.88M, 3.5 in.] ASUS P5GD1-VM 2-15 2.3 Main menu When you enter the BIOS Setup program, the Main menu screen appears, giving you to set the system time. 2.3.2 System Date [Day...
... System time. 2.3.1 System Time [xx:xx:xx] Allows you to set the system date. 2.3.3 Legacy Diskette A [1.44M, 3.5 in ] : [ST320413A] : [Pioneer CD-ROM ATA] : [Not Detected] : [Not Detected] : [Not Detected] : [Not Detected] Use [ENTER], [TAB] or [SHIFT-TAB] to select a field. Refer to section... system information. Configuration options: [Disabled] [360K, 5.25 in.] [1.2M , 5.25 in.] [720K , 3.5 in.] [1.44M, 3.5 in.] [2.88M, 3.5 in.] ASUS P5GD1-VM 2-15 2.3 Main menu When you enter the BIOS Setup program, the Main menu screen appears, giving you to set the system time. 2.3.2 System Date [Day...
P5GD1-VM User's manual English Edition E1881
Page 60
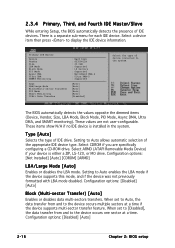
... if the device was not previously formatted with LBA mode disabled. Configuration options: [Disabled] [Auto] 2-16 Chapter 2: BIOS setup These values are specifically configuring a CD-ROM drive. Select ARMD (ATAPI Removable Media Device) if your device is a separate sub-menu for each IDE device. When set to [Disabled], the data transfer...
... if the device was not previously formatted with LBA mode disabled. Configuration options: [Disabled] [Auto] 2-16 Chapter 2: BIOS setup These values are specifically configuring a CD-ROM drive. Select ARMD (ATAPI Removable Media Device) if your device is a separate sub-menu for each IDE device. When set to [Disabled], the data transfer...

P5GD1-VM User's manual English Edition E1881
Page 68
...to select the Serial Port1 base address. 2.4.4 Onboard Devices Configuration Configure Win627EHF Super IO Chipset Azalia Controller Onboard LAN LAN Boot ROM ITE8211 Controller Detecting Device Time [Enabled] [Enabled] [Disabled] [Enabled] [Quick Mode] Serial Port1 Address Parallel Port Address ... Port IRQ [3F8/IRQ4] [378] [ECP] [DMA3] [IRQ7] Enable or disable Azalia controller. Configuration options: [Disabled] [Enabled] LAN Boot ROM [Disabled] Allows you to enable complete detecting process. Configuration options: [Disabled] [3F8/IRQ4] [2F8/IRQ3] [3E8/IRQ4] [2E8/IRQ3] 2-24...
...to select the Serial Port1 base address. 2.4.4 Onboard Devices Configuration Configure Win627EHF Super IO Chipset Azalia Controller Onboard LAN LAN Boot ROM ITE8211 Controller Detecting Device Time [Enabled] [Enabled] [Disabled] [Enabled] [Quick Mode] Serial Port1 Address Parallel Port Address ... Port IRQ [3F8/IRQ4] [378] [ECP] [DMA3] [IRQ7] Enable or disable Azalia controller. Configuration options: [Disabled] [Enabled] LAN Boot ROM [Disabled] Allows you to enable complete detecting process. Configuration options: [Disabled] [3F8/IRQ4] [2F8/IRQ3] [3E8/IRQ4] [2E8/IRQ3] 2-24...

P5GD1-VM User's manual English Edition E1881
Page 75
...to change the system boot options. 2.6 Boot menu The Boot menu items allow you to display the sub-menu. Configuration options: [xxxxx Drive] [Disabled] ASUS P5GD1-VM 2-31 The number of device items that appears on the screen depends on the number of devices installed in the system. Boot Settings Boot Device... 2.6.1 Boot Device Priority Boot Device Priority 1st Boot Device 2nd Boot Device 3rd Boot Device [1st FLOPPY DRIVE] [PM-ST330620A] [PS-Pioneer CD-ROM] 1st ~ xxth Boot Device [1st Floppy Drive] These items specify the boot device priority sequence from the available devices.
...to change the system boot options. 2.6 Boot menu The Boot menu items allow you to display the sub-menu. Configuration options: [xxxxx Drive] [Disabled] ASUS P5GD1-VM 2-31 The number of device items that appears on the screen depends on the number of devices installed in the system. Boot Settings Boot Device... 2.6.1 Boot Device Priority Boot Device Priority 1st Boot Device 2nd Boot Device 3rd Boot Device [1st FLOPPY DRIVE] [PM-ST330620A] [PS-Pioneer CD-ROM] 1st ~ xxth Boot Device [1st Floppy Drive] These items specify the boot device priority sequence from the available devices.

P5GD1-VM User's manual English Edition E1881
Page 76
...Configuration Quick Boot Full Screen Logo AddOn ROM Display Mode Bootup Num-Lock PS/2 Mouse Support Wait For 'F1' If Error Hit 'DEL' Message Display Interrupt 19 Capture [Enabled] [Enabled] [Force BIOS] [On] [Auto] [Enabled] [Enabled] [Disabled] Allows BIOS to use the ASUS MyLogo™ feature. Quick Boot [...] [Enabled] Full Screen Logo [Enabled] This allows you to boot the system. When set to Enabled, the system waits for option ROM. Add On ROM Display Mode [Force BIOS] Sets the display mode for the F1 key to enable or disable the full screen logo display feature. Configuration ...
...Configuration Quick Boot Full Screen Logo AddOn ROM Display Mode Bootup Num-Lock PS/2 Mouse Support Wait For 'F1' If Error Hit 'DEL' Message Display Interrupt 19 Capture [Enabled] [Enabled] [Force BIOS] [On] [Auto] [Enabled] [Enabled] [Disabled] Allows BIOS to use the ASUS MyLogo™ feature. Quick Boot [...] [Enabled] Full Screen Logo [Enabled] This allows you to boot the system. When set to Enabled, the system waits for option ROM. Add On ROM Display Mode [Force BIOS] Sets the display mode for the F1 key to enable or disable the full screen logo display feature. Configuration ...

P5GD1-VM User's manual English Edition E1881
Page 77
Configuration options: [Disabled] [Enabled] Interrupt 19 Capture [Disabled] When set a password, this function allows the option ROMs to trap Interrupt 19. The Supervisor Password item on top of at least six letters and/or numbers, then press . 3...., select the Change Supervisor Password then press . Select an item then press to disabled password. again to display the configuration options. To set your password. ASUS P5GD1-VM 2-33 From the password box, type a password composed of the screen shows the default N o t I n s t a l l e d. Hit 'DEL' Message Display [...
Configuration options: [Disabled] [Enabled] Interrupt 19 Capture [Disabled] When set a password, this function allows the option ROMs to trap Interrupt 19. The Supervisor Password item on top of at least six letters and/or numbers, then press . 3...., select the Change Supervisor Password then press . Select an item then press to disabled password. again to display the configuration options. To set your password. ASUS P5GD1-VM 2-33 From the password box, type a password composed of the screen shows the default N o t I n s t a l l e d. Hit 'DEL' Message Display [...

P5GD1-VM User's manual English Edition E1671
Page 14
...and S/PDIF interfaces, you to personalize and add style to your system with USB 1.1. See page 1-23 for details. 1.3.2 Innovative ASUS features CrashFree BIOS 2 This feature allows you can connect your computer into a high-end entertainment system with Intel® High Definition ...customizable boot logos. The S/PDIF technology turns your computer to home theater decoders to buy a replacement ROM chip. See page 2-5 for details. ASUS Q-Fan technology The ASUS Q-Fan technology smartly adjusts the fan speeds according to the system loading to powerful audio and speaker systems...
...and S/PDIF interfaces, you to personalize and add style to your system with USB 1.1. See page 1-23 for details. 1.3.2 Innovative ASUS features CrashFree BIOS 2 This feature allows you can connect your computer into a high-end entertainment system with Intel® High Definition ...customizable boot logos. The S/PDIF technology turns your computer to home theater decoders to buy a replacement ROM chip. See page 2-5 for details. ASUS Q-Fan technology The ASUS Q-Fan technology smartly adjusts the fan speeds according to the system loading to powerful audio and speaker systems...

P5GD1-VM User's manual English Edition E1671
Page 39
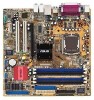
... it is inadequate. 7 . This PSU type has a 24-pin and 4-pin ATX power plugs. • If you intend to use of 350 W. ASUS P5GD1-VM 1-29 Find the proper orientation and push down firmly until the connectors completely fit. ATX power connectors (24-pin EATXPWR1, 4-pin ATX12V1) These connectors are... : Intel® Pentium® 4 3.6 GHz 512 MB DDR2 (x 4) PCI Express x16 Nvidia EN5900 IDE hard disk drive (x 2) SATA hard disk drive CD-ROM (x 2) • You must install a PSU with a minimum 350 W power rating. The plugs from the power supply are for ATX power supply plugs.
... it is inadequate. 7 . This PSU type has a 24-pin and 4-pin ATX power plugs. • If you intend to use of 350 W. ASUS P5GD1-VM 1-29 Find the proper orientation and push down firmly until the connectors completely fit. ATX power connectors (24-pin EATXPWR1, 4-pin ATX12V1) These connectors are... : Intel® Pentium® 4 3.6 GHz 512 MB DDR2 (x 4) PCI Express x16 Nvidia EN5900 IDE hard disk drive (x 2) SATA hard disk drive CD-ROM (x 2) • You must install a PSU with a minimum 350 W power rating. The plugs from the power supply are for ATX power supply plugs.

P5GD1-VM User's manual English Edition E1671
Page 47
A:\>afudos /oOLDBIOS1.ROM Main filename Extension name ASUS P5GD1-VM 2-3 Copy the original or the latest motherboard BIOS file to save the file. • The succeeding BIOS screens are for the extension name. Copy the ...
A:\>afudos /oOLDBIOS1.ROM Main filename Extension name ASUS P5GD1-VM 2-3 Copy the original or the latest motherboard BIOS file to save the file. • The succeeding BIOS screens are for the extension name. Copy the ...

P5GD1-VM User's manual English Edition E1671
Page 48
...created earlier. 3. Copy the AFUDOS utility (afudos.exe) from the motherboard support CD to a bootable floppy disk. A:\>afudos /iP5GD1-VM.ROM 4. A:\>afudos /iP5GD1-VM.ROM AMI Firmware Update Utility - done Erasing flash .... Version 1.10 Copyright (C) 2002 American Megatrends, Inc. Write the BIOS filename on ... is the latest or the original BIOS file on a piece of paper. Visit the ASUS website (www.asus.com) and download the latest BIOS file for the motherboard. A:\>afudos /oOLDBIOS1.ROM AMI Firmware Update Utility - Press . You need to the DOS prompt after copying the ...
...created earlier. 3. Copy the AFUDOS utility (afudos.exe) from the motherboard support CD to a bootable floppy disk. A:\>afudos /iP5GD1-VM.ROM 4. A:\>afudos /iP5GD1-VM.ROM AMI Firmware Update Utility - done Erasing flash .... Version 1.10 Copyright (C) 2002 American Megatrends, Inc. Write the BIOS filename on ... is the latest or the original BIOS file on a piece of paper. Visit the ASUS website (www.asus.com) and download the latest BIOS file for the motherboard. A:\>afudos /oOLDBIOS1.ROM AMI Firmware Update Utility - Press . You need to the DOS prompt after copying the ...


