
User Manual
Page 16
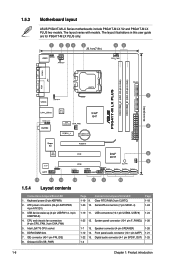
...LED Clear RTC RAM (3-pin CLRTC) Serial ATA connectors (7-pin SATA1-4) Page 1-18 1-24 1-19 11. Speaker connector (4-pin SPEAKER) 1-26 1-12 14. The layout illustrations in this user guide are for P5G41T-M LX PLUS only. 20.1cm(7.9in) COM1 P5G41T-M LX PLUS RTL 8111E... 13 12 11 10 1.5.4 Layout contents Connectors/Jumpers/Slots/LED 1. IDE connector (40-1 pin PRI_IDE) 8. 1.5.3 Motherboard layout ASUS P5G41T-M LX Series motherboards include P5G41T-M LX V2 and P5G41T-M LX PLUS two models. Front panel audio connector (10-1 pin AAFP) 1-21 1-22 15. Keyboard power (3-pin KBPWR) 2. CPU...
...LED Clear RTC RAM (3-pin CLRTC) Serial ATA connectors (7-pin SATA1-4) Page 1-18 1-24 1-19 11. Speaker connector (4-pin SPEAKER) 1-26 1-12 14. The layout illustrations in this user guide are for P5G41T-M LX PLUS only. 20.1cm(7.9in) COM1 P5G41T-M LX PLUS RTL 8111E... 13 12 11 10 1.5.4 Layout contents Connectors/Jumpers/Slots/LED 1. IDE connector (40-1 pin PRI_IDE) 8. 1.5.3 Motherboard layout ASUS P5G41T-M LX Series motherboards include P5G41T-M LX V2 and P5G41T-M LX PLUS two models. Front panel audio connector (10-1 pin AAFP) 1-21 1-22 15. Keyboard power (3-pin KBPWR) 2. CPU...
User Manual
Page 28
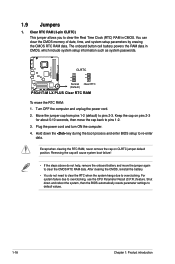
..., remove the onboard battery and move the cap back to clear the CMOS RTC RAM data. For system failure due to default values. 1-18 Chapter 1: Product introduction P5G41T-M LX PLUS Clear RTC RAM To erase the RTC RAM: 1. Plug the power cord and turn ON the computer. 4. Shut down the... key during the boot process and enter BIOS setup to pins 2-3. Except when clearing the RTC RAM, never remove the cap on pins ...
..., remove the onboard battery and move the cap back to clear the CMOS RTC RAM data. For system failure due to default values. 1-18 Chapter 1: Product introduction P5G41T-M LX PLUS Clear RTC RAM To erase the RTC RAM: 1. Plug the power cord and turn ON the computer. 4. Shut down the... key during the boot process and enter BIOS setup to pins 2-3. Except when clearing the RTC RAM, never remove the cap on pins ...

User Manual
Page 56
...section 1.9 Jumpers for the F1 key to be pressed when error occurs. Full Screen Logo [Enabled] This allows you to erase the RTC RAM. 2-18 Chapter 2: BIOS information Confirm the password when prompted. Select an item then press to change the supervisor password, follow the same...and press . 2. The message Password Installed appears after you successfully set to [Enabled], the system displays the message Press DEL to use the ASUS MyLogo2™ feature. Configuration options: [Disabled] [Enabled] 2.6.3 Security The Security menu items allow you can clear it by erasing the CMOS...
...section 1.9 Jumpers for the F1 key to be pressed when error occurs. Full Screen Logo [Enabled] This allows you to erase the RTC RAM. 2-18 Chapter 2: BIOS information Confirm the password when prompted. Select an item then press to change the supervisor password, follow the same...and press . 2. The message Password Installed appears after you successfully set to [Enabled], the system displays the message Press DEL to use the ASUS MyLogo2™ feature. Configuration options: [Disabled] [Enabled] 2.6.3 Security The Security menu items allow you can clear it by erasing the CMOS...

User Manual
Page 59
... selections you selected are finished making your changes to load the default values for a confirmation before saving the values to the CMOS RAM. An onboard backup battery sustains the CMOS RAM so it stays on the Setup menus. After selecting this option or if you to the BIOS items. Main Advanced Power.... Load Setup Defaults This option allows you press , a confirmation window appears. Select OK to save the changes that you are saved to the non-volatile RAM. When you select this option, a confirmation appears. ASUS P5G41T-M LX Series 2-21
... selections you selected are finished making your changes to load the default values for a confirmation before saving the values to the CMOS RAM. An onboard backup battery sustains the CMOS RAM so it stays on the Setup menus. After selecting this option or if you to the BIOS items. Main Advanced Power.... Load Setup Defaults This option allows you press , a confirmation window appears. Select OK to save the changes that you are saved to the non-volatile RAM. When you select this option, a confirmation appears. ASUS P5G41T-M LX Series 2-21


