

P4BP-MX 2.0 user's manual
Page 3
... in this guide vii Typography vii P4BP-MX 2.0 specifications summary viii Chapter 1: Product introduction 1.1 Welcome 1-2 1.2 Package contents 1-2 1.3 Special features 1-3 1.3.1 Product Highlights 1-3 1.3.2 Unique ASUS features 1-4 1.4 Before you proceed 1-5 1.5 Motherboard overview 1-6 1.5.1 Motherboard layout 1-6 1.5.2 Placement direction 1-7 1.5.3 Screw holes 1-7 1.6 Central Processing Unit (CPU 1-8 1.6.1 Overview 1-8 1.6.2 Installing the CPU 1-9 1.7 System memory 1-10 1.7.1 DIMM sockets location 1-10 1.7.2 Installing a DIMM 1-10 1.8 Expansion...
... in this guide vii Typography vii P4BP-MX 2.0 specifications summary viii Chapter 1: Product introduction 1.1 Welcome 1-2 1.2 Package contents 1-2 1.3 Special features 1-3 1.3.1 Product Highlights 1-3 1.3.2 Unique ASUS features 1-4 1.4 Before you proceed 1-5 1.5 Motherboard overview 1-6 1.5.1 Motherboard layout 1-6 1.5.2 Placement direction 1-7 1.5.3 Screw holes 1-7 1.6 Central Processing Unit (CPU 1-8 1.6.1 Overview 1-8 1.6.2 Installing the CPU 1-9 1.7 System memory 1-10 1.7.1 DIMM sockets location 1-10 1.7.2 Installing a DIMM 1-10 1.8 Expansion...
P4BP-MX 2.0 user's manual
Page 6
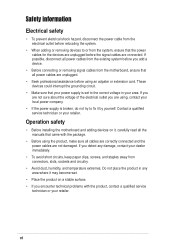
... not damaged. Contact a qualified service technician or your dealer immediately. • To avoid short circuits, keep paper clips, screws, and staples away from connectors, slots, sockets and circuitry. • Avoid dust, humidity, and temperature extremes. Operation safety • Before installing the motherboard and adding devices on a stable surface. • If you...
... not damaged. Contact a qualified service technician or your dealer immediately. • To avoid short circuits, keep paper clips, screws, and staples away from connectors, slots, sockets and circuitry. • Avoid dust, humidity, and temperature extremes. Operation safety • Before installing the motherboard and adding devices on a stable surface. • If you...
P4BP-MX 2.0 user's manual
Page 8
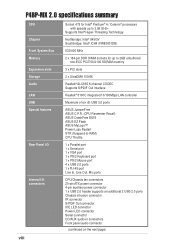
P4BP-MX 2.0 specifications summary CPU Chipset Front System Bus Memory Expansion slots Storage Audio LAN USB Special features Rear Panel I/O Internal I/O connectors ` viii Socket 478 for Intel® Pentium® 4 / Celeron® processors with speeds up to 3.06 ... 6-channel CODEC Supports S/PDIF Out interface Realtek® 8100C integrated 10/100Mbps LAN controller Maximum of six (6) USB 2.0 ports ASUS JumperFree ASUS C.P.R. (CPU Parameter Recall) ASUS CrashFree BIOS ASUS EZ Flash ASUS MyLogo™ Power Loss Restart STR (Suspend-to-RAM) CPU Throttle 1 x Parallel port 1 x Serial port 1 x...
P4BP-MX 2.0 specifications summary CPU Chipset Front System Bus Memory Expansion slots Storage Audio LAN USB Special features Rear Panel I/O Internal I/O connectors ` viii Socket 478 for Intel® Pentium® 4 / Celeron® processors with speeds up to 3.06 ... 6-channel CODEC Supports S/PDIF Out interface Realtek® 8100C integrated 10/100Mbps LAN controller Maximum of six (6) USB 2.0 ports ASUS JumperFree ASUS C.P.R. (CPU Parameter Recall) ASUS CrashFree BIOS ASUS EZ Flash ASUS MyLogo™ Power Loss Restart STR (Suspend-to-RAM) CPU Throttle 1 x Parallel port 1 x Serial port 1 x...

P4BP-MX 2.0 user's manual
Page 13
...implements the new Universal Serial Bus (USB) 2.0 specification, extending the connection speed from 12 Mbps on USB 1.1 to powerful speaker systems. ASUS P4BP-MX 2.0 motherboard 1-3 The higher bandwidth of USB 2.0 allows connection of 10/100 Mbps Fast Ethernet LAN. USB 2.0 is backward compatible with digital.... 1.3 Special features 1.3.1 Product Highlights Latest processor technology The motherboard comes with a 478-pin surface mount, Zero Insertion Force (ZIF) socket for the Intel® Pentium® 4 processor in the 478-pin package with 512/256KB L2 cache on USB 2.0 - Onboard ...
...implements the new Universal Serial Bus (USB) 2.0 specification, extending the connection speed from 12 Mbps on USB 1.1 to powerful speaker systems. ASUS P4BP-MX 2.0 motherboard 1-3 The higher bandwidth of USB 2.0 allows connection of 10/100 Mbps Fast Ethernet LAN. USB 2.0 is backward compatible with digital.... 1.3 Special features 1.3.1 Product Highlights Latest processor technology The motherboard comes with a 478-pin surface mount, Zero Insertion Force (ZIF) socket for the Intel® Pentium® 4 processor in the 478-pin package with 512/256KB L2 cache on USB 2.0 - Onboard ...

P4BP-MX 2.0 user's manual
Page 15
...When lit, this green LED indicates that the system is ON, in sleep mode, or in any component. 2. P4BP-MX 2.0 P4BP-MX 2.0 Onboard LED SB_PWR ON Standby Power OFF Powered Off ASUS P4BP-MX 2.0 motherboard 1-5 Onboard LED The motherboard comes with the component. 5. The illustration below shows the location of the ... system and unplug the power cable before removing or plugging in soft-off or the power cord is detached from the wall socket before touching any motherboard component. Use a grounded wrist strap or touch a safely grounded object or discharge any static electricity by...
...When lit, this green LED indicates that the system is ON, in sleep mode, or in any component. 2. P4BP-MX 2.0 P4BP-MX 2.0 Onboard LED SB_PWR ON Standby Power OFF Powered Off ASUS P4BP-MX 2.0 motherboard 1-5 Onboard LED The motherboard comes with the component. 5. The illustration below shows the location of the ... system and unplug the power cable before removing or plugging in soft-off or the power cord is detached from the wall socket before touching any motherboard component. Use a grounded wrist strap or touch a safely grounded object or discharge any static electricity by...

P4BP-MX 2.0 user's manual
Page 16
Ground Reset NC IDE_LED Reset 1-6 Chapter 1: Product introduction 1.5 Motherboard overview 1.5.1 Motherboard layout PS/2KBMS T: Mouse B: Keyboard COM1 Socket 478 CPU_FAN Super I/O IR_CON DDR DIMM1 (64/72 bit, 184-pin module) DDR DIMM2 (64/72 bit, 184-pin module) ... Top:Line In Center:Line Out Below:Mic In FP_AUDIO Intel 82845GV Memory Controller Hub 01 23 SEC_IDE PRI_ IDE 3Mbit Firmware Hub RTL8100C PCI1 P4BP-MX 2.0 PCI2 Intel 82801DB ICH4 Audio Codec SPDIF_OUT CD PCI3 CHA_FAN AUX SB_PWR COM2 USBPWR_56 USB56 GAME1 CLRTC BUZZ PLED CHASSIS F_PANEL USBPWR_12 3 2 2 1...
Ground Reset NC IDE_LED Reset 1-6 Chapter 1: Product introduction 1.5 Motherboard overview 1.5.1 Motherboard layout PS/2KBMS T: Mouse B: Keyboard COM1 Socket 478 CPU_FAN Super I/O IR_CON DDR DIMM1 (64/72 bit, 184-pin module) DDR DIMM2 (64/72 bit, 184-pin module) ... Top:Line In Center:Line Out Below:Mic In FP_AUDIO Intel 82845GV Memory Controller Hub 01 23 SEC_IDE PRI_ IDE 3Mbit Firmware Hub RTL8100C PCI1 P4BP-MX 2.0 PCI2 Intel 82801DB ICH4 Audio Codec SPDIF_OUT CD PCI3 CHA_FAN AUX SB_PWR COM2 USBPWR_56 USB56 GAME1 CLRTC BUZZ PLED CHASSIS F_PANEL USBPWR_12 3 2 2 1...
P4BP-MX 2.0 user's manual
Page 18
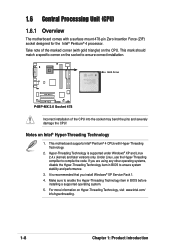
This motherboard supports Intel® Pentium® 4 CPUs with a surface mount 478-pin Zero Insertion Force (ZIF) socket designed for the Intel® Pentium® 4 processor. If you install Windows® XP Service Pack 1. 4. Make sure to ensure ...It is supported under Windows® XP and Linux 2.4.x (kernel) and later versions only. Gold Arrow P4BP-MX 2.0 P4BP-MX 2.0 Socket 478 Incorrect installation of the marked corner (with gold triangle) on the socket to compile the code. Hyper-Threading Technology is recommended that you are using any other operating systems, disable ...
This motherboard supports Intel® Pentium® 4 CPUs with a surface mount 478-pin Zero Insertion Force (ZIF) socket designed for the Intel® Pentium® 4 processor. If you install Windows® XP Service Pack 1. 4. Make sure to ensure ...It is supported under Windows® XP and Linux 2.4.x (kernel) and later versions only. Gold Arrow P4BP-MX 2.0 P4BP-MX 2.0 Socket 478 Incorrect installation of the marked corner (with gold triangle) on the socket to compile the code. Hyper-Threading Technology is recommended that you are using any other operating systems, disable ...

P4BP-MX 2.0 user's manual
Page 19
...Position the CPU above the socket such that its marked corner matches the base of the socket lever. When the CPU is lifted up to install a CPU. 1. ASUS P4BP-MX 2.0 motherboard 1-9 Carefully insert the CPU into the socket to secure the CPU. Locate the 478-pin ZIF socket on the side tab to... indicate that the socket lever is in place. 1.6.2 ...
...Position the CPU above the socket such that its marked corner matches the base of the socket lever. When the CPU is lifted up to install a CPU. 1. ASUS P4BP-MX 2.0 motherboard 1-9 Carefully insert the CPU into the socket to secure the CPU. Locate the 478-pin ZIF socket on the side tab to... indicate that the socket lever is in place. 1.6.2 ...
P4BP-MX 2.0 user's manual
Page 20
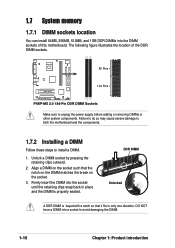
... the retaining clips snap back in only one direction. DO NOT force a DIMM into the DIMM sockets of the DDR DIMM sockets. 80 Pins P4BP-MX 2.0 104 Pins P4BP-MX 2.0 184-Pin DDR DIMM Sockets Make sure to install a DIMM. 1. Failure to do so may cause severe damage to both the motherboard and the components. 1.7.2 Installing a DIMM...
... the retaining clips snap back in only one direction. DO NOT force a DIMM into the DIMM sockets of the DDR DIMM sockets. 80 Pins P4BP-MX 2.0 104 Pins P4BP-MX 2.0 184-Pin DDR DIMM Sockets Make sure to install a DIMM. 1. Failure to do so may cause severe damage to both the motherboard and the components. 1.7.2 Installing a DIMM...


