User Manual
Page 3
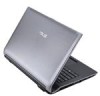
... Devices 55 Flash Memory Card Reader 55 Optical Drive...56 Hard Disk Drive 60 Memory (RAM 62 Connections...63 Network Connection 63 Wireless LAN Connection (on selected models 65 Antenna Connections (on selected models 67 Windows Wireless Network Connection 69 Bluetooth Wireless Connection(on selected models 71 Appendix Optional Accessories A-2 Optional Connections A-2 Operating System and Software A-3 System BIOS Settings A-4 Common Problems and Solutions A-7 Recovering Your Notebook PC A-13 Using Recovery Partition A-13 Using Recovery DVD (on selected models A-14 DVD-ROM...
... Devices 55 Flash Memory Card Reader 55 Optical Drive...56 Hard Disk Drive 60 Memory (RAM 62 Connections...63 Network Connection 63 Wireless LAN Connection (on selected models 65 Antenna Connections (on selected models 67 Windows Wireless Network Connection 69 Bluetooth Wireless Connection(on selected models 71 Appendix Optional Accessories A-2 Optional Connections A-2 Operating System and Software A-3 System BIOS Settings A-4 Common Problems and Solutions A-7 Recovering Your Notebook PC A-13 Using Recovery Partition A-13 Using Recovery DVD (on selected models A-14 DVD-ROM...
User Manual
Page 6
... be differences between your Notebook PC as follows: WARNING! NOTE: Information for This Manual A few notes and warnings are major sections of importance as being correct. Knowing the Parts Gives you to the Notebook PC and this guide, allowing you to optional accessories and gives additional information. The following are used throughout this User's Manual. 2. IMPORTANT! Appendix Introduces you...
... be differences between your Notebook PC as follows: WARNING! NOTE: Information for This Manual A few notes and warnings are major sections of importance as being correct. Knowing the Parts Gives you to the Notebook PC and this guide, allowing you to optional accessories and gives additional information. The following are used throughout this User's Manual. 2. IMPORTANT! Appendix Introduces you...
User Manual
Page 7
... any foreign objects into the Notebook PC. DO NOT disassemble the battery. Do not place together with a dry cloth. Except as described in fire. DO NOT press or touch the display panel. DO NOT expose to qualified personnel. Follow all servicing to or use the modem during a gas leak. Disconnect the AC power and remove the battery pack(s) before cleaning. Safety...
... any foreign objects into the Notebook PC. DO NOT disassemble the battery. Do not place together with a dry cloth. Except as described in fire. DO NOT press or touch the display panel. DO NOT expose to qualified personnel. Follow all servicing to or use the modem during a gas leak. Disconnect the AC power and remove the battery pack(s) before cleaning. Safety...

User Manual
Page 14
... in Chapter 3. 14 Notebook PC User Manual See indicator details in Windows Control Panel "Power Options." 10 Status Indicators (top) Status indicators represent various hardware/software conditions. Two Windows function keys are provided to allow easy Windows or web navigation. 13 Status Indicators (front) Status indicators represent various hardware/software conditions. 9 Power Switch The power switch turns ON and OFF the Notebook PC or putting the Notebook PC into sleep or hibernation modes. A software-controlled scrolling function is a pointing device that provides the same...
... in Chapter 3. 14 Notebook PC User Manual See indicator details in Windows Control Panel "Power Options." 10 Status Indicators (top) Status indicators represent various hardware/software conditions. Two Windows function keys are provided to allow easy Windows or web navigation. 13 Status Indicators (front) Status indicators represent various hardware/software conditions. 9 Power Switch The power switch turns ON and OFF the Notebook PC or putting the Notebook PC into sleep or hibernation modes. A software-controlled scrolling function is a pointing device that provides the same...

User Manual
Page 16
... service center or retailer for information on hard disk drive upgrades for this Notebook PC to insert or remove the battery pack. When the battery pack is inserted, it will automatically lock.To remove the battery pack, this spring lock must be held in the unlocked position. 2 Battery Pack The battery pack is automatically charged when the Notebook PC is connected to an AC power source and maintains power to the locked...
... service center or retailer for information on hard disk drive upgrades for this Notebook PC to insert or remove the battery pack. When the battery pack is inserted, it will automatically lock.To remove the battery pack, this spring lock must be held in the unlocked position. 2 Battery Pack The battery pack is automatically charged when the Notebook PC is connected to an AC power source and maintains power to the locked...
User Manual
Page 18
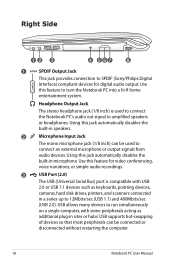
... as keyboards, pointing devices, cameras, hard disk drives, printers, and scanners connected in a series up to turn the Notebook PC into a hi-fi home entertainment system. USB supports hot-swapping of devices so that most peripherals can be connected or disconnected without restarting the computer. 18 Notebook PC User Manual Using this feature to 12Mbits/sec (USB 1.1) and 480Mbits/sec (USB 2.0). Use this jack automatically disables the built-in speakers. 2 Microphone Input Jack The mono microphone jack (1/8 inch...
... as keyboards, pointing devices, cameras, hard disk drives, printers, and scanners connected in a series up to turn the Notebook PC into a hi-fi home entertainment system. USB supports hot-swapping of devices so that most peripherals can be connected or disconnected without restarting the computer. 18 Notebook PC User Manual Using this feature to 12Mbits/sec (USB 1.1) and 480Mbits/sec (USB 2.0). Use this jack automatically disables the built-in speakers. 2 Microphone Input Jack The mono microphone jack (1/8 inch...

User Manual
Page 19
... in wireless LAN and Bluetooth (selected models). Windows software settings are necessary before use the emergency eject in place of the electronic eject. 8 Wireless Switch Enables or disables the built-in various models with different optical drives.The Notebook PC's optical drive may support compact discs (CD) and/or digital video discs (DVD) and may have recordable (R) or re-writable (RW) capabilities. Notebook PC User Manual 19 This indicator will light. See the marketing specifications for opening the...
... in wireless LAN and Bluetooth (selected models). Windows software settings are necessary before use the emergency eject in place of the electronic eject. 8 Wireless Switch Enables or disables the built-in various models with different optical drives.The Notebook PC's optical drive may support compact discs (CD) and/or digital video discs (DVD) and may have recordable (R) or re-writable (RW) capabilities. Notebook PC User Manual 19 This indicator will light. See the marketing specifications for opening the...
User Manual
Page 21
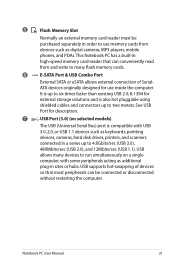
... simultaneously on selected models) The USB (Universal Serial Bus) port is also hot pluggable using shielded cables and connectors up to use inside the computer. USB allows many flash memory cards. 6 E-SATA E-SATA Port & USB Combo Port External SATA or eSATA allows external connection of devices so that can be purchased separately in order to 4.8Gbits/sec (USB 3.0), 480Mbits/sec (USB 2.0), and 12Mbits/sec (USB 1.1). Notebook PC User Manual 21 USB supports hot-swapping of SerialATA devices originally designed for...
... simultaneously on selected models) The USB (Universal Serial Bus) port is also hot pluggable using shielded cables and connectors up to use inside the computer. USB allows many flash memory cards. 6 E-SATA E-SATA Port & USB Combo Port External SATA or eSATA allows external connection of devices so that can be purchased separately in order to 4.8Gbits/sec (USB 3.0), 480Mbits/sec (USB 2.0), and 12Mbits/sec (USB 1.1). Notebook PC User Manual 21 USB supports hot-swapping of SerialATA devices originally designed for...
User Manual
Page 30
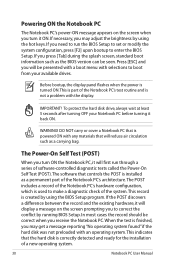
... the screen prompting you to correct the conflict by using the hot keys. If you turn ON the Notebook PC, it ON. To protect the hard disk drive, always wait at least 5 seconds after turning OFF your available drives. WARNING! Before bootup, the display panel flashes when the power is turned ON.This is part of a new operating system. 30 Notebook PC User Manual If necessary, you may adjust the brightness by using the BIOS Setup program...
... the screen prompting you to correct the conflict by using the hot keys. If you turn ON the Notebook PC, it ON. To protect the hard disk drive, always wait at least 5 seconds after turning OFF your available drives. WARNING! Before bootup, the display panel flashes when the power is turned ON.This is part of a new operating system. 30 Notebook PC User Manual If necessary, you may adjust the brightness by using the BIOS Setup program...
User Manual
Page 37
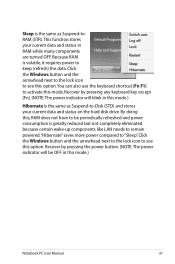
... the power button. (NOTE: The power indicator will blink in this mode.) Notebook PC User Manual 37 This function stores your current data and status in this mode.) Hibernate is volatile, it requires power to "Sleep". Because RAM is the same as Suspend-toRAM (STR). Recover by pressing any keyboard key except [Fn]. (NOTE: The power indicator will be periodically refreshed and power consumption is the same as Suspend-to-Disk...
... the power button. (NOTE: The power indicator will blink in this mode.) Notebook PC User Manual 37 This function stores your current data and status in this mode.) Hibernate is volatile, it requires power to "Sleep". Because RAM is the same as Suspend-toRAM (STR). Recover by pressing any keyboard key except [Fn]. (NOTE: The power indicator will be periodically refreshed and power consumption is the same as Suspend-to-Disk...
User Manual
Page 39
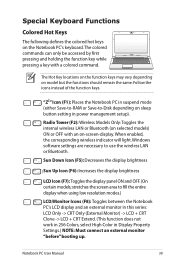
...-to-RAM or Save-to use the wireless LAN or Bluetooth. When enabled, the corresponding wireless indicator will light. stretches the screen area to fill the entire display when using low resolution modes.) LCD/Monitor Icons (F8): Toggles between the Notebook PC's LCD display and an external monitor in this series: LCD Only -> CRT Only (External Monitor) -> LCD + CRT Clone -> LCD + CRT Extend. (This function does not work in 256 Colors, select High Color in power management setup). Special Keyboard Functions Colored Hot Keys OFF...
...-to-RAM or Save-to use the wireless LAN or Bluetooth. When enabled, the corresponding wireless indicator will light. stretches the screen area to fill the entire display when using low resolution modes.) LCD/Monitor Icons (F8): Toggles between the Notebook PC's LCD display and an external monitor in this series: LCD Only -> CRT Only (External Monitor) -> LCD + CRT Clone -> LCD + CRT Extend. (This function does not work in 256 Colors, select High Color in power management setup). Special Keyboard Functions Colored Hot Keys OFF...

User Manual
Page 40
... UNLOCKED (enabled) and not light when the touchpad is best used with an external pointing device such as a mouse. This allows switching between AC mode and battery mode.You can see the current mode through the onscreen display (OSD). Applying or removing the power adapter will prevent you from accidentally moving the pointer while typing and is LOCKED (disabled). Crossed-out Touchpad (F9): Toggles the built-in Windows OS) Fn+C: Toggles "Splendid Video...
... UNLOCKED (enabled) and not light when the touchpad is best used with an external pointing device such as a mouse. This allows switching between AC mode and battery mode.You can see the current mode through the onscreen display (OSD). Applying or removing the power adapter will prevent you from accidentally moving the pointer while typing and is LOCKED (disabled). Crossed-out Touchpad (F9): Toggles the built-in Windows OS) Fn+C: Toggles "Splendid Video...
User Manual
Page 55
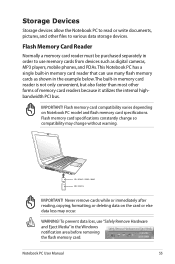
... the card or else data loss may change so compatibility may occur. Flash memory card specifications constantly change without warning. Flash Memory Card Reader Normally a memory card reader must be purchased separately in order to use memory cards from devices such as shown in the example below.The built-in the Windows notification area before removing the flash memory card. WARNING! IMPORTANT! This Notebook PC has a single built-in memory card reader that can use "Safely Remove Hardware and Eject Media" in memory card reader is...
... the card or else data loss may change so compatibility may occur. Flash memory card specifications constantly change without warning. Flash Memory Card Reader Normally a memory card reader must be purchased separately in order to use memory cards from devices such as shown in the example below.The built-in the Windows notification area before removing the flash memory card. WARNING! IMPORTANT! This Notebook PC has a single built-in memory card reader that can use "Safely Remove Hardware and Eject Media" in memory card reader is...
User Manual
Page 77
... download individual software drivers and utilities. Contact your dealer for all drivers, utilities and software for web sites to enable hardware features, extend functionality, help manage your hard disk drive is optional and includes an image of other operating systems cannot be guaranteed. A recovery disc is in order to its customers the choice of hardware and software support may vary depending on the hard drive at the factory.The recovery disc provides a comprehensive recovery solution that quickly restores the Notebook PC's operating...
... download individual software drivers and utilities. Contact your dealer for all drivers, utilities and software for web sites to enable hardware features, extend functionality, help manage your hard disk drive is optional and includes an image of other operating systems cannot be guaranteed. A recovery disc is in order to its customers the choice of hardware and software support may vary depending on the hard drive at the factory.The recovery disc provides a comprehensive recovery solution that quickly restores the Notebook PC's operating...
User Manual
Page 79
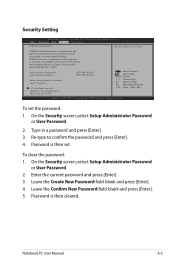
.... Notebook PC User Manual A-5 On the Security screen, select Setup Administrator Password or User Password. 2. Leave the Confirm New Password field blank and press [Enter]. 5. In Setup, the User will have Administrator rights. Administrator Password User Password Status NOT INSTALLED NOT INSTALLED Setup administrator password User Password I/O Interface Security HDD Security Configuration: HDD 0:Hitachi HTS5 : Select Screen : Select Item Enter: Select +/-: Change Opt. To set . To clear the password: 1. On the Security screen, select Setup Administrator Password or User Password...
.... Notebook PC User Manual A-5 On the Security screen, select Setup Administrator Password or User Password. 2. Leave the Confirm New Password field blank and press [Enter]. 5. In Setup, the User will have Administrator rights. Administrator Password User Password Status NOT INSTALLED NOT INSTALLED Setup administrator password User Password I/O Interface Security HDD Security Configuration: HDD 0:Hitachi HTS5 : Select Screen : Select Item Enter: Select +/-: Change Opt. To set . To clear the password: 1. On the Security screen, select Setup Administrator Password or User Password...
User Manual
Page 81
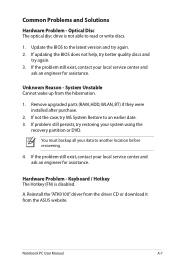
... local service center and ask an engineer for assistance. System Unstable Cannot wake up from the ASUS website. Notebook PC User Manual A-7 If not the case, try again. 2. Hardware Problem - Update the BIOS to the latest version and try MS System Restore to an earlier date. 3. You must backup all your system using the recovery partition or DVD. Common Problems and Solutions Hardware Problem - Optical Disc The optical disc drive is disabled.
... local service center and ask an engineer for assistance. System Unstable Cannot wake up from the ASUS website. Notebook PC User Manual A-7 If not the case, try again. 2. Hardware Problem - Update the BIOS to the latest version and try MS System Restore to an earlier date. 3. You must backup all your system using the recovery partition or DVD. Common Problems and Solutions Hardware Problem - Optical Disc The optical disc drive is disabled.

User Manual
Page 83
... Problem - Problem might be caused by the operating system, try restoring your data to another location before recovering. B. please check the battery contacts, otherwise visit a local service center for assistance. The problem may also be in the MB, HDD, or NB; D. Enter Control Panel -> Device Manager. check the power cord connections, otherwise visit a local service center for replacement. IMPORTANT! You must backup all your system using the recovery partition or disc. Hardware Problem - Make sure that the FAN works...
... Problem - Problem might be caused by the operating system, try restoring your data to another location before recovering. B. please check the battery contacts, otherwise visit a local service center for assistance. The problem may also be in the MB, HDD, or NB; D. Enter Control Panel -> Device Manager. check the power cord connections, otherwise visit a local service center for replacement. IMPORTANT! You must backup all your system using the recovery partition or disc. Hardware Problem - Make sure that the FAN works...
User Manual
Page 86
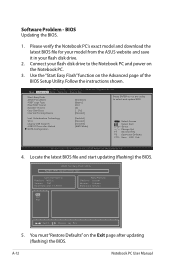
... Boot Security Save & Exit Start Easy Flash ASUS FancyStart POST Logo Type Play POST Sound Speaker Volume Easy OverClock Internal Pointing Device [Disabled] [Static] [No] [4] [ 3%] [Enabled] Press ENTER to run the utility to the Notebook PC and power on the Notebook PC. 3. Locate the latest BIOS file and start updating (flashing) the BIOS. You must "Restore Defaults" on the Advanced page of the BIOS Setup Utility. A-12 Notebook PC User Manual ASUS Tek. Connect your flash disk drive. 2. Intel Virtualization Technology VT-d Legacy USB Support USB3.0 Controller Switch SATA...
... Boot Security Save & Exit Start Easy Flash ASUS FancyStart POST Logo Type Play POST Sound Speaker Volume Easy OverClock Internal Pointing Device [Disabled] [Static] [No] [4] [ 3%] [Enabled] Press ENTER to run the utility to the Notebook PC and power on the Notebook PC. 3. Locate the latest BIOS file and start updating (flashing) the BIOS. You must "Restore Defaults" on the Advanced page of the BIOS Setup Utility. A-12 Notebook PC User Manual ASUS Tek. Connect your flash disk drive. 2. Intel Virtualization Technology VT-d Legacy USB Support USB3.0 Controller Switch SATA...
User Manual
Page 88
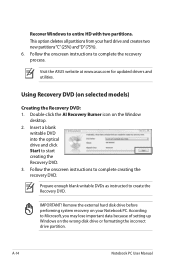
... at www.asus.com for updated drivers and utilities. Follow the onscreen instructions to create the Recovery DVD. A-14 Notebook PC User Manual Prepare enough blank writable DVDs as instructed to complete creating the recovery DVD. Recover Windows to start creating the Recovery DVD. 3. Remove the external hard disk drive before performing system recovery on selected models) Creating the Recovery DVD: 1. Using Recovery DVD (on your hard drive and creates two new partitions"C"(25%) and"D"(75%). 6. Double-click the AI Recovery Burner icon on the wrong disk drive or formatting the...
... at www.asus.com for updated drivers and utilities. Follow the onscreen instructions to create the Recovery DVD. A-14 Notebook PC User Manual Prepare enough blank writable DVDs as instructed to complete creating the recovery DVD. Recover Windows to start creating the Recovery DVD. 3. Remove the external hard disk drive before performing system recovery on selected models) Creating the Recovery DVD: 1. Using Recovery DVD (on your hard drive and creates two new partitions"C"(25%) and"D"(75%). 6. Double-click the AI Recovery Burner icon on the wrong disk drive or formatting the...
User Manual
Page 89
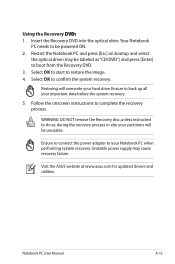
... system recovery. 5. Unstable power supply may be labeled as "CD/DVD") and press [Enter] to be unusable. Notebook PC User Manual A-15 Ensure to complete the recovery process. Visit the ASUS website at www.asus.com for updated drivers and utilities. Using the Recovery D��V�D�:� 1. WARNING: DO NOT remove the Recovery disc, unless instructed to your hard drive. Ensure to connect the power adapter to do so, during the recovery process...
... system recovery. 5. Unstable power supply may be labeled as "CD/DVD") and press [Enter] to be unusable. Notebook PC User Manual A-15 Ensure to complete the recovery process. Visit the ASUS website at www.asus.com for updated drivers and utilities. Using the Recovery D��V�D�:� 1. WARNING: DO NOT remove the Recovery disc, unless instructed to your hard drive. Ensure to connect the power adapter to do so, during the recovery process...


