User Guide
Page 3
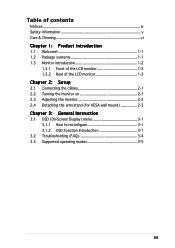
Table of contents Notices iv Safety information v Care & Cleaning vi Chapter 1: Product introduction 1.1 Welcome 1-1 1.2 Package contents 1-1 1.3 Monitor introduction 1-2 1.3.1 Front of the LCD monitor 1-2 1.3.2 Rear of the LCD monitor 1-3 Chapter 2: Setup 2.1 Connecting the cables 2-1 2.2 Turning the monitor on 2-1 2.3 Adjusting the monitor 2-2 2.4 Detaching the arm/stand (for VESA wall mount 2-3 Chapter 3: General Instruction 3.1 OSD (On-Screen Display) menu 3-1 3.1.1 How to...
Table of contents Notices iv Safety information v Care & Cleaning vi Chapter 1: Product introduction 1.1 Welcome 1-1 1.2 Package contents 1-1 1.3 Monitor introduction 1-2 1.3.1 Front of the LCD monitor 1-2 1.3.2 Rear of the LCD monitor 1-3 Chapter 2: Setup 2.1 Connecting the cables 2-1 2.2 Turning the monitor on 2-1 2.3 Adjusting the monitor 2-2 2.4 Detaching the arm/stand (for VESA wall mount 2-3 Chapter 3: General Instruction 3.1 OSD (On-Screen Display) menu 3-1 3.1.1 How to...
User Guide
Page 6
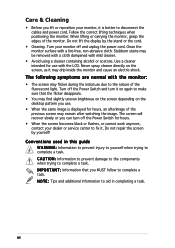
.... Do not repair the screen by the stand or the cord. • Cleaning. Follow the correct lifting techniques when positioning the monitor. The following symptoms are normal with a lint-free, non-abrasive cloth. Use a cleaner intended for hours. • When the... N I O N : Information to prevent damage to the components when trying to complete a task. Clean the monitor surface with the monitor: • The screen may be removed with a cloth dampened with the LCD. N O T E : Tips and additional information to disconnect the cables and power cord. Never spray cleaner directly...
.... Do not repair the screen by the stand or the cord. • Cleaning. Follow the correct lifting techniques when positioning the monitor. The following symptoms are normal with a lint-free, non-abrasive cloth. Use a cleaner intended for hours. • When the... N I O N : Information to prevent damage to the components when trying to complete a task. Clean the monitor surface with the monitor: • The screen may be removed with a cloth dampened with the LCD. N O T E : Tips and additional information to disconnect the cables and power cord. Never spray cleaner directly...
User Guide
Page 9
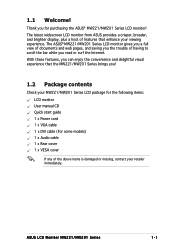
...viewing experience. With these features, you can enjoy the convenience and delightful visual experience that enhance your retailer immediately. ASUS LCD Monitor MW221/MW201 Series 1-1 The ASUS® MW221/MW201 Series LCD monitor gives you a full view of documents and web pages, and saving you the trouble of having to scroll the... 1 x Rear cover 1 x VESA cover If any of features that the MW221/MW201 Series brings you! 1.2 Package contents Check your MW221/MW201 Series LCD package for purchasing the ASUS® MW221/MW201 Series LCD monitor! Thank you read or surf the Internet.
...viewing experience. With these features, you can enjoy the convenience and delightful visual experience that enhance your retailer immediately. ASUS LCD Monitor MW221/MW201 Series 1-1 The ASUS® MW221/MW201 Series LCD monitor gives you a full view of documents and web pages, and saving you the trouble of having to scroll the... 1 x Rear cover 1 x VESA cover If any of features that the MW221/MW201 Series brings you! 1.2 Package contents Check your MW221/MW201 Series LCD package for purchasing the ASUS® MW221/MW201 Series LCD monitor! Thank you read or surf the Internet.
User Guide
Page 10
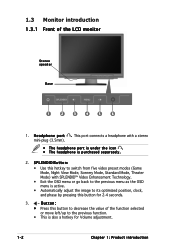
...N D I D B u t t o n : • Use this button for Volume adjustment. 1-2 Chapter 1: Product introduction 1.3 Monitor introduction 1.3.1 Front of the function selected or move left/up to its optimized position, clock, and phase by pressing this hotkey to switch ...port is under the icon . • The headphone is also a hotkey for 2-4 seconds. 3. Button: • Press this button to decrease the value of the LCD monitor Stereo speaker Base 1 2 3 4 5 6 1. This port connects a headphone with SPLENDID™ Video Enhancement Technology. • Exit the OSD menu or go ...
...N D I D B u t t o n : • Use this button for Volume adjustment. 1-2 Chapter 1: Product introduction 1.3 Monitor introduction 1.3.1 Front of the function selected or move left/up to its optimized position, clock, and phase by pressing this hotkey to switch ...port is under the icon . • The headphone is also a hotkey for 2-4 seconds. 3. Button: • Press this button to decrease the value of the LCD monitor Stereo speaker Base 1 2 3 4 5 6 1. This port connects a headphone with SPLENDID™ Video Enhancement Technology. • Exit the OSD menu or go ...
User Guide
Page 11
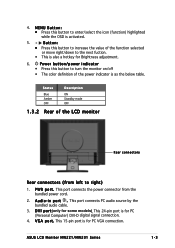
...• Press this button to right) 1. This 24-pin port is for Brightness adjustment. 6. i n p o r t . V G A p o r t . ASUS LCD Monitor MW221/MW201 Series 1-3 This port connects the power connector from left to enter/select the icon (function) highlighted while the OSD is activated. 5. This port... this button to increase the value of the function selected or move right/down to turn the monitor on/off • The color definition of the LCD monitor Rear connectors Rear connectors (from the bundled power cord. 2. Power button/power indicator • Press...
...• Press this button to right) 1. This 24-pin port is for Brightness adjustment. 6. i n p o r t . V G A p o r t . ASUS LCD Monitor MW221/MW201 Series 1-3 This port connects the power connector from left to enter/select the icon (function) highlighted while the OSD is activated. 5. This port... this button to increase the value of the function selected or move right/down to turn the monitor on/off • The color definition of the LCD monitor Rear connectors Rear connectors (from the bundled power cord. 2. Power button/power indicator • Press...
User Guide
Page 13
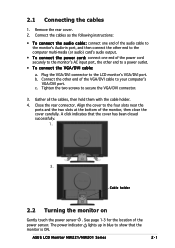
... to the four slots near the ports and the two slots at the bottom of the power sensor. Cable holder 2.2 Turning the monitor on Gently touch the power sensor . ASUS LCD Monitor MW221/MW201 Series 2-1 Plug the VGA/DVI connector to secure the VGA/DVI connector. 3. Close the rear connector. Align the cover to...
... to the four slots near the ports and the two slots at the bottom of the power sensor. Cable holder 2.2 Turning the monitor on Gently touch the power sensor . ASUS LCD Monitor MW221/MW201 Series 2-1 Plug the VGA/DVI connector to secure the VGA/DVI connector. 3. Close the rear connector. Align the cover to...
User Guide
Page 15
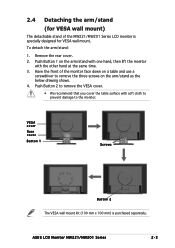
To detach the arm/stand: 1. Have the front of the MW221/MW201 Series LCD monitor is purchased separately. Push Button 2 to remove the VESA cover. • We recommend that you cover the table surface with the other hand at the ... the rear cover. 2. 2.4 Detaching the arm/stand (for VESA wall mount) The detachable stand of the monitor face down on the arm/stand as the below drawing shows. 4. ASUS LCD Monitor MW221/MW201 Series 2-3 VESA cover Rear cover Button 1 Screws Button 2 The VESA wall mount kit (100 mm x 100 mm) is specially designed for...
To detach the arm/stand: 1. Have the front of the MW221/MW201 Series LCD monitor is purchased separately. Push Button 2 to remove the VESA cover. • We recommend that you cover the table surface with the other hand at the ... the rear cover. 2. 2.4 Detaching the arm/stand (for VESA wall mount) The detachable stand of the monitor face down on the arm/stand as the below drawing shows. 4. ASUS LCD Monitor MW221/MW201 Series 2-3 VESA cover Rear cover Button 1 Screws Button 2 The VESA wall mount kit (100 mm x 100 mm) is specially designed for...
User Guide
Page 17
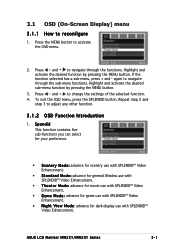
...; Video Enhancement. 3.1 OSD (On-Screen Display) menu 3.1.1 How to adjust any other function. 3.1.2 OSD Function Introduction 1. To exit the OSD menu, press the SPLENDID button. ASUS LCD Monitor MW221/MW201 Series 3-1 Repeat step 2 and step 3 to reconfigure 1. Press the MENU button to navigate through the sub-menu functions. Press and to activate the...
...; Video Enhancement. 3.1 OSD (On-Screen Display) menu 3.1.1 How to adjust any other function. 3.1.2 OSD Function Introduction 1. To exit the OSD menu, press the SPLENDID button. ASUS LCD Monitor MW221/MW201 Series 3-1 Repeat step 2 and step 3 to reconfigure 1. Press the MENU button to navigate through the sub-menu functions. Press and to activate the...
User Guide
Page 19
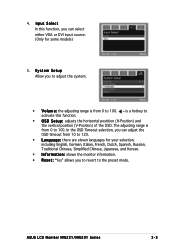
... input source. (Only for your selection, including English, German, Italian, French, Dutch, Spanish, Russian, Traditional Chinese, Simplified Chinese, Japanese, and Korean. • Information: shows the monitor information. • R e s e t : "Yes" allows you to adjust the system. • V o l u m e : the adjusting range is from 0 to 100...• OSD Setup: adjusts the horizontal postition (H-Position) and the vertical position (V-Position) of the OSD. ASUS LCD Monitor MW221/MW201 Series 3-3 activate this function, you can adjust the OSD timeout from 0 to the preset mode. ...
... input source. (Only for your selection, including English, German, Italian, French, Dutch, Spanish, Russian, Traditional Chinese, Simplified Chinese, Japanese, and Korean. • Information: shows the monitor information. • R e s e t : "Yes" allows you to adjust the system. • V o l u m e : the adjusting range is from 0 to 100...• OSD Setup: adjusts the horizontal postition (H-Position) and the vertical position (V-Position) of the OSD. ASUS LCD Monitor MW221/MW201 Series 3-3 activate this function, you can adjust the OSD timeout from 0 to the preset mode. ...
User Guide
Page 21
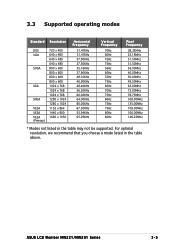
... 49.50MHz 65.00MHz 75.00MHz 78.75MHz 108.00MHz 135.00MHz 108.00MHz 106.00MHz 146.25MHz * Modes not listed in the table above. ASUS LCD Monitor MW221/MW201 Series 3-5
... 49.50MHz 65.00MHz 75.00MHz 78.75MHz 108.00MHz 135.00MHz 108.00MHz 106.00MHz 146.25MHz * Modes not listed in the table above. ASUS LCD Monitor MW221/MW201 Series 3-5


