User Guide
Page 2
.... or (2) the serial number of ASUSTeK COMPUTER INC. ("ASUS"). Products and corporate names appearing in this manual, including the products and software described in it, may not be registered trademarks or copyrights of alteration is defaced or missing. SPECIFICATIONS AND INFORMATION CONTAINED IN THIS MANUAL ARE FURNISHED FOR INFORMATIONAL USE ONLY, AND ARE SUBJECT TO CHANGE AT ANY TIME...
.... or (2) the serial number of ASUSTeK COMPUTER INC. ("ASUS"). Products and corporate names appearing in this manual, including the products and software described in it, may not be registered trademarks or copyrights of alteration is defaced or missing. SPECIFICATIONS AND INFORMATION CONTAINED IN THIS MANUAL ARE FURNISHED FOR INFORMATIONAL USE ONLY, AND ARE SUBJECT TO CHANGE AT ANY TIME...
User Guide
Page 3
... Notices iv Safety information v Care & Cleaning vi Chapter 1: Product introduction 1.1 Welcome 1-1 1.2 Package contents 1-1 1.3 Monitor introduction 1-2 1.3.1 Front of the LCD monitor 1-2 1.3.2 Rear of the LCD monitor 1-3 Chapter 2: Setup 2.1 Connecting the cables 2-1 2.2 Turning the monitor on 2-1 2.3 Adjusting the monitor 2-2 2.4 Detaching the arm/stand (for VESA wall mount 2-3 Chapter 3: General Instruction 3.1 OSD (On-Screen Display) menu 3-1 3.1.1 How to reconfigure 3-1 3.1.2 OSD Function Introduction 3-1 3.2 Troubleshooting (FAQ 3-4 3.3 Supported operating modes 3-5 iii
... Notices iv Safety information v Care & Cleaning vi Chapter 1: Product introduction 1.1 Welcome 1-1 1.2 Package contents 1-1 1.3 Monitor introduction 1-2 1.3.1 Front of the LCD monitor 1-2 1.3.2 Rear of the LCD monitor 1-3 Chapter 2: Setup 2.1 Connecting the cables 2-1 2.2 Turning the monitor on 2-1 2.3 Adjusting the monitor 2-2 2.4 Detaching the arm/stand (for VESA wall mount 2-3 Chapter 3: General Instruction 3.1 OSD (On-Screen Display) menu 3-1 3.1.1 How to reconfigure 3-1 3.1.2 OSD Function Introduction 3-1 3.2 Troubleshooting (FAQ 3-4 3.3 Supported operating modes 3-5 iii
User Guide
Page 4
... receiver. • Connect the equipment to which can radiate radio frequency energy and, if not installed and used in the Radio Interference Regulations of the Canadian Department of Communications. As an Energy Star® Partner, our company has determined that to an outlet on a circuit different from digital apparatus set out in accordance with Part 15 of...
... receiver. • Connect the equipment to which can radiate radio frequency energy and, if not installed and used in the Radio Interference Regulations of the Canadian Department of Communications. As an Energy Star® Partner, our company has determined that to an outlet on a circuit different from digital apparatus set out in accordance with Part 15 of...
User Guide
Page 5
...; Before setting up the monitor, carefully read all cables are correctly connected and the power cables are not sure of the type of power supply to your home, consult your dealer or local power company. • Use the appropriate power plug which have appropriate configured receptacles marked between 100-240V AC. • If you encounter technical problems with the monitor, contact a qualified service technician or...
...; Before setting up the monitor, carefully read all cables are correctly connected and the power cables are not sure of the type of power supply to your home, consult your dealer or local power company. • Use the appropriate power plug which have appropriate configured receptacles marked between 100-240V AC. • If you encounter technical problems with the monitor, contact a qualified service technician or...
User Guide
Page 6
... the fluorescent light. Turn your dealer or service center to complete a task. Clean the monitor surface with a lint-free, non-abrasive cloth. Care & Cleaning • Before you lift or reposition your monitor, it is displayed for hours. • When the screen becomes black or flashes, or cannot work anymore, contact your monitor off the Power Switch for hours, an afterimage of the previous screen may be removed with...
... the fluorescent light. Turn your dealer or service center to complete a task. Clean the monitor surface with a lint-free, non-abrasive cloth. Care & Cleaning • Before you lift or reposition your monitor, it is displayed for hours. • When the screen becomes black or flashes, or cannot work anymore, contact your monitor off the Power Switch for hours, an afterimage of the previous screen may be removed with...
User Guide
Page 7
vii ASUS websites The ASUS websites worldwide provide updated information on ASUS hardware and software products. Optional documentation Your product package may include optional documentation, such as warranty card, that may have been added by your dealer. Where to find more information Refer to http://www.asus.com 2. These documents are not part of the standard package. Refer to the following sources for additional information and for product and software updates. 1.
vii ASUS websites The ASUS websites worldwide provide updated information on ASUS hardware and software products. Optional documentation Your product package may include optional documentation, such as warranty card, that may have been added by your dealer. Where to find more information Refer to http://www.asus.com 2. These documents are not part of the standard package. Refer to the following sources for additional information and for product and software updates. 1.
User Guide
Page 9
... you for the following items: LCD monitor User manual CD Quick start guide 1 x Power cord 1 x VGA cable 1 x DVI cable (For some models) 1 x Audio cable 1 x Rear cover 1 x VESA cover If any of having to scroll the bar while you read or surf the Internet. Thank you ! 1.2 Package contents Check your viewing experience. The ASUS® MW221/MW201 Series LCD monitor gives you a full view of documents and web pages, and saving you the trouble of the above items is...
... you for the following items: LCD monitor User manual CD Quick start guide 1 x Power cord 1 x VGA cable 1 x DVI cable (For some models) 1 x Audio cable 1 x Rear cover 1 x VESA cover If any of having to scroll the bar while you read or surf the Internet. Thank you ! 1.2 Package contents Check your viewing experience. The ASUS® MW221/MW201 Series LCD monitor gives you a full view of documents and web pages, and saving you the trouble of the above items is...
User Guide
Page 10
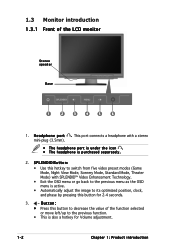
... OSD menu is active. • Automatically adjust the image to the previous function. • This is purchased separately. 2. Button: • Press this button to decrease the value of the LCD monitor Stereo speaker Base 1 2 3 4 5 6 1. 1.3 Monitor introduction 1.3.1 Front of the function selected or move left/up to its optimized position, clock, and phase by pressing this button for Volume adjustment. 1-2 Chapter 1: Product introduction H e a d p h o n e p o r t . S P L E N D I D B u t t o n : • Use this hotkey to switch...
... OSD menu is active. • Automatically adjust the image to the previous function. • This is purchased separately. 2. Button: • Press this button to decrease the value of the LCD monitor Stereo speaker Base 1 2 3 4 5 6 1. 1.3 Monitor introduction 1.3.1 Front of the function selected or move left/up to its optimized position, clock, and phase by pressing this button for Volume adjustment. 1-2 Chapter 1: Product introduction H e a d p h o n e p o r t . S P L E N D I D B u t t o n : • Use this hotkey to switch...
User Guide
Page 11
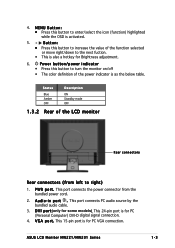
... bundled audio cable. 3. ASUS LCD Monitor MW221/MW201 Series 1-3 V G A p o r t . Button: • Press this button to right) 1. D V I p o r t(only for PC VGA connection. M E N U B u t t o n : • Press this button to increase the value of the function selected or move right/down to turn the monitor on/off • The color definition of the LCD monitor Rear connectors Rear connectors (from the bundled power cord. 2. i n p o r t . P W R p o r t . This 24-pin port is also a hotkey for PC (Personal Computer) DVI-D digital signal connection. 4. 4. Power button/power...
... bundled audio cable. 3. ASUS LCD Monitor MW221/MW201 Series 1-3 V G A p o r t . Button: • Press this button to right) 1. D V I p o r t(only for PC VGA connection. M E N U B u t t o n : • Press this button to increase the value of the function selected or move right/down to turn the monitor on/off • The color definition of the LCD monitor Rear connectors Rear connectors (from the bundled power cord. 2. i n p o r t . P W R p o r t . This 24-pin port is also a hotkey for PC (Personal Computer) DVI-D digital signal connection. 4. 4. Power button/power...
User Guide
Page 13
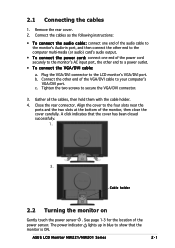
... audio cable to the monitor's Audio-in blue to a power outlet. • To connect the VGA/DVI cable: a. See page 1-3 for the location of the monitor, then close the cover carefully. ASUS LCD Monitor MW221/MW201 Series 2-1 Align the cover to secure the VGA/DVI connector. 3. c. Connect the cables as the following instructions: • To connect the audio cable: connect one end of the power cord securely to the monitor's AC input port, the other end to the computer multi-media (or audio) card's audio...
... audio cable to the monitor's Audio-in blue to a power outlet. • To connect the VGA/DVI cable: a. See page 1-3 for the location of the monitor, then close the cover carefully. ASUS LCD Monitor MW221/MW201 Series 2-1 Align the cover to secure the VGA/DVI connector. 3. c. Connect the cables as the following instructions: • To connect the audio cable: connect one end of the power cord securely to the monitor's AC input port, the other end to the computer multi-media (or audio) card's audio...
User Guide
Page 14
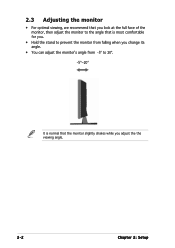
2.3 Adjusting the monitor • For optimal viewing, we recommend that you look at the full face of the monitor, then adjust the monitor to the angle that is most comfortable for you. • Hold the stand to prevent the monitor from falling when you change its angle. • You can adjust the monitor's angle from -5º to 20º. -5º~20º It is normal that the monitor slightly shakes while you adjust the the viewing angle. 2-2 Chapter 2: Setup
2.3 Adjusting the monitor • For optimal viewing, we recommend that you look at the full face of the monitor, then adjust the monitor to the angle that is most comfortable for you. • Hold the stand to prevent the monitor from falling when you change its angle. • You can adjust the monitor's angle from -5º to 20º. -5º~20º It is normal that the monitor slightly shakes while you adjust the the viewing angle. 2-2 Chapter 2: Setup
User Guide
Page 15
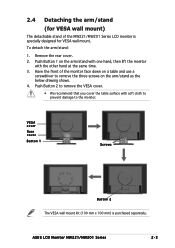
... other hand at the same time. 3. Push Button 1 on the arm/stand as the below drawing shows. 4. ASUS LCD Monitor MW221/MW201 Series 2-3 To detach the arm/stand: 1. 2.4 Detaching the arm/stand (for VESA wall mount. VESA cover Rear cover Button 1 Screws Button 2 The VESA wall mount kit (100 mm x 100 mm) is specially designed for VESA wall mount) The detachable stand of the monitor face down on a table and use a screwdriver to the monitor. Remove the rear cover. 2.
... other hand at the same time. 3. Push Button 1 on the arm/stand as the below drawing shows. 4. ASUS LCD Monitor MW221/MW201 Series 2-3 To detach the arm/stand: 1. 2.4 Detaching the arm/stand (for VESA wall mount. VESA cover Rear cover Button 1 Screws Button 2 The VESA wall mount kit (100 mm x 100 mm) is specially designed for VESA wall mount) The detachable stand of the monitor face down on a table and use a screwdriver to the monitor. Remove the rear cover. 2.
User Guide
Page 17
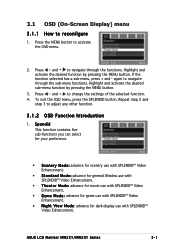
...; Video Enhancement. again to navigate through the sub-menu functions. Press and to activate the OSD menu. 2. Highlight and activate the desired function by pressing the MENU button. 3. If the function selected has a sub-menu, press + and - ASUS LCD Monitor MW221/MW201 Series 3-1 Press the MENU button to change the settings of the selected function. 4. Repeat step 2 and step 3 to reconfigure 1. 3.1 OSD (On-Screen Display) menu 3.1.1 How to adjust any...
...; Video Enhancement. again to navigate through the sub-menu functions. Press and to activate the OSD menu. 2. Highlight and activate the desired function by pressing the MENU button. 3. If the function selected has a sub-menu, press + and - ASUS LCD Monitor MW221/MW201 Series 3-1 Press the MENU button to change the settings of the selected function. 4. Repeat step 2 and step 3 to reconfigure 1. 3.1 OSD (On-Screen Display) menu 3.1.1 How to adjust any...
User Guide
Page 18
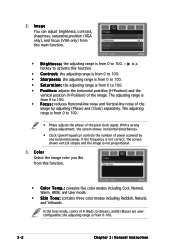
... signal. With a wrong phase adjustment, the screen shows horizontal disturbances. • Clock (pixel frequency) controls the number of R (Red), G (Green), and B (Bluee) are userconfigurable; the adjusting range is from 0 to activate this function. • Color Temp.: contains five color modes including Cool, Normal, Warm, sRGB, and User mode. • Skin Tone: contains three color modes including Reddish, Natural, and Yellowish. is from 0-100. 3-2 Chapter 3: General Instruction I m a g e You can adjust brightness, contrast, sharpness, saturation,position (VGA...
... signal. With a wrong phase adjustment, the screen shows horizontal disturbances. • Clock (pixel frequency) controls the number of R (Red), G (Green), and B (Bluee) are userconfigurable; the adjusting range is from 0 to activate this function. • Color Temp.: contains five color modes including Cool, Normal, Warm, sRGB, and User mode. • Skin Tone: contains three color modes including Reddish, Natural, and Yellowish. is from 0-100. 3-2 Chapter 3: General Instruction I m a g e You can adjust brightness, contrast, sharpness, saturation,position (VGA...
User Guide
Page 19
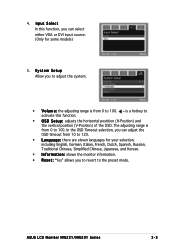
.... 4. ASUS LCD Monitor MW221/MW201 Series 3-3 activate this function, you can adjust the OSD timeout from 10 to 120. • Language: there are eleven languages for some models) 5. S y s t e m S e t u p Allow you to revert to 100. is from 0 to • OSD Setup: adjusts the horizontal postition (H-Position) and the vertical position (V-Position) of the OSD. The adjusting range is a hotkey to 100. In the OSD Timeout selection, you can select either VGA or DVI input source. (Only...
.... 4. ASUS LCD Monitor MW221/MW201 Series 3-3 activate this function, you can adjust the OSD timeout from 10 to 120. • Language: there are eleven languages for some models) 5. S y s t e m S e t u p Allow you to revert to 100. is from 0 to • OSD Setup: adjusts the horizontal postition (H-Position) and the vertical position (V-Position) of the OSD. The adjusting range is a hotkey to 100. In the OSD Timeout selection, you can select either VGA or DVI input source. (Only...
User Guide
Page 20
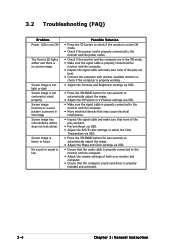
... mode. • Make sure the signal cable is properly connected the monitor and the computer. • Inspect the signal cable and make sure none of the pins are bent. • Connect the computer with another available monitor to check if the computer is properly working. • Adjust the Contrast and Brightness settings via OSD. • Press the SPLENDID button for two seconds to automatically adjust the image. • Adjust the H-Position or V-Position settings via OSD...
... mode. • Make sure the signal cable is properly connected the monitor and the computer. • Inspect the signal cable and make sure none of the pins are bent. • Connect the computer with another available monitor to check if the computer is properly working. • Adjust the Contrast and Brightness settings via OSD. • Press the SPLENDID button for two seconds to automatically adjust the image. • Adjust the H-Position or V-Position settings via OSD...
User Guide
Page 21
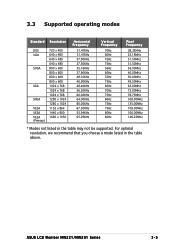
...table may not be supported. 3.3 Supported operating modes Standard Resolution DOS VGA SVGA XGA SXGA VESA VESA VESA (Primary) 720 x 400 640 x 480 640 x 480 640 x 480 800 x 600 800 x 600 800 x 600 800 x 600 1024 x 768 1024 x 768 1024 x 768 1280 x 1024 1280 x 1024 1152 x 864 1440 x 900 1680 x 1050 Horizontal Frequency 31.47KHz 31.... 75Hz 60Hz 75Hz 75Hz 60Hz 60Hz Pixel Frequency 28.32MHz 25.18MHz 31.50MHz 31.50MHz 36.00MHz 40.00MHz 50.00MHz 49.50MHz 65.00MHz 75.00MHz 78.75MHz 108.00MHz 135.00MHz 108.00MHz 106.00MHz 146.25MHz * Modes not listed in the table above. ASUS LCD Monitor MW221/MW201...
...table may not be supported. 3.3 Supported operating modes Standard Resolution DOS VGA SVGA XGA SXGA VESA VESA VESA (Primary) 720 x 400 640 x 480 640 x 480 640 x 480 800 x 600 800 x 600 800 x 600 800 x 600 1024 x 768 1024 x 768 1024 x 768 1280 x 1024 1280 x 1024 1152 x 864 1440 x 900 1680 x 1050 Horizontal Frequency 31.47KHz 31.... 75Hz 60Hz 75Hz 75Hz 60Hz 60Hz Pixel Frequency 28.32MHz 25.18MHz 31.50MHz 31.50MHz 36.00MHz 40.00MHz 50.00MHz 49.50MHz 65.00MHz 75.00MHz 78.75MHz 108.00MHz 135.00MHz 108.00MHz 106.00MHz 146.25MHz * Modes not listed in the table above. ASUS LCD Monitor MW221/MW201...


