User Guide
Page 3
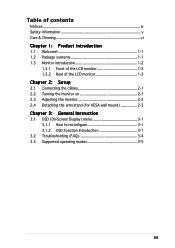
Table of contents Notices iv Safety information v Care & Cleaning vi Chapter 1: Product introduction 1.1 Welcome 1-1 1.2 Package contents 1-1 1.3 Monitor introduction 1-2 1.3.1 Front of the LCD monitor 1-2 1.3.2 Rear of the LCD monitor 1-3 Chapter 2: Setup 2.1 Connecting the cables 2-1 2.2 Turning the monitor on 2-1 2.3 Adjusting the monitor 2-2 2.4 Detaching the arm/stand (for VESA wall mount 2-3 Chapter 3: General Instruction 3.1 OSD (On-Screen Display) menu 3-1 3.1.1 How to...
Table of contents Notices iv Safety information v Care & Cleaning vi Chapter 1: Product introduction 1.1 Welcome 1-1 1.2 Package contents 1-1 1.3 Monitor introduction 1-2 1.3.1 Front of the LCD monitor 1-2 1.3.2 Rear of the LCD monitor 1-3 Chapter 2: Setup 2.1 Connecting the cables 2-1 2.2 Turning the monitor on 2-1 2.3 Adjusting the monitor 2-2 2.4 Detaching the arm/stand (for VESA wall mount 2-3 Chapter 3: General Instruction 3.1 OSD (On-Screen Display) menu 3-1 3.1.1 How to...
User Guide
Page 5
...of power supply to your home, consult your dealer or local power company. • Use the appropriate power plug which complies with the monitor, contact a qualified service technician or your dealer immediately. • Slots and openings on a stable surface. • Unplug the unit...result in fire or electric shock. • Avoid dust, humidity, and temperature extremes. v Safety information • Before setting up the monitor, carefully read all cables are correctly connected and the power cables are not damaged. Contact a qualified service technician or your local power standard...
...of power supply to your home, consult your dealer or local power company. • Use the appropriate power plug which complies with the monitor, contact a qualified service technician or your dealer immediately. • Slots and openings on a stable surface. • Unplug the unit...result in fire or electric shock. • Avoid dust, humidity, and temperature extremes. v Safety information • Before setting up the monitor, carefully read all cables are correctly connected and the power cables are not damaged. Contact a qualified service technician or your local power standard...
User Guide
Page 6
...with the LCD. Conventions used in completing a task. C A U T I N G : Information to prevent injury to yourself when trying to complete a task. I M P O R T A N T : Information that the flicker disappears. • You may find slightly uneven brightness on the screen depending on the desktop pattern you use with the monitor: •... of the previous screen may remain after switching the image. Turn off and unplug the power cord. When lifting or carrying the monitor, grasp the edges of the fluorescent light. Use a cleaner intended for use . • When the same image is better to...
...with the LCD. Conventions used in completing a task. C A U T I N G : Information to prevent injury to yourself when trying to complete a task. I M P O R T A N T : Information that the flicker disappears. • You may find slightly uneven brightness on the screen depending on the desktop pattern you use with the monitor: •... of the previous screen may remain after switching the image. Turn off and unplug the power cord. When lifting or carrying the monitor, grasp the edges of the fluorescent light. Use a cleaner intended for use . • When the same image is better to...
User Guide
Page 9
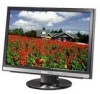
... 1 x Rear cover 1 x VESA cover If any of the above items is damaged or missing, contact your viewing experience. 1.1 Welcome! The ASUS® MW221/MW201 Series LCD monitor gives you a full view of documents and web pages, and saving you the trouble of features that the MW221/MW201 Series brings you... read or surf the Internet. The latest widescreen LCD monitor from ASUS provides a crisper, broader, and brighter display, plus a host of having to scroll the bar while you ! 1.2 Package contents Check your...
... 1 x Rear cover 1 x VESA cover If any of the above items is damaged or missing, contact your viewing experience. 1.1 Welcome! The ASUS® MW221/MW201 Series LCD monitor gives you a full view of documents and web pages, and saving you the trouble of features that the MW221/MW201 Series brings you... read or surf the Internet. The latest widescreen LCD monitor from ASUS provides a crisper, broader, and brighter display, plus a host of having to scroll the bar while you ! 1.2 Package contents Check your...
User Guide
Page 10
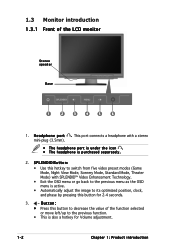
... is active. • Automatically adjust the image to its optimized position, clock, and phase by pressing this button to decrease the value of the LCD monitor Stereo speaker Base 1 2 3 4 5 6 1. 1.3 Monitor introduction 1.3.1 Front of the function selected or move left/up to the previous function. • This is also a hotkey for 2-4 seconds. 3. H e a d p h o n e p o r t . This port...
... is active. • Automatically adjust the image to its optimized position, clock, and phase by pressing this button to decrease the value of the LCD monitor Stereo speaker Base 1 2 3 4 5 6 1. 1.3 Monitor introduction 1.3.1 Front of the function selected or move left/up to the previous function. • This is also a hotkey for 2-4 seconds. 3. H e a d p h o n e p o r t . This port...
User Guide
Page 11
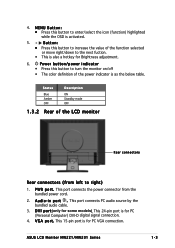
...Standby mode OFF 1.3.2 Rear of the power indicator is as the below table. D V I p o r t(only for PC VGA connection. ASUS LCD Monitor MW221/MW201 Series 1-3 This port connects the power connector from left to enter/select the icon (function) highlighted while the OSD is also a...Power button/power indicator • Press this button to increase the value of the function selected or move right/down to turn the monitor on/off • The color definition of the LCD monitor Rear connectors Rear connectors (from the bundled power cord. 2. A u d i o - V G A p o r t . 4.
...Standby mode OFF 1.3.2 Rear of the power indicator is as the below table. D V I p o r t(only for PC VGA connection. ASUS LCD Monitor MW221/MW201 Series 1-3 This port connects the power connector from left to enter/select the icon (function) highlighted while the OSD is also a...Power button/power indicator • Press this button to increase the value of the function selected or move right/down to turn the monitor on/off • The color definition of the LCD monitor Rear connectors Rear connectors (from the bundled power cord. 2. A u d i o - V G A p o r t . 4.
User Guide
Page 13
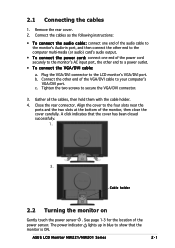
...VGA/DVI cable to a power outlet. • To connect the VGA/DVI cable: a. Cable holder 2.2 Turning the monitor on Gently touch the power sensor . ASUS LCD Monitor MW221/MW201 Series 2-1 Plug the VGA/DVI connector to secure the VGA/DVI connector. 3. Align the cover to show ...that the cover has been closed successfully. 1. 3. c. Tighten the two screws to the LCD monitor's VGA/DVI port. 2.1 Connecting the cables 1. ...
...VGA/DVI cable to a power outlet. • To connect the VGA/DVI cable: a. Cable holder 2.2 Turning the monitor on Gently touch the power sensor . ASUS LCD Monitor MW221/MW201 Series 2-1 Plug the VGA/DVI connector to secure the VGA/DVI connector. 3. Align the cover to show ...that the cover has been closed successfully. 1. 3. c. Tighten the two screws to the LCD monitor's VGA/DVI port. 2.1 Connecting the cables 1. ...
User Guide
Page 14
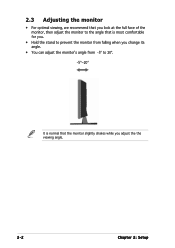
2.3 Adjusting the monitor • For optimal viewing, we recommend that you look at the full face of the monitor, then adjust the monitor to the angle that is most comfortable for you. • Hold the stand to prevent the monitor from falling when you change its angle. • You can adjust the monitor's angle from -5º to 20º. -5º~20º It is normal that the monitor slightly shakes while you adjust the the viewing angle. 2-2 Chapter 2: Setup
2.3 Adjusting the monitor • For optimal viewing, we recommend that you look at the full face of the monitor, then adjust the monitor to the angle that is most comfortable for you. • Hold the stand to prevent the monitor from falling when you change its angle. • You can adjust the monitor's angle from -5º to 20º. -5º~20º It is normal that the monitor slightly shakes while you adjust the the viewing angle. 2-2 Chapter 2: Setup
User Guide
Page 15
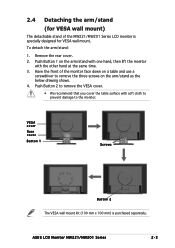
... mm) is specially designed for VESA wall mount) The detachable stand of the monitor face down on a table and use a screwdriver to the monitor. To detach the arm/stand: 1. Have the front of the MW221/MW201 Series LCD monitor is purchased separately. ASUS LCD Monitor MW221/MW201 Series 2-3 Push Button 2 to remove the VESA cover. • We...
... mm) is specially designed for VESA wall mount) The detachable stand of the monitor face down on a table and use a screwdriver to the monitor. To detach the arm/stand: 1. Have the front of the MW221/MW201 Series LCD monitor is purchased separately. ASUS LCD Monitor MW221/MW201 Series 2-3 Push Button 2 to remove the VESA cover. • We...
User Guide
Page 17
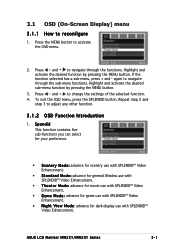
.... 3. Press and to adjust any other function. 3.1.2 OSD Function Introduction 1. Press the MENU button to navigate through the functions. again to activate the OSD menu. 2. ASUS LCD Monitor MW221/MW201 Series 3-1 Press and to reconfigure 1. 3.1 OSD (On-Screen Display) menu 3.1.1 How to navigate through the sub-menu functions.
.... 3. Press and to adjust any other function. 3.1.2 OSD Function Introduction 1. Press the MENU button to navigate through the functions. again to activate the OSD menu. 2. ASUS LCD Monitor MW221/MW201 Series 3-1 Press and to reconfigure 1. 3.1 OSD (On-Screen Display) menu 3.1.1 How to navigate through the sub-menu functions.
User Guide
Page 19
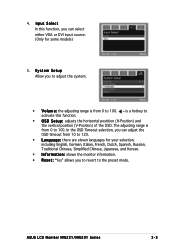
... the system. • V o l u m e : the adjusting range is from 0 to 100. The adjusting range is from 10 to 100. ASUS LCD Monitor MW221/MW201 Series 3-3 4. activate this function, you can select either VGA or DVI input source. (Only for your selection, including English, German, Italian,... French, Dutch, Spanish, Russian, Traditional Chinese, Simplified Chinese, Japanese, and Korean. • Information: shows the monitor information. • R e s e t : "Yes" allows you can adjust the OSD timeout from 0 to 120. • Language: there...
... the system. • V o l u m e : the adjusting range is from 0 to 100. The adjusting range is from 10 to 100. ASUS LCD Monitor MW221/MW201 Series 3-3 4. activate this function, you can select either VGA or DVI input source. (Only for your selection, including English, German, Italian,... French, Dutch, Spanish, Russian, Traditional Chinese, Simplified Chinese, Japanese, and Korean. • Information: shows the monitor information. • R e s e t : "Yes" allows you can adjust the OSD timeout from 0 to 120. • Language: there...
User Guide
Page 20
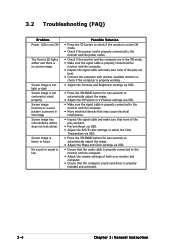
...the computer. • Inspect the signal cable and make sure none of the pins are bent. • Connect the computer with another available monitor to check if the computer is properly working. • Adjust the Contrast and Brightness settings via OSD. • Press the SPLENDID button for ... adjust the image. • Adjust the H-Position or V-Position settings via OSD. • Make sure the signal cable is properly connected to the monitor and the computer. • Move electrical devices that may cause electrical interference. • Inspect the signal cable and make sure that none of the ...
...the computer. • Inspect the signal cable and make sure none of the pins are bent. • Connect the computer with another available monitor to check if the computer is properly working. • Adjust the Contrast and Brightness settings via OSD. • Press the SPLENDID button for ... adjust the image. • Adjust the H-Position or V-Position settings via OSD. • Make sure the signal cable is properly connected to the monitor and the computer. • Move electrical devices that may cause electrical interference. • Inspect the signal cable and make sure that none of the ...
User Guide
Page 21
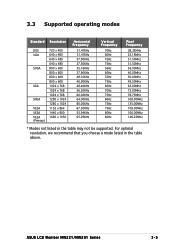
ASUS LCD Monitor MW221/MW201 Series 3-5 For optimal resolution, we recommend that you choose a mode listed in the table may not be supported. 3.3 Supported operating modes Standard Resolution ...
ASUS LCD Monitor MW221/MW201 Series 3-5 For optimal resolution, we recommend that you choose a mode listed in the table may not be supported. 3.3 Supported operating modes Standard Resolution ...


