Asus VH202T - 20" LCD Monitor Support and Manuals
Get Help and Manuals for this Asus item

Popular Asus VH202T Manual Pages
User Guide - Page 2
... mount 2-1 2.2 Adjusting the monitor 2-2
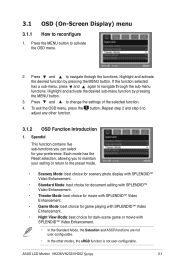
Chapter 3: General Instruction 3.1 OSD (On-Screen Display) menu 3-1
3.1.1 How to infringe. Table of their respective companies, and are used only for backup purposes, without intent to reconfigure 3-1 3.1.2 OSD Function Introduction 3-1 3.2 Specifications summary 3-4 3.3 Troubleshooting (FAQ 3-7 3.4 Supported operating modes 3-8 3.5 HDMI...
User Guide - Page 4
... encounter technical problems with your local power standard. • Do not overload power strips and extention cords. Place the monitor on the ...monitor cabinet. • To ensure satisfactory operation, use the monitor only with UL listed computers which complies with the monitor, contact a qualified service technician or your retailer. Safety information
• Before setting up the monitor...
User Guide - Page 7

... your VH236/VH232/VH202 Series LCD package for the following items: LCD monitor Monitor base Support CD Quick Start Guide Power cord VGA cable DVI cable (Only for some models) Audio cable (Only for some models)
If any of features that the VH236/VH232/VH202 Series brings you for purchasing the ASUS® VH236/VH232/VH202 Series LCD monitor! The latest widescreen LCD monitor from ASUS provides...
User Guide - Page 9
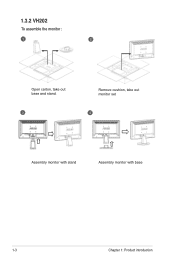
1.3.2 VH202
To assemble the monitor :
1
2
Open carton, take out base and stand.
3
Remove cushion, take out monitor set
4
Assembly monitor with stand
Assembly monitor with base
1-3
Chapter 1: Product introduction
User Guide - Page 10
...
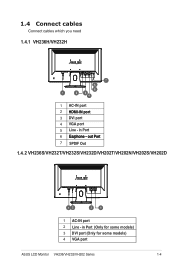
1.4.2 VH236S/VH232T/VH232S/VH232D/VH202T/VH202N/VH202S/VH202D
12
3
4
1 AC-IN port 2 Line - in Port 6 Earphone - 1.4 Connect cables
Connect cables which you need
1.4.1 VH236H/VH232H
7
5
6
1
23
4
1 AC-IN port 2 HDMI-IN port 3 DVI port 4 VGA port 5 Line - in Port (Only for some models) 3 DVI port (Only for some models) 4 VGA port
ASUS LCD Monitor VH236/VH232/VH202 Series
1-4
User Guide - Page 11
... is activated.
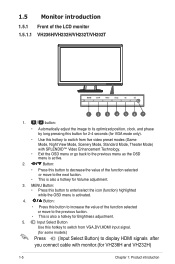
4. Input Select Button
Use this button to increase the value of the LCD monitor 1.5.1.1 VH236H/VH232H/VH232T/VH202T
1
2
3
4
567
1. 1.5 Monitor introduction
1.5.1 Front of the function selected or move to the next fuction.
• This is also a hotkey for some models)
Press (Input Select Button) to display HDMI signals after
you connect cable with...
User Guide - Page 13
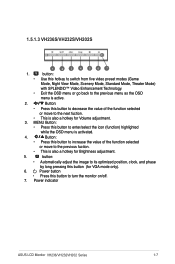
1.5.1.3 VH236S/VH232S/VH202S
1
2
3
4
56 7
1.
Power indicator
ASUS LCD Monitor VH236/VH232VH202 Series
1-7 button:
• Use this hotkey to...
• Press this button (for Brightness adjustment.
5. button:
• Automatically adjust the image to turn the monitor on/off. 7.
Power button
• Press this button to its optimized position, clock, and phase
by long...
User Guide - Page 15

... VESA Wall Mount
1.5.2.1 VH236H/VH232H
Rear connectors
1 AC-IN port 2 HDMI-IN port 3 DVI port 4 VGA port 5 Line - 1.5.2 Rear of the LCD monitor
Screw holes for some models) 4 VGA port
ASUS LCD Monitor VH236/VH232/VH202Series
1-9 in Port 6 Earphone - out Port 7 SPDIF Out
1.5.2.2 VH236S/VH232T/VH232S/VH232D/VH202T/VH202S/VH202D
12
34
Rear connectors
1 AC-IN port 2 Line -
User Guide - Page 16
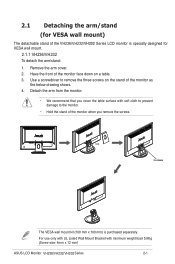
... (for VESA wall mount.
2.1.1 VH236/VH232 To detach the arm/stand: . Have the front of the monitor when you cover the table surface with minimum weight/load 5.8Kg (Screw size: 4mm x 12 mm)
ASUS LCD Monitor VH236/VH232/VH202 Series
2- For use only with UL Listed Wall Mount Bracket with soft cloth to prevent damage...
User Guide - Page 17
Press the release button. 3.
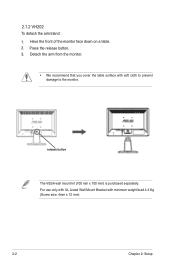
2.1.2 VH202 To detach the arm/stand: 1. release button
The VESA wall mount kit (100 mm x 100 mm) is purchased separately. Detach the arm from the monitor.
• We recommend that you cover the table surface with minimum weight/load 4.4 Kg (Screw size: 4mm x 12 mm)
2-2
Chapter 2: Setup Have the front...
User Guide - Page 18

2.2 Adjusting the monitor
• For optimal viewing, we recommend that you look at the full face of the monitor, then adjust the monitor to the angle that is most comfortable for you.
• Hold the stand to prevent the monitor from falling when you change its angle. • You can adjust the monitor's angle from -5º to 20º.
-5º~20º
2-2
Chapter 2: Setup
User Guide - Page 19
... menu.
2. To exit the OSD menu, press the button. ASUS LCD Monitor VH236/VH232/VH202 Series
3- Spendid
This function contains five sub-functions you to navigate through the sub-menu
functions. Press and
to maintain your preference. 3.1 OSD (On-Screen Display) menu
3.1.1 How to change the settings of the selected function.
4. Press and
to reconfigure
1.
User Guide - Page 21
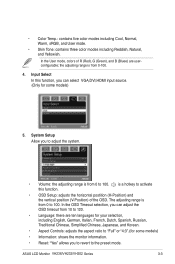
... Language: there are userconfigurable; ASUS LCD Monitor VH236/VH232/VH202 Series
3- The adjusting range is from 10 to 100. Input Select In this function.
• OSD Setup: adjusts the horizontal postition (H-...Controls: adjusts the aspect ratio to "Full" or "4:3". (for some models)
• Information: shows the monitor information.
• Reset: "Yes" allows you to revert to the...
User Guide - Page 24

3.2.2 Specifications summary
Model Panel Size True Resolution Brightness (Max.) Intrisinc Contrast Ratio
Viewing Angle (CR=10)
VH202T 20"W 1600x900 ≧250cd/㎡ ≧1000:1 ≧160°(V), ≧
160°(H)
VH202N 20"W 1600x900 ≧250cd/㎡ ≧1000:1 ≧160°(V), ≧
160°(H)
VH202S 20"W
1600x900 ≧250cd/㎡
≧1000:1 ≧160&#...
User Guide - Page 25
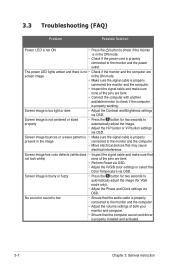
... the signal cable is properly
present in the image
connected to the monitor and the computer
• Adjust the volume settings of both your
monitor and computer.
• Ensure that the computer sound card driver
is properly installed and activated.
3-7
Chapter 3: General Instruction No sound or sound is low
• Ensure that the audio cable is properly
connected to...
Asus VH202T Reviews
We have not received any reviews for Asus yet.