User Manual
Page 6
... Utilities menu 4-3 4.2.4 Make disk menu 4-5 4.2.5 Manual menu 4-6 4.2.6 Video menu 4-6 4.2.7 ASUS Contact information 4-7 4.2.8 Other information 4-7 4.3 Software information 4-9 4.3.1 ASUS MyLogo3 4-9 4.3.2 AI NET 2 4-11 4.3.3 Sound Blaster X-Fi audio utility 4-12 4.3.4 ASUS PC Probe II 4-16 4.3.5 ASUS EPU-Six Engine 4-22 4.3.6 ASUS AI Suite 4-26 4.3.7 ASUS AI Nap 4-28 4.3.8 ASUS Fan Xpert 4-29 4.3.9 ASUS AI Booster 4-31 4.3.10 CPU Level Up 4-32 4.3.11 ROG Speeding HDD 4-33 4.4 RAID configurations 4-40 4.4.1 RAID definitions 4-40 4.4.2 Installing Serial ATA hard disks...
... Utilities menu 4-3 4.2.4 Make disk menu 4-5 4.2.5 Manual menu 4-6 4.2.6 Video menu 4-6 4.2.7 ASUS Contact information 4-7 4.2.8 Other information 4-7 4.3 Software information 4-9 4.3.1 ASUS MyLogo3 4-9 4.3.2 AI NET 2 4-11 4.3.3 Sound Blaster X-Fi audio utility 4-12 4.3.4 ASUS PC Probe II 4-16 4.3.5 ASUS EPU-Six Engine 4-22 4.3.6 ASUS AI Suite 4-26 4.3.7 ASUS AI Nap 4-28 4.3.8 ASUS Fan Xpert 4-29 4.3.9 ASUS AI Booster 4-31 4.3.10 CPU Level Up 4-32 4.3.11 ROG Speeding HDD 4-33 4.4 RAID configurations 4-40 4.4.1 RAID definitions 4-40 4.4.2 Installing Serial ATA hard disks...
User Manual
Page 17
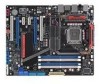
... your retailer. ASUS Maximus II Formula 1-1 Before you for the following items. Motherboard ASUS Maximus II Formula I/O module USB 2.0 + IEEE 1394a module Cables Ultra DMA 133/100/66 cable Floppy disk drive cable Serial ATA cables Serial ATA power cables Accessories S�up�r�em�e�F�X�X�-F�i�A�ud�i�o �C�ar�d LCD Poster ASUS Optional Fan 3-in-1 ASUS Q-Connector Kit Q-Shield Cable ties Application DVD ASUS motherboard support DVD Documentation User guide If any...
... your retailer. ASUS Maximus II Formula 1-1 Before you for the following items. Motherboard ASUS Maximus II Formula I/O module USB 2.0 + IEEE 1394a module Cables Ultra DMA 133/100/66 cable Floppy disk drive cable Serial ATA cables Serial ATA power cables Accessories S�up�r�em�e�F�X�X�-F�i�A�ud�i�o �C�ar�d LCD Poster ASUS Optional Fan 3-in-1 ASUS Q-Connector Kit Q-Shield Cable ties Application DVD ASUS motherboard support DVD Documentation User guide If any...
User Manual
Page 51
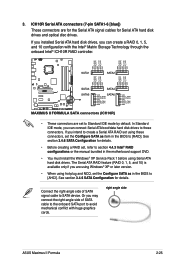
... the manual bundled in the motherboard support DVD. • You must install the Windows® XP Service Pack 1 before using hot-plug and NCQ, set the Configure SATA as in the BIOS to SATA device. Or you may connect the right-angle side of SATA signal cable to [RAID]. right angle side ASUS Maximus II Formula 2-25 If you can create a RAID 0, 1, 5, and 10 configuration with huge graphics cards. Connect the right-angle side of SATA cable to the onboard SATA port to [AHCI...
... the manual bundled in the motherboard support DVD. • You must install the Windows® XP Service Pack 1 before using hot-plug and NCQ, set the Configure SATA as in the BIOS to SATA device. Or you may connect the right-angle side of SATA signal cable to [RAID]. right angle side ASUS Maximus II Formula 2-25 If you can create a RAID 0, 1, 5, and 10 configuration with huge graphics cards. Connect the right-angle side of SATA cable to the onboard SATA port to [AHCI...
User Manual
Page 69
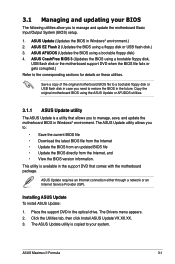
... Windows® environment. ASUS AFUDOS (Updates the BIOS using a floppy disk or USB flash disk.) 3. The Drivers menu appears. 2. Save a copy of the original motherboard BIOS file to a bootable floppy disk or USB flash disk in case you need to your BIOS The following utilities allow you to manage, save, and update the motherboard BIOS in the support DVD that allows you to manage and update the motherboard Basic Input/Output System (BIOS) setup. 1. ASUS Update requires an Internet connection either through a network or an Internet Service...
... Windows® environment. ASUS AFUDOS (Updates the BIOS using a floppy disk or USB flash disk.) 3. The Drivers menu appears. 2. Save a copy of the original motherboard BIOS file to a bootable floppy disk or USB flash disk in case you need to your BIOS The following utilities allow you to manage, save, and update the motherboard BIOS in the support DVD that allows you to manage and update the motherboard Basic Input/Output System (BIOS) setup. 1. ASUS Update requires an Internet connection either through a network or an Internet Service...
User Manual
Page 75
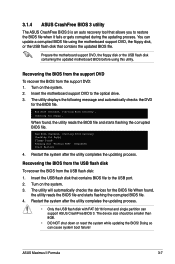
.... ASUS Maximus II Formula 3-7 Bad BIOS checksum. Floppy found , the utility reads the BIOS file and starts flashing the corrupted BIOS file. 4. Restart the system after the utility completes the updating process. • Only the USB flash disk with FAT 32/16 format and single partition can cause system boot failure! The utility will automatically checks the devices for floppy... Prepare the motherboard support DVD, the floppy disk or the USB flash disk containing the updated motherboard BIOS before using the motherboard support DVD, the floppy disk, or the USB flash disk that...
.... ASUS Maximus II Formula 3-7 Bad BIOS checksum. Floppy found , the utility reads the BIOS file and starts flashing the corrupted BIOS file. 4. Restart the system after the utility completes the updating process. • Only the USB flash disk with FAT 32/16 format and single partition can cause system boot failure! The utility will automatically checks the devices for floppy... Prepare the motherboard support DVD, the floppy disk or the USB flash disk containing the updated motherboard BIOS before using the motherboard support DVD, the floppy disk, or the USB flash disk that...

User Manual
Page 89
...DMA, and SMART monitoring). These values are specifically configuring a CD-ROM drive. Configuration options: [Disabled] [Auto] Block (Multi-sector Transfer) [Auto] Enables or disables data multi-sectors transfers. Configuration options: [Auto] [0] [1] [2] [3] [4] ASUS Maximus II Formula 3-21 Main BIOS SETUP UTILITY SATA 1 Device :Not Detected Select the type of the appropriate IDE device type. Select [ARMD] (ATAPI Removable Media Device) if your device is a separate sub-menu for each SATA device. These items show [Auto] if no IDE device is installed in the system. When set to...
...DMA, and SMART monitoring). These values are specifically configuring a CD-ROM drive. Configuration options: [Disabled] [Auto] Block (Multi-sector Transfer) [Auto] Enables or disables data multi-sectors transfers. Configuration options: [Auto] [0] [1] [2] [3] [4] ASUS Maximus II Formula 3-21 Main BIOS SETUP UTILITY SATA 1 Device :Not Detected Select the type of the appropriate IDE device type. Select [ARMD] (ATAPI Removable Media Device) if your device is a separate sub-menu for each SATA device. These items show [Auto] if no IDE device is installed in the system. When set to...
User Manual
Page 90
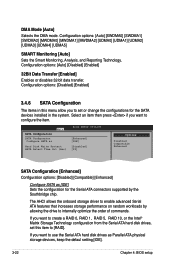
... Serial ATA hard disk drives as [IDE] Sets the configuration for the SATA devices installed in this item to enable advanced Serial ATA features that increases storage performance on random workloads by the Southbridge chip. The AHCI allows the onboard storage driver to [RAID]. Main SATA Configuration SATA Configuraton Configure SATA as BIOS SETUP UTILITY [Enhanced] [IDE] Hard Disk Write Protect [Disabled] SATA Detect Time Out (Sec) [35] Options Disabled Compatible Enhanced SATA Configuration [Enhanced] Configuration options: [Disabled] [Compatible] [Enhanced] Configure SATA...
... Serial ATA hard disk drives as [IDE] Sets the configuration for the SATA devices installed in this item to enable advanced Serial ATA features that increases storage performance on random workloads by the Southbridge chip. The AHCI allows the onboard storage driver to [RAID]. Main SATA Configuration SATA Configuraton Configure SATA as BIOS SETUP UTILITY [Enhanced] [IDE] Hard Disk Write Protect [Disabled] SATA Detect Time Out (Sec) [35] Options Disabled Compatible Enhanced SATA Configuration [Enhanced] Configuration options: [Disabled] [Compatible] [Enhanced] Configure SATA...
User Manual
Page 92
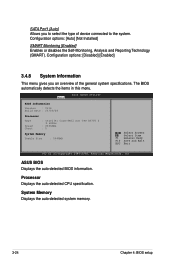
... the items in this menu. System Memory Displays the auto-detected system memory. 3-24 Chapter 4: BIOS setup ASUS BIOS Displays the auto-detected BIOS information. Processor Displays the auto-detected CPU specification. Configuration options: [Auto] [Not Installed] SMART Monitoring [Enabled] Enables or disables the Self-Monitoring, Analysis and Reporting Technology (SMART). Configuration options: [Disabled] [Enabled] 3.4.8 System Information This menu gives you to the system. SATA Port1 [Auto] Allows you an overview of device connected to select the type of the general system...
... the items in this menu. System Memory Displays the auto-detected system memory. 3-24 Chapter 4: BIOS setup ASUS BIOS Displays the auto-detected BIOS information. Processor Displays the auto-detected CPU specification. Configuration options: [Auto] [Not Installed] SMART Monitoring [Enabled] Enables or disables the Self-Monitoring, Analysis and Reporting Technology (SMART). Configuration options: [Disabled] [Enabled] 3.4.8 System Information This menu gives you to the system. SATA Port1 [Auto] Allows you an overview of device connected to select the type of the general system...
User Manual
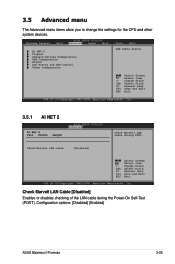
Page 93
... v02.58 (C)Copyright 1985-2008, American Megatrends, Inc. Configuration options: [Disabled] [Enabled] ASUS Maximus II Formula 3-25 Extreme Tweaker Main BIOS SETUP UTILITY Advanced Power Boot Tools Exit AI NET 2 Chipset Onboard Devices Configuration USB Configuration PCIPnP LCD Poster and LED Control Other Configuration LAN Cable Status Select Screen Select Item +- Check Marvell LAN cable [Disabled] Select Screen Select Item +- Check Marvell LAN Cable [Disabled] Enables or disables checking of the LAN cable during POST. Change Field Tab Select Field F1 General Help F10...
... v02.58 (C)Copyright 1985-2008, American Megatrends, Inc. Configuration options: [Disabled] [Enabled] ASUS Maximus II Formula 3-25 Extreme Tweaker Main BIOS SETUP UTILITY Advanced Power Boot Tools Exit AI NET 2 Chipset Onboard Devices Configuration USB Configuration PCIPnP LCD Poster and LED Control Other Configuration LAN Cable Status Select Screen Select Item +- Check Marvell LAN cable [Disabled] Select Screen Select Item +- Check Marvell LAN Cable [Disabled] Enables or disables checking of the LAN cable during POST. Change Field Tab Select Field F1 General Help F10...
User Manual
Page 95
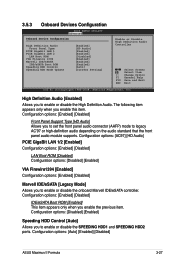
... (AAFP) mode to enable or disable the SPEEDING HDD1 and SPEEDING HDD2 ports. 3.5.3 Onboard Devices Configuration BIOS SETUP UTILITY Advanced Onboard Device Configuration High Definition Audio Front Panel Type PCIE GigaBit LAN 1 PCIE GigaBit LAN 2 LAN Boot ROM VIA Firewire 1394 Marvell IDE/eSATA IDE/eSATA Boot ROM Speeding HDD Control Speeding HDD Mode Update [Enabled] [HD Audio] [Enabled] [Enabled] [Disabled] [Enabled] [Enabled] [Enabled] [Auto] [Current Setting] Enable or Disable High Definition Audio Controller Select Screen Select Item +- Change Option F1...
... (AAFP) mode to enable or disable the SPEEDING HDD1 and SPEEDING HDD2 ports. 3.5.3 Onboard Devices Configuration BIOS SETUP UTILITY Advanced Onboard Device Configuration High Definition Audio Front Panel Type PCIE GigaBit LAN 1 PCIE GigaBit LAN 2 LAN Boot ROM VIA Firewire 1394 Marvell IDE/eSATA IDE/eSATA Boot ROM Speeding HDD Control Speeding HDD Mode Update [Enabled] [HD Audio] [Enabled] [Enabled] [Disabled] [Enabled] [Enabled] [Enabled] [Auto] [Current Setting] Enable or Disable High Definition Audio Controller Select Screen Select Item +- Change Option F1...
User Manual
Page 97
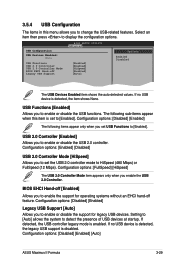
...Disabled] [Enabled] Legacy USB Support [Auto] Allows you to set USB Functions to enable or disable the USB functions. Configuration options: [Disabled] [Enabled] [Auto] ASUS Maximus II Formula 3-29 Configuration options: [FullSpeed] [HiSpeed] The USB 2.0 Controller Mode item appears only when you to [Enabled]. Setting to [Auto] allows the system to display the configuration options. Configuration options: [Enabled] [Disabled] USB 2.0 Controller Mode [HiSpeed] Allows you to enable the support for legacy USB devices. BIOS SETUP UTILITY Advanced USB Configuration USB Devices...
...Disabled] [Enabled] Legacy USB Support [Auto] Allows you to set USB Functions to enable or disable the USB functions. Configuration options: [Disabled] [Enabled] [Auto] ASUS Maximus II Formula 3-29 Configuration options: [FullSpeed] [HiSpeed] The USB 2.0 Controller Mode item appears only when you to [Enabled]. Setting to [Auto] allows the system to display the configuration options. Configuration options: [Enabled] [Disabled] USB 2.0 Controller Mode [HiSpeed] Allows you to enable the support for legacy USB devices. BIOS SETUP UTILITY Advanced USB Configuration USB Devices...
User Manual
Page 101
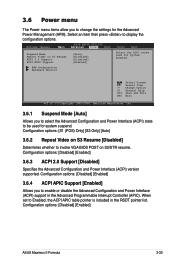
... Configuration options: [Disabled] [Enabled] ASUS Maximus II Formula 3-33 APM Configuration Hardware Monitor Select Screen Select Item +- When set to display the configuration options. 3.6 Power menu The Power menu items allow you to enable or disable the Advanced Configuration and Power Interface (ACPI) support in the RSDT pointer list. Extreme Tweaker BIOS SETUP UTILITY �M�a�i�n A�d�v�a�n��c�e�d� Power Boot Tools Exit Suspend Mode Repost Video on S3 Resume ACPI 2.0 Support ACPI...
... Configuration options: [Disabled] [Enabled] ASUS Maximus II Formula 3-33 APM Configuration Hardware Monitor Select Screen Select Item +- When set to display the configuration options. 3.6 Power menu The Power menu items allow you to enable or disable the Advanced Configuration and Power Interface (ACPI) support in the RSDT pointer list. Extreme Tweaker BIOS SETUP UTILITY �M�a�i�n A�d�v�a�n��c�e�d� Power Boot Tools Exit Suspend Mode Repost Video on S3 Resume ACPI 2.0 Support ACPI...

User Manual
Page 109
... display the configuration options. Change Supervisor Password Select this item shows Installed. From the password box, type a password composed of the screen shows the default Not Installed. To change password. See section 2.6 Jumpers for information on top of at least six letters and/or numbers, then press . 3. 3.7.4 Security The Security menu items allow you can clear it by erasing the CMOS Real Time Clock (RTC) RAM. Security Settings BIOS SETUP UTILITY Boot Supervisor Password User Password :Not Installed :Not Installed Change...
... display the configuration options. Change Supervisor Password Select this item shows Installed. From the password box, type a password composed of the screen shows the default Not Installed. To change password. See section 2.6 Jumpers for information on top of at least six letters and/or numbers, then press . 3. 3.7.4 Security The Security menu items allow you can clear it by erasing the CMOS Real Time Clock (RTC) RAM. Security Settings BIOS SETUP UTILITY Boot Supervisor Password User Password :Not Installed :Not Installed Change...
User Manual
Page 117
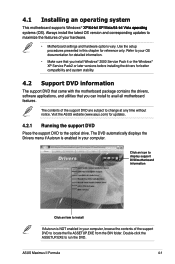
... Service Pack2 or later versions before installing the drivers for updates. 4.2.1 Running the support DVD Place the support DVD to locate the file ASSETUP.EXE from the BIN folder. Visit the ASUS website (www.asus.com) for better compatibility and system stability. 4.2 Support DVD information The support DVD that came with the motherboard package contains the drivers, software applications, and utilities that you can install to your hardware. • Motherboard settings and hardware options vary. 4.1 Installing an...
... Service Pack2 or later versions before installing the drivers for updates. 4.2.1 Running the support DVD Place the support DVD to locate the file ASSETUP.EXE from the BIN folder. Visit the ASUS website (www.asus.com) for better compatibility and system stability. 4.2 Support DVD information The support DVD that came with the motherboard package contains the drivers, software applications, and utilities that you can install to your hardware. • Motherboard settings and hardware options vary. 4.1 Installing an...

User Manual
Page 119
... II This smart utility monitors the fan speed, CPU temperature, and system voltages, and alerts you of any detected problems. This utility helps you to display the previous screen ASUS InstAll-Installation Wizard for Utilities Installs all of the utilities through a network or an Internet Service Provider (ISP). 4.2.3 Utilities menu The Utilities menu shows the applications and other software that the motherboard supports. This utility requires an Internet connection either through the Installation Wizard. Click to display the next screen Click to update the motherboard BIOS...
... II This smart utility monitors the fan speed, CPU temperature, and system voltages, and alerts you of any detected problems. This utility helps you to display the previous screen ASUS InstAll-Installation Wizard for Utilities Installs all of the utilities through a network or an Internet Service Provider (ISP). 4.2.3 Utilities menu The Utilities menu shows the applications and other software that the motherboard supports. This utility requires an Internet connection either through the Installation Wizard. Click to display the next screen Click to update the motherboard BIOS...
User Manual
Page 128
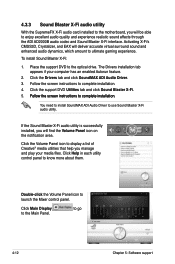
... Panel icon to the optical drive. To install Sound Blaster X-Fi: 1. Place the support DVD to display a list of Creative® media utilities that help you manage and play your computer has an enabled Autorun feature. 2. Click Help in each utility control panel to the Main Panel. Click Main Display to know more about them. Activating X-Fi's CMSS3D, Crystalizer, and EAX will deliver accurate virtual surround sound and enhanced audio...
... Panel icon to the optical drive. To install Sound Blaster X-Fi: 1. Place the support DVD to display a list of Creative® media utilities that help you manage and play your computer has an enabled Autorun feature. 2. Click Help in each utility control panel to the Main Panel. Click Main Display to know more about them. Activating X-Fi's CMSS3D, Crystalizer, and EAX will deliver accurate virtual surround sound and enhanced audio...
User Manual
Page 157
... Matrix Storage configurations for a RAID configuration: 1. Refer to the power connector on entering and navigating through the Intel® ICH10R Southbridge chip. For optimal performance, install identical drives of the same model and capacity when creating a disk array. Go to display the configuration options. 4. Save your changes, then exit the BIOS Setup. 4.4.2 Installing Serial ATA hard disks The motherboard supports Serial ATA hard disk drives. ASUS Maximus II Formula 4-41 To install the SATA hard disks for Serial ATA hard disks drives through the BIOS Setup...
... Matrix Storage configurations for a RAID configuration: 1. Refer to the power connector on entering and navigating through the Intel® ICH10R Southbridge chip. For optimal performance, install identical drives of the same model and capacity when creating a disk array. Go to display the configuration options. 4. Save your changes, then exit the BIOS Setup. 4.4.2 Installing Serial ATA hard disks The motherboard supports Serial ATA hard disk drives. ASUS Maximus II Formula 4-41 To install the SATA hard disks for Serial ATA hard disks drives through the BIOS Setup...
User Manual
Page 166
... install the RAID driver in Windows® Vista: 1. Insert the floppy disk/USB device with RAID driver into the floppy disk drive/USB port. 2. During the OS installation, select Intel(R) SATA RAID Controller (Desktop ICH10R). 3. Press then insert the floppy disk with RAID driver into the floppy disk drive. 3. When prompted to select the SCSI adapter to complete the installation. Follow the succeeding screen instructions to install, make sure you to press the key to complete the installation. 4-50 Chapter 4: Software support To install the RAID driver in Windows...
... install the RAID driver in Windows® Vista: 1. Insert the floppy disk/USB device with RAID driver into the floppy disk drive/USB port. 2. During the OS installation, select Intel(R) SATA RAID Controller (Desktop ICH10R). 3. Press then insert the floppy disk with RAID driver into the floppy disk drive. 3. When prompted to select the SCSI adapter to complete the installation. Follow the succeeding screen instructions to install, make sure you to press the key to complete the installation. 4-50 Chapter 4: Software support To install the RAID driver in Windows...
User Manual
Page 172
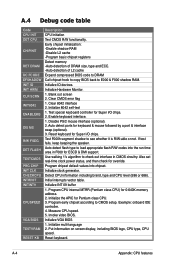
... memory -Auto-detection of DRAM size, type and ECC. -Auto-detection of L2 cache Expand compressed BIOS code to DRAM Call chipset hook to copy BIOS back to CMOS setup. Clear CMOS error flag 1. Use walking 1's algorithm to check out interface in F000 for ESCD & DMI support. Also set real-time clock power status, and then check for Pentium class CPU. 3. Initialize clock generator. Initialize the APIC for override. Example: onboard IDE controller. 4. Put information on screen display...
... memory -Auto-detection of DRAM size, type and ECC. -Auto-detection of L2 cache Expand compressed BIOS code to DRAM Call chipset hook to copy BIOS back to CMOS setup. Clear CMOS error flag 1. Use walking 1's algorithm to check out interface in F000 for ESCD & DMI support. Also set real-time clock power status, and then check for Pentium class CPU. 3. Initialize clock generator. Initialize the APIC for override. Example: onboard IDE controller. 4. Put information on screen display...

User Manual
Page 173
... 0) Display number of processors (multi-processor platform) Display PnP logo Initialize Onboard IO devices. Initialize floppy controller 2. Test 8259 functionality. Initialize L2 cache for channel 2. Assign resources to enter Setup utility. Call chipset power management hook. 2. Initialize the APIC for password. Set up floppy related fields in 40:hardware. Detect serial ports & parallel ports. ASUS Maximus II Formula A-5 Calculate total memory by EPA logo (not for channel 1. If password is set, ask for P6 class CPU. 4. Detect & install all extended memory...
... 0) Display number of processors (multi-processor platform) Display PnP logo Initialize Onboard IO devices. Initialize floppy controller 2. Test 8259 functionality. Initialize L2 cache for channel 2. Assign resources to enter Setup utility. Call chipset power management hook. 2. Initialize the APIC for password. Set up floppy related fields in 40:hardware. Detect serial ports & parallel ports. ASUS Maximus II Formula A-5 Calculate total memory by EPA logo (not for channel 1. If password is set, ask for P6 class CPU. 4. Detect & install all extended memory...


