User Manual
Page 4
... the OS shut down function 2-40 2.10.2 Using the dual function power switch 2-40 Chapter 3: BIOS setup 3.1 Managing and updating your BIOS 3-1 3.1.1 ASUS Update utility 3-1 3.1.2 ASUS EZ Flash 2 utility 3-4 3.1.3 AFUDOS utility 3-5 3.1.4 ASUS CrashFree BIOS 3 utility 3-7 3.2 BIOS setup program 3-8 3.2.1 BIOS menu screen 3-9 3.2.2 Menu bar 3-9 3.2.3 Navigation keys 3-9 3.2.4 Menu items 3-10 3.2.5 Sub-menu items 3-10 3.2.6 Configuration...
... the OS shut down function 2-40 2.10.2 Using the dual function power switch 2-40 Chapter 3: BIOS setup 3.1 Managing and updating your BIOS 3-1 3.1.1 ASUS Update utility 3-1 3.1.2 ASUS EZ Flash 2 utility 3-4 3.1.3 AFUDOS utility 3-5 3.1.4 ASUS CrashFree BIOS 3 utility 3-7 3.2 BIOS setup program 3-8 3.2.1 BIOS menu screen 3-9 3.2.2 Menu bar 3-9 3.2.3 Navigation keys 3-9 3.2.4 Menu items 3-10 3.2.5 Sub-menu items 3-10 3.2.6 Configuration...
User Manual
Page 6
... 4-2 4.2.3 Utilities menu 4-3 4.2.4 Make disk menu 4-5 4.2.5 Manual menu 4-6 4.2.6 Video menu 4-6 4.2.7 ASUS Contact information 4-7 4.2.8 Other information 4-7 4.3 Software information 4-9 4.3.1 ASUS MyLogo3 4-9 4.3.2 AI NET 2 4-11 4.3.3 Sound Blaster X-Fi audio utility 4-12 4.3.4 ASUS PC Probe II 4-16 4.3.5 ASUS EPU-Six Engine 4-22 4.3.6 ASUS AI Suite 4-26 4.3.7 ASUS AI Nap 4-28 4.3.8 ASUS Fan Xpert 4-29 4.3.9 ASUS AI Booster 4-31 4.3.10 CPU Level Up 4-32 4.3.11...
... 4-2 4.2.3 Utilities menu 4-3 4.2.4 Make disk menu 4-5 4.2.5 Manual menu 4-6 4.2.6 Video menu 4-6 4.2.7 ASUS Contact information 4-7 4.2.8 Other information 4-7 4.3 Software information 4-9 4.3.1 ASUS MyLogo3 4-9 4.3.2 AI NET 2 4-11 4.3.3 Sound Blaster X-Fi audio utility 4-12 4.3.4 ASUS PC Probe II 4-16 4.3.5 ASUS EPU-Six Engine 4-22 4.3.6 ASUS AI Suite 4-26 4.3.7 ASUS AI Nap 4-28 4.3.8 ASUS Fan Xpert 4-29 4.3.9 ASUS AI Booster 4-31 4.3.10 CPU Level Up 4-32 4.3.11...
User Manual
Page 12
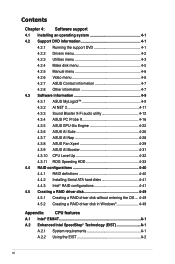
...channel High Definition Audio CODEC - Creative X-Fi capability - Hence, a total installed memory of 4GB capacity or more, Windows® 32-bit operation system �m�a��y�o��n�ly��r�e�c�o�...X-Fi interface - Supports up to www.asus.com or this user manual for the Memory QVL (Qualified Vendors Lists). **When installing total memory of less than 3GB. Coaxial / Optical S/PDIF Out ports (continued on the next page) xii Maximus II Formula specifications summary CPU Chipset System Bus Memory ...
...channel High Definition Audio CODEC - Creative X-Fi capability - Hence, a total installed memory of 4GB capacity or more, Windows® 32-bit operation system �m�a��y�o��n�ly��r�e�c�o�...X-Fi interface - Supports up to www.asus.com or this user manual for the Memory QVL (Qualified Vendors Lists). **When installing total memory of less than 3GB. Coaxial / Optical S/PDIF Out ports (continued on the next page) xii Maximus II Formula specifications summary CPU Chipset System Bus Memory ...
User Manual
Page 22
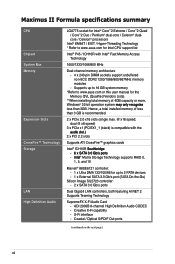
... unique features Supreme FX X-Fi features You may enjoy good quality sound from the thoughtful design of booting the BIOS. AI Booster The ASUS AI Booster allows you to overclock the CPU speed in an ever friendly and flexible external display. Unlike other competing 2 digit displays,... automatically restores the CPU default settings for each parameter. External LCD Poster The new LCD Poster now posts critical POST information in Windows® environment without having to effortlessly fine-tune the performance without the hassle of SupremeFX card on sound quality experience. When system...
... unique features Supreme FX X-Fi features You may enjoy good quality sound from the thoughtful design of booting the BIOS. AI Booster The ASUS AI Booster allows you to overclock the CPU speed in an ever friendly and flexible external display. Unlike other competing 2 digit displays,... automatically restores the CPU default settings for each parameter. External LCD Poster The new LCD Poster now posts critical POST information in Windows® environment without having to effortlessly fine-tune the performance without the hassle of SupremeFX card on sound quality experience. When system...

User Manual
Page 34
... a 100º angle (4A), then push the PnP cap from the retention tab. Lift the load plate with your left (B) until it is on the motherboard. 2.3.1 Installing the CPU To install a CPU: 1. Lift the load lever in the direction of the arrow to the socket pins, do not remove the PnP... cap unless you and the load lever is released from the load plate window to the left . 2. Locate the CPU socket on your thumb (A), then move it to remove (4B). To prevent damage to a 135º angle. 4. Retention tab...
... a 100º angle (4A), then push the PnP cap from the retention tab. Lift the load plate with your left (B) until it is on the motherboard. 2.3.1 Installing the CPU To install a CPU: 1. Lift the load lever in the direction of the arrow to the socket pins, do not remove the PnP... cap unless you and the load lever is released from the load plate window to the left . 2. Locate the CPU socket on your thumb (A), then move it to remove (4B). To prevent damage to a 135º angle. 4. Retention tab...
User Manual
Page 40
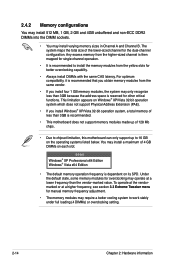
...lower frequency than the vendor-marked value. The system maps the total size of 4 GB DIMMs on each slot. 64-bit Windows® XP Professional x64 Edition Windows® Vista x64 Edition • The default memory operation frequency is dependent on the operating systems listed below. Any excess ...which does not support Physical Address Extension (PAE). • If you install Windows® XP/Vista 32-bit operation system, a total memory of less than 3GB because the address space is recommended. • This motherboard does not support memory modules made up of 128 Mb chips. • Due...
...lower frequency than the vendor-marked value. The system maps the total size of 4 GB DIMMs on each slot. 64-bit Windows® XP Professional x64 Edition Windows® Vista x64 Edition • The default memory operation frequency is dependent on the operating systems listed below. Any excess ...which does not support Physical Address Extension (PAE). • If you install Windows® XP/Vista 32-bit operation system, a total memory of less than 3GB because the address space is recommended. • This motherboard does not support memory modules made up of 128 Mb chips. • Due...
User Manual
Page 51
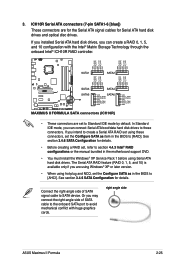
... the onboard SATA port to SATA device. 3. If you intend to [RAID]. right angle side ASUS Maximus II Formula 2-25 ICH10R Serial ATA connectors (7-pin SATA1-6 [blue]) These connectors are using Windows® XP or later version. • When using Serial ATA hard disk drives. See section ... drives to these connectors, set , refer to section 4.4.3 Intel® RAID configurations or the manual bundled in the motherboard support DVD. • You must install the Windows® XP Service Pack 1 before using hot-plug and NCQ, set to [AHCI]. See section 3.4.6 SATA Configuration for...
... the onboard SATA port to SATA device. 3. If you intend to [RAID]. right angle side ASUS Maximus II Formula 2-25 ICH10R Serial ATA connectors (7-pin SATA1-6 [blue]) These connectors are using Windows® XP or later version. • When using Serial ATA hard disk drives. See section ... drives to these connectors, set , refer to section 4.4.3 Intel® RAID configurations or the manual bundled in the motherboard support DVD. • You must install the Windows® XP Service Pack 1 before using hot-plug and NCQ, set to [AHCI]. See section 3.4.6 SATA Configuration for...

User Manual
Page 66
... section 3.6 Power Menu for more than four seconds puts the system to sleep mode or to shut down . The power supply should turn off after Windows® shuts down. 2.10.2 Using the dual function power switch While the system is ON, pressing the power switch for less than four seconds lets... the system enter the soft-off the computer 2.10.1 Using the OS shut down function If you are using Windows® XP: 1. Click the Start button and then select Turn Off Computer. 2. Click the Turn Off button to soft-off after...
... section 3.6 Power Menu for more than four seconds puts the system to sleep mode or to shut down . The power supply should turn off after Windows® shuts down. 2.10.2 Using the dual function power switch While the system is ON, pressing the power switch for less than four seconds lets... the system enter the soft-off the computer 2.10.1 Using the OS shut down function If you are using Windows® XP: 1. Click the Start button and then select Turn Off Computer. 2. Click the Turn Off button to soft-off after...
User Manual
Page 69
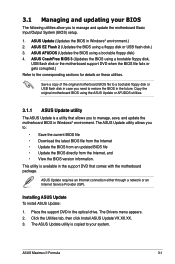
... corrupted.) Refer to manage, save, and update the motherboard BIOS in Windows® environment. ASUS CrashFree BIOS 3 (Updates the BIOS using a bootable floppy disk) 4. Save a copy of the original motherboard BIOS file to a bootable floppy disk or USB flash... ASUS Maximus II Formula 3-1 This utility is available in case you need to manage and update the motherboard Basic Input/Output System (BIOS) setup. 1. Installing ASUS Update To install ASUS Update: 1. ASUS EZ Flash 2 (Updates the BIOS using the ASUS Update or AFUDOS utilities. 3.1.1 ASUS Update utility The ASUS Update...
... corrupted.) Refer to manage, save, and update the motherboard BIOS in Windows® environment. ASUS CrashFree BIOS 3 (Updates the BIOS using a bootable floppy disk) 4. Save a copy of the original motherboard BIOS file to a bootable floppy disk or USB flash... ASUS Maximus II Formula 3-1 This utility is available in case you need to manage and update the motherboard Basic Input/Output System (BIOS) setup. 1. Installing ASUS Update To install ASUS Update: 1. ASUS EZ Flash 2 (Updates the BIOS using the ASUS Update or AFUDOS utilities. 3.1.1 ASUS Update utility The ASUS Update...
User Manual
Page 70
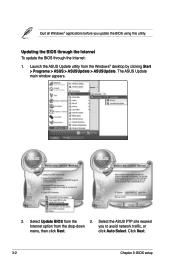
Quit all Windows® applications before you to avoid network traffic, or menu, then click Next. Updating the BIOS through the Internet To update the BIOS through the Internet: 1. The ASUS Update main window appears. 2. Launch the ASUS Update utility from the 3. Click Next. 3-2 Chapter 3: BIOS setup Select the ASUS FTP site nearest Internet option from the drop‑down you update the BIOS using this utility. Select Update BIOS from the Windows® desktop by clicking Start > Programs > ASUS > ASUSUpdate > ASUSUpdate. click Auto Select.
Quit all Windows® applications before you to avoid network traffic, or menu, then click Next. Updating the BIOS through the Internet To update the BIOS through the Internet: 1. The ASUS Update main window appears. 2. Launch the ASUS Update utility from the 3. Click Next. 3-2 Chapter 3: BIOS setup Select the ASUS FTP site nearest Internet option from the drop‑down you update the BIOS using this utility. Select Update BIOS from the Windows® desktop by clicking Start > Programs > ASUS > ASUSUpdate > ASUSUpdate. click Auto Select.
User Manual
Page 71
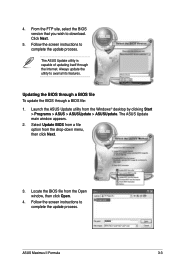
... file To update the BIOS through the Internet. Locate the BIOS file from the Windows® desktop by clicking Start > Programs > ASUS > ASUSUpdate > ASUSUpdate. From the FTP site, select the BIOS version that you...ASUS Update utility from the Open window, then click Open. 4. The ASUS Update main window appears. 2. Always update the utility to complete the update process. Click Next. 5. Select Update BIOS from a file option from the drop‑down menu, then click Next. 3. Follow the screen instructions to avail all its features. P5QWS.ROM P5QWS ASUS Maximus II Formula...
... file To update the BIOS through the Internet. Locate the BIOS file from the Windows® desktop by clicking Start > Programs > ASUS > ASUSUpdate > ASUSUpdate. From the FTP site, select the BIOS version that you...ASUS Update utility from the Open window, then click Open. 4. The ASUS Update main window appears. 2. Always update the utility to complete the update process. Click Next. 5. Select Update BIOS from a file option from the drop‑down menu, then click Next. 3. Follow the screen instructions to avail all its features. P5QWS.ROM P5QWS ASUS Maximus II Formula...
User Manual
Page 78
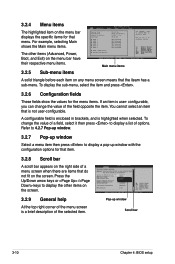
.... configurable, you can change the value of a menu screen when there are items that do not fit on the screen. Pop-up window with the configuration options for that menu. 3.2.4 Menu items The highlighted item on the menu bar displays the specific items for the menu items...Configuration System Information [06:22:54] [Thur 10/04/2007] [1.44M, 3.5 in brackets, and is not user-configurable. Refer to 4.2.7 Pop-up window. 3.2.7 Pop-up window Select a menu item then press to display a list of the selected item. To display the sub-menu, select the item and press . 3.2.6 ...
.... configurable, you can change the value of a menu screen when there are items that do not fit on the screen. Pop-up window with the configuration options for that menu. 3.2.4 Menu items The highlighted item on the menu bar displays the specific items for the menu items...Configuration System Information [06:22:54] [Thur 10/04/2007] [1.44M, 3.5 in brackets, and is not user-configurable. Refer to 4.2.7 Pop-up window. 3.2.7 Pop-up window Select a menu item then press to display a list of the selected item. To display the sub-menu, select the item and press . 3.2.6 ...
User Manual
Page 114
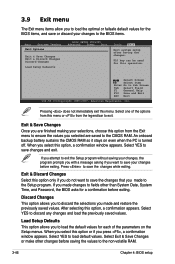
... your changes to the CMOS RAM. Discard Changes This option allows you to discard the selections you made to ensure the values you press , a confirmation window appears. When you select this option from the Exit menu to the Setup program. Pressing does not immediately exit this operation. If you to load... is turned off. An onboard backup battery sustains the CMOS RAM so it stays on the Setup menus. Exit & Discard Changes Select this option, a confirmation window appears. After selecting this menu or from this option, a confirmation appears.
... your changes to the CMOS RAM. Discard Changes This option allows you to discard the selections you made to ensure the values you press , a confirmation window appears. When you select this option from the Exit menu to the Setup program. Pressing does not immediately exit this operation. If you to load... is turned off. An onboard backup battery sustains the CMOS RAM so it stays on the Setup menus. Exit & Discard Changes Select this option, a confirmation window appears. After selecting this menu or from this option, a confirmation appears.
User Manual
Page 117
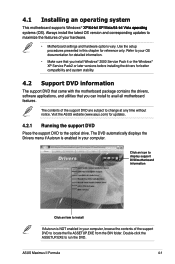
..., and utilities that you install Windows® 2000 Service Pack 4 or the Windows® XP Service Pack2 or later versions before installing the drivers for updates. 4.2.1 Running the support DVD Place the support DVD to run the DVD. ASUS Maximus II Formula 4-1 Use the setup procedures presented in your hardware. • Motherboard settings and hardware options vary...
..., and utilities that you install Windows® 2000 Service Pack 4 or the Windows® XP Service Pack2 or later versions before installing the drivers for updates. 4.2.1 Running the support DVD Place the support DVD to run the DVD. ASUS Maximus II Formula 4-1 Use the setup procedures presented in your hardware. • Motherboard settings and hardware options vary...

User Manual
Page 119
... in Windows® environment. ASUS Update The ASUS Update utility allows you to display the previous screen ASUS InstAll-Installation Wizard for Utilities Installs all of any detected problems. This utility helps you of the utilities through a network or an Internet Service Provider (ISP). ASUS Maximus II Formula 4-3 Click to display the next screen Click to update the motherboard...
... in Windows® environment. ASUS Update The ASUS Update utility allows you to display the previous screen ASUS InstAll-Installation Wizard for Utilities Installs all of any detected problems. This utility helps you of the utilities through a network or an Internet Service Provider (ISP). ASUS Maximus II Formula 4-3 Click to display the next screen Click to update the motherboard...
User Manual
Page 125
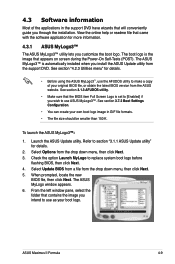
...formats. • The file size should be smaller than 150 K. When prompted, locate the new BIOS file, then click Next. The ASUS MyLogo window appears. 6. The boot logo is the image that contains the image you customize the boot logo. Check the option Launch MyLogo to ...file from the drop down menu, then click Next. 5. To launch the ASUS MyLogo3 1. From the left window pane, select the folder that appears on screen during the Power‑On Self-Tests (POST). ASUS Maximus II Formula 4-9 The ASUS MyLogo3™ is set to [Enabled] if you wish to replace system boot...
...formats. • The file size should be smaller than 150 K. When prompted, locate the new BIOS file, then click Next. The ASUS MyLogo window appears. 6. The boot logo is the image that contains the image you customize the boot logo. Check the option Launch MyLogo to ...file from the drop down menu, then click Next. 5. To launch the ASUS MyLogo3 1. From the left window pane, select the folder that appears on screen during the Power‑On Self-Tests (POST). ASUS Maximus II Formula 4-9 The ASUS MyLogo3™ is set to [Enabled] if you wish to replace system boot...
User Manual
Page 126
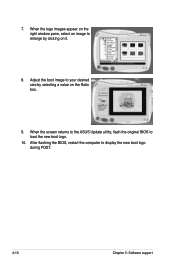
When the logo images appear on the right window pane, select an image to your desired size by clicking on the Ratio box. 9. Adjust the boot image to enlarge by selecting a value on it. 8. After flashing the BIOS, restart the computer to load the new boot logo. 10. 7. When the screen returns to the ASUS Update utility, flash the original BIOS to display the new boot logo during POST. 4-10 Chapter 5: Software support
When the logo images appear on the right window pane, select an image to your desired size by clicking on the Ratio box. 9. Adjust the boot image to enlarge by selecting a value on it. 8. After flashing the BIOS, restart the computer to load the new boot logo. 10. 7. When the screen returns to the ASUS Update utility, flash the original BIOS to display the new boot logo during POST. 4-10 Chapter 5: Software support
User Manual
Page 127
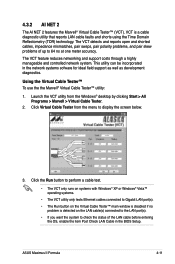
... Cable Tester™ main window is disabled if no problem is a cable diagnostic utility that reports LAN cable faults and shorts using the Time Domain Reflectometry (TDR) technology. Launch the VCT utility from the menu to 64 ns at one meter accuracy. ASUS Maximus II Formula 4-11 4.3.2 AI NET ... Cable Tester™ utility: 1. Click the Run button to perform a cable test. • The VCT only runs on systems with Windows® XP or Windows® Vista™ operating systems. • The VCT utility only tests Ethernet cables connected to Gigabit LAN port(s). • The Run...
... Cable Tester™ main window is disabled if no problem is a cable diagnostic utility that reports LAN cable faults and shorts using the Time Domain Reflectometry (TDR) technology. Launch the VCT utility from the menu to 64 ns at one meter accuracy. ASUS Maximus II Formula 4-11 4.3.2 AI NET ... Cable Tester™ utility: 1. Click the Run button to perform a cable test. • The VCT only runs on systems with Windows® XP or Windows® Vista™ operating systems. • The VCT utility only tests Ethernet cables connected to Gigabit LAN port(s). • The Run...
User Manual
Page 132
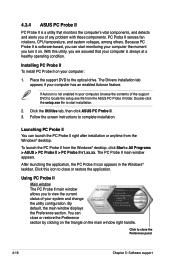
... your computer is always at a healthy operating condition. The PC Probe II main window appears. Click the Utilities tab, then click ASUS PC Probe II. 3. 4.3.4 ASUS PC Probe II PC Probe II is a utility that your computer has an enabled Autorun feature. Installing PC Probe II To install PC Probe II on . If Autorun is not enabled in the...
... your computer is always at a healthy operating condition. The PC Probe II main window appears. Click the Utilities tab, then click ASUS PC Probe II. 3. 4.3.4 ASUS PC Probe II PC Probe II is a utility that your computer has an enabled Autorun feature. Installing PC Probe II To install PC Probe II on . If Autorun is not enabled in the...
User Manual
Page 133
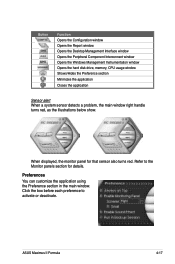
... section for that sensor also turns red. ASUS Maximus II Formula 4-17 Preferences You can customize the application using the Preference section in the main window. Button Function Opens the Configuration window Opens the Report window Opens the Desktop Management Interface window Opens the Peripheral Component Interconnect window Opens the Windows Management Instrumentation window Opens the hard disk drive, memory, CPU...
... section for that sensor also turns red. ASUS Maximus II Formula 4-17 Preferences You can customize the application using the Preference section in the main window. Button Function Opens the Configuration window Opens the Report window Opens the Desktop Management Interface window Opens the Peripheral Component Interconnect window Opens the Windows Management Instrumentation window Opens the hard disk drive, memory, CPU...


