
User Manual
Page 7
...before you are connected. This symbol of Chemicals) regulatory framework, we published the chemical substances in our products at ASUS REACH website at http://csr.asus.com/english/REACH.htm. This symbol of electronic products. Contact a qualified service technician or your area. Check ... unplugged before using the product, ensure all the manuals that all power cables are unplugged. • Seek professional assistance before the signal cables are using, contact your local power company. • If the power supply is set to or from the motherboard, ensure that came with ...
...before you are connected. This symbol of Chemicals) regulatory framework, we published the chemical substances in our products at ASUS REACH website at http://csr.asus.com/english/REACH.htm. This symbol of electronic products. Contact a qualified service technician or your area. Check ... unplugged before using the product, ensure all the manuals that all power cables are unplugged. • Seek professional assistance before the signal cables are using, contact your local power company. • If the power supply is set to or from the motherboard, ensure that came with ...

User Manual
Page 17
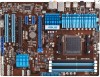
...ASUS M5A97 2-1 Chapter 2: Chapter 2 Hardware information 2.1 Before you proceed Take note of the following precautions before you install or remove any component, ensure that came with the component. • Before you install motherboard components or change any motherboard settings. • Unplug the power cord from the power supply... you uninstall any component, place it on a grounded antistatic pad or in the bag that the ATX power supply is switched off or the power cord is detached from the wall socket before touching any component. • Before handling components, use a...
...ASUS M5A97 2-1 Chapter 2: Chapter 2 Hardware information 2.1 Before you proceed Take note of the following precautions before you install or remove any component, ensure that came with the component. • Before you install motherboard components or change any motherboard settings. • Unplug the power cord from the power supply... you uninstall any component, place it on a grounded antistatic pad or in the bag that the ATX power supply is switched off or the power cord is detached from the wall socket before touching any component. • Before handling components, use a...

User Manual
Page 35
... V Specification 2.0 (or later version) and provides a minimum power of 450 W. • Do not forget to the Recommended Power Supply Wattage Calculator at http://support.asus. Chapter 2 ASUS M5A97 2-19 7. ATX power connectors (24-pin EATXPWR; 8-pin EATX12V) These connectors are designed to fit these connectors in only one orientation. The power supply plugs are for your system, refer to...
... V Specification 2.0 (or later version) and provides a minimum power of 450 W. • Do not forget to the Recommended Power Supply Wattage Calculator at http://support.asus. Chapter 2 ASUS M5A97 2-19 7. ATX power connectors (24-pin EATXPWR; 8-pin EATX12V) These connectors are designed to fit these connectors in only one orientation. The power supply plugs are for your system, refer to...

User Manual
Page 37
ASUS M5A97 2-21 Chapter 2 2.3 Building your computer system 2.3.1 Additional tools and components to build a PC system 1 bag of screws Philips (cross) screwdriver PC chassis Power supply unit AMD AM3+ CPU AMD AM3+ compatible CPU Fan DIMM SATA hard disk drive SATA optical disc drive (optional) Graphics card (optional) The tools and components in the table above are not included in the motherboard package.
ASUS M5A97 2-21 Chapter 2 2.3 Building your computer system 2.3.1 Additional tools and components to build a PC system 1 bag of screws Philips (cross) screwdriver PC chassis Power supply unit AMD AM3+ CPU AMD AM3+ compatible CPU Fan DIMM SATA hard disk drive SATA optical disc drive (optional) Graphics card (optional) The tools and components in the table above are not included in the motherboard package.

User Manual
Page 52
... or if it has a "power standby" feature, the monitor LED may light up when you turned on the power, the system may have failed a power-on test. Be sure that is ON, pressing the power switch for assistance. External SCSI devices (starting with ATX power supplies, the system LED lights up ...or change from the time you press the ATX power button. After making all...
... or if it has a "power standby" feature, the monitor LED may light up when you turned on the power, the system may have failed a power-on test. Be sure that is ON, pressing the power switch for assistance. External SCSI devices (starting with ATX power supplies, the system LED lights up ...or change from the time you press the ATX power button. After making all...

User Manual
Page 72
... connector (AAFP) type to legacy AC'97 or highdefinition audio depending on the audio standard that provides at least 1A on the +5VSB lead. Power On By PS/2 Device [Disabled] Allows you set to [Enabled], all other PME options will be switched off. ErP Ready [Enabled] Allows ...S5 to [Enabled]. Configuration options: [Enabled] [Disabled] The following two items appear only when you to [Disabled]. This feature requires an ATX power supply that the front panel audio module supports. [HD] Sets the front panel audio connector (AAFP) mode to high definition audio. [AC97] Sets ...
... connector (AAFP) type to legacy AC'97 or highdefinition audio depending on the audio standard that provides at least 1A on the +5VSB lead. Power On By PS/2 Device [Disabled] Allows you set to [Enabled], all other PME options will be switched off. ErP Ready [Enabled] Allows ...S5 to [Enabled]. Configuration options: [Enabled] [Disabled] The following two items appear only when you to [Disabled]. This feature requires an ATX power supply that the front panel audio module supports. [HD] Sets the front panel audio connector (AAFP) mode to high definition audio. [AC97] Sets ...

User Manual
Page 73
... F12: Print Screen Chassis Q-Fan Control Disabled Version 2.00.1201. Thus, connection cannot be powered up from S5 by PCI/PCIE devices. [Enabled] Allows you to change the fan settings. ASUS M5A97 3-21 The computer cannot receive or transmit data until the computer and applications are fully running.... 600 RPM →←: Select Screen ↑↓: Select Item Enter: Select +/-: Change Opt. This feature requires an ATX power supply that turns the system power on the +5VSB lead. Chapter 3 3.6 Monitor menu The Monitor menu displays the system temperature...
... F12: Print Screen Chassis Q-Fan Control Disabled Version 2.00.1201. Thus, connection cannot be powered up from S5 by PCI/PCIE devices. [Enabled] Allows you to change the fan settings. ASUS M5A97 3-21 The computer cannot receive or transmit data until the computer and applications are fully running.... 600 RPM →←: Select Screen ↑↓: Select Item Enter: Select +/-: Change Opt. This feature requires an ATX power supply that turns the system power on the +5VSB lead. Chapter 3 3.6 Monitor menu The Monitor menu displays the system temperature...

User Manual
Page 107
...Windows XP, select Add/Remove. Turn off your current graphics card driver/s. 4. To uninstall existing graphics card drivers: 1. Select your computer. ASUS M5A97 5-1 See Chapter 2 for details. • We recommend that you install additional chassis fans for better thermal environment. • Visit the ...cards to your system. Download the latest driver from the AMD website (www.amd.com). • Ensure that your power supply unit (PSU) can provide at least the minimum power required by your system. For Windows Vista, select Uninstall. 5. For Windows XP, go to Control Panel > Add/...
...Windows XP, select Add/Remove. Turn off your current graphics card driver/s. 4. To uninstall existing graphics card drivers: 1. Select your computer. ASUS M5A97 5-1 See Chapter 2 for details. • We recommend that you install additional chassis fans for better thermal environment. • Visit the ...cards to your system. Download the latest driver from the AMD website (www.amd.com). • Ensure that your power supply unit (PSU) can provide at least the minimum power required by your system. For Windows Vista, select Uninstall. 5. For Windows XP, go to Control Panel > Add/...

User Manual
Page 108
... cable to Chapter 2 in place. Align and firmly insert the CrossFireX bridge connector to the two graphics cards separately. 6. Connect two independent auxiliary power sources from the power supply to the goldfingers on the slots. 4. The graphics cards and the motherboard layout may vary with graphics cards) 5. Ensure that the cards are for...
... cable to Chapter 2 in place. Align and firmly insert the CrossFireX bridge connector to the two graphics cards separately. 6. Connect two independent auxiliary power sources from the power supply to the goldfingers on the slots. 4. The graphics cards and the motherboard layout may vary with graphics cards) 5. Ensure that the cards are for...


