User Manual
Page 2
... distributed WITHOUT ANY WARRANTY and licensed under various Free Open Source Software licenses. SPECIFICATIONS AND INFORMATION CONTAINED IN THIS MANUAL ARE FURNISHED FOR INFORMATIONAL USE ONLY, AND ARE SUBJECT TO CHANGE AT ANY TIME WITHOUT NOTICE, AND SHOULD NOT BE CONSTRUED AS A COMMITMENT BY ASUS. Offer to Provide Source Code of reproduction and shipment, which will be much...
... distributed WITHOUT ANY WARRANTY and licensed under various Free Open Source Software licenses. SPECIFICATIONS AND INFORMATION CONTAINED IN THIS MANUAL ARE FURNISHED FOR INFORMATIONAL USE ONLY, AND ARE SUBJECT TO CHANGE AT ANY TIME WITHOUT NOTICE, AND SHOULD NOT BE CONSTRUED AS A COMMITMENT BY ASUS. Offer to Provide Source Code of reproduction and shipment, which will be much...
User Manual
Page 5
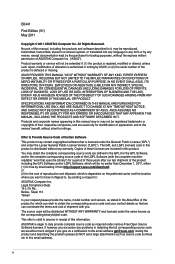
Contents 4.4 RAID configurations 4-13 4.4.1 RAID definitions 4-13 4.4.2 Installing Serial ATA hard disks 4-14 4.4.3 Setting the RAID item in BIOS 4-14 4.4.4 AMD® Option ROM Utility 4-15 4.5 Creating a RAID driver disk 4-18 4.5.1 Creating a RAID driver disk without entering the OS 4-18 4.5.2 Creating a RAID driver disk in Windows 4-18 4.5.3 Installing the RAID driver during Windows® OS installation....... 4-18 4.5.4 Using a USB floppy disk drive 4-19 Chapter 5: Multiple GPU technology support 5.1 ATI® CrossFireX™ technology 5-1 5.1.1 Requirements 5-1 5.1.2 ...
Contents 4.4 RAID configurations 4-13 4.4.1 RAID definitions 4-13 4.4.2 Installing Serial ATA hard disks 4-14 4.4.3 Setting the RAID item in BIOS 4-14 4.4.4 AMD® Option ROM Utility 4-15 4.5 Creating a RAID driver disk 4-18 4.5.1 Creating a RAID driver disk without entering the OS 4-18 4.5.2 Creating a RAID driver disk in Windows 4-18 4.5.3 Installing the RAID driver during Windows® OS installation....... 4-18 4.5.4 Using a USB floppy disk drive 4-19 Chapter 5: Multiple GPU technology support 5.1 ATI® CrossFireX™ technology 5-1 5.1.1 Requirements 5-1 5.1.2 ...

User Manual
Page 12
... SM BIOS 2.5, ACPI 2.0a, Multi-language BIOS, ASUS EZ Flash 2 WfM 2.0, DMI 2.0, WOL by PME, WOR by PME, PXE Drivers ASUS utilities ASUS Update Anti-virus software (OEM version) 2 x Serial ATA 6.0 Gb/s cables 1 x I /O connectors BIOS features Manageability Support DVD contents Accessories Form factor 3 x USB 2.0/1.1 connectors support additional 6 USB ports 1 x COM connector 6 x SATA 6.0 Gb/s connectors 1 x CPU fan connector (4-pin) 2 x Chassis fan connectors (2 x 4-pin) 1 x S/PDIF Out header 1 x MemOK! x 9 in . xii M5A97 specifications summary Internal I /O Shield 1 x User Manual ATX...
... SM BIOS 2.5, ACPI 2.0a, Multi-language BIOS, ASUS EZ Flash 2 WfM 2.0, DMI 2.0, WOL by PME, WOR by PME, PXE Drivers ASUS utilities ASUS Update Anti-virus software (OEM version) 2 x Serial ATA 6.0 Gb/s cables 1 x I /O connectors BIOS features Manageability Support DVD contents Accessories Form factor 3 x USB 2.0/1.1 connectors support additional 6 USB ports 1 x COM connector 6 x SATA 6.0 Gb/s connectors 1 x CPU fan connector (4-pin) 2 x Chassis fan connectors (2 x 4-pin) 1 x S/PDIF Out header 1 x MemOK! x 9 in . xii M5A97 specifications summary Internal I /O Shield 1 x User Manual ATX...

User Manual
Page 16
... on your favorite settings. It natively supports hard drives larger than traditional BIOS version. while the Advanced Mode is an Unified Extensible Firmware Interface that offers a user-friendly interface that goes beyond traditional keyboard-only BIOS control to update the BIOS without using a bootable floppy disk or an OS-based utility. Profile that allows you to fine-tune the VCore / VDDNB voltage in 0.00625V steps and DRAM voltage in 0.00625V steps...
... on your favorite settings. It natively supports hard drives larger than traditional BIOS version. while the Advanced Mode is an Unified Extensible Firmware Interface that offers a user-friendly interface that goes beyond traditional keyboard-only BIOS control to update the BIOS without using a bootable floppy disk or an OS-based utility. Profile that allows you to fine-tune the VCore / VDDNB voltage in 0.00625V steps and DRAM voltage in 0.00625V steps...

User Manual
Page 30
... load BIOS default settings. function. • The MemOK! If the installed DIMMs still fail to boot after using the MemOK! It takes about 5-10 seconds. • If your system fail to boot due to BIOS overclocking, press the MemOK! Replace the DIMMs with the motherboard may cause system boot failure, and the DRAM_LED near the MemOK! Press and hold the MemOK! switch to begin automatic memory compatibility...
... load BIOS default settings. function. • The MemOK! If the installed DIMMs still fail to boot after using the MemOK! It takes about 5-10 seconds. • If your system fail to boot due to BIOS overclocking, press the MemOK! Replace the DIMMs with the motherboard may cause system boot failure, and the DRAM_LED near the MemOK! Press and hold the MemOK! switch to begin automatic memory compatibility...

User Manual
Page 53
... Load Optimized Defaults item under two modes: EZ Mode and Advanced Mode. Being a menu-driven program, it as storage device configuration, overclocking settings, advanced power management, and boot device configuration that are for information on your screen. • Ensure that a USB mouse is connected to run the BIOS Setup. • You have installed a new system component that requires further BIOS settings or update. You can easily navigate the new UEFI BIOS with the opportunity to your motherboard...
... Load Optimized Defaults item under two modes: EZ Mode and Advanced Mode. Being a menu-driven program, it as storage device configuration, overclocking settings, advanced power management, and boot device configuration that are for information on your screen. • Ensure that a USB mouse is connected to run the BIOS Setup. • You have installed a new system component that requires further BIOS settings or update. You can easily navigate the new UEFI BIOS with the opportunity to your motherboard...
User Manual
Page 55
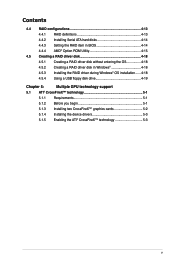
...OPROM > Serial Port Configuration > SB HD Azalia Configuration Disabled Realtek LAN Controller Disabled Enabled Boot Tool Enabled/Disabled Realtek LAN →←: Select Screen ↑↓: Select Item Enter: Select +/-: Change Opt. 3.2.2 Advanced Mode The Advanced Mode provides advanced options for experienced end-users to the following main items: Main Ai Tweaker Advanced Monitor Boot Tool Exit For changing the basic system configuration For changing the overclocking settings For changing the advanced system settings For displaying the system temperature, power status...
...OPROM > Serial Port Configuration > SB HD Azalia Configuration Disabled Realtek LAN Controller Disabled Enabled Boot Tool Enabled/Disabled Realtek LAN →←: Select Screen ↑↓: Select Item Enter: Select +/-: Change Opt. 3.2.2 Advanced Mode The Advanced Mode provides advanced options for experienced end-users to the following main items: Main Ai Tweaker Advanced Monitor Boot Tool Exit For changing the basic system configuration For changing the overclocking settings For changing the advanced system settings For displaying the system temperature, power status...

User Manual
Page 61
... setting. Configurations options: [Auto] [Light Power Saving Mode] [Medium Power Saving Mode] [Max Power Saving Mode]. Configuration options: [Auto] [800MHz] [1066MHz] [1333MHz] [1600MHz] Selecting a very high DRAM frequency may cause the system to adjust the ratio. DRAM CAS# Latency [Auto] You can manually adjust the maximum non-CPB mode CPU ratio. ASUS M5A97 3-9 Use the and keys to become unstable! If this happens, revert to [Enabled] for some of the following items vary depending on the motherboard. PCIe Spread Spectrum [Auto] [Auto...
... setting. Configurations options: [Auto] [Light Power Saving Mode] [Medium Power Saving Mode] [Max Power Saving Mode]. Configuration options: [Auto] [800MHz] [1066MHz] [1333MHz] [1600MHz] Selecting a very high DRAM frequency may cause the system to adjust the ratio. DRAM CAS# Latency [Auto] You can manually adjust the maximum non-CPB mode CPU ratio. ASUS M5A97 3-9 Use the and keys to become unstable! If this happens, revert to [Enabled] for some of the following items vary depending on the motherboard. PCIe Spread Spectrum [Auto] [Auto...
User Manual
Page 66
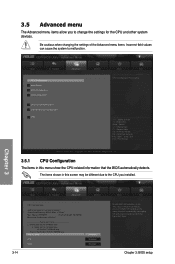
... to change the settings for the CPU and other system devices. UEFI BIOS Utility - Chapter 3: BIOS setup F1: General Help F2: Previous Values F5: Optimized Defaults F10: Save ESC: Exit F12: Print Screen Chapter 3 Version 2.00.1201. Advanced Mode Exit Main Ai Tweaker > CPU Configuration > North Bridge > SATA Configuration > USB Configuration > CPU Core On/Off Function > Onboard Devices Configuration > APM Advanced Monitor Boot Tool CPU Configuration Parameters →←: Select Screen ↑↓: Select Item Enter: Select +/-: Change Opt. Copyright...
... to change the settings for the CPU and other system devices. UEFI BIOS Utility - Chapter 3: BIOS setup F1: General Help F2: Previous Values F5: Optimized Defaults F10: Save ESC: Exit F12: Print Screen Chapter 3 Version 2.00.1201. Advanced Mode Exit Main Ai Tweaker > CPU Configuration > North Bridge > SATA Configuration > USB Configuration > CPU Core On/Off Function > Onboard Devices Configuration > APM Advanced Monitor Boot Tool CPU Configuration Parameters →←: Select Screen ↑↓: Select Item Enter: Select +/-: Change Opt. Copyright...
User Manual
Page 68
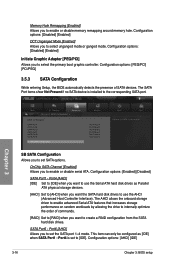
UEFI BIOS Utility - Port4 is installed to the corresponding SATA port. Configuration options: [Disabled] [Enabled] DCT Unganged Mode [Enabled] Allows you to enable or disable serial ATA. OnChip SATA Channel [Enabled] Allows you to select unganged mode or ganged mode. Memory Hole Remapping [Enabled] Allows you to select the primary boot graphic controller. Configuration options: [Disabled] [Enabled] Initiate Graphic Adapter [PEG/PCI] Allows you to [IDE]. The SATA Port items show Not Present if no SATA device is set to enable or disable memory remapping around memory ...
UEFI BIOS Utility - Port4 is installed to the corresponding SATA port. Configuration options: [Disabled] [Enabled] DCT Unganged Mode [Enabled] Allows you to enable or disable serial ATA. OnChip SATA Channel [Enabled] Allows you to select unganged mode or ganged mode. Memory Hole Remapping [Enabled] Allows you to select the primary boot graphic controller. Configuration options: [Disabled] [Enabled] Initiate Graphic Adapter [PEG/PCI] Allows you to [IDE]. The SATA Port items show Not Present if no SATA device is set to enable or disable memory remapping around memory ...
User Manual
Page 69
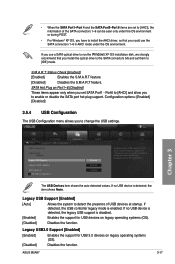
...If no USB devices are set SATA Port1 - ASUS M5A97 3-17 UEFI BIOS Utility - The USB Devices item shows the auto-detected values. Legacy USB3.0 Support [Enabled] [Enabled] Enables the support for USB 3.0 devices on legacy operating systems (OS). [Disabled] Disables the function. Advanced Mode Exit Chapter 3 Main Back Ai Tweaker Advanced Advanced\ USB Configuration > Monitor USB Configuration USB Devices: 1 Mouse Legacy USB Support Enabled Legacy USB3.0 Support Enabled EHCI Hand-off > SB USB Configuration Disabled Boot Tool Enables Legacy USB support...
...If no USB devices are set SATA Port1 - ASUS M5A97 3-17 UEFI BIOS Utility - The USB Devices item shows the auto-detected values. Legacy USB3.0 Support [Enabled] [Enabled] Enables the support for USB 3.0 devices on legacy operating systems (OS). [Disabled] Disables the function. Advanced Mode Exit Chapter 3 Main Back Ai Tweaker Advanced Advanced\ USB Configuration > Monitor USB Configuration USB Devices: 1 Mouse Legacy USB Support Enabled Legacy USB3.0 Support Enabled EHCI Hand-off > SB USB Configuration Disabled Boot Tool Enables Legacy USB support...

User Manual
Page 71
...options: [IO=3F8h; Realtek PXE OPROM [Disabled] This item appears only when you set the serial port configuration. Serial Port [Enabled] Allows you to set the Realtek LAN Controller to [Enabled] and allows you to change settings. IRQ=3] ASUS M5A97 3-19 Chapter 3 Advanced Mode Exit Main Back Ai Tweaker Advanced Advanced\ Onboard Devices Configuration > Monitor Asmedia USB 3.0 Controller Enabled Asmedia USB 3.0 Battery Charging Support Disabled Realtek LAN Controller Enabled Realtek PXE OPROM Disabled > Serial Port Configuration > SB HD Azalia Configuration Boot...
...options: [IO=3F8h; Realtek PXE OPROM [Disabled] This item appears only when you set the serial port configuration. Serial Port [Enabled] Allows you to set the Realtek LAN Controller to [Enabled] and allows you to change settings. IRQ=3] ASUS M5A97 3-19 Chapter 3 Advanced Mode Exit Main Back Ai Tweaker Advanced Advanced\ Onboard Devices Configuration > Monitor Asmedia USB 3.0 Controller Enabled Asmedia USB 3.0 Battery Charging Support Disabled Realtek LAN Controller Enabled Realtek PXE OPROM Disabled > Serial Port Configuration > SB HD Azalia Configuration Boot...

User Manual
Page 73
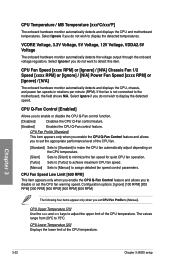
This feature requires an ATX power supply that turns the system power on. UEFI BIOS Utility - Advanced Mode Exit Main Ai Tweaker Advanced Monitor Boot Tool CPU Temperature +45ºC / +113ºF MB Temperature +33ºC / +91ºF VCORE Voltage +1.380V 3.3V Voltage +3.216V 5V Voltage +5.057V 12V Voltage +11.685V VDDA2.5V Voltage +2.520V CPU Fan Speed 4166 RPM Chassis Fan 1 Speed N/A Chassis Fan 2 Speed N/A Power Fan Speed N/A CPU Q-Fan Control Enabled CPU Fan Profile Standard Cpu Fan Speed Low Limit 600 RPM →←: ...
This feature requires an ATX power supply that turns the system power on. UEFI BIOS Utility - Advanced Mode Exit Main Ai Tweaker Advanced Monitor Boot Tool CPU Temperature +45ºC / +113ºF MB Temperature +33ºC / +91ºF VCORE Voltage +1.380V 3.3V Voltage +3.216V 5V Voltage +5.057V 12V Voltage +11.685V VDDA2.5V Voltage +2.520V CPU Fan Speed 4166 RPM Chassis Fan 1 Speed N/A Chassis Fan 2 Speed N/A Power Fan Speed N/A CPU Q-Fan Control Enabled CPU Fan Profile Standard Cpu Fan Speed Low Limit 600 RPM →←: ...
User Manual
Page 74
... maximum CPU fan speed. [Manual] Sets to [Manual] to display the detected temperatures. CPU Fan Speed [xxxx RPM] or [Ignore] / [N/A] Chassis Fan 1/2 Speed [xxxx RPM] or [Ignore] / [N/A] Power Fan Speed [xxxx RPM] or [Ignore] / [N/A] The onboard hardware monitor automatically detects and displays the CPU, chassis, and power fan speeds in rotations per minute (RPM). Chapter 3 3-22 Chapter 3: BIOS setup CPU Fan Speed Low Limit [600 RPM] This item appears only when you enable the CPU Q-Fan Control feature and allows you set the CPU fan warning speed. The...
... maximum CPU fan speed. [Manual] Sets to [Manual] to display the detected temperatures. CPU Fan Speed [xxxx RPM] or [Ignore] / [N/A] Chassis Fan 1/2 Speed [xxxx RPM] or [Ignore] / [N/A] Power Fan Speed [xxxx RPM] or [Ignore] / [N/A] The onboard hardware monitor automatically detects and displays the CPU, chassis, and power fan speeds in rotations per minute (RPM). Chapter 3 3-22 Chapter 3: BIOS setup CPU Fan Speed Low Limit [600 RPM] This item appears only when you enable the CPU Q-Fan Control feature and allows you set the CPU fan warning speed. The...
User Manual
Page 80
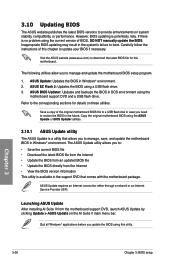
... the motherboard package. ASUS Update requires an Internet connection either through a network or an Internet Service Provider (ISP). Chapter 3 3-28 Chapter 3: BIOS setup Inappropriate BIOS updating may result in the system's failure to the corresponding sections for this utility. ASUS BIOS Updater: Updates and backups the BIOS in DOS environment using a USB flash drive. 3. Refer to boot. Quit all Windows® applications before you update the BIOS using the current version of the original motherboard BIOS file to a USB flash disk in case you...
... the motherboard package. ASUS Update requires an Internet connection either through a network or an Internet Service Provider (ISP). Chapter 3 3-28 Chapter 3: BIOS setup Inappropriate BIOS updating may result in the system's failure to the corresponding sections for this utility. ASUS BIOS Updater: Updates and backups the BIOS in DOS environment using a USB flash drive. 3. Refer to boot. Quit all Windows® applications before you update the BIOS using the current version of the original motherboard BIOS file to a USB flash disk in case you...
User Manual
Page 84
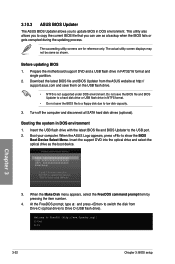
... USB flash drive in DOS environment. At the FreeDOS prompt, type d: and press to switch the disk from the ASUS website at http:// support.asus.com and save the BIOS file to a floppy disk due to Drive D (USB flash drive). C:\>d: D:\> Chapter 3 3-32 Chapter 3: BIOS setup This utility also allows you can use as a backup when the BIOS fails or gets corrupted during the updating process. The actual utility screen displays may not be same as the boot device...
... USB flash drive in DOS environment. At the FreeDOS prompt, type d: and press to switch the disk from the ASUS website at http:// support.asus.com and save the BIOS file to a floppy disk due to Drive D (USB flash drive). C:\>d: D:\> Chapter 3 3-32 Chapter 3: BIOS setup This utility also allows you can use as a backup when the BIOS fails or gets corrupted during the updating process. The actual utility screen displays may not be same as the boot device...
User Manual
Page 87
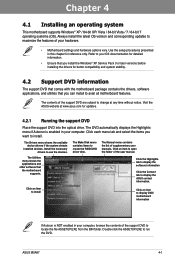
... Manual menu contains the list of the user manual. ASUS M5A97 4-1 Click an item to install Click an icon to locate the file ASSETUP.EXE from the BIN folder. Install the necessary drivers to create the RAID/AHCI driver disk. The contents of the support DVD to display DVD/ motherboard information Chapter 4 If Autorun is enabled in your hardware. • Motherboard settings and hardware options vary. Chapter 4: Chapter 4 Software support 4.1 Installing an operating system This motherboard supports Windows® XP / 64-bit...
... Manual menu contains the list of the user manual. ASUS M5A97 4-1 Click an item to install Click an icon to locate the file ASSETUP.EXE from the BIN folder. Install the necessary drivers to create the RAID/AHCI driver disk. The contents of the support DVD to display DVD/ motherboard information Chapter 4 If Autorun is enabled in your hardware. • Motherboard settings and hardware options vary. Chapter 4: Chapter 4 Software support 4.1 Installing an operating system This motherboard supports Windows® XP / 64-bit...
User Manual
Page 100
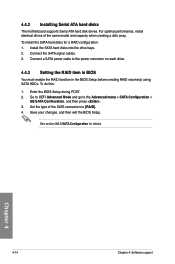
... Serial ATA hard disks The motherboard supports Serial ATA hard disk drives. Connect the SATA signal cables. 3. Chapter 4 4-14 Chapter 4: Software support See section 3.6.3 SATA Configuration for a RAID configuration: 1. Install the SATA hard disks into the drive bays. 2. Connect a SATA power cable to [RAID]. 4. For optimal performance, install identical drives of the SATA connectors to the power connector on each drive. 4.4.3 Setting the RAID item in BIOS You must enable the RAID function in the BIOS Setup before creating RAID volume(s) using SATA HDDs. Go to UEFI Advanced Mode...
... Serial ATA hard disks The motherboard supports Serial ATA hard disk drives. Connect the SATA signal cables. 3. Chapter 4 4-14 Chapter 4: Software support See section 3.6.3 SATA Configuration for a RAID configuration: 1. Install the SATA hard disks into the drive bays. 2. Connect a SATA power cable to [RAID]. 4. For optimal performance, install identical drives of the SATA connectors to the power connector on each drive. 4.4.3 Setting the RAID item in BIOS You must enable the RAID function in the BIOS Setup before creating RAID volume(s) using SATA HDDs. Go to UEFI Advanced Mode...
User Manual
Page 104
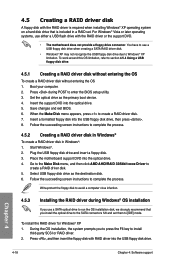
... drive. 4. Start Windows®. 2. Place the motherboard support DVD into the optical drive. 5. Boot your computer. 2. Save changes and exit BIOS. 6. Go to the Make Disk menu, and then click AMD AHCI/RAID 32/64bit xxxx Driver to section 4.5.4 Using a USB floppy disk drive. 4.5.1 Creating a RAID driver disk without entering the OS To create a RAID driver disk without entering the OS 1. Select USB floppy disk drive as the primary boot device. 4. Chapter 4 4-18 Chapter 4: Software support Set the optical drive as the destination disk. 6. Plug the USB floppy disk drive...
... drive. 4. Start Windows®. 2. Place the motherboard support DVD into the optical drive. 5. Boot your computer. 2. Save changes and exit BIOS. 6. Go to the Make Disk menu, and then click AMD AHCI/RAID 32/64bit xxxx Driver to section 4.5.4 Using a USB floppy disk drive. 4.5.1 Creating a RAID driver disk without entering the OS To create a RAID driver disk without entering the OS 1. Select USB floppy disk drive as the primary boot device. 4. Chapter 4 4-18 Chapter 4: Software support Set the optical drive as the destination disk. 6. Plug the USB floppy disk drive...
User Manual
Page 105
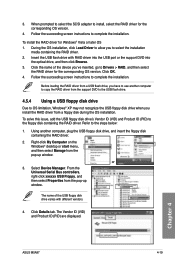
To install the RAID driver for the corresponding OS version. 4. Follow the succeeding screen instructions to complete the installation. Using another computer to copy the RAID driver from the support DVD to the USB flash drive. 4.5.4 Using a USB floppy disk drive Due to OS limitation, Windows® XP may not recognize the USB floppy disk drive when you install the RAID driver from a floppy disk during the OS installation. Select Device Manager. From the Universal Serial Bus controllers, right-click xxxxxx USB Floppy, and then select Properties from...
To install the RAID driver for the corresponding OS version. 4. Follow the succeeding screen instructions to complete the installation. Using another computer to copy the RAID driver from the support DVD to the USB flash drive. 4.5.4 Using a USB floppy disk drive Due to OS limitation, Windows® XP may not recognize the USB floppy disk drive when you install the RAID driver from a floppy disk during the OS installation. Select Device Manager. From the Universal Serial Bus controllers, right-click xxxxxx USB Floppy, and then select Properties from...


