
User Manual
Page 2
...system load. 6. Turbo Unlocker instruction Specially-designed for AMD® 6-core and Black Edition processors, the ASUS exclusive Turbo Unlocker allows dynamic and automatic CPU core adjustments based on the bottom-right corner of the Windows... desktop shows current CPU ratio in real-time. In the ASUS TurboV EVO window, click More Settings, and then click CPU Ratio. 3. Turbo Unlocker is now enabled and... system. 1. Click ON to enable Turbo Unlocker. 4. Install ASUS TurboV EVO from the support DVD that came with the motherboard package. 2.
...system load. 6. Turbo Unlocker instruction Specially-designed for AMD® 6-core and Black Edition processors, the ASUS exclusive Turbo Unlocker allows dynamic and automatic CPU core adjustments based on the bottom-right corner of the Windows... desktop shows current CPU ratio in real-time. In the ASUS TurboV EVO window, click More Settings, and then click CPU Ratio. 3. Turbo Unlocker is now enabled and... system. 1. Click ON to enable Turbo Unlocker. 4. Install ASUS TurboV EVO from the support DVD that came with the motherboard package. 2.

User Manual
Page 1
M4A88TD-M EVO Motherboard
M4A88TD-M EVO Motherboard

User Manual
Page 3
Contents Notices...vi Safety information...vii About this guide...vii M4A88TD-M EVO specifications summary...ix Chapter 1: 1.1 1.2 1.3 Welcome!...1-1 Package contents...1-1 Special features...1-1 1.3.1 1.3.2 Product highlights...1-1 Innovative ASUS features...1-3 Product introduction 1.4 1.5 Before you proceed...1-6 Motherboard overview...1-6 1.5.1 1.5.2 1.5.3 1.5.4 1.6.1 1.6.2 1.7.1 1.7.2 1.7.3 1.7.4 1.8.1 1.8.2 1.8.3 1.8.4 1.8.5 Placement direction...1-6 Screw holes...1-6 Motherboard layout...1-7 Layout contents...1-7 Installing the CPU...1-8 Installing the heatsink ...
Contents Notices...vi Safety information...vii About this guide...vii M4A88TD-M EVO specifications summary...ix Chapter 1: 1.1 1.2 1.3 Welcome!...1-1 Package contents...1-1 Special features...1-1 1.3.1 1.3.2 Product highlights...1-1 Innovative ASUS features...1-3 Product introduction 1.4 1.5 Before you proceed...1-6 Motherboard overview...1-6 1.5.1 1.5.2 1.5.3 1.5.4 1.6.1 1.6.2 1.7.1 1.7.2 1.7.3 1.7.4 1.8.1 1.8.2 1.8.3 1.8.4 1.8.5 Placement direction...1-6 Screw holes...1-6 Motherboard layout...1-7 Layout contents...1-7 Installing the CPU...1-8 Installing the heatsink ...

User Manual
Page 6
...outlet on , the user is connected. DO NOT throw the mercury-containing button cell battery in our products at ASUS REACH website at http://green.asus.com/english/REACH.htm. Notices Federal Communications Commission Statement This device complies with Canadian ICES-003. If this equipment ...the limits for compliance could void the user's authority to correct the interference by one or more of Communications. DO NOT throw the motherboard in a residential installation. This symbol of the crossed out wheeled bin indicates that may not cause harmful interference, and • ...
...outlet on , the user is connected. DO NOT throw the mercury-containing button cell battery in our products at ASUS REACH website at http://green.asus.com/english/REACH.htm. Notices Federal Communications Commission Statement This device complies with Canadian ICES-003. If this equipment ...the limits for compliance could void the user's authority to correct the interference by one or more of Communications. DO NOT throw the motherboard in a residential installation. This symbol of the crossed out wheeled bin indicates that may not cause harmful interference, and • ...

User Manual
Page 7
...safety To prevent electric shock hazard, disconnect the power cable from connectors, slots, sockets and circuitry. Operation safety Before installing the motherboard and adding devices on a stable surface. To avoid short circuits, keep paper clips, screws, and staples away from the electric...become wet. Chapter 2: BIOS information This chapter tells how to fix it supports. Before connecting or removing signal cables from the motherboard, ensure that all cables are correctly connected and the power cables are using, contact your retailer. Ensure that came with the product...
...safety To prevent electric shock hazard, disconnect the power cable from connectors, slots, sockets and circuitry. Operation safety Before installing the motherboard and adding devices on a stable surface. To avoid short circuits, keep paper clips, screws, and staples away from the electric...become wet. Chapter 2: BIOS information This chapter tells how to fix it supports. Before connecting or removing signal cables from the motherboard, ensure that all cables are correctly connected and the power cables are using, contact your retailer. Ensure that came with the product...

User Manual
Page 13
...and accelerates data transfer rate up to 5200MT/s via HyperTransport™ 3.0-based system bus. ASUS M4A88TD-M EVO 1-1 Before you for the following items. Motherboard Cables Accessories Application DVD Documentations If any of new features and latest technologies, making it ,... check the items in your package with the list below. 1.2 Package contents ASUS M4A88TD-M EVO motherboard 2 x Serial ATA 6Gb/s cables 1 x Ultra DMA 133/100/66 cable 1 x Q-Shield ASUS motherboard Support DVD User Manual Check your retailer. 1.3 1.3.1 Special features Product highlights AMD®...
...and accelerates data transfer rate up to 5200MT/s via HyperTransport™ 3.0-based system bus. ASUS M4A88TD-M EVO 1-1 Before you for the following items. Motherboard Cables Accessories Application DVD Documentations If any of new features and latest technologies, making it ,... check the items in your package with the list below. 1.2 Package contents ASUS M4A88TD-M EVO motherboard 2 x Serial ATA 6Gb/s cables 1 x Ultra DMA 133/100/66 cable 1 x Q-Shield ASUS motherboard Support DVD User Manual Check your retailer. 1.3 1.3.1 Special features Product highlights AMD®...

User Manual
Page 14
...Visual Interface) provides high quality visuals for full HD 1080p visuals through a single cable. DDR3 2000(O.C.)/1333/1066 support This motherboard supports DDR3 memory that deliver multi-channel digital audio and uncompressed digital video for digital display devices like LCD monitors. HDMI/DVI...The dual-channel DDR3 architecture enlarges the bandwidth of the latest 3D graphics, multimedia, and Internet applications. SidePort Memory This motherboard features SidePort Memory, an individual onboard DDR3 memory serving as HD DVD and Blu-ray discs, HDMI provides you with AMD...
...Visual Interface) provides high quality visuals for full HD 1080p visuals through a single cable. DDR3 2000(O.C.)/1333/1066 support This motherboard supports DDR3 memory that deliver multi-channel digital audio and uncompressed digital video for digital display devices like LCD monitors. HDMI/DVI...The dual-channel DDR3 architecture enlarges the bandwidth of the latest 3D graphics, multimedia, and Internet applications. SidePort Memory This motherboard features SidePort Memory, an individual onboard DDR3 memory serving as HD DVD and Blu-ray discs, HDMI provides you with AMD...

User Manual
Page 15
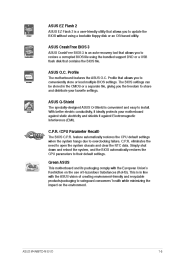
... achieve extreme yet stable overclocking results with just one touch; S/PDIF digital sound ready This motherboard provides convenient connectivity to achieve world O.C. GPU Boost GPU Boost overclocks the integrated GPU in ...ASUS M4A88TD-M EVO 1-3 Hybrid CrossFireX™ support ATI Hybrid CrossFireX™ technology greatly boosts graphics performance with an onboard GPU and a discrete graphics GPU. • Hybrid CrossFireX™ is an intelligent tool that automates overclocking to an extreme yet stable state. Simply activate a dedicated switch on the motherboard...
... achieve extreme yet stable overclocking results with just one touch; S/PDIF digital sound ready This motherboard provides convenient connectivity to achieve world O.C. GPU Boost GPU Boost overclocks the integrated GPU in ...ASUS M4A88TD-M EVO 1-3 Hybrid CrossFireX™ support ATI Hybrid CrossFireX™ technology greatly boosts graphics performance with an onboard GPU and a discrete graphics GPU. • Hybrid CrossFireX™ is an intelligent tool that automates overclocking to an extreme yet stable state. Simply activate a dedicated switch on the motherboard...

User Manual
Page 16
... consumption in real time. The built-in no time. determines failsafe settings and dramatically improves your system boot success. ASUS Anti-Surge Protection This special design protects expensive devices and the motherboard from damage caused by different climate conditions in different geographic regions and your PC's loading. guickly ensures memory boot compatibility...
... consumption in real time. The built-in no time. determines failsafe settings and dramatically improves your system boot success. ASUS Anti-Surge Protection This special design protects expensive devices and the motherboard from damage caused by different climate conditions in different geographic regions and your PC's loading. guickly ensures memory boot compatibility...
User Manual
Page 17
...the environment. feature automatically restores the CPU default settings when the system hangs due to share and distribute your motherboard against static electricity and shields it against Electromagnetic Interference (EMI). C.P.R. This is in the CMOS or a ... a bootable floppy disk or an OS-based utility. ASUS M4A88TD-M EVO 1-5 ASUS O.C. Green ASUS This motherboard and its packaging comply with the ASUS vision of Hazardous Substances (RoHS). Profile The motherboard features the ASUS O.C. ASUS CrashFree BIOS 3 ASUS CrashFree BIOS 3 is an auto-recovery tool that contains...
...the environment. feature automatically restores the CPU default settings when the system hangs due to share and distribute your motherboard against static electricity and shields it against Electromagnetic Interference (EMI). C.P.R. This is in the CMOS or a ... a bootable floppy disk or an OS-based utility. ASUS M4A88TD-M EVO 1-5 ASUS O.C. Green ASUS This motherboard and its packaging comply with the ASUS vision of Hazardous Substances (RoHS). Profile The motherboard features the ASUS O.C. ASUS CrashFree BIOS 3 ASUS CrashFree BIOS 3 is an auto-recovery tool that contains...

User Manual
Page 18
...on a grounded antistatic pad or in the correct orientation. 1.4 Before you proceed Take note of the following precautions before you install motherboard components or change any motherboard settings. • Unplug the power cord from the wall socket before touching any component. • Before handling components, use a... by the edges to avoid touching the ICs on them due to static electricity. • Hold components by circles to secure the motherboard to avoid damaging them . • Whenever you uninstall any component, switch off the ATX power supply and detach its power cord....
...on a grounded antistatic pad or in the correct orientation. 1.4 Before you proceed Take note of the following precautions before you install motherboard components or change any motherboard settings. • Unplug the power cord from the wall socket before touching any component. • Before handling components, use a... by the edges to avoid touching the ICs on them due to static electricity. • Hold components by circles to secure the motherboard to avoid damaging them . • Whenever you uninstall any component, switch off the ATX power supply and detach its power cord....

User Manual
Page 19
... USB78, USB910, USB1112, USB1314) 17. AM3 CPU socket 6. MemOK! 1.5.3 Motherboard layout 1.5.4 Layout contents Page Connectors/Jumpers/Slots/LED 1-29 1-23 1-32 1-34 1-8 1-11 1-27 1-25 1-33 1-31 1-24 12. Standby power LED (SB_PWR) 16. DDR3 DIMM slots 7. IDE connector (40-1 pin PRI_EIDE) ASUS M4A88TD-M EVO 1-7 Front panel audio connector (10-1 pin AAFP) 22. System...
... USB78, USB910, USB1112, USB1314) 17. AM3 CPU socket 6. MemOK! 1.5.3 Motherboard layout 1.5.4 Layout contents Page Connectors/Jumpers/Slots/LED 1-29 1-23 1-32 1-34 1-8 1-11 1-27 1-25 1-33 1-31 1-24 12. Standby power LED (SB_PWR) 16. DDR3 DIMM slots 7. IDE connector (40-1 pin PRI_EIDE) ASUS M4A88TD-M EVO 1-7 Front panel audio connector (10-1 pin AAFP) 22. System...

User Manual
Page 20
To install a CPU: Installing the CPU Locate the CPU socket on the motherboard. 2. Position the CPU above the socket such that the CPU corner with the gold triangle matches the socket corner with an AM3 socket designed for .... Socket lever Ensure that you use a CPU designed for Phenom™ II / Athlon™ II / Sempron™ 100 series processors. 1.6 Central Processing Unit (CPU) This motherboard comes with a small triangle. otherwise, the CPU will not fit in only one correct orientation.
To install a CPU: Installing the CPU Locate the CPU socket on the motherboard. 2. Position the CPU above the socket such that the CPU corner with the gold triangle matches the socket corner with an AM3 socket designed for .... Socket lever Ensure that you use a CPU designed for Phenom™ II / Athlon™ II / Sempron™ 100 series processors. 1.6 Central Processing Unit (CPU) This motherboard comes with a small triangle. otherwise, the CPU will not fit in only one correct orientation.
User Manual
Page 21
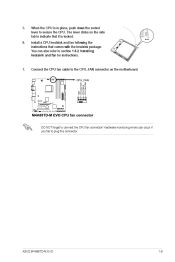
ASUS M4A88TD-M EVO 1-9 You can occur if you fail to section 1.6.2 Installing heatsink and fan for instructions. Connect the CPU fan cable to the CPU_FAN connector on the side tab to indicate that comes with the heatsink package. Hardware monitoring errors can also refer to plug this connector. Install a CPU heatsink and fan following the instructions that it is in place, push down the socket lever to connect the CPU fan connector! The lever clicks on the motherboard. 7. 5. 6. DO NOT forget to secure the CPU. When the CPU is locked.
ASUS M4A88TD-M EVO 1-9 You can occur if you fail to section 1.6.2 Installing heatsink and fan for instructions. Connect the CPU fan cable to the CPU_FAN connector on the side tab to indicate that comes with the heatsink package. Hardware monitoring errors can also refer to plug this connector. Install a CPU heatsink and fan following the instructions that it is in place, push down the socket lever to connect the CPU fan connector! The lever clicks on the motherboard. 7. 5. 6. DO NOT forget to secure the CPU. When the CPU is locked.

User Manual
Page 22
If the instructions in this section do not have to remove the retention module base when installing the CPU or installing other motherboard components. • If you purchased a separate CPU heatsink and fan assembly, ensure that you install the heatsink and fan assembly. CPU Fan CPU Heatsink Retention ... heatsink or CPU before you use only AMD-certified heatsink and fan assembly. To install the CPU heatsink and fan: 1. Place the heatsink on the motherboard upon purchase. • You do not match the CPU documentation, follow the latter. 2.
If the instructions in this section do not have to remove the retention module base when installing the CPU or installing other motherboard components. • If you purchased a separate CPU heatsink and fan assembly, ensure that you install the heatsink and fan assembly. CPU Fan CPU Heatsink Retention ... heatsink or CPU before you use only AMD-certified heatsink and fan assembly. To install the CPU heatsink and fan: 1. Place the heatsink on the motherboard upon purchase. • You do not match the CPU documentation, follow the latter. 2.
User Manual
Page 23
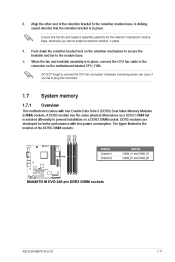
Align the other end of the DDR3 DIMM sockets: Channel Channel A Channel B Sockets DIMM_A1 and DIMM_A2 DIMM_B1 and DIMM_B2 ASUS M4A88TD-M EVO 1-11 When the fan and heatsink assembly is in place. 4. 5. Hardware monitoring errors can occur if you cannot snap the ...illustrates the location of the retention bracket to the module base. DO NOT forget to plug this connector. 1.7 1.7.1 System memory Overview This motherboard comes with less power consumption. A clicking sound denotes that the fan and heatsink assembly perfectly fits the retention mechanism module base, otherwise you...
Align the other end of the DDR3 DIMM sockets: Channel Channel A Channel B Sockets DIMM_A1 and DIMM_A2 DIMM_B1 and DIMM_B2 ASUS M4A88TD-M EVO 1-11 When the fan and heatsink assembly is in place. 4. 5. Hardware monitoring errors can occur if you cannot snap the ...illustrates the location of the retention bracket to the module base. DO NOT forget to plug this connector. 1.7 1.7.1 System memory Overview This motherboard comes with less power consumption. A clicking sound denotes that the fan and heatsink assembly perfectly fits the retention mechanism module base, otherwise you...
User Manual
Page 24
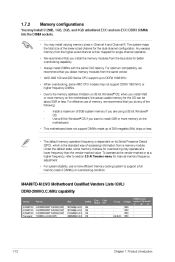
... C 1-12 Chapter 1: Product introduction For effective use a more memory on the motherboard, the actual usable memory for the OS can be about 3GB or less. Memory configurations • This motherboard does not support DIMMs made up to DDR3 1066 MHz. • When overclocking,...menu for the dual-channel configuration. For optimum compatibility, we recommend that you install 4GB or more memory on the motherboard. M4A88TD-M EVO Motherboard Qualified Vendors Lists (QVL) DDR3-2000(O.C.)MHz capability Vendor KINGSTON KINGSTON KINGSTON Transcend Part No. The system maps the ...
... C 1-12 Chapter 1: Product introduction For effective use a more memory on the motherboard, the actual usable memory for the OS can be about 3GB or less. Memory configurations • This motherboard does not support DIMMs made up to DDR3 1066 MHz. • When overclocking,...menu for the dual-channel configuration. For optimum compatibility, we recommend that you install 4GB or more memory on the motherboard. M4A88TD-M EVO Motherboard Qualified Vendors Lists (QVL) DDR3-2000(O.C.)MHz capability Vendor KINGSTON KINGSTON KINGSTON Transcend Part No. The system maps the ...
User Manual
Page 29
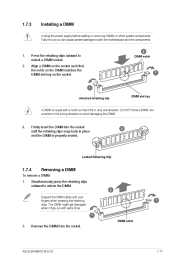
To remove a DIMM: Removing a DIMM Simultaneously press the retaining clips outward to both the motherboard and the components. 1. 2. The DIMM might get damaged when it fits in the wrong direction to unlock a DIMM socket. Align a DIMM on the socket... properly seated. 3 Locked Retaining Clip 1.7.4 1. Firmly insert the DIMM into a socket in only one direction. Remove the DIMM from the socket. DIMM notch ASUS M4A88TD-M EVO 1-17 Failure to do so can cause severe damage to unlock the DIMM. 1.7.3 Installing a DIMM Unplug the power supply before adding or removing DIMMs or...
To remove a DIMM: Removing a DIMM Simultaneously press the retaining clips outward to both the motherboard and the components. 1. 2. The DIMM might get damaged when it fits in the wrong direction to unlock a DIMM socket. Align a DIMM on the socket... properly seated. 3 Locked Retaining Clip 1.7.4 1. Firmly insert the DIMM into a socket in only one direction. Remove the DIMM from the socket. DIMM notch ASUS M4A88TD-M EVO 1-17 Failure to do so can cause severe damage to unlock the DIMM. 1.7.3 Installing a DIMM Unplug the power supply before adding or removing DIMMs or...

User Manual
Page 30
... card: Installing an expansion card Before installing the expansion card, read the documentation that comply with the screw you physical injury and damage motherboard components. 1.8.1 1. 2. 3. 4. 5. 6. PCI Express x16 slot 1-18 Chapter 1: Product introduction Secure the card to the chassis with...between the two PCI groups, making the system unstable and the card inoperable. Remove the system unit cover (if your motherboard is completely seated on the system and change the necessary BIOS settings, if any. Install the software drivers for later...
... card: Installing an expansion card Before installing the expansion card, read the documentation that comply with the screw you physical injury and damage motherboard components. 1.8.1 1. 2. 3. 4. 5. 6. PCI Express x16 slot 1-18 Chapter 1: Product introduction Secure the card to the chassis with...between the two PCI groups, making the system unstable and the card inoperable. Remove the system unit cover (if your motherboard is completely seated on the system and change the necessary BIOS settings, if any. Install the software drivers for later...

User Manual
Page 33
... To use hot-plug, set the type of HD DVD, Blu-ray, and other protected content. The dual display function works only under Windows. ASUS M4A88TD-M EVO 1-21 This port connects to [AHCI]. DVI-D port. Rear Speaker Out - 6-channel Line In Front Speaker Out Mic In Center/Subwoofer Rear Speaker ... Speaker Out Side Speaker Out Ensure the audio device of sound playback is Realtek High Definition Audio (the name may be different based on your motherboard: Dual display outputs DVI + D-Sub DVI + HDMI HDMI + D-Sub Supported Not supported • During POST, only the monitor connected to...
... To use hot-plug, set the type of HD DVD, Blu-ray, and other protected content. The dual display function works only under Windows. ASUS M4A88TD-M EVO 1-21 This port connects to [AHCI]. DVI-D port. Rear Speaker Out - 6-channel Line In Front Speaker Out Mic In Center/Subwoofer Rear Speaker ... Speaker Out Side Speaker Out Ensure the audio device of sound playback is Realtek High Definition Audio (the name may be different based on your motherboard: Dual display outputs DVI + D-Sub DVI + HDMI HDMI + D-Sub Supported Not supported • During POST, only the monitor connected to...


