
User Manual
Page 19
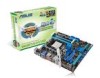
...CHA_FAN) 2. LPT connector (26-1 pin LPT) 9. DRAM LED (DRAM_LED) 10. Serial port connector (10-1 pin COM1) 8. Clear RTC RAM (3-pin CLRTC) 15. Core Unlocker LED (02LED1) 18. AM3 CPU socket 6. Digital audio connector (4-1 pin SPDIF_OUT) 21. DDR3 DIMM slots...SATA2, SATA3, SATA5, SATA6) 14. switch 11. ATX power connectors (24-pin EATXPWR, 4-pin ATX12V) 3. IDE connector (40-1 pin PRI_EIDE) ASUS M4A88TD-M EVO 1-7 1.5.3 Motherboard layout 1.5.4 Layout contents Page Connectors/Jumpers/Slots/LED 1-29 1-23 1-32 1-34 1-8 1-11 1-27 1-25 1-33 1-31 1-...
...CHA_FAN) 2. LPT connector (26-1 pin LPT) 9. DRAM LED (DRAM_LED) 10. Serial port connector (10-1 pin COM1) 8. Clear RTC RAM (3-pin CLRTC) 15. Core Unlocker LED (02LED1) 18. AM3 CPU socket 6. Digital audio connector (4-1 pin SPDIF_OUT) 21. DDR3 DIMM slots...SATA2, SATA3, SATA5, SATA6) 14. switch 11. ATX power connectors (24-pin EATXPWR, 4-pin ATX12V) 3. IDE connector (40-1 pin PRI_EIDE) ASUS M4A88TD-M EVO 1-7 1.5.3 Motherboard layout 1.5.4 Layout contents Page Connectors/Jumpers/Slots/LED 1-29 1-23 1-32 1-34 1-8 1-11 1-27 1-25 1-33 1-31 1-...

User Manual
Page 31
...the computer and unplug the power cord. 2. Plug the power cord and turn ON the computer. 4. Clear RTC RAM (CLRTC) Jumpers To erase the RTC RAM: 1. Except when clearing the RTC RAM, never remove the cap on pins 2-3 for about 5~10 seconds, then move the jumper again to clear the ...the boot process and enter BIOS setup to pins 1-2. 3. Keep the cap on CLRTC jumper default position. For system failure due to pins 2-3. ASUS M4A88TD-M EVO 1-19 Hold down and reboot the system so the BIOS can clear the CMOS memory of date, time, and system setup parameters by erasing the...
...the computer and unplug the power cord. 2. Plug the power cord and turn ON the computer. 4. Clear RTC RAM (CLRTC) Jumpers To erase the RTC RAM: 1. Except when clearing the RTC RAM, never remove the cap on pins 2-3 for about 5~10 seconds, then move the jumper again to clear the ...the boot process and enter BIOS setup to pins 1-2. 3. Keep the cap on CLRTC jumper default position. For system failure due to pins 2-3. ASUS M4A88TD-M EVO 1-19 Hold down and reboot the system so the BIOS can clear the CMOS memory of date, time, and system setup parameters by erasing the...

User Manual
Page 75
... options: [Off] [On] Wait for 'F1' If Error [Enabled] When this item to erase the RTC RAM. After you can clear it by erasing the CMOS Real Time Clock (RTC) RAM. The message Password Installed appears after you to six letters or numbers, or both, then press . In the ...when error occurs. Confirm the password when prompted. See section 1.9 Jumpers for information on top of the screen shows the default Not Installed. ASUS M4A88TD-M EVO 2-27 Security Change Supervisor Password Select this item is set your BIOS password, you set to [Enabled], the system waits for the NumLock.
... options: [Off] [On] Wait for 'F1' If Error [Enabled] When this item to erase the RTC RAM. After you can clear it by erasing the CMOS Real Time Clock (RTC) RAM. The message Password Installed appears after you to six letters or numbers, or both, then press . In the ...when error occurs. Confirm the password when prompted. See section 1.9 Jumpers for information on top of the screen shows the default Not Installed. ASUS M4A88TD-M EVO 2-27 Security Change Supervisor Password Select this item is set your BIOS password, you set to [Enabled], the system waits for the NumLock.

User Manual
Page 78
If you made changes to discard the selections you made to the non-volatile RAM. 2-30 Chapter 2: BIOS information Discard Changes This option allows you to load default values. Load ...Exit Save and Exit ESC ESC Exit Once you made and restore the previously saved values. Select OK to the CMOS RAM. When you select this option or if you select this menu. changes. After selecting this option from the legend ... systemsetup setup Exit aftersaving savingthe the after changes. An onboard backup battery sustains the CMOS RAM so it stays on the Setup menus.
If you made changes to discard the selections you made to the non-volatile RAM. 2-30 Chapter 2: BIOS information Discard Changes This option allows you to load default values. Load ...Exit Save and Exit ESC ESC Exit Once you made and restore the previously saved values. Select OK to the CMOS RAM. When you select this option or if you select this menu. changes. After selecting this option from the legend ... systemsetup setup Exit aftersaving savingthe the after changes. An onboard backup battery sustains the CMOS RAM so it stays on the Setup menus.


