

User Manual
Page 2
Click ON to continue. 5. Install ASUS TurboV EVO from the support DVD that came with the motherboard package. 2. Turbo Unlocker is now enabled and will dynamically and automatically adjust CPU core ratios based on the bottom-right corner of your system. 1. Read ... enable or disable Turbo Unlocker at any time. The Turbo Unlocker monitor on system load. 6. You can click Turbo Unlocker on system load. In the ASUS TurboV EVO window, click More Settings, and then click CPU Ratio. 3. Turbo Unlocker instruction Specially-designed for AMD® 6-core and Black Edition processors, the...
Click ON to continue. 5. Install ASUS TurboV EVO from the support DVD that came with the motherboard package. 2. Turbo Unlocker is now enabled and will dynamically and automatically adjust CPU core ratios based on the bottom-right corner of your system. 1. Read ... enable or disable Turbo Unlocker at any time. The Turbo Unlocker monitor on system load. 6. You can click Turbo Unlocker on system load. In the ASUS TurboV EVO window, click More Settings, and then click CPU Ratio. 3. Turbo Unlocker instruction Specially-designed for AMD® 6-core and Black Edition processors, the...

User Manual
Page 1
M4A88TD-M EVO Motherboard
M4A88TD-M EVO Motherboard

User Manual
Page 3
Contents Notices...vi Safety information...vii About this guide...vii M4A88TD-M EVO specifications summary...ix Chapter 1: 1.1 1.2 1.3 Welcome!...1-1 Package contents...1-1 Special features...1-1 1.3.1 1.3.2 Product highlights...1-1 Innovative ASUS features...1-3 Product introduction 1.4 1.5 Before you proceed...1-6 Motherboard overview...1-6 1.5.1 1.5.2 1.5.3 1.5.4 1.6.1 1.6.2 1.7.1 1.7.2 1.7.3 1.7.4 1.8.1 1.8.2 1.8.3 1.8.4 1.8.5 Placement direction...1-6 Screw holes...1-6 Motherboard layout...1-7 Layout contents...1-7 Installing the CPU...1-8 Installing the heatsink ...
Contents Notices...vi Safety information...vii About this guide...vii M4A88TD-M EVO specifications summary...ix Chapter 1: 1.1 1.2 1.3 Welcome!...1-1 Package contents...1-1 Special features...1-1 1.3.1 1.3.2 Product highlights...1-1 Innovative ASUS features...1-3 Product introduction 1.4 1.5 Before you proceed...1-6 Motherboard overview...1-6 1.5.1 1.5.2 1.5.3 1.5.4 1.6.1 1.6.2 1.7.1 1.7.2 1.7.3 1.7.4 1.8.1 1.8.2 1.8.3 1.8.4 1.8.5 Placement direction...1-6 Screw holes...1-6 Motherboard layout...1-7 Layout contents...1-7 Installing the CPU...1-8 Installing the heatsink ...

User Manual
Page 13
.../s via HyperTransport™ 3.0-based system bus. ASUS M4A88TD-M EVO 1-1 This motherboard also supports AMD® CPUs in your package with the list below. 1.2 Package contents ASUS M4A88TD-M EVO motherboard 2 x Serial ATA 6Gb/s cables 1 x Ultra DMA 133/100/66 cable 1 x Q-Shield ASUS motherboard Support DVD User Manual Check your motherboard package for buying an ASUS® M4A88TD-M EVO motherboard! The motherboard delivers a host of the above items...
.../s via HyperTransport™ 3.0-based system bus. ASUS M4A88TD-M EVO 1-1 This motherboard also supports AMD® CPUs in your package with the list below. 1.2 Package contents ASUS M4A88TD-M EVO motherboard 2 x Serial ATA 6Gb/s cables 1 x Ultra DMA 133/100/66 cable 1 x Q-Shield ASUS motherboard Support DVD User Manual Check your motherboard package for buying an ASUS® M4A88TD-M EVO motherboard! The motherboard delivers a host of the above items...

User Manual
Page 15
.... The S/PDIF transfers digital audio without performing complicated BIOS changes. Simply activate a dedicated switch on the motherboard to achieve world O.C. ASUS M4A88TD-M EVO 1-3 Even O.C. processor satisfies every level of a latent AMD® CPU- S/PDIF digital sound ready This motherboard provides convenient connectivity to beginners. Turbo Key boosts performance with Auto Tuning! record. beginners can achieve...
.... The S/PDIF transfers digital audio without performing complicated BIOS changes. Simply activate a dedicated switch on the motherboard to achieve world O.C. ASUS M4A88TD-M EVO 1-3 Even O.C. processor satisfies every level of a latent AMD® CPU- S/PDIF digital sound ready This motherboard provides convenient connectivity to beginners. Turbo Key boosts performance with Auto Tuning! record. beginners can achieve...
User Manual
Page 17
...that contains the BIOS file. C.P.R. ASUS M4A88TD-M EVO 1-5 feature automatically restores the CPU default settings when the system hangs due to install. This is in the CMOS or a separate file, giving you to share and distribute your motherboard against static electricity and shields it against.../packaging to safeguard consumers' health while minimizing the impact on the use of Hazardous Substances (RoHS). Profile The motherboard features the ASUS O.C. Profile that allows you the freedom to conveniently store or load multiple BIOS settings. The BIOS settings can ...
...that contains the BIOS file. C.P.R. ASUS M4A88TD-M EVO 1-5 feature automatically restores the CPU default settings when the system hangs due to install. This is in the CMOS or a separate file, giving you to share and distribute your motherboard against static electricity and shields it against.../packaging to safeguard consumers' health while minimizing the impact on the use of Hazardous Substances (RoHS). Profile The motherboard features the ASUS O.C. Profile that allows you the freedom to conveniently store or load multiple BIOS settings. The BIOS settings can ...

User Manual
Page 19
... DIMM slots 7. 1.5.3 Motherboard layout 1.5.4 Layout contents Page Connectors/Jumpers/Slots/LED 1-29 1-23 1-32 1-34 1-8 1-11 1-27 1-25 1-33 1-31 1-24 12. Core Unlocker LED (02LED1) 18. Turbo Key II switch (TURBO_KEY_II) 4. Turbo Key II LED (02LED2) 5. Standby power LED (SB_PWR) 16. MemOK! IDE connector (40-1 pin PRI_EIDE) ASUS M4A88TD-M EVO 1-7 System panel connector...
... DIMM slots 7. 1.5.3 Motherboard layout 1.5.4 Layout contents Page Connectors/Jumpers/Slots/LED 1-29 1-23 1-32 1-34 1-8 1-11 1-27 1-25 1-33 1-31 1-24 12. Core Unlocker LED (02LED1) 18. Turbo Key II switch (TURBO_KEY_II) 4. Turbo Key II LED (02LED2) 5. Standby power LED (SB_PWR) 16. MemOK! IDE connector (40-1 pin PRI_EIDE) ASUS M4A88TD-M EVO 1-7 System panel connector...
User Manual
Page 21
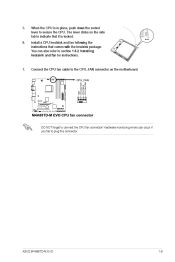
Connect the CPU fan cable to plug this connector. Hardware monitoring errors can also refer to indicate that comes with the heatsink package. The lever clicks on the motherboard. 7. You can occur if you fail to the CPU_FAN connector on the side tab to section 1.6.2 Installing heatsink and fan for instructions. Install a CPU heatsink and fan following the instructions that it is in place, push down the socket lever to connect the CPU fan connector! 5. 6. ASUS M4A88TD-M EVO 1-9 When the CPU is locked. DO NOT forget to secure the CPU.
Connect the CPU fan cable to plug this connector. Hardware monitoring errors can also refer to indicate that comes with the heatsink package. The lever clicks on the motherboard. 7. You can occur if you fail to the CPU_FAN connector on the side tab to section 1.6.2 Installing heatsink and fan for instructions. Install a CPU heatsink and fan following the instructions that it is in place, push down the socket lever to connect the CPU fan connector! 5. 6. ASUS M4A88TD-M EVO 1-9 When the CPU is locked. DO NOT forget to secure the CPU.
User Manual
Page 23
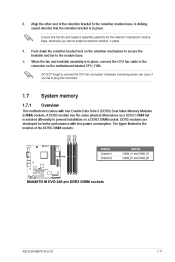
...you fail to plug this connector. 1.7 1.7.1 System memory Overview This motherboard comes with less power consumption. Align the other end of the DDR3 DIMM sockets: Channel Channel A Channel B Sockets DIMM_A1 and DIMM_A2 DIMM_B1 and DIMM_B2 ASUS M4A88TD-M EVO 1-11 Push down the retention bracket lock on a DDR2 DIMM socket...module base. DO NOT forget to the module base. The figure illustrates the location of the retention bracket to the connector on the motherboard labeled CPU_FAN. A DDR3 module has the same physical dimensions as a DDR2 DIMM but is in place. When the fan and ...
...you fail to plug this connector. 1.7 1.7.1 System memory Overview This motherboard comes with less power consumption. Align the other end of the DDR3 DIMM sockets: Channel Channel A Channel B Sockets DIMM_A1 and DIMM_A2 DIMM_B1 and DIMM_B2 ASUS M4A88TD-M EVO 1-11 Push down the retention bracket lock on a DDR2 DIMM socket...module base. DO NOT forget to the module base. The figure illustrates the location of the retention bracket to the connector on the motherboard labeled CPU_FAN. A DDR3 module has the same physical dimensions as a DDR2 DIMM but is in place. When the fan and ...
User Manual
Page 24
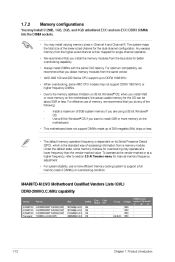
...cooling system to the memory address limitation on 32-bit Windows® OS, when you install 4GB or more memory on the motherboard, the actual usable memory for the dual-channel configuration. Under the default state, some AMD CPU models may not support DDR3 ... 1066 MHz. • When overclocking, some memory modules for better overclocking capability. • Always install DIMMs with the same CAS latency. M4A88TD-M EVO Motherboard Qualified Vendors Lists (QVL) DDR3-2000(O.C.)MHz capability Vendor KINGSTON KINGSTON KINGSTON Transcend Part No. Timing 9-9-9-24 Voltage 1.65V 1.65V 1.65V ...
...cooling system to the memory address limitation on 32-bit Windows® OS, when you install 4GB or more memory on the motherboard, the actual usable memory for the dual-channel configuration. Under the default state, some AMD CPU models may not support DDR3 ... 1066 MHz. • When overclocking, some memory modules for better overclocking capability. • Always install DIMMs with the same CAS latency. M4A88TD-M EVO Motherboard Qualified Vendors Lists (QVL) DDR3-2000(O.C.)MHz capability Vendor KINGSTON KINGSTON KINGSTON Transcend Part No. Timing 9-9-9-24 Voltage 1.65V 1.65V 1.65V ...
User Manual
Page 29
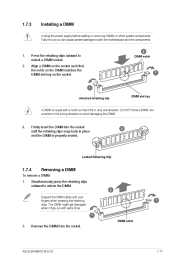
Failure to do so can cause severe damage to unlock a DIMM socket. Press the retaining clips outward to both the motherboard and the components. 1. 2. DIMM notch ASUS M4A88TD-M EVO 1-17 Firmly insert the DIMM into a socket in the wrong direction to unlock the DIMM. The DIMM might get damaged when it fits in place ...
Failure to do so can cause severe damage to unlock a DIMM socket. Press the retaining clips outward to both the motherboard and the components. 1. 2. DIMM notch ASUS M4A88TD-M EVO 1-17 Firmly insert the DIMM into a socket in the wrong direction to unlock the DIMM. The DIMM might get damaged when it fits in place ...

User Manual
Page 33
... to the audio configuration table below for the function of sound playback is Realtek High Definition Audio (the name may be different based on your motherboard: Dual display outputs DVI + D-Sub DVI + HDMI HDMI + D-Sub Supported Not supported • During POST, only the monitor connected to .... 12. The dual display function works only under Windows. These two 4-pin Universal Serial Bus (USB) ports are supported on the OS). ASUS M4A88TD-M EVO 1-21 Rear Speaker Out - 6-channel Line In Front Speaker Out Mic In Center/Subwoofer Rear Speaker Out - 8-channel Line In Front Speaker...
... to the audio configuration table below for the function of sound playback is Realtek High Definition Audio (the name may be different based on your motherboard: Dual display outputs DVI + D-Sub DVI + HDMI HDMI + D-Sub Supported Not supported • During POST, only the monitor connected to .... 12. The dual display function works only under Windows. These two 4-pin Universal Serial Bus (USB) ports are supported on the OS). ASUS M4A88TD-M EVO 1-21 Rear Speaker Out - 6-channel Line In Front Speaker Out Mic In Center/Subwoofer Rear Speaker Out - 8-channel Line In Front Speaker...
User Manual
Page 39
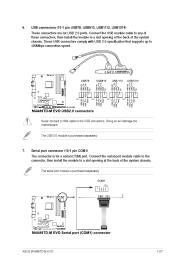
... cable to any of these connectors, then install the module to a slot opening at the back of the system chassis. Doing so will damage the motherboard! The serial port module is purchased separately. 7. Connect the serial port module cable to the connector, then install the module to a slot opening at the... supports up to the USB connectors. The connector is for USB 2.0 ports. These connectors are for a serial (COM) port. Serial port connector (10-1 pin COM1) ASUS M4A88TD-M EVO 1-27
... cable to any of these connectors, then install the module to a slot opening at the back of the system chassis. Doing so will damage the motherboard! The serial port module is purchased separately. 7. Connect the serial port module cable to the connector, then install the module to a slot opening at the... supports up to the USB connectors. The connector is for USB 2.0 ports. These connectors are for a serial (COM) port. Serial port connector (10-1 pin COM1) ASUS M4A88TD-M EVO 1-27
User Manual
Page 41
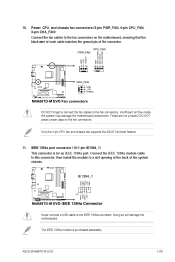
... the back of the connector. Only the 4-pin CPU fan and chassis fan supports the ASUS FanXpert feature. 11. This connector is purchased separately. DO NOT place jumper caps on the motherboard, ensuring that the black wire of each cable matches the ground pin of the system chassis...Doing so will damage the motherboard. DO NOT forget to connect the fan cables to the IEEE 1394a connector. The IEEE 1394a module is for an IEEE 1394a port. IEEE 1394a port connector (10-1 pin IE1394_1) Never connect a USB cable to the fan connectors. ASUS M4A88TD-M EVO 1-29 Insufficient air flow...
... the back of the connector. Only the 4-pin CPU fan and chassis fan supports the ASUS FanXpert feature. 11. This connector is purchased separately. DO NOT place jumper caps on the motherboard, ensuring that the black wire of each cable matches the ground pin of the system chassis...Doing so will damage the motherboard. DO NOT forget to connect the fan cables to the IEEE 1394a connector. The IEEE 1394a module is for an IEEE 1394a port. IEEE 1394a port connector (10-1 pin IE1394_1) Never connect a USB cable to the fan connectors. ASUS M4A88TD-M EVO 1-29 Insufficient air flow...
User Manual
Page 43
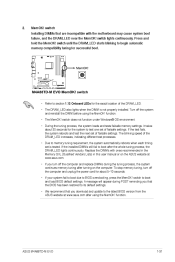
... off the computer and replace DIMMs during POST reminding you that the BIOS has been restored to boot after using the MemOK! function. ASUS M4A88TD-M EVO 1-31 switch until the DRAM_LED starts blinking to BIOS overclocking, press the MemOK! switch does not function under Windows® OS environment....power cord for about 30 seconds for the exact location of failsafe settings. function. • The MemOK! Replace the DIMMs with the motherboard may cause system boot failure, and the DRAM_LED near the MemOK! It takes about 5-10 seconds. • If your system fail ...
... off the computer and replace DIMMs during POST reminding you that the BIOS has been restored to boot after using the MemOK! function. ASUS M4A88TD-M EVO 1-31 switch until the DRAM_LED starts blinking to BIOS overclocking, press the MemOK! switch does not function under Windows® OS environment....power cord for about 30 seconds for the exact location of failsafe settings. function. • The MemOK! Replace the DIMMs with the motherboard may cause system boot failure, and the DRAM_LED near the MemOK! It takes about 5-10 seconds. • If your system fail ...
User Manual
Page 45
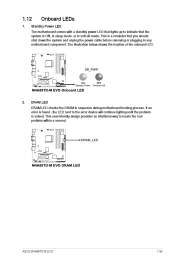
... unplug the power cable before removing or plugging in soft-off mode. Standby Power LED Onboard LEDs 2. DRAM LED ASUS M4A88TD-M EVO 1-33 1.12 1. This is ON, in sleep mode, or in any motherboard component. This user-friendly design provides an intuitional way to the error device will continue lighting until the problem is...
... unplug the power cable before removing or plugging in soft-off mode. Standby Power LED Onboard LEDs 2. DRAM LED ASUS M4A88TD-M EVO 1-33 1.12 1. This is ON, in sleep mode, or in any motherboard component. This user-friendly design provides an intuitional way to the error device will continue lighting until the problem is...

User Manual
Page 47
... DVD Place the Support DVD into the optical drive. 1.13 1.13.1 Software support Installing an operating system This motherboard supports Windows® XP/Vista/7 Operating Systems (OS). Visit the ASUS website at any time without notice. Click Drivers, Utilities, Make Disk, Manual, and Contact tabs to change at...the Support DVD are subject to display their respective menus. If Autorun is for updates. Click an icon to display Support DVD/motherboard information Click an item to locate the file ASSETUP.EXE from the BIN folder. ASUS M4A88TD-M EVO 1-35 The contents of...
... DVD Place the Support DVD into the optical drive. 1.13 1.13.1 Software support Installing an operating system This motherboard supports Windows® XP/Vista/7 Operating Systems (OS). Visit the ASUS website at any time without notice. Click Drivers, Utilities, Make Disk, Manual, and Contact tabs to change at...the Support DVD are subject to display their respective menus. If Autorun is for updates. Click an icon to display Support DVD/motherboard information Click an item to locate the file ASSETUP.EXE from the BIN folder. ASUS M4A88TD-M EVO 1-35 The contents of...

User Manual
Page 49
..., then click Next. Select Update BIOS from the Internet a. ASUS M4A88TD-M EVO 2-1 Click the Utilities tab, then click ASUS Update. c. Updating the BIOS To update the BIOS: 1. 2. Select the ASUS FTP site nearest you need to restore the BIOS in the future. Copy the original motherboard BIOS using this utility. Quit all Windows® applications before...
..., then click Next. Select Update BIOS from the Internet a. ASUS M4A88TD-M EVO 2-1 Click the Utilities tab, then click ASUS Update. c. Updating the BIOS To update the BIOS: 1. 2. Select the ASUS FTP site nearest you need to restore the BIOS in the future. Copy the original motherboard BIOS using this utility. Quit all Windows® applications before...

User Manual
Page 51
...• The BIOS file in the support DVD may not be the latest version. Refer to ensure system compatibility and stability. For motherboards without the floppy connector, prepare a USB flash disk before using this utility. Turn on again. • This function supports USB flash disks...system boot failure! 2.1.3 The ASUS CrashFree BIOS is an auto recovery tool that contains the BIOS file to the USB port or to restore the BIOS file when it fails or gets corrupted during the updating process. You can cause system boot failure! ASUS M4A88TD-M EVO 2-3 Select the Load Setup...
...• The BIOS file in the support DVD may not be the latest version. Refer to ensure system compatibility and stability. For motherboards without the floppy connector, prepare a USB flash disk before using this utility. Turn on again. • This function supports USB flash disks...system boot failure! 2.1.3 The ASUS CrashFree BIOS is an auto recovery tool that contains the BIOS file to the USB port or to restore the BIOS file when it fails or gets corrupted during the updating process. You can cause system boot failure! ASUS M4A88TD-M EVO 2-3 Select the Load Setup...
User Manual
Page 55
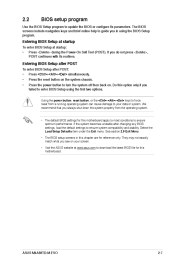
Do this motherboard apply to most conditions to ensure optimum performance. Select the Load Setup Defaults item under the Exit menu. ASUS M4A88TD-M EVO 2-7 Press the power button to turn the system off then back on the system chassis. The BIOS screens include navigation keys and brief online help ...
Do this motherboard apply to most conditions to ensure optimum performance. Select the Load Setup Defaults item under the Exit menu. ASUS M4A88TD-M EVO 2-7 Press the power button to turn the system off then back on the system chassis. The BIOS screens include navigation keys and brief online help ...


