
User Manual
Page 1
M4A88T-M Motherboard
M4A88T-M Motherboard
User Manual
Page 3
Contents Notices...vi Safety information vii About this guide vii M4A88T-M specifications summary ix Chapter 1: Product introduction 1.1 Welcome 1-1 1.2 Package contents 1-1 1.3 Special features 1-1 1.3.1 Product highlights 1-1 1.3.2 Innovative ASUS features 1-3 1.4 Before you proceed 1-6 1.5 Motherboard overview 1-7 1.5.1 Placement direction 1-7 1.5.2 Screw holes 1-7 1.5.3 Motherboard layout 1-8 1.5.4 Layout contents 1-8 1.6 Central Processing Unit (CPU 1-9 1.6.1 Installing the CPU 1-9 1.6.2 Installing the heatsink and fan 1-11 1.7 System memory...
Contents Notices...vi Safety information vii About this guide vii M4A88T-M specifications summary ix Chapter 1: Product introduction 1.1 Welcome 1-1 1.2 Package contents 1-1 1.3 Special features 1-1 1.3.1 Product highlights 1-1 1.3.2 Innovative ASUS features 1-3 1.4 Before you proceed 1-6 1.5 Motherboard overview 1-7 1.5.1 Placement direction 1-7 1.5.2 Screw holes 1-7 1.5.3 Motherboard layout 1-8 1.5.4 Layout contents 1-8 1.6 Central Processing Unit (CPU 1-9 1.6.1 Installing the CPU 1-9 1.6.2 Installing the heatsink and fan 1-11 1.7 System memory...
User Manual
Page 6
... guarantee that the product (electrical and electronic equipment) should not be placed in accordance with Canadian ICES-003. DO NOT throw the motherboard in a particular installation. Check local regulations for disposal of Communications. vi Changes or modifications to enable proper reuse of the crossed out...comply with the limits for radio noise emissions from that the battery should not be placed in our products at ASUS REACH website at http://green.asus.com/english/REACH.htm. REACH Complying with FCC regulations. This equipment generates, uses and can be determined by ...
... guarantee that the product (electrical and electronic equipment) should not be placed in accordance with Canadian ICES-003. DO NOT throw the motherboard in a particular installation. Check local regulations for disposal of Communications. vi Changes or modifications to enable proper reuse of the crossed out...comply with the limits for radio noise emissions from that the battery should not be placed in our products at ASUS REACH website at http://green.asus.com/english/REACH.htm. REACH Complying with FCC regulations. This equipment generates, uses and can be determined by ...
User Manual
Page 7
...; Chapter 2: BIOS information This chapter tells how to change system settings through the BIOS Setup menus. Operation safety • Before installing the motherboard and adding devices on a stable surface. • If you detect any area where it by yourself. About this guide is set to ...8226; To avoid short circuits, keep paper clips, screws, and staples away from the motherboard, ensure that your retailer. vii Do not place the product in your retailer. Detailed descriptions of the motherboard and the new technology it , carefully read all the manuals that came with the product,...
...; Chapter 2: BIOS information This chapter tells how to change system settings through the BIOS Setup menus. Operation safety • Before installing the motherboard and adding devices on a stable surface. • If you detect any area where it by yourself. About this guide is set to ...8226; To avoid short circuits, keep paper clips, screws, and staples away from the motherboard, ensure that your retailer. vii Do not place the product in your retailer. Detailed descriptions of the motherboard and the new technology it , carefully read all the manuals that came with the product,...
User Manual
Page 9
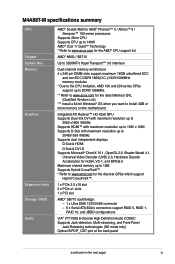
...up to 1GB Supports Hybrid CrossFireX™ * Refer to install 4GB or more memory on the next page) ix M4A88T-M specifications summary CPU Chipset System Bus Memory Graphics Expansion slots Storage / RAID Audio AMD® Socket AM3 for AMD.../ Sempron™ 100 series processors Supports 45nm CPU Supports CPU up to 140W AMD® Cool 'n' Quiet™ Technology * Refer to www.asus.com for the discrete GPUs which support Hybrid CrossFireX™. 1 x PCIe 2.0 x16 slot 2 x PCIe x1 slots 1 x PCI slot AMD...mode only) Optical S/PDIF_OUT port at the back panel (continued on the motherboard.
...up to 1GB Supports Hybrid CrossFireX™ * Refer to install 4GB or more memory on the next page) ix M4A88T-M specifications summary CPU Chipset System Bus Memory Graphics Expansion slots Storage / RAID Audio AMD® Socket AM3 for AMD.../ Sempron™ 100 series processors Supports 45nm CPU Supports CPU up to 140W AMD® Cool 'n' Quiet™ Technology * Refer to www.asus.com for the discrete GPUs which support Hybrid CrossFireX™. 1 x PCIe 2.0 x16 slot 2 x PCIe x1 slots 1 x PCI slot AMD...mode only) Optical S/PDIF_OUT port at the back panel (continued on the motherboard.
User Manual
Page 13
... data transfer rate up to 5200MT/s via HyperTransport™ 3.0-based system bus. ASUS M4A88T-M 1-1 Thank you start installing the motherboard, and hardware devices on it another standout in the new 45nm manufacturing process. Before you...the following items. Motherboard Cables Accessories Application DVD Documentations ASUS M4A88T-M motherboard 2 x Serial ATA cables 1 x Ultra DMA 133/100/66 cable 1 x I/O shield ASUS motherboard Support DVD User Manual If any of ASUS quality motherboards! Chapter 1 Product introduction 1.1 Welcome! This motherboard also supports AMD&#...
... data transfer rate up to 5200MT/s via HyperTransport™ 3.0-based system bus. ASUS M4A88T-M 1-1 Thank you start installing the motherboard, and hardware devices on it another standout in the new 45nm manufacturing process. Before you...the following items. Motherboard Cables Accessories Application DVD Documentations ASUS M4A88T-M motherboard 2 x Serial ATA cables 1 x Ultra DMA 133/100/66 cable 1 x I/O shield ASUS motherboard Support DVD User Manual If any of ASUS quality motherboards! Chapter 1 Product introduction 1.1 Welcome! This motherboard also supports AMD&#...
User Manual
Page 14
... the AMD Cool 'n' Quiet technology which enhances system performance. PCI Express 2.0 support This motherboard supports PCI Express 2.0 devices for double speed and bandwidth which monitors system operation and automatically adjusts CPU ...CPUs to provide excellent system performance and overclocking capabilities. S/PDIF digital sound ready This motherboard provides convenient connectivity to analog format and keeps the best signal quality. DDR3 1866(O.C.) support The motherboard supports DDR3 memory that radically improves system efficiency for a smoother and faster computing ...
... the AMD Cool 'n' Quiet technology which enhances system performance. PCI Express 2.0 support This motherboard supports PCI Express 2.0 devices for double speed and bandwidth which monitors system operation and automatically adjusts CPU ...CPUs to provide excellent system performance and overclocking capabilities. S/PDIF digital sound ready This motherboard provides convenient connectivity to analog format and keeps the best signal quality. DDR3 1866(O.C.) support The motherboard supports DDR3 memory that radically improves system efficiency for a smoother and faster computing ...
User Manual
Page 15
...drives to the Internet. Refer to choose and upgrade display devices freely. 100% All High-quality Conductive Polymer Capacitors This motherboard uses high-quality conductive polymer capacitors for durability, improved lifespan, and enhanced thermal capacity. HDMI/DVI/RGB support This...jacks and notifies users of inappropriate connection, which means there will be no more confusion of peripherals are able to support.asus.com for Express Gate source codes. ASUS M4A88T-M 1-3 With such diversity of display outputs, you with at least 1.2GB free disk space. It supports file downloading ...
...drives to the Internet. Refer to choose and upgrade display devices freely. 100% All High-quality Conductive Polymer Capacitors This motherboard uses high-quality conductive polymer capacitors for durability, improved lifespan, and enhanced thermal capacity. HDMI/DVI/RGB support This...jacks and notifies users of inappropriate connection, which means there will be no more confusion of peripherals are able to support.asus.com for Express Gate source codes. ASUS M4A88T-M 1-3 With such diversity of display outputs, you with at least 1.2GB free disk space. It supports file downloading ...
User Manual
Page 16
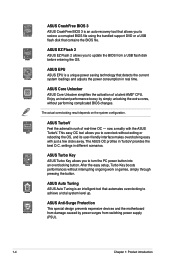
... tool that allows you to achieve a total system level up. ASUS EZ Flash 2 ASUS EZ Flash 2 allows you to update the BIOS from switching power supply (PSU). 1-4 Chapter 1: Product introduction ASUS Anti-Surge Protection This special design prevents expensive devices and the motherboard from damage caused by simply unlocking the extra cores, without interrupting...
... tool that allows you to achieve a total system level up. ASUS EZ Flash 2 ASUS EZ Flash 2 allows you to update the BIOS from switching power supply (PSU). 1-4 Chapter 1: Product introduction ASUS Anti-Surge Protection This special design prevents expensive devices and the motherboard from damage caused by simply unlocking the extra cores, without interrupting...
User Manual
Page 17
...the system and any faulty cable connections are reported back up to overclocking failure. C.P.R. (CPU Parameter Recall) The BIOS C.P.R. ASUS M4A88T-M 1-5 ASUS Q-Fan ASUS Q-Fan technology intelligently adjusts CPU fan speeds according to system loading to their default settings. Simply shut down and reboot the...color boot logos to open the system chassis and clear the RTC data. Green ASUS This motherboard and its packaging comply with a faster reaction time for the most demanding tasks. ASUS MyLogo 2™ Turn your system. feature automatically restores the CPU default settings ...
...the system and any faulty cable connections are reported back up to overclocking failure. C.P.R. (CPU Parameter Recall) The BIOS C.P.R. ASUS M4A88T-M 1-5 ASUS Q-Fan ASUS Q-Fan technology intelligently adjusts CPU fan speeds according to system loading to their default settings. Simply shut down and reboot the...color boot logos to open the system chassis and clear the RTC data. Green ASUS This motherboard and its packaging comply with a faster reaction time for the most demanding tasks. ASUS MyLogo 2™ Turn your system. feature automatically restores the CPU default settings ...
User Manual
Page 18
... you uninstall any component, place it on a grounded antistatic pad or in the bag that came with the component. • Before you install motherboard components or change any motherboard settings. • Unplug the power cord from the wall socket before touching any component. • Before handling components, use a grounded wrist strap or... or a metal object, such as the power supply case, to avoid damaging them due to static electricity. • Hold components by the edges to the motherboard, peripherals, or components. 1-6 Chapter 1: Product introduction
... you uninstall any component, place it on a grounded antistatic pad or in the bag that came with the component. • Before you install motherboard components or change any motherboard settings. • Unplug the power cord from the wall socket before touching any component. • Before handling components, use a grounded wrist strap or... or a metal object, such as the power supply case, to avoid damaging them due to static electricity. • Hold components by the edges to the motherboard, peripherals, or components. 1-6 Chapter 1: Product introduction
User Manual
Page 19
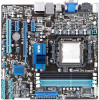
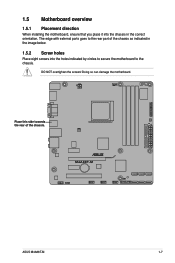
M4A88T-M ASUS M4A88T-M 1-7 Place this side towards the rear of the chassis as indicated in the correct orientation. Doing so can damage the motherboard. DO NOT overtighten the screws! The edge with external ports goes to the rear part of the chassis. 1.5 Motherboard overview 1.5.1 Placement direction When installing the motherboard, ensure that you place it into the chassis in the image below. 1.5.2 Screw holes Place eight screws into the holes indicated by circles to secure the motherboard to the chassis.
M4A88T-M ASUS M4A88T-M 1-7 Place this side towards the rear of the chassis as indicated in the correct orientation. Doing so can damage the motherboard. DO NOT overtighten the screws! The edge with external ports goes to the rear part of the chassis. 1.5 Motherboard overview 1.5.1 Placement direction When installing the motherboard, ensure that you place it into the chassis in the image below. 1.5.2 Screw holes Place eight screws into the holes indicated by circles to secure the motherboard to the chassis.
User Manual
Page 21
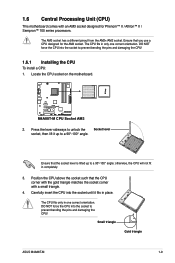
... fits in one correct orientation. Press the lever sideways to unlock the Socket lever socket, then lift it fits in completely. 3. Small triangle Gold triangle ASUS M4A88T-M 1-9 The AM3 socket has a different pinout from the AM2+/AM2 socket. DO NOT force the CPU into the socket to prevent bending the pins and... not fit in place. Carefully insert the CPU into the socket until it up to a 90°-100° angle. 1.6 Central Processing Unit (CPU) This motherboard comes with a small triangle. 4.
... fits in one correct orientation. Press the lever sideways to unlock the Socket lever socket, then lift it fits in completely. 3. Small triangle Gold triangle ASUS M4A88T-M 1-9 The AM3 socket has a different pinout from the AM2+/AM2 socket. DO NOT force the CPU into the socket to prevent bending the pins and... not fit in place. Carefully insert the CPU into the socket until it up to a 90°-100° angle. 1.6 Central Processing Unit (CPU) This motherboard comes with a small triangle. 4.
User Manual
Page 22
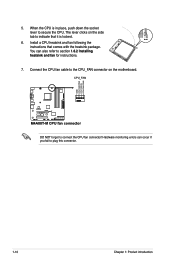
When the CPU is locked. 6. Connect the CPU fan cable to connect the CPU fan connector! CPU_FAN M4A88T-M M4A88T-M CPU fan connector DO NOT forget to the CPU_FAN connector on the side tab to indicate that comes with the heatsink package. Install a CPU heatsink ... this connector. 1-10 Chapter 1: Product introduction Hardware monitoring errors can also refer to section 1.6.2 Installing heatsink and fan for instructions. 7. The lever clicks on the motherboard. You can occur if you fail to secure the CPU. GND CPU FAN PWR CPU FAN IN CPU FAN PWM 5.
When the CPU is locked. 6. Connect the CPU fan cable to connect the CPU fan connector! CPU_FAN M4A88T-M M4A88T-M CPU fan connector DO NOT forget to the CPU_FAN connector on the side tab to indicate that comes with the heatsink package. Install a CPU heatsink ... this connector. 1-10 Chapter 1: Product introduction Hardware monitoring errors can also refer to section 1.6.2 Installing heatsink and fan for instructions. 7. The lever clicks on the motherboard. You can occur if you fail to secure the CPU. GND CPU FAN PWR CPU FAN IN CPU FAN PWM 5.
User Manual
Page 23
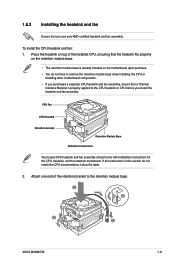
... If the instructions in this section do not have to the retention module base. 1 2 3 4 5 ASUS M4A88T-M 1-11 Attach one end of the installed CPU, ensuring that the heatsink fits properly on the motherboard upon purchase. • You do not match the CPU documentation, follow the latter. 2. To install the ...Place the heatsink on top of the retention bracket to remove the retention module base when installing the CPU or installing other motherboard components. • If you purchased a separate CPU heatsink and fan assembly, ensure that you install the heatsink and fan assembly.
... If the instructions in this section do not have to the retention module base. 1 2 3 4 5 ASUS M4A88T-M 1-11 Attach one end of the installed CPU, ensuring that the heatsink fits properly on the motherboard upon purchase. • You do not match the CPU documentation, follow the latter. 2. To install the ...Place the heatsink on top of the retention bracket to remove the retention module base when installing the CPU or installing other motherboard components. • If you purchased a separate CPU heatsink and fan assembly, ensure that you install the heatsink and fan assembly.
User Manual
Page 24
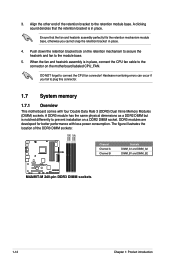
...in place. 4. The figure illustrates the location of the retention bracket to plug this connector. 1.7 System memory 1.7.1 Overview This motherboard comes with less power consumption. 3. When the fan and heatsink assembly is notched differently to the connector on the retention mechanism ... end of the DDR3 DIMM sockets: DIMM_A2 DIMM_B2 DIMM_A1 DIMM_B1 Channel Channel A Channel B Sockets DIMM_A1 and DIMM_A2 DIMM_B1 and DIMM_B2 M4A88T-M M4A88T-M 240-pin DDR3 DIMM sockets 1-12 Chapter 1: Product introduction DDR3 modules are developed for better performance with four Double Data Rate...
...in place. 4. The figure illustrates the location of the retention bracket to plug this connector. 1.7 System memory 1.7.1 Overview This motherboard comes with less power consumption. 3. When the fan and heatsink assembly is notched differently to the connector on the retention mechanism ... end of the DDR3 DIMM sockets: DIMM_A2 DIMM_B2 DIMM_A1 DIMM_B1 Channel Channel A Channel B Sockets DIMM_A1 and DIMM_A2 DIMM_B1 and DIMM_B2 M4A88T-M M4A88T-M 240-pin DDR3 DIMM sockets 1-12 Chapter 1: Product introduction DDR3 modules are developed for better performance with four Double Data Rate...
User Manual
Page 25
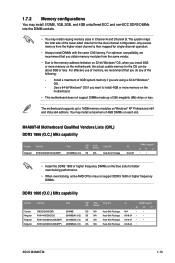
.... The system maps the total size of 2) DS N/A Heat-Sink Package 8-8-8-24 • ASUS M4A88T-M 1-13 For optimum compatibility, we recommend that you obtain memory modules from the higher-sized channel is then mapped for the dual-channel configuration. M4A88T-M Motherboard Qualified Vendors Lists (QVL) DDR3 1866 (O.C.) MHz capability Vendor Part No. 1.7.2 Memory configurations...
.... The system maps the total size of 2) DS N/A Heat-Sink Package 8-8-8-24 • ASUS M4A88T-M 1-13 For optimum compatibility, we recommend that you obtain memory modules from the higher-sized channel is then mapped for the dual-channel configuration. M4A88T-M Motherboard Qualified Vendors Lists (QVL) DDR3 1866 (O.C.) MHz capability Vendor Part No. 1.7.2 Memory configurations...
User Manual
Page 29
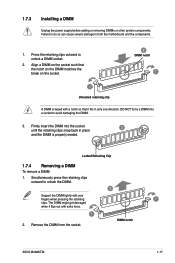
... to unlock a DIMM socket. 2. Align a DIMM on the socket. 2 DIMM notch 1 1 Unlocked retaining clip A DIMM is properly seated. DIMM notch ASUS M4A88T-M 1-17 Press the retaining clips outward to both the motherboard and the components. 1. Firmly insert the DIMM into a socket to unlock the DIMM. 2 Support the DIMM lightly with extra force. 1 2. The...
... to unlock a DIMM socket. 2. Align a DIMM on the socket. 2 DIMM notch 1 1 Unlocked retaining clip A DIMM is properly seated. DIMM notch ASUS M4A88T-M 1-17 Press the retaining clips outward to both the motherboard and the components. 1. Firmly insert the DIMM into a socket to unlock the DIMM. 2 Support the DIMM lightly with extra force. 1 2. The...
User Manual
Page 30
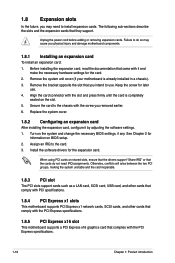
.... 4. Remove the bracket opposite the slot that you intend to do not need to the chassis with the screw you physical injury and damage motherboard components. 1.8.1 Installing an expansion card To install an expansion card: 1. See Chapter 2 for the card. 2. Before installing the expansion card,... slots, ensure that the drivers support "Share IRQ" or that came with the PCI Express specifications. 1.8.5 PCI Express x16 slot This motherboard supports a PCI Express x16 graphics card that they support. Keep the screw for the expansion card. Otherwise, conflicts will arise between the...
.... 4. Remove the bracket opposite the slot that you intend to do not need to the chassis with the screw you physical injury and damage motherboard components. 1.8.1 Installing an expansion card To install an expansion card: 1. See Chapter 2 for the card. 2. Before installing the expansion card,... slots, ensure that the drivers support "Share IRQ" or that came with the PCI Express specifications. 1.8.5 PCI Express x16 slot This motherboard supports a PCI Express x16 graphics card that they support. Keep the screw for the expansion card. Otherwise, conflicts will arise between the...
User Manual
Page 33
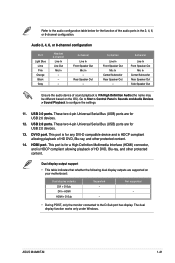
... > Sound Playback to the D-Sub port has display. ASUS M4A88T-M 1-21 The dual display function works only under Windows. Refer to the audio configuration table below for the function of sound playback is VIA High Definition Audio (the name may be different based on your motherboard: Dual display outputs DVI + D-Sub DVI + HDMI...
... > Sound Playback to the D-Sub port has display. ASUS M4A88T-M 1-21 The dual display function works only under Windows. Refer to the audio configuration table below for the function of sound playback is VIA High Definition Audio (the name may be different based on your motherboard: Dual display outputs DVI + D-Sub DVI + HDMI...


