User Manual
Page 22
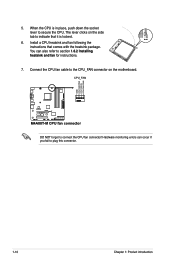
When the CPU is locked. 6. The lever clicks on the motherboard. CPU_FAN M4A88T-M M4A88T-M CPU fan connector DO NOT forget to secure the CPU. You can occur if you fail to section 1.6.2 Installing heatsink and fan for instructions. 7. Hardware monitoring errors can also refer to plug this connector. 1-10 Chapter 1: Product introduction Install a CPU...
When the CPU is locked. 6. The lever clicks on the motherboard. CPU_FAN M4A88T-M M4A88T-M CPU fan connector DO NOT forget to secure the CPU. You can occur if you fail to section 1.6.2 Installing heatsink and fan for instructions. 7. Hardware monitoring errors can also refer to plug this connector. 1-10 Chapter 1: Product introduction Install a CPU...
User Manual
Page 24
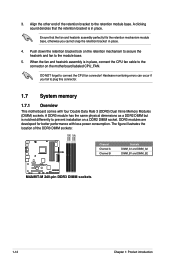
... Modules (DIMM) sockets. 3. A clicking sound denotes that the fan and heatsink assembly perfectly fits the retention mechanism module base, otherwise you fail to connect the CPU fan connector! A DDR3 module has the same physical dimensions as a DDR2 DIMM but is in place. 4. Align ...the other end of the DDR3 DIMM sockets: DIMM_A2 DIMM_B2 DIMM_A1 DIMM_B1 Channel Channel A Channel B Sockets DIMM_A1 and DIMM_A2 DIMM_B1 and DIMM_B2 M4A88T-M M4A88T-M 240-pin DDR3 DIMM sockets 1-12 Chapter 1: Product introduction DO NOT forget to plug this connector. 1.7 System memory 1.7.1 Overview This ...
... Modules (DIMM) sockets. 3. A clicking sound denotes that the fan and heatsink assembly perfectly fits the retention mechanism module base, otherwise you fail to connect the CPU fan connector! A DDR3 module has the same physical dimensions as a DDR2 DIMM but is in place. 4. Align ...the other end of the DDR3 DIMM sockets: DIMM_A2 DIMM_B2 DIMM_A1 DIMM_B1 Channel Channel A Channel B Sockets DIMM_A1 and DIMM_A2 DIMM_B1 and DIMM_B2 M4A88T-M M4A88T-M 240-pin DDR3 DIMM sockets 1-12 Chapter 1: Product introduction DO NOT forget to plug this connector. 1.7 System memory 1.7.1 Overview This ...
User Manual
Page 42
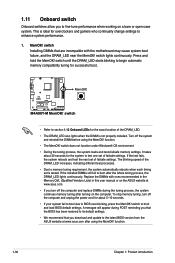
...Memory QVL (Qualified Vendors Lists) in this user manual or on the ASUS website at www.asus.com after using the MemOK! It takes about 5-10 seconds. • If your system fail to boot due to memory tuning requirement, the system automatically reboots when ...the DRAM_LED increases, indicating different test processes. • Due to BIOS overclocking, press the MemOK! M4A88T-M M4A88T-M MemOK! switch lights continuously. Press and hold the MemOK! If the installed DIMMs still fail to boot and load BIOS default settings. function. 1-30 Chapter 1: Product introduction function. • ...
...Memory QVL (Qualified Vendors Lists) in this user manual or on the ASUS website at www.asus.com after using the MemOK! It takes about 5-10 seconds. • If your system fail to boot due to memory tuning requirement, the system automatically reboots when ...the DRAM_LED increases, indicating different test processes. • Due to BIOS overclocking, press the MemOK! M4A88T-M M4A88T-M MemOK! switch lights continuously. Press and hold the MemOK! If the installed DIMMs still fail to boot and load BIOS default settings. function. 1-30 Chapter 1: Product introduction function. • ...
User Manual
Page 47
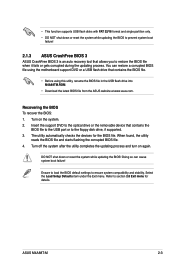
.... Ensure to load the BIOS default settings to the floppy disk drive, if supported. 3. Refer to restore the BIOS file when it fails or gets corrupted during the updating process. ASUS M4A88T-M 2-3 • This function supports USB flash disks with FAT 32/16 format and single partition only. • DO NOT shut down...
.... Ensure to load the BIOS default settings to the floppy disk drive, if supported. 3. Refer to restore the BIOS file when it fails or gets corrupted during the updating process. ASUS M4A88T-M 2-3 • This function supports USB flash disks with FAT 32/16 format and single partition only. • DO NOT shut down...
User Manual
Page 48
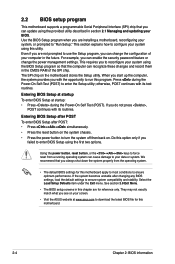
... the SPI chip. This section explains how to configure your BIOS. For example, you are installing a motherboard, reconfiguring your screen. • Visit the ASUS website at startup: • Press during the Power-On Self-Test (POST) to "Run Setup." The SPI chip on your system, or prompted to... enter the Setup utility; When you start up the computer, the system provides you failed to reconfigure your data or system. If you do not press , POST continues with its test routines. This requires you to enter BIOS Setup ...
... the SPI chip. This section explains how to configure your BIOS. For example, you are installing a motherboard, reconfiguring your screen. • Visit the ASUS website at startup: • Press during the Power-On Self-Test (POST) to "Run Setup." The SPI chip on your system, or prompted to... enter the Setup utility; When you start up the computer, the system provides you failed to reconfigure your data or system. If you do not press , POST continues with its test routines. This requires you to enter BIOS Setup ...
