

User Manual
Page 4
Contents 1.11 Software support 1-28 1.11.1 Installing an operating system 1-28 1.11.2 Support DVD information 1-28 Chapter 2: BIOS information 2.1 Managing and updating your BIOS 2-1 2.1.1 ASUS Update utility 2-1 2.1.2 ASUS EZ Flash 2 utility 2-3 2.1.3 ASUS CrashFree BIOS 3 utility 2-4 2.2 BIOS setup program 2-5 2.2.1 BIOS menu screen 2-6 2.2.2 Menu bar 2-6 2.2.3 Navigation keys 2-6 2.2.4 Menu items 2-7 2.2.5 Submenu items 2-7 2.2.6 Configuration fields 2-7 2.2.7 Pop-up window 2-7 2.2.8 Scroll bar 2-7 2.2.9 General help 2-7 2.3 Main...
Contents 1.11 Software support 1-28 1.11.1 Installing an operating system 1-28 1.11.2 Support DVD information 1-28 Chapter 2: BIOS information 2.1 Managing and updating your BIOS 2-1 2.1.1 ASUS Update utility 2-1 2.1.2 ASUS EZ Flash 2 utility 2-3 2.1.3 ASUS CrashFree BIOS 3 utility 2-4 2.2 BIOS setup program 2-5 2.2.1 BIOS menu screen 2-6 2.2.2 Menu bar 2-6 2.2.3 Navigation keys 2-6 2.2.4 Menu items 2-7 2.2.5 Submenu items 2-7 2.2.6 Configuration fields 2-7 2.2.7 Pop-up window 2-7 2.2.8 Scroll bar 2-7 2.2.9 General help 2-7 2.3 Main...

User Manual
Page 8
... is organized This guide contains the following parts: • Chapter 1: Product introduction This chapter describes the features of the BIOS parameters are not damaged. viii How this guide This user guide contains the information you need when installing and configuring the ...the new technology it may become wet. If you detect any area where it supports. • Chapter 2: BIOS information This chapter tells how to change system settings through the BIOS Setup menus. Operation safety • Before installing the motherboard and adding devices on a stable surface. •...
... is organized This guide contains the following parts: • Chapter 1: Product introduction This chapter describes the features of the BIOS parameters are not damaged. viii How this guide This user guide contains the information you need when installing and configuring the ...the new technology it may become wet. If you detect any area where it supports. • Chapter 2: BIOS information This chapter tells how to change system settings through the BIOS Setup menus. Operation safety • Before installing the motherboard and adding devices on a stable surface. •...
User Manual
Page 11
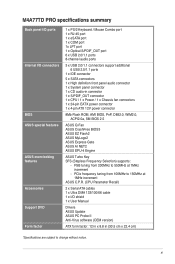
PCIe frequency tuning from 200MHz to change without notice. xi M4A77TD PRO specifications summary Back panel I/O ports Internal I/O connectors BIOS ASUS special features ASUS overclocking features Accessories Support DVD Form factor 1 x PS/2 Keyboard / Mouse Combo port 1 x RJ-45 port 1 x eSATA... 1 x 4-pin ATX 12V power connector 8Mb Flash ROM, AMI BIOS, PnP, DMI2.0, WfM2.0, ACPI2.0a, SM BIOS 2.5 ASUS Q-Fan ASUS CrashFree BIOS3 ASUS EZ Flash2 ASUS MyLogo2 ASUS Express Gate ASUS AI NET2 ASUS EPU-4 Engine ASUS Turbo Key SFS (Stepless Frequency Selection) supports: - FSB tuning from...
PCIe frequency tuning from 200MHz to change without notice. xi M4A77TD PRO specifications summary Back panel I/O ports Internal I/O connectors BIOS ASUS special features ASUS overclocking features Accessories Support DVD Form factor 1 x PS/2 Keyboard / Mouse Combo port 1 x RJ-45 port 1 x eSATA... 1 x 4-pin ATX 12V power connector 8Mb Flash ROM, AMI BIOS, PnP, DMI2.0, WfM2.0, ACPI2.0a, SM BIOS 2.5 ASUS Q-Fan ASUS CrashFree BIOS3 ASUS EZ Flash2 ASUS MyLogo2 ASUS Express Gate ASUS AI NET2 ASUS EPU-4 Engine ASUS Turbo Key SFS (Stepless Frequency Selection) supports: - FSB tuning from...
User Manual
Page 16
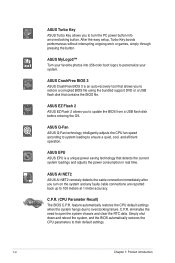
... up to 100 meters at 1 meter accuracy. ASUS EPU ASUS EPU is an auto-recovery tool that allows you to update the BIOS from a USB flash disk before entering the OS. C.P.R. (CPU Parameter Recall) The BIOS C.P.R. ASUS AI NET2 ASUS AI NET2 remotely detects the cable connection immediately after... you to restore a corrupted BIOS file using the bundled support DVD or a ...
... up to 100 meters at 1 meter accuracy. ASUS EPU ASUS EPU is an auto-recovery tool that allows you to update the BIOS from a USB flash disk before entering the OS. C.P.R. (CPU Parameter Recall) The BIOS C.P.R. ASUS AI NET2 ASUS AI NET2 remotely detects the cable connection immediately after... you to restore a corrupted BIOS file using the bundled support DVD or a ...
User Manual
Page 19
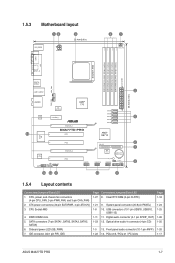
...Digital audio connector (4-1 pin SPDIF_OUT) 1-23 12. PCIe x16 / PCIe x1 / PCI slots Page 1-18 1-24 1-25 1-26 1-25 1-26 1-17 ASUS M4A77TD PRO 1-7 Optical drive audio-in connector (4-pin CD) 1-5 13. 1.5.3 Motherboard layout 12 KB_USB56 ATX12V 3 22.4cm(8.8in) 4 1 PWR_FAN COM1 LPT SOCKET ...AMD® 770 ICS 9LPRS485 SATA1 RTL 8112L PCIEX1_1 SATA2 SATA3 5 SATA5 SATA6 PCIEX16_1 M4A77TD PRO 14 AMD® PCI1 SB710 Super I/O PCI2 6 PRI_IDE 7 VIA VT1708S PCIEX16_2 8Mb BIOS Lithium Cell CMOS Power CD SPDIF_OUT PCI3 SB_PWR USB78 USB1112 USB910 CLRTC PANEL 8 AAFP...
...Digital audio connector (4-1 pin SPDIF_OUT) 1-23 12. PCIe x16 / PCIe x1 / PCI slots Page 1-18 1-24 1-25 1-26 1-25 1-26 1-17 ASUS M4A77TD PRO 1-7 Optical drive audio-in connector (4-pin CD) 1-5 13. 1.5.3 Motherboard layout 12 KB_USB56 ATX12V 3 22.4cm(8.8in) 4 1 PWR_FAN COM1 LPT SOCKET ...AMD® 770 ICS 9LPRS485 SATA1 RTL 8112L PCIEX1_1 SATA2 SATA3 5 SATA5 SATA6 PCIEX16_1 M4A77TD PRO 14 AMD® PCI1 SB710 Super I/O PCI2 6 PRI_IDE 7 VIA VT1708S PCIEX16_2 8Mb BIOS Lithium Cell CMOS Power CD SPDIF_OUT PCI3 SB_PWR USB78 USB1112 USB910 CLRTC PANEL 8 AAFP...
User Manual
Page 29
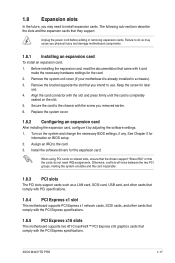
...documentation that they support. Failure to do not need to use . 4. Remove the system unit cover (if your motherboard is completely seated on BIOS setup. 2. Align the card connector with the slot and press firmly until the card is already installed in a chassis). 3. Turn on ... that comply with it by adjusting the software settings. 1. ASUS M4A77TD PRO 1-17 Remove the bracket opposite the slot that comply with the screw you removed earlier. 6. When using PCI cards on the system and change the necessary BIOS settings, if any. 1.8 Expansion slots In the future, ...
...documentation that they support. Failure to do not need to use . 4. Remove the system unit cover (if your motherboard is completely seated on BIOS setup. 2. Align the card connector with the slot and press firmly until the card is already installed in a chassis). 3. Turn on ... that comply with it by adjusting the software settings. 1. ASUS M4A77TD PRO 1-17 Remove the bracket opposite the slot that comply with the screw you removed earlier. 6. When using PCI cards on the system and change the necessary BIOS settings, if any. 1.8 Expansion slots In the future, ...

User Manual
Page 30
M4A77TD PRO CLRTC 12 23 Normal (Default) M4A77TD PRO Clear RTC RAM Clear RTC To erase the RTC RAM: 1. After clearing the CMOS, reinstall the battery. ...clear the CMOS RTC RAM data. For system failure due to reenter data. Hold down and reboot the system so the BIOS can clear the CMOS memory of date, time, and system setup parameters by erasing the CMOS RTC RAM data. Removing... system setup information such as system passwords. Shut down the key during the boot process and enter BIOS setup to overclocking, use the CPU Parameter Recall (C.P.R) feature. 1.9 Jumpers 1.
M4A77TD PRO CLRTC 12 23 Normal (Default) M4A77TD PRO Clear RTC RAM Clear RTC To erase the RTC RAM: 1. After clearing the CMOS, reinstall the battery. ...clear the CMOS RTC RAM data. For system failure due to reenter data. Hold down and reboot the system so the BIOS can clear the CMOS memory of date, time, and system setup parameters by erasing the CMOS RTC RAM data. Removing... system setup information such as system passwords. Shut down the key during the boot process and enter BIOS setup to overclocking, use the CPU Parameter Recall (C.P.R) feature. 1.9 Jumpers 1.
User Manual
Page 32
... of sound playback is for USB 2.0 devices. 1-20 Chapter 1: Product introduction eSATA port. To use hot-plug, set the OnChip SATA Type item in the BIOS to configure the settings. 11. This port connects to an external audio output device via an optical S/PDIF cable. 14. COM port. These two 4-pin...
... of sound playback is for USB 2.0 devices. 1-20 Chapter 1: Product introduction eSATA port. To use hot-plug, set the OnChip SATA Type item in the BIOS to configure the settings. 11. This port connects to an external audio output device via an optical S/PDIF cable. 14. COM port. These two 4-pin...
User Manual
Page 35
... Pack 1 or later versions before using Serial ATA. • If you can create a RAID 0, RAID 1, and RAID 0+1 configurations through the onboard SB710 chipset. ASUS M4A77TD PRO 1-23 The data transfer rate of the Serial ATA 3Gb/s is backward compatible with 133 MB/s (Ultra DMA133). If you install Serial ATA hard disk...floppy disk drive. • For more details on a hard disk drive that includes a RAID/AHCI set the OnChip SATA Type item in the BIOS to the RAID/AHCI Supplementary Guide included in the folder named Manual in the support DVD. You could use a USB floppy disk drive when ...
... Pack 1 or later versions before using Serial ATA. • If you can create a RAID 0, RAID 1, and RAID 0+1 configurations through the onboard SB710 chipset. ASUS M4A77TD PRO 1-23 The data transfer rate of the Serial ATA 3Gb/s is backward compatible with 133 MB/s (Ultra DMA133). If you install Serial ATA hard disk...floppy disk drive. • For more details on a hard disk drive that includes a RAID/AHCI set the OnChip SATA Type item in the BIOS to the RAID/AHCI Supplementary Guide included in the folder named Manual in the support DVD. You could use a USB floppy disk drive when ...

User Manual
Page 36
...; Hard disk drive activity LED This 2-pin connector is in SLEEP or SOFT-OFF mode depending on the BIOS settings. PWR Ground Reset Ground PANEL PIN 1 M4A77TD PRO IDE_LED PWRSW RESET * Requires an ATX power supply M4A77TD PRO System panel connector • System power LED This 2-pin connector is for system reboot without turning off...
...; Hard disk drive activity LED This 2-pin connector is in SLEEP or SOFT-OFF mode depending on the BIOS settings. PWR Ground Reset Ground PANEL PIN 1 M4A77TD PRO IDE_LED PWRSW RESET * Requires an ATX power supply M4A77TD PRO System panel connector • System power LED This 2-pin connector is for system reboot without turning off...
User Manual
Page 38
... is for an additional Sony/Philips Digital Interface (S/PDIF) port. +5V SPDIFOUT GND M4A77TD PRO SPDIF_OUT M4A77TD PRO Digital audio connector Ensure that you connect a high-definition front panel audio module to ...BIOS to [HD Audio]. Connect one end of Sound playback is purchased separately. 8. Digital audio connector (4-1 pin SPDIF_OUT) This connector is for details. 1-26 Chapter 1: Product introduction GND PRESENCE# SENSE1_RETUR SENSE2_RETUR AGND NC NC NC AAFP PIN 1 PIN 1 MIC2 MICPWR Line out_R NC Line out_L PORT1 L PORT1 R PORT2 R SENSE_SEND PORT2 L M4A77TD PRO...
... is for an additional Sony/Philips Digital Interface (S/PDIF) port. +5V SPDIFOUT GND M4A77TD PRO SPDIF_OUT M4A77TD PRO Digital audio connector Ensure that you connect a high-definition front panel audio module to ...BIOS to [HD Audio]. Connect one end of Sound playback is purchased separately. 8. Digital audio connector (4-1 pin SPDIF_OUT) This connector is for details. 1-26 Chapter 1: Product introduction GND PRESENCE# SENSE1_RETUR SENSE2_RETUR AGND NC NC NC AAFP PIN 1 PIN 1 MIC2 MICPWR Line out_R NC Line out_L PORT1 L PORT1 R PORT2 R SENSE_SEND PORT2 L M4A77TD PRO...
User Manual
Page 41
... this utility. Place the support DVD into the optical drive. ASUS M4A77TD PRO 2-1 Quit all Windows® applications before you to manage, save, and update the motherboard BIOS in Windows® environment. • ASUS Update requires an Internet connection either through a network or an Internet Service Provider (ISP). • This utility is a utility that comes...
... this utility. Place the support DVD into the optical drive. ASUS M4A77TD PRO 2-1 Quit all Windows® applications before you to manage, save, and update the motherboard BIOS in Windows® environment. • ASUS Update requires an Internet connection either through a network or an Internet Service Provider (ISP). • This utility is a utility that comes...

User Manual
Page 42
... download then click Next. b. Select Update BIOS from a BIOS file a. b. Updating from the Internet, then click Next. Locate the BIOS file from the Internet a. From the Windows® desktop, click Start > Programs > ASUS > ASUS Update > ASUS Update to complete the updating process. 2-2 Chapter 2: BIOS information Updating the BIOS To update the BIOS: 1. The ASUS Update utility is capable of the...
... download then click Next. b. Select Update BIOS from a BIOS file a. b. Updating from the Internet, then click Next. Locate the BIOS file from the Internet a. From the Windows® desktop, click Start > Programs > ASUS > ASUS Update > ASUS Update to complete the updating process. 2-2 Chapter 2: BIOS information Updating the BIOS To update the BIOS: 1. The ASUS Update utility is capable of the...
User Manual
Page 43
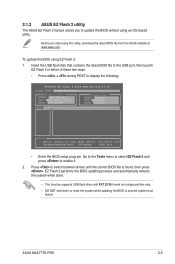
Before you to update the BIOS without using an OS‑based utility. ASUS M4A77TD PRO 2-3 To update the BIOS using this utility, download the latest BIOS file from the ASUS website at www.asus.com. Go to the Tools menu to select EZ Flash 2 and press to display the following: ASUSTek EZ Flash 2 BIOS ROM Utility V3.36 FLASH...
Before you to update the BIOS without using an OS‑based utility. ASUS M4A77TD PRO 2-3 To update the BIOS using this utility, download the latest BIOS file from the ASUS website at www.asus.com. Go to the Tools menu to select EZ Flash 2 and press to display the following: ASUSTek EZ Flash 2 BIOS ROM Utility V3.36 FLASH...

User Manual
Page 44
...USB flash disk with FAT 32/16 format and single partition supports ASUS CrashFree BIOS 3. Starting BIOS recovery... The device size should be the latest BIOS version for the BIOS file. Doing so can update a corrupted BIOS file using the motherboard support DVD or a USB flash disk that ...cable to the optical drive or USB port. Completed. The recovered BIOS may not be smaller than 8GB. • DO NOT shut down or reset the system while updating the BIOS! 2.1.3 ASUS CrashFree BIOS 3 utility The ASUS CrashFree BIOS 3 is found ! Start erasing... You can cause system boot...
...USB flash disk with FAT 32/16 format and single partition supports ASUS CrashFree BIOS 3. Starting BIOS recovery... The device size should be the latest BIOS version for the BIOS file. Doing so can update a corrupted BIOS file using the motherboard support DVD or a USB flash disk that ...cable to the optical drive or USB port. Completed. The recovered BIOS may not be smaller than 8GB. • DO NOT shut down or reset the system while updating the BIOS! 2.1.3 ASUS CrashFree BIOS 3 utility The ASUS CrashFree BIOS 3 is found ! Start erasing... You can cause system boot...
User Manual
Page 45
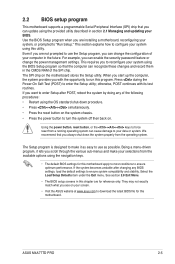
... at www.asus.com to use the Setup program, you scroll through the various sub-menus and make your selections from the available options using the provided utility described in section 2.1 Managing and updating your BIOS. If you are not prompted to force reset from the operating .... • Press the power button to configure your system using the BIOS Setup program so that you are for this motherboard apply to most conditions to "Run Setup." Being a menu-driven program, it as possible. ASUS M4A77TD PRO 2-5 When you start up the computer, the system provides you to ...
... at www.asus.com to use the Setup program, you scroll through the various sub-menus and make your selections from the available options using the provided utility described in section 2.1 Managing and updating your BIOS. If you are not prompted to force reset from the operating .... • Press the power button to configure your system using the BIOS Setup program so that you are for this motherboard apply to most conditions to "Run Setup." Being a menu-driven program, it as possible. ASUS M4A77TD PRO 2-5 When you start up the computer, the system provides you to ...

User Manual
Page 46
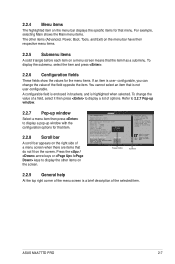
... management (APM) configuration Boot For changing the system boot configuration Tools For configuring options for that particular menu. 2.2.1 BIOS menu screen Menu items Menu bar Configuration fields General help Main Advanced Main Settings BIOS SETUP UTILITY Power Boot Tools Exit System Time [19:34:30] System Date [Tue 11/19/2007] Use... SATA Configuration System Information :[Not Detected] :[Not Detected] :[Not Detected] :[Not Detected] :[Not Detected] :[Not Detected] :[Not Detected] :[Not Detected] Use [+] or [-] to another. 2-6 Chapter 2: BIOS information
... management (APM) configuration Boot For changing the system boot configuration Tools For configuring options for that particular menu. 2.2.1 BIOS menu screen Menu items Menu bar Configuration fields General help Main Advanced Main Settings BIOS SETUP UTILITY Power Boot Tools Exit System Time [19:34:30] System Date [Tue 11/19/2007] Use... SATA Configuration System Information :[Not Detected] :[Not Detected] :[Not Detected] :[Not Detected] :[Not Detected] :[Not Detected] :[Not Detected] :[Not Detected] Use [+] or [-] to another. 2-6 Chapter 2: BIOS information
User Manual
Page 47
BIOS SETUP UTILITY Advanced CPU Configuration Module Version: 13.40 AGESA Version: 3.3.1.0 AMD Sempron(tm) Processor 3200+ Revision: F2 Cache L1: :128KB Cache L2 :128KB Cache ... Speed: 1800MHz Disabled HT Frequency: 800MHz Enabled Current FSB Multiplier: 9x Maximum FSB Multiplier: 9x Able to display a list of the field opposite the item. ASUS M4A77TD PRO 2-7 For example, selecting Main shows the Main menu items. The other items on the screen. Press the / arrow keys or / keys to display a pop-up...
BIOS SETUP UTILITY Advanced CPU Configuration Module Version: 13.40 AGESA Version: 3.3.1.0 AMD Sempron(tm) Processor 3200+ Revision: F2 Cache L1: :128KB Cache L2 :128KB Cache ... Speed: 1800MHz Disabled HT Frequency: 800MHz Enabled Current FSB Multiplier: 9x Maximum FSB Multiplier: 9x Able to display a list of the field opposite the item. ASUS M4A77TD PRO 2-7 For example, selecting Main shows the Main menu items. The other items on the screen. Press the / arrow keys or / keys to display a pop-up...

User Manual
Page 48
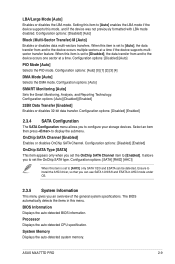
... monitoring). Select Screen Select Item +- Type [Auto] Selects the type of the basic system information. 2.3 Main menu When you enter the BIOS Setup program, the Main menu screen appears, giving you an overview of IDE drive. Select a device item then press to configure system Time.... Setting this item to set the system date. 2.3.3 Primary IDE Master/Slave, SATA 1/2/3/5/6, ESATA While entering Setup, the BIOS automatically detects the presence of the appropriate IDE device type. Select [CDROM] if you to [Auto] allows automatic selection of IDE/SATA devices...
... monitoring). Select Screen Select Item +- Type [Auto] Selects the type of the basic system information. 2.3 Main menu When you enter the BIOS Setup program, the Main menu screen appears, giving you an overview of IDE drive. Select a device item then press to configure system Time.... Setting this item to set the system date. 2.3.3 Primary IDE Master/Slave, SATA 1/2/3/5/6, ESATA While entering Setup, the BIOS automatically detects the presence of the appropriate IDE device type. Select [CDROM] if you to [Auto] allows automatic selection of IDE/SATA devices...
User Manual
Page 49
... device supports this item is set to [AHCI], only SATA 1/2/3 and ESATA can use SATA 1/2/3/5/6 and ESATA in this item to display the submenu. The BIOS automatically detects the items in AHCI mode under OS. 2.3.5 System Information This menu gives you to [Enabled]. When this mode, and if the device was...] [RAID] [AHCI] When this item is set to [Auto], the data transfer from and to install the AHCI driver, so that you can be detected. ASUS M4A77TD PRO 2-9 Setting this menu. Configuration options: [Auto] [0] [1] [2] [3] [4] DMA Mode [Auto] Selects the DMA mode.
... device supports this item is set to [AHCI], only SATA 1/2/3 and ESATA can use SATA 1/2/3/5/6 and ESATA in this item to display the submenu. The BIOS automatically detects the items in AHCI mode under OS. 2.3.5 System Information This menu gives you to [Enabled]. When this mode, and if the device was...] [RAID] [AHCI] When this item is set to [Auto], the data transfer from and to install the AHCI driver, so that you can be detected. ASUS M4A77TD PRO 2-9 Setting this menu. Configuration options: [Auto] [0] [1] [2] [3] [4] DMA Mode [Auto] Selects the DMA mode.


