
User Manual
Page 1
Motherboard
Motherboard

User Manual
Page 1
M3N72-D Motherboard
M3N72-D Motherboard
User Manual
Page 3
......iii Notices...vii Safety information viii About this guide ix M3N72-D specifications summary xi Chapter 1: Product introduction 1.1 Welcome 1-1 1.2 Package contents 1-1 1.3 Special features 1-2 1.3.1 Product highlights 1-2 1.3.2 ASUS unique features 1-4 1.3.3 ASUS intelligent performance and overclocking features 1-6 Chapter 2: Hardware information 2.1 Before you proceed 2-1 2.2 Motherboard overview 2-2 2.2.1 Placement direction 2-2 2.2.2 Screw holes 2-2 2.2.3 Motherboard layout 2-3 2.2.4 Layout contents 2-4 2.3 Central Processing Unit (CPU 2-6 2.3.1 Installing the...
......iii Notices...vii Safety information viii About this guide ix M3N72-D specifications summary xi Chapter 1: Product introduction 1.1 Welcome 1-1 1.2 Package contents 1-1 1.3 Special features 1-2 1.3.1 Product highlights 1-2 1.3.2 ASUS unique features 1-4 1.3.3 ASUS intelligent performance and overclocking features 1-6 Chapter 2: Hardware information 2.1 Before you proceed 2-1 2.2 Motherboard overview 2-2 2.2.1 Placement direction 2-2 2.2.2 Screw holes 2-2 2.2.3 Motherboard layout 2-3 2.2.4 Layout contents 2-4 2.3 Central Processing Unit (CPU 2-6 2.3.1 Installing the...

User Manual
Page 8
...are unplugged before the signal cables are not damaged. If you add a device. • Before connecting or removing signal cables from the motherboard, ensure that all power cables are using, contact your power supply is broken, do not try to fix it , carefully read all ... adpater or extension cord. Do not place the product in your retailer. This symbol of electronic products. Operation safety • Before installing the motherboard and adding devices on a stable surface. • If you are unplugged. • Seek professional assistance before using the product, make sure...
...are unplugged before the signal cables are not damaged. If you add a device. • Before connecting or removing signal cables from the motherboard, ensure that all power cables are using, contact your power supply is broken, do not try to fix it , carefully read all ... adpater or extension cord. Do not place the product in your retailer. This symbol of electronic products. Operation safety • Before installing the motherboard and adding devices on a stable surface. • If you are unplugged. • Seek professional assistance before using the product, make sure...
User Manual
Page 9
...system components. How this guide This user guide contains the information you have been added by your dealer. ASUS websites The ASUS website provides updated information on the motherboard. • Chapter 3: Powering up This chapter describes the power up sequence and ways of the support... DVD that comes with the motherboard package and the software. • Chapter 6: nVIDIA Hybrid SLI™ support This chapter describes...
...system components. How this guide This user guide contains the information you have been added by your dealer. ASUS websites The ASUS website provides updated information on the motherboard. • Chapter 3: Powering up This chapter describes the power up sequence and ways of the support... DVD that comes with the motherboard package and the software. • Chapter 6: nVIDIA Hybrid SLI™ support This chapter describes...

User Manual
Page 15
This chapter describes the motherboard features and the new technologies it supports. Chapter 1: 1Product introduction
This chapter describes the motherboard features and the new technologies it supports. Chapter 1: 1Product introduction
User Manual
Page 17
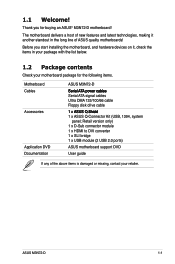
... is damaged or missing, contact your motherboard package for buying an ASUS® M3N72-D motherboard! ASUS M3N72-D 1-1 Retail version only) 1 x D-Sub connector module 1 x HDMI to DVI converter 1 x SLI bridge 1 x USB module (2 USB 2.0 ports) Application DVD ASUS motherboard support DVD Documentation User guide If any of ASUS quality motherboards! 1.1 Welcome! Before you for the following items. Motherboard ASUS M3N72-D Cables S�e��ri...
... is damaged or missing, contact your motherboard package for buying an ASUS® M3N72-D motherboard! ASUS M3N72-D 1-1 Retail version only) 1 x D-Sub connector module 1 x HDMI to DVI converter 1 x SLI bridge 1 x USB module (2 USB 2.0 ports) Application DVD ASUS motherboard support DVD Documentation User guide If any of ASUS quality motherboards! 1.1 Welcome! Before you for the following items. Motherboard ASUS M3N72-D Cables S�e��ri...
User Manual
Page 18
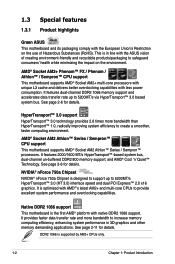
.... DDR2 1066 is designed to support up to increase memory computing efficiency, enhancing system performance in line with the ASUS vision of Hazardous Substances (RoHS). 1.3 Special features 1.3.1 Product highlights Green ASUS This motherboard and its packaging comply with native DDR2 1066 support. It is in 3D graphics and other memory demanding applications. AMD...
.... DDR2 1066 is designed to support up to increase memory computing efficiency, enhancing system performance in line with the ASUS vision of Hazardous Substances (RoHS). 1.3 Special features 1.3.1 Product highlights Green ASUS This motherboard and its packaging comply with native DDR2 1066 support. It is in 3D graphics and other memory demanding applications. AMD...
User Manual
Page 19
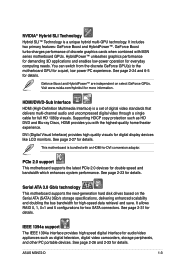
...See page 2-27 for audio/video appliances such as HD DVD and Blu-ray Discs, HDMI provides you with M3N series motherboard GPUs. See page 2-23 for double speed and bandwidth which enhances system performance. NVIDIA® Hybrid SLI Technology Hybrid SLI...2.0 support This motherboard supports the latest PCIe 2.0 devices for details. See page 2-24 and 6-5 for more information. Visit www.nvidia.com/hybridsli for details. HybridPower™ unleashes graphics performance for demanding 3D applications and enables low-power operation for details. ASUS M3N72-D 1-3 Geforce ...
...See page 2-27 for audio/video appliances such as HD DVD and Blu-ray Discs, HDMI provides you with M3N series motherboard GPUs. See page 2-23 for double speed and bandwidth which enhances system performance. NVIDIA® Hybrid SLI Technology Hybrid SLI...2.0 support This motherboard supports the latest PCIe 2.0 devices for details. See page 2-24 and 6-5 for more information. Visit www.nvidia.com/hybridsli for details. HybridPower™ unleashes graphics performance for demanding 3D applications and enables low-power operation for details. ASUS M3N72-D 1-3 Geforce ...
User Manual
Page 20
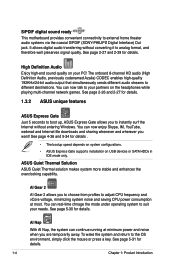
...page 4-36 and 5-34 for details. 1-4 Chapter 1: Product Introduction S/PDIF digital sound ready This motherboard provides convenient connectivity to boot up, ASUS Express Gate allows you want! ASUS Quiet Thermal Solution ASUS Quiet Thermal solution makes system more stable and enhances the overclocking capability. You can now enjoy Skype, ... it to suit your PC! See page 5-31 for details . • The bootup speed depends on system configurations. • ASUS Express Gate supports installation on USB devices or SATA HDDs in IDE mode only. See page 2-26 and 2-27 for details...
...page 4-36 and 5-34 for details. 1-4 Chapter 1: Product Introduction S/PDIF digital sound ready This motherboard provides convenient connectivity to boot up, ASUS Express Gate allows you want! ASUS Quiet Thermal Solution ASUS Quiet Thermal solution makes system more stable and enhances the overclocking capability. You can now enjoy Skype, ... it to suit your PC! See page 5-31 for details . • The bootup speed depends on system configurations. • ASUS Express Gate supports installation on USB devices or SATA HDDs in IDE mode only. See page 2-26 and 2-27 for details...
User Manual
Page 21
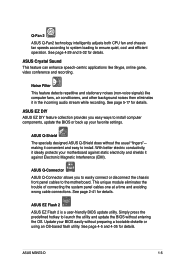
...hotkey to launch the utility and update the BIOS without the usual "fingers"- ASUS Q-Connector ASUS Q-Connector allows you easy ways to the motherboard. See page 4-5 and 4-35 for details. Q-Fan 2 ASUS Q-Fan2 technology intelligently adjusts both CPU fan and chassis fan speeds according to ...utility. ASUS M3N72-D 1-5 This unique module eliminates the trouble of connecting the system panel cables one at a time and avoiding wrong cable connections. See page 5-17 for details. See page 2-41 for details. See page 4-29 and 5-32 for details. Update your motherboard against ...
...hotkey to launch the utility and update the BIOS without the usual "fingers"- ASUS Q-Connector ASUS Q-Connector allows you easy ways to the motherboard. See page 4-5 and 4-35 for details. Q-Fan 2 ASUS Q-Fan2 technology intelligently adjusts both CPU fan and chassis fan speeds according to ...utility. ASUS M3N72-D 1-5 This unique module eliminates the trouble of connecting the system panel cables one at a time and avoiding wrong cable connections. See page 5-17 for details. See page 2-41 for details. See page 4-29 and 5-32 for details. Update your motherboard against ...

User Manual
Page 22
... drivers are already installed, as well as those that are not. AI Booster The ASUS AI Booster allows you to overclock the CPU speed in Windows environment without the hassle of the motherboard BIOS allows automatic re-setting to the BIOS default settings in case the system hangs ...due to overclocking. C.P.R. (CPU Parameter Recall) The C.P.R. feature of booting the BIOS. eliminates the need to achieve maximum system performance. When using ASUS PC Probe II, you to...
... drivers are already installed, as well as those that are not. AI Booster The ASUS AI Booster allows you to overclock the CPU speed in Windows environment without the hassle of the motherboard BIOS allows automatic re-setting to the BIOS default settings in case the system hangs ...due to overclocking. C.P.R. (CPU Parameter Recall) The C.P.R. feature of booting the BIOS. eliminates the need to achieve maximum system performance. When using ASUS PC Probe II, you to...
User Manual
Page 23
Chapter 2: 2 Hardware information This chapter lists the hardware setup procedures that you have to perform when installing system components. It includes description of the jumpers and connectors on the motherboard.
Chapter 2: 2 Hardware information This chapter lists the hardware setup procedures that you have to perform when installing system components. It includes description of the jumpers and connectors on the motherboard.
User Manual
Page 24
Chapter summary 2 2.1 Before you proceed 2-1 2.2 Motherboard overview 2-2 2.3 Central Processing Unit (CPU 2-6 2.4 System memory 2-11 2.5 Expansion slots 2-21 2.6 Jumper 2-25 2.7 Connectors 2-26 ASUS M3N72-D
Chapter summary 2 2.1 Before you proceed 2-1 2.2 Motherboard overview 2-2 2.3 Central Processing Unit (CPU 2-6 2.4 System memory 2-11 2.5 Expansion slots 2-21 2.6 Jumper 2-25 2.7 Connectors 2-26 ASUS M3N72-D
User Manual
Page 25
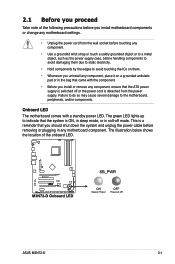
.... • Whenever you uninstall any component, place it on a grounded antistatic pad or in any motherboard settings. • Unplug the power cord from the power supply. Onboard LED The motherboard comes with the component. • Before you install or remove any component, ensure that the system... ATX power supply is detached from the wall socket before touching any component. • Use a grounded wrist strap or touch a safely grounded object or to a metal object, such as the power supply case, before removing or plugging in the bag that came with a standby power LED. ASUS M3N72...
.... • Whenever you uninstall any component, place it on a grounded antistatic pad or in any motherboard settings. • Unplug the power cord from the power supply. Onboard LED The motherboard comes with the component. • Before you install or remove any component, ensure that the system... ATX power supply is detached from the wall socket before touching any component. • Use a grounded wrist strap or touch a safely grounded object or to a metal object, such as the power supply case, before removing or plugging in the bag that came with a standby power LED. ASUS M3N72...
User Manual
Page 26
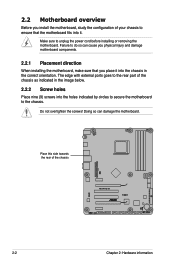
... overtighten the screws! Place this side towards the rear of your chassis to unplug the power cord before installing or removing the motherboard. The edge with external ports goes to the rear part of the chassis as indicated in the image below. 2.2.2 Screw holes... can cause you physical injury and damage motherboard components. 2.2.1 Placement direction When installing the motherboard, make sure that the motherboard fits into it into the holes indicated by circles to secure the motherboard to do so can damage the motherboard. 2.2 Motherboard overview Before you place it . Make ...
... overtighten the screws! Place this side towards the rear of your chassis to unplug the power cord before installing or removing the motherboard. The edge with external ports goes to the rear part of the chassis as indicated in the image below. 2.2.2 Screw holes... can cause you physical injury and damage motherboard components. 2.2.1 Placement direction When installing the motherboard, make sure that the motherboard fits into it into the holes indicated by circles to secure the motherboard to do so can damage the motherboard. 2.2 Motherboard overview Before you place it . Make ...
User Manual
Page 27
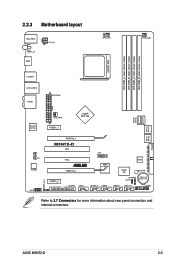
2.2.3 Motherboard layout Refer to 2.7 Connectors for more information about rear panel connectors and internal connectors. ASUS M3N72-D 2-3
2.2.3 Motherboard layout Refer to 2.7 Connectors for more information about rear panel connectors and internal connectors. ASUS M3N72-D 2-3
User Manual
Page 30
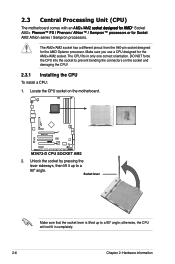
... AM2+/AM2 socket. Unlock the socket by pressing the lever sideways, then lift it up to prevent bending the connectors on the motherboard. 2. 2.3 Central Processing Unit (CPU) The motherboard comes with an �A�M�2��+�/A��M�2���s��o��c��k��...
... AM2+/AM2 socket. Unlock the socket by pressing the lever sideways, then lift it up to prevent bending the connectors on the motherboard. 2. 2.3 Central Processing Unit (CPU) The motherboard comes with an �A�M�2��+�/A��M�2���s��o��c��k��...
User Manual
Page 32
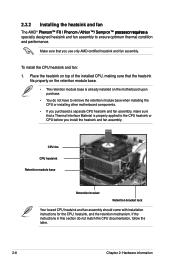
..., making sure that the heatsink fits properly on the retention module base. • The retention module base is already installed on the motherboard upon purchase. • You do not match the CPU documentation, follow the latter. 2-8 Chapter 2: Hardware information If the instructions in... this section do not have to remove the retention module base when installing the CPU or installing other motherboard components. • If you purchased a separate CPU heatsink and fan assembly, make sure that you install the heatsink and fan assembly....
..., making sure that the heatsink fits properly on the retention module base. • The retention module base is already installed on the motherboard upon purchase. • You do not match the CPU documentation, follow the latter. 2-8 Chapter 2: Hardware information If the instructions in... this section do not have to remove the retention module base when installing the CPU or installing other motherboard components. • If you purchased a separate CPU heatsink and fan assembly, make sure that you install the heatsink and fan assembly....
User Manual
Page 34
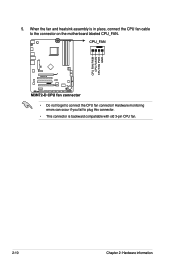
5. Hardware monitoring errors can occur if you fail to connect the CPU fan connector! When the fan and heatsink assembly is in place, connect the CPU fan cable to the connector on the motherboard labeled CPU_FAN. • Do not forget to plug this connector. • This connector is backward compatiable with old 3-pin CPU fan. 2-10 Chapter 2: Hardware information
5. Hardware monitoring errors can occur if you fail to connect the CPU fan connector! When the fan and heatsink assembly is in place, connect the CPU fan cable to the connector on the motherboard labeled CPU_FAN. • Do not forget to plug this connector. • This connector is backward compatiable with old 3-pin CPU fan. 2-10 Chapter 2: Hardware information


