
User Manual
Page 1
Motherboard
Motherboard

User Manual
Page 1
M3N72-D Motherboard
M3N72-D Motherboard
User Manual
Page 3
......iii Notices...vii Safety information viii About this guide ix M3N72-D specifications summary xi Chapter 1: Product introduction 1.1 Welcome 1-1 1.2 Package contents 1-1 1.3 Special features 1-2 1.3.1 Product highlights 1-2 1.3.2 ASUS unique features 1-4 1.3.3 ASUS intelligent performance and overclocking features 1-6 Chapter 2: Hardware information 2.1 Before you proceed 2-1 2.2 Motherboard overview 2-2 2.2.1 Placement direction 2-2 2.2.2 Screw holes 2-2 2.2.3 Motherboard layout 2-3 2.2.4 Layout contents 2-4 2.3 Central Processing Unit (CPU 2-6 2.3.1 Installing the...
......iii Notices...vii Safety information viii About this guide ix M3N72-D specifications summary xi Chapter 1: Product introduction 1.1 Welcome 1-1 1.2 Package contents 1-1 1.3 Special features 1-2 1.3.1 Product highlights 1-2 1.3.2 ASUS unique features 1-4 1.3.3 ASUS intelligent performance and overclocking features 1-6 Chapter 2: Hardware information 2.1 Before you proceed 2-1 2.2 Motherboard overview 2-2 2.2.1 Placement direction 2-2 2.2.2 Screw holes 2-2 2.2.3 Motherboard layout 2-3 2.2.4 Layout contents 2-4 2.3 Central Processing Unit (CPU 2-6 2.3.1 Installing the...

User Manual
Page 8
... waste. If you are not sure about the voltage of the electrical outlet you add a device. • Before connecting or removing signal cables from the motherboard, ensure that came with the product, contact a qualified service technician or your retailer. Operation safety • Before installing the...
... waste. If you are not sure about the voltage of the electrical outlet you add a device. • Before connecting or removing signal cables from the motherboard, ensure that came with the product, contact a qualified service technician or your retailer. Operation safety • Before installing the...
User Manual
Page 9
...and software products. Where to find more information Refer to change system settings through the BIOS Setup menus. ASUS websites The ASUS website provides updated information on the motherboard. • Chapter 3: Powering up This chapter describes the power up sequence and ways of shutting down... installing system components. These documents are also provided. • Chapter 5: Software support This chapter describes the contents of the motherboard and the new technology it supports. • Chapter 2: Hardware information This chapter lists the hardware setup procedures that you need...
...and software products. Where to find more information Refer to change system settings through the BIOS Setup menus. ASUS websites The ASUS website provides updated information on the motherboard. • Chapter 3: Powering up This chapter describes the power up sequence and ways of shutting down... installing system components. These documents are also provided. • Chapter 5: Software support This chapter describes the contents of the motherboard and the new technology it supports. • Chapter 2: Hardware information This chapter lists the hardware setup procedures that you need...

User Manual
Page 15
Chapter 1: 1Product introduction This chapter describes the motherboard features and the new technologies it supports.
Chapter 1: 1Product introduction This chapter describes the motherboard features and the new technologies it supports.
User Manual
Page 17
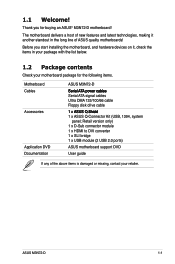
Before you for the following items. Motherboard ASUS M3N72-D Cables S�e��ri��al��A��TA�p�o�w�er�c�ab�le�s Serial ...
Before you for the following items. Motherboard ASUS M3N72-D Cables S�e��ri��al��A��TA�p�o�w�er�c�ab�le�s Serial ...
User Manual
Page 18
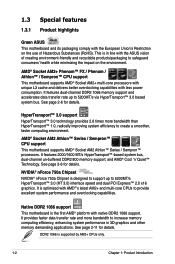
... than HyperTransport™ 1.0, radically improving system efficiency to increase memory computing efficiency, enhancing system performance in line with the ASUS vision of Hazardous Substances (RoHS). It features dual-channel DDR2 1066 memory support and accelerates data transfer rate up to...of creating environment-friendly and recyclable products/packaging to provide excellent system performance and overclocking capabilities. Native DDR2 1066 support This motherboard is supported by AM2+ CPUs only. 1-2 Chapter 1: Product Introduction DDR2 1066 is the first AMD® platform with...
... than HyperTransport™ 1.0, radically improving system efficiency to increase memory computing efficiency, enhancing system performance in line with the ASUS vision of Hazardous Substances (RoHS). It features dual-channel DDR2 1066 memory support and accelerates data transfer rate up to...of creating environment-friendly and recyclable products/packaging to provide excellent system performance and overclocking capabilities. Native DDR2 1066 support This motherboard is supported by AM2+ CPUs only. 1-2 Chapter 1: Product Introduction DDR2 1066 is the first AMD® platform with...
User Manual
Page 19
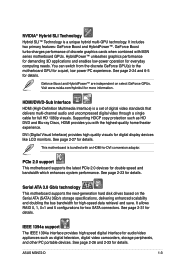
...1080p visuals. You can switch from the discrete GeForce GPU(s) to -DVI conversion adaptor. Serial ATA 3.0 Gb/s technology This motherboard supports the next-generation hard disk drives based on select GeForce GPUs. Geforce Boost and HybridPower™ are independent on the... save. ASUS M3N72-D 1-3 It includes two primary features: GeForce Boost and HybridPower™. HybridPower™ unleashes graphics performance for demanding 3D applications and enables low-power operation for details. See page 2-27 for everyday computing needs. PCIe 2.0 support This motherboard supports the...
...1080p visuals. You can switch from the discrete GeForce GPU(s) to -DVI conversion adaptor. Serial ATA 3.0 Gb/s technology This motherboard supports the next-generation hard disk drives based on select GeForce GPUs. Geforce Boost and HybridPower™ are independent on the... save. ASUS M3N72-D 1-3 It includes two primary features: GeForce Boost and HybridPower™. HybridPower™ unleashes graphics performance for demanding 3D applications and enables low-power operation for details. See page 2-27 for everyday computing needs. PCIe 2.0 support This motherboard supports the...
User Manual
Page 20
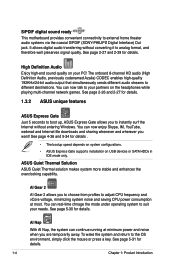
...See page 2-26 and 2-27 for details. 1.3.2 ASUS unique features ASUS Express Gate Just 5 seconds to boot up, ASUS Express Gate allows you to choose from profiles to your PC! ASUS Quiet Thermal Solution ASUS Quiet Thermal solution makes system more stable and enhances ...details . • The bootup speed depends on system configurations. • ASUS Express Gate supports installation on the headphones while playing multi-channel network games. S/PDIF digital sound ready This motherboard provides convenient connectivity to analog format, and therefore well preserves signal quality....
...See page 2-26 and 2-27 for details. 1.3.2 ASUS unique features ASUS Express Gate Just 5 seconds to boot up, ASUS Express Gate allows you to choose from profiles to your PC! ASUS Quiet Thermal Solution ASUS Quiet Thermal solution makes system more stable and enhances ...details . • The bootup speed depends on system configurations. • ASUS Express Gate supports installation on the headphones while playing multi-channel network games. S/PDIF digital sound ready This motherboard provides convenient connectivity to analog format, and therefore well preserves signal quality....
User Manual
Page 21
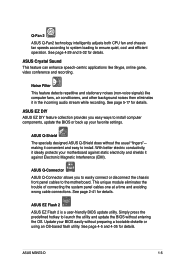
... the chassis front panel cables to the motherboard. ASUS Q-Connector ASUS Q-Connector allows you easy ways to install. ASUS EZ Flash 2 ASUS EZ Flash 2 is a user-friendly BIOS update utility. See page 4-5 and 4-35 for details. ASUS Crystal Sound This feature can enhance speech-centric...your BIOS easily without the usual "fingers"- Simply press the predefined hotkey to ensure quiet, cool and efficient operation. ASUS M3N72-D 1-5 Q-Fan 2 ASUS Q-Fan2 technology intelligently adjusts both CPU fan and chassis fan speeds according to system loading to launch the utility and...
... the chassis front panel cables to the motherboard. ASUS Q-Connector ASUS Q-Connector allows you easy ways to install. ASUS EZ Flash 2 ASUS EZ Flash 2 is a user-friendly BIOS update utility. See page 4-5 and 4-35 for details. ASUS Crystal Sound This feature can enhance speech-centric...your BIOS easily without the usual "fingers"- Simply press the predefined hotkey to ensure quiet, cool and efficient operation. ASUS M3N72-D 1-5 Q-Fan 2 ASUS Q-Fan2 technology intelligently adjusts both CPU fan and chassis fan speeds according to system loading to launch the utility and...

User Manual
Page 22
... the BIOS. eliminates the need to overclocking, C.P.R. When the system hangs due to open the system chassis and clear the RTC data. ASUS MyLogo 2™ This feature allows you can easily monitor the critical components of the computer. C.P.R. (CPU Parameter Recall) The C.P.R. Simply ... photo into a 256-color boot logo for details. 1.3.3 ASUS intelligent performance and overclocking features Precision Tweaker This feature allows you to overclock the CPU speed in Windows environment without the hassle of the motherboard BIOS allows automatic re-setting to the BIOS default settings in...
... the BIOS. eliminates the need to overclocking, C.P.R. When the system hangs due to open the system chassis and clear the RTC data. ASUS MyLogo 2™ This feature allows you can easily monitor the critical components of the computer. C.P.R. (CPU Parameter Recall) The C.P.R. Simply ... photo into a 256-color boot logo for details. 1.3.3 ASUS intelligent performance and overclocking features Precision Tweaker This feature allows you to overclock the CPU speed in Windows environment without the hassle of the motherboard BIOS allows automatic re-setting to the BIOS default settings in...
User Manual
Page 23
It includes description of the jumpers and connectors on the motherboard. This chapter lists the hardware setup procedures that you have to perform when installing system components. Chapter 2: 2 Hardware information
It includes description of the jumpers and connectors on the motherboard. This chapter lists the hardware setup procedures that you have to perform when installing system components. Chapter 2: 2 Hardware information
User Manual
Page 24
Chapter summary 2 2.1 Before you proceed 2-1 2.2 Motherboard overview 2-2 2.3 Central Processing Unit (CPU 2-6 2.4 System memory 2-11 2.5 Expansion slots 2-21 2.6 Jumper 2-25 2.7 Connectors 2-26 ASUS M3N72-D
Chapter summary 2 2.1 Before you proceed 2-1 2.2 Motherboard overview 2-2 2.3 Central Processing Unit (CPU 2-6 2.4 System memory 2-11 2.5 Expansion slots 2-21 2.6 Jumper 2-25 2.7 Connectors 2-26 ASUS M3N72-D
User Manual
Page 25
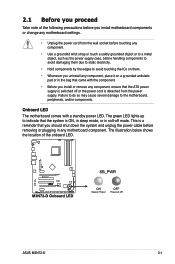
...grounded object or to a metal object, such as the power supply case, before removing or plugging in soft‑off mode. ASUS M3N72-D 2-1 The green LED lights up to the motherboard, peripherals, and/or components. This is a reminder that you should shut down the system and unplug the power cable before ... you uninstall any component, place it on a grounded antistatic pad or in the bag that the ATX power supply is switched off or the power cord is ON, in sleep mode, or in any motherboard settings. • Unplug the power cord from the power supply. 2.1 Before you proceed Take note...
...grounded object or to a metal object, such as the power supply case, before removing or plugging in soft‑off mode. ASUS M3N72-D 2-1 The green LED lights up to the motherboard, peripherals, and/or components. This is a reminder that you should shut down the system and unplug the power cable before ... you uninstall any component, place it on a grounded antistatic pad or in the bag that the ATX power supply is switched off or the power cord is ON, in sleep mode, or in any motherboard settings. • Unplug the power cord from the power supply. 2.1 Before you proceed Take note...
User Manual
Page 26
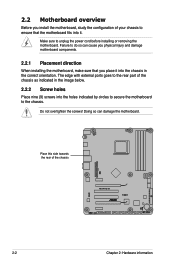
... the configuration of your chassis to ensure that you physical injury and damage motherboard components. 2.2.1 Placement direction When installing the motherboard, make sure that the motherboard fits into it into the holes indicated by circles to secure the motherboard to the chassis. Do not overtighten the screws! Doing so can cause you place it...
... the configuration of your chassis to ensure that you physical injury and damage motherboard components. 2.2.1 Placement direction When installing the motherboard, make sure that the motherboard fits into it into the holes indicated by circles to secure the motherboard to the chassis. Do not overtighten the screws! Doing so can cause you place it...
User Manual
Page 27
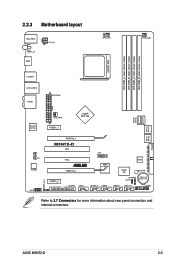
2.2.3 Motherboard layout Refer to 2.7 Connectors for more information about rear panel connectors and internal connectors. ASUS M3N72-D 2-3
2.2.3 Motherboard layout Refer to 2.7 Connectors for more information about rear panel connectors and internal connectors. ASUS M3N72-D 2-3
User Manual
Page 30
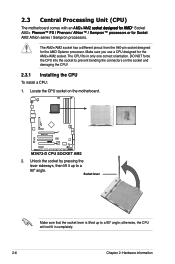
...socket has a different pinout from the 940-pin socket designed for the AM2+/AM2 socket. 2.3 Central Processing Unit (CPU) The motherboard comes with an �A�M�2��+�/A��M�2���s��o��c��k�&#...To install a CPU: 1. Unlock the socket by pressing the lever sideways, then lift it up to prevent bending the connectors on the motherboard. 2. DO NOT force the CPU into the socket to a 90º angle; otherwise, the CPU will not fit in only one correct orientation...
...socket has a different pinout from the 940-pin socket designed for the AM2+/AM2 socket. 2.3 Central Processing Unit (CPU) The motherboard comes with an �A�M�2��+�/A��M�2���s��o��c��k�&#...To install a CPU: 1. Unlock the socket by pressing the lever sideways, then lift it up to prevent bending the connectors on the motherboard. 2. DO NOT force the CPU into the socket to a 90º angle; otherwise, the CPU will not fit in only one correct orientation...
User Manual
Page 32
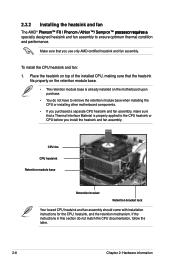
Make sure that a Thermal Interface Material is already installed on the motherboard upon purchase. • You do not match the CPU documentation, follow the latter. 2-8 Chapter 2: Hardware information Place the heatsink on top of the installed CPU, ...;e��s���a� specially designed heatsink and fan assembly to remove the retention module base when installing the CPU or installing other motherboard components. • If you purchased a separate CPU heatsink and fan assembly, make sure that you install the heatsink and fan assembly.
Make sure that a Thermal Interface Material is already installed on the motherboard upon purchase. • You do not match the CPU documentation, follow the latter. 2-8 Chapter 2: Hardware information Place the heatsink on top of the installed CPU, ...;e��s���a� specially designed heatsink and fan assembly to remove the retention module base when installing the CPU or installing other motherboard components. • If you purchased a separate CPU heatsink and fan assembly, make sure that you install the heatsink and fan assembly.
User Manual
Page 34
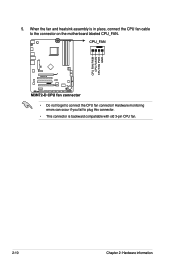
5. Hardware monitoring errors can occur if you fail to plug this connector. • This connector is in place, connect the CPU fan cable to the connector on the motherboard labeled CPU_FAN. • Do not forget to connect the CPU fan connector! When the fan and heatsink assembly is backward compatiable with old 3-pin CPU fan. 2-10 Chapter 2: Hardware information
5. Hardware monitoring errors can occur if you fail to plug this connector. • This connector is in place, connect the CPU fan cable to the connector on the motherboard labeled CPU_FAN. • Do not forget to connect the CPU fan connector! When the fan and heatsink assembly is backward compatiable with old 3-pin CPU fan. 2-10 Chapter 2: Hardware information


