User Manual
Page 6
... ASUS Q-Fan 2 5-32 5.3.9 ASUS AI Booster 5-33 5.3.10 ASUS Express Gate 5-34 5.4 RAID configurations 5-42 5.4.1 RAID definitions 5-42 5.4.2 NVIDIA® RAID configurations 5-43 5.5 Creating a RAID driver disk 5-50 5.5.1 Creating a RAID driver disk without entering the OS.... 5-50 5.5.2 Creating a RAID/SATA driver disk in Windows 5-50 Chapter 6: NVIDIA® Hybrid SLI™ technology support 6.1 NVIDIA® SLI™ technology 6-1 6.1.1 Requirements 6-1 6.1.2 Installing two SLI-ready graphics cards 6-1 6.1.3 Installing the device drivers 6-2 6.1.4 Enabling the NVIDIA® SLI...
... ASUS Q-Fan 2 5-32 5.3.9 ASUS AI Booster 5-33 5.3.10 ASUS Express Gate 5-34 5.4 RAID configurations 5-42 5.4.1 RAID definitions 5-42 5.4.2 NVIDIA® RAID configurations 5-43 5.5 Creating a RAID driver disk 5-50 5.5.1 Creating a RAID driver disk without entering the OS.... 5-50 5.5.2 Creating a RAID/SATA driver disk in Windows 5-50 Chapter 6: NVIDIA® Hybrid SLI™ technology support 6.1 NVIDIA® SLI™ technology 6-1 6.1.1 Requirements 6-1 6.1.2 Installing two SLI-ready graphics cards 6-1 6.1.3 Installing the device drivers 6-2 6.1.4 Enabling the NVIDIA® SLI...
User Manual
Page 17
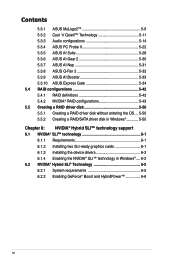
... features and latest technologies, making it , check the items in the long line of the above items is damaged or missing, contact your motherboard package for buying an ASUS® M3N72-D motherboard! Retail version only) 1 x D-Sub connector module 1 x HDMI to DVI converter 1 x SLI bridge 1 x USB module (2 USB 2.0 ports) Application DVD ASUS motherboard support DVD Documentation User guide If any of ASUS quality motherboards! ASUS M3N72-D 1-1 Before you for the following items. Motherboard ASUS M3N72-D Cables S�e��...
... features and latest technologies, making it , check the items in the long line of the above items is damaged or missing, contact your motherboard package for buying an ASUS® M3N72-D motherboard! Retail version only) 1 x D-Sub connector module 1 x HDMI to DVI converter 1 x SLI bridge 1 x USB module (2 USB 2.0 ports) Application DVD ASUS motherboard support DVD Documentation User guide If any of ASUS quality motherboards! ASUS M3N72-D 1-1 Before you for the following items. Motherboard ASUS M3N72-D Cables S�e��...
User Manual
Page 45
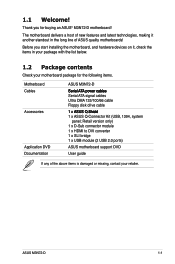
... cards. When using PCI cards on shared slots, ensure that the drivers support "Share IRQ" or that you physical injury and damage motherboard components. 2.5.1 Installing an expansion card To install an expansion card: 1. ASUS M3N72-D 2-21 Assign an IRQ to do not need to the chassis with the slot and press firmly until the card is already installed in a chassis). 3. Failure to the card. Install the software drivers for information on the system and change...
... cards. When using PCI cards on shared slots, ensure that the drivers support "Share IRQ" or that you physical injury and damage motherboard components. 2.5.1 Installing an expansion card To install an expansion card: 1. ASUS M3N72-D 2-21 Assign an IRQ to do not need to the chassis with the slot and press firmly until the card is already installed in a chassis). 3. Failure to the card. Install the software drivers for information on the system and change...
User Manual
Page 51
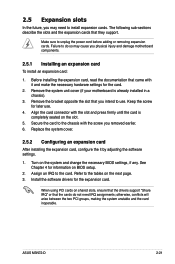
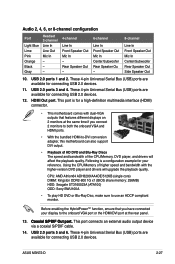
... Port Light Blue Lime Pink Orange Black Gray Headset 2-channel Line In Line Out Mic In - - - 4-channel Line In Front Speaker Out Mic In - These 4-pin Universal Serial Bus (USB) ports are available for connecting USB 2.0 devices. 11. These 4-pin Universal Serial Bus (USB) ports are available for connecting USB 2.0 devices. 12. This port is a configuration example for connecting USB 2.0 devices. This port connects an external audio output device via a coaxial S/PDIF cable. 14. ASUS M3N72-D 2-27 Using the CPU/Memory of the CPU/Memory, DVD player, and drivers will upgrade...
... Port Light Blue Lime Pink Orange Black Gray Headset 2-channel Line In Line Out Mic In - - - 4-channel Line In Front Speaker Out Mic In - These 4-pin Universal Serial Bus (USB) ports are available for connecting USB 2.0 devices. 11. These 4-pin Universal Serial Bus (USB) ports are available for connecting USB 2.0 devices. 12. This port is a configuration example for connecting USB 2.0 devices. This port connects an external audio output device via a coaxial S/PDIF cable. 14. ASUS M3N72-D 2-27 Using the CPU/Memory of the CPU/Memory, DVD player, and drivers will upgrade...
User Manual
Page 55
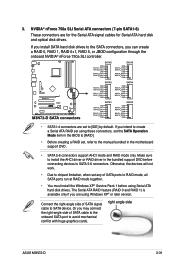
.... • You must install the Windows XP® Service Pack 1 before connecting devices to [IDE] by default. right angle side ASUS M3N72-D 2-31 If you can create a RAID 0, RAID 1, RAID 0+1, RAID 5, or JBOD configuration through the onboard NVIDIA® nForce 750a SLI controller. • SATA1-4 connectors are for the Serial ATA signal cables for Serial ATA hard disk and optical disk drives. Connect the right-angle side of SATA ports to install the AHCI driver or RAID driver in the motherboard support DVD. • SATA 5-6 connectors support AHCI mode and RAID mode only.
.... • You must install the Windows XP® Service Pack 1 before connecting devices to [IDE] by default. right angle side ASUS M3N72-D 2-31 If you can create a RAID 0, RAID 1, RAID 0+1, RAID 5, or JBOD configuration through the onboard NVIDIA® nForce 750a SLI controller. • SATA1-4 connectors are for the Serial ATA signal cables for Serial ATA hard disk and optical disk drives. Connect the right-angle side of SATA ports to install the AHCI driver or RAID driver in the motherboard support DVD. • SATA 5-6 connectors support AHCI mode and RAID mode only.

User Manual
Page 60
... configuration: CPU: AMD FX-62 Memory 1024 MB DDR2-800 (x4) Graphics card: PCI Express x16 NVIDIA 7900GTX Serial ATA device: SATA hard disk drive (x2) Optical drives: DVD-RW 2-36 Chapter 2: Hardware information aspx?SLanguage=en-us for details. • The ATX 12 V Specification 2.0-compliant (500W) PSU has been tested to connect the 4-pin ATX +12 V power plug; otherwise, the system will not boot. • Use of 600 W. • Do not forget to support the motherboard power...
... configuration: CPU: AMD FX-62 Memory 1024 MB DDR2-800 (x4) Graphics card: PCI Express x16 NVIDIA 7900GTX Serial ATA device: SATA hard disk drive (x2) Optical drives: DVD-RW 2-36 Chapter 2: Hardware information aspx?SLanguage=en-us for details. • The ATX 12 V Specification 2.0-compliant (500W) PSU has been tested to connect the 4-pin ATX +12 V power plug; otherwise, the system will not boot. • Use of 600 W. • Do not forget to support the motherboard power...
User Manual
Page 73
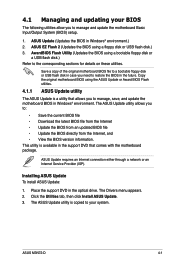
... utilities. ASUS M3N72-D 4-1 The Drivers menu appears. 2. 4.1 Managing and updating your system. Place the support DVD in Windows® environment.) 2. ASUS Update (Updates the BIOS in the optical drive. AwardBIOS Flash Utility (Updates the BIOS using a floppy disk or USB flash disk.) 3. This utility is copied to manage, save, and update the motherboard BIOS in the future. ASUS Update requires an Internet connection either through a network or an Internet Service Provider (ISP). The ASUS Update utility allows you need to : • Save the current BIOS file •...
... utilities. ASUS M3N72-D 4-1 The Drivers menu appears. 2. 4.1 Managing and updating your system. Place the support DVD in Windows® environment.) 2. ASUS Update (Updates the BIOS in the optical drive. AwardBIOS Flash Utility (Updates the BIOS using a floppy disk or USB flash disk.) 3. This utility is copied to manage, save, and update the motherboard BIOS in the future. ASUS Update requires an Internet connection either through a network or an Internet Service Provider (ISP). The ASUS Update utility allows you need to : • Save the current BIOS file •...
User Manual
Page 90
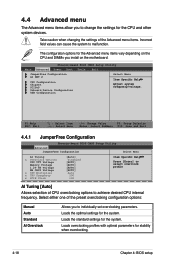
... on the CPU and DIMMs you install on the motherboard. F1:Help ESC: Exit ↑↓ : Select Item →←: Select Menu -/+: Change Value F5: Setup Defaults Enter: Select SubMenu F10: Save and Exit 4.4.1 JumperFree Configuration Phoenix-Award BIOS CMOS Setup Utility Advanced JumperFree Configuration Select Menu AI Tuning x Overclock Options CPU VTT Voltage Memory Voltage 1.2V HT Voltage NB CHIP Voltage x CPU Multiplier x CPU Frequency x PCIE Clock [Auto] Disabled [AUTO] [AUTO] [AUTO] [AUTO] Auto 200 100 Item Specific Help Press [Enter] to select overclock profile AI...
... on the CPU and DIMMs you install on the motherboard. F1:Help ESC: Exit ↑↓ : Select Item →←: Select Menu -/+: Change Value F5: Setup Defaults Enter: Select SubMenu F10: Save and Exit 4.4.1 JumperFree Configuration Phoenix-Award BIOS CMOS Setup Utility Advanced JumperFree Configuration Select Menu AI Tuning x Overclock Options CPU VTT Voltage Memory Voltage 1.2V HT Voltage NB CHIP Voltage x CPU Multiplier x CPU Frequency x PCIE Clock [Auto] Disabled [AUTO] [AUTO] [AUTO] [AUTO] Auto 200 100 Item Specific Help Press [Enter] to select overclock profile AI...
User Manual
Page 93
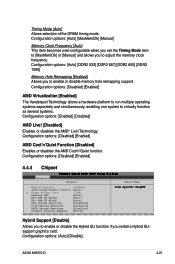
...the Hybrid SLI function if you to enable or disable memory hole remapping support. Configuration options: [Disabled] [Enabled] 4.4.4 Chipset Advanced Phoenix-Award BIOS CMOS Setup Utility Chipset Select Menu Hybrid Support Disable iGPU Frame Buffer Control [Auto] x Frame Buffer Size 128M Onboard GPU [Auto] K8NB HT Speed [Auto] K8NB HT Width [Auto] CPU Spread Spectrum [Disabled] PCIE Spread Spectrum [Disabled] SATA Spread Spectrum [Disabled] Primary Display Adapter [PCI-E] Item Specific Help Hybrid Support [Disable] Allows you install a Hybrid SLIsupport graphics card...
...the Hybrid SLI function if you to enable or disable memory hole remapping support. Configuration options: [Disabled] [Enabled] 4.4.4 Chipset Advanced Phoenix-Award BIOS CMOS Setup Utility Chipset Select Menu Hybrid Support Disable iGPU Frame Buffer Control [Auto] x Frame Buffer Size 128M Onboard GPU [Auto] K8NB HT Speed [Auto] K8NB HT Width [Auto] CPU Spread Spectrum [Disabled] PCIE Spread Spectrum [Disabled] SATA Spread Spectrum [Disabled] Primary Display Adapter [PCI-E] Item Specific Help Hybrid Support [Disable] Allows you install a Hybrid SLIsupport graphics card...
User Manual
Page 96
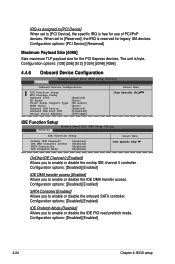
... BIOS CMOS Setup Utility Advanced Onboard Device Configuration Select Menu IDE Function Setup MCP Storage Config Onboard 1394 HD Audio Front Panel Support Type HDMI Audio Onboard LAN Device Onboard LAN Boot ROM Serial Port1 Address [Enabled] [Auto] [HD Audio] [Auto] [Enabled] [Disabled] [3F8/IRQ4] Item Specific Help IDE Function Setup Phoenix-Award BIOS CMOS Setup Utility Advanced IDE Function Setup OnChip IDE Channel0 IDE DMA transfer access SATA Controller IDE Prefetch Mode [Enabled] [Enabled] [Enabled] [Enabled] Select Menu Item Specific Help OnChip IDE Channel...
... BIOS CMOS Setup Utility Advanced Onboard Device Configuration Select Menu IDE Function Setup MCP Storage Config Onboard 1394 HD Audio Front Panel Support Type HDMI Audio Onboard LAN Device Onboard LAN Boot ROM Serial Port1 Address [Enabled] [Auto] [HD Audio] [Auto] [Enabled] [Disabled] [3F8/IRQ4] Item Specific Help IDE Function Setup Phoenix-Award BIOS CMOS Setup Utility Advanced IDE Function Setup OnChip IDE Channel0 IDE DMA transfer access SATA Controller IDE Prefetch Mode [Enabled] [Enabled] [Enabled] [Enabled] Select Menu Item Specific Help OnChip IDE Channel...
User Manual
Page 97
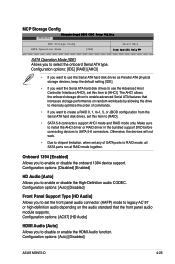
... Controller Interface (AHCI), set this item to [RAID]. • SATA 5-6 connectors support AHCI mode and RAID mode only. Configuration options: [Disabled] [Enabled] HD Audio [Auto] Allows you to select the onboard Serial ATA type. MCP Storage Config Advanced Phoenix-Award BIOS CMOS Setup Utility MCP Storage Config SATA Operation Mode [IDE] Select Menu Item Specific Help SATA Operation Mode [IDE] Allows you to enable or disable the High-Definition audio CODEC. Configuration options: [Auto] [Disabled] ASUS M3N72-D 4-25 The AHCI allows the onboard storage driver to enable...
... Controller Interface (AHCI), set this item to [RAID]. • SATA 5-6 connectors support AHCI mode and RAID mode only. Configuration options: [Disabled] [Enabled] HD Audio [Auto] Allows you to select the onboard Serial ATA type. MCP Storage Config Advanced Phoenix-Award BIOS CMOS Setup Utility MCP Storage Config SATA Operation Mode [IDE] Select Menu Item Specific Help SATA Operation Mode [IDE] Allows you to enable or disable the High-Definition audio CODEC. Configuration options: [Auto] [Disabled] ASUS M3N72-D 4-25 The AHCI allows the onboard storage driver to enable...
User Manual
Page 99
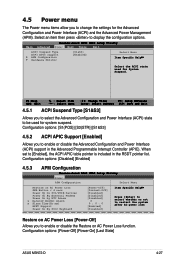
...Interrupt Controller (APIC). Configuration options: [S1(POS)] [S3(STR)] [S1&S3] 4.5.2 ACPI APIC Support [Enabled] Allows you to select the Advanced Configuration and Power Interface (ACPI) state to be used for System Suspend. Configuration options: [Power-Off] [Power-On] [Last State] ASUS M3N72-D 4-27 When set to enable or disable the Advanced Configuration and Power Interface (ACPI) support in the RSDT pointer list. Phoenix-Award BIOS CMOS Setup Utility Main Advanced Power Boot Tools Exit ACPI Suspend Type ACPI APIC support APM Configuration Hardware Monitor [S1&S3] [Enabled...
...Interrupt Controller (APIC). Configuration options: [S1(POS)] [S3(STR)] [S1&S3] 4.5.2 ACPI APIC Support [Enabled] Allows you to select the Advanced Configuration and Power Interface (ACPI) state to be used for System Suspend. Configuration options: [Power-Off] [Power-On] [Last State] ASUS M3N72-D 4-27 When set to enable or disable the Advanced Configuration and Power Interface (ACPI) support in the RSDT pointer list. Phoenix-Award BIOS CMOS Setup Utility Main Advanced Power Boot Tools Exit ACPI Suspend Type ACPI APIC support APM Configuration Hardware Monitor [S1&S3] [Enabled...
User Manual
Page 100
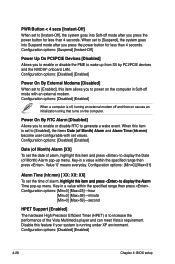
...] To set values. Power On By RTC Alarm [Disabled] Allows you to enable or disable RTC to generate a wake event. Value '0' means everyday. Configuration options: [Disabled] [Enabled] Date (of Month) Alarm pop-up from S5 by PCI/PCIE devices and the NVIDIA® onboard LAN. Configuration options: [Disabled] [Enabled] 4-28 Chapter 4: BIOS setup Configuration options: [Disabled] [Enabled] Power On By External Modems [Disabled] When set to [Instant-Off], the system goes into Suspend mode after you press the power button for...
...] To set values. Power On By RTC Alarm [Disabled] Allows you to enable or disable RTC to generate a wake event. Value '0' means everyday. Configuration options: [Disabled] [Enabled] Date (of Month) Alarm pop-up from S5 by PCI/PCIE devices and the NVIDIA® onboard LAN. Configuration options: [Disabled] [Enabled] 4-28 Chapter 4: BIOS setup Configuration options: [Disabled] [Enabled] Power On By External Modems [Disabled] When set to [Instant-Off], the system goes into Suspend mode after you press the power button for...
User Manual
Page 101
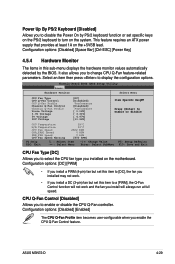
.... Configuration options: [Disabled] [Enabled] The CPU Q-Fan Profile item becomes user-configurable when you to disable the Power On by PS/2 keyboard function or set this sub-menu displays the hardware monitor values automatically detected by the BIOS. It also allows you to a [PWM], the Q-Fan Control function will always run at least 1A on the motherboard. CPU Q-Fan Control [Disabled] Allows you to display the configuration options. This feature requires an ATX power supply that provides at full speed.
.... Configuration options: [Disabled] [Enabled] The CPU Q-Fan Profile item becomes user-configurable when you to disable the Power On by PS/2 keyboard function or set this sub-menu displays the hardware monitor values automatically detected by the BIOS. It also allows you to a [PWM], the Q-Fan Control function will always run at least 1A on the motherboard. CPU Q-Fan Control [Disabled] Allows you to display the configuration options. This feature requires an ATX power supply that provides at full speed.
User Manual
Page 103
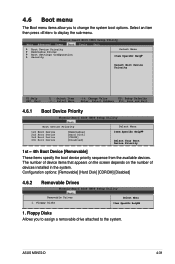
... 1st ~ 4th Boot Device [Removable] These items specify the boot device priority sequence from the available devices. The number of device items that appears on the screen depends on the number of devices installed in the system. Floppy Disks Allows you to change the system boot options. Floppy Disks Item Specific Help 1. Configuration options: [Removable] [Hard Disk] [CDROM] [Disabled] 4.6.2 Removable Drives Phoenix-Award BIOS CMOS Setup Utility Boot Removable Drives Select Menu 1. Select an item then press to display the sub-menu. 4.6 Boot menu The Boot menu items allow...
... 1st ~ 4th Boot Device [Removable] These items specify the boot device priority sequence from the available devices. The number of device items that appears on the screen depends on the number of devices installed in the system. Floppy Disks Allows you to change the system boot options. Floppy Disks Item Specific Help 1. Configuration options: [Removable] [Hard Disk] [CDROM] [Disabled] 4.6.2 Removable Drives Phoenix-Award BIOS CMOS Setup Utility Boot Removable Drives Select Menu 1. Select an item then press to display the sub-menu. 4.6 Boot menu The Boot menu items allow...
User Manual
Page 109
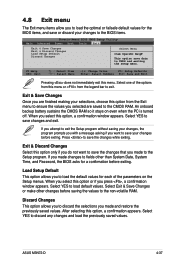
... the values to the non-volatile RAM. 4.8 Exit menu The Exit menu items allow you to load the optimal or failsafe default values for the BIOS items, and save or discard your changes to the BIOS items. Phoenix-Award BIOS CMOS Setup Utility Main Advanced Power Boot Tools Exit Exit & Save Changes Exit & Discard Changes Load Setup Default Discard Changes Select Menu Item Specific Help This option save the changes while exiting. Select one of the...
... the values to the non-volatile RAM. 4.8 Exit menu The Exit menu items allow you to load the optimal or failsafe default values for the BIOS items, and save or discard your changes to the BIOS items. Phoenix-Award BIOS CMOS Setup Utility Main Advanced Power Boot Tools Exit Exit & Save Changes Exit & Discard Changes Load Setup Default Discard Changes Select Menu Item Specific Help This option save the changes while exiting. Select one of the...
User Manual
Page 146
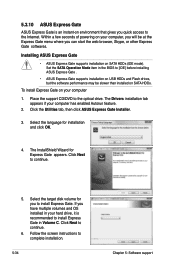
... your hard drive, it is an instant-on environment that gives you quick access to [IDE] before installing ASUS Express Gate . • ASUS Express Gate supports installation on USB HDDs and Flash drives, but the software performance may be at the Express Gate menu where you can start the web browser, Skype, or other Express Gate softwares. Set the SATA Operation Mode item in the BIOS to the Internet. Place the support CD/DVD to install Express Gate. The Drivers installation...
... your hard drive, it is an instant-on environment that gives you quick access to [IDE] before installing ASUS Express Gate . • ASUS Express Gate supports installation on USB HDDs and Flash drives, but the software performance may be at the Express Gate menu where you can start the web browser, Skype, or other Express Gate softwares. Set the SATA Operation Mode item in the BIOS to the Internet. Place the support CD/DVD to install Express Gate. The Drivers installation...
User Manual
Page 155
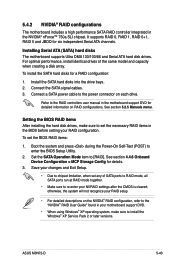
... enter the BIOS Setup Utility. 2. ASUS M3N72-D 5-43 For optimal performance, install identical drives of SATA ports to RAID mode, all SATA ports run at RAID mode together. • Make sure to the RAID controllers user manual in the NVIDIA® nForce™ 750a SLI chipset. See section 4.4.6 Onboard Device Configuration > MCP Storage Config for details. 3. Install the SATA hard disks into the drive bays. 2. Connect the SATA signal cables. 3. See section 5.2.5 Manuals menu. 5.4.2 NVIDIA® RAID configurations The motherboard includes a high performance SATA RAID...
... enter the BIOS Setup Utility. 2. ASUS M3N72-D 5-43 For optimal performance, install identical drives of SATA ports to RAID mode, all SATA ports run at RAID mode together. • Make sure to the RAID controllers user manual in the NVIDIA® nForce™ 750a SLI chipset. See section 4.4.6 Onboard Device Configuration > MCP Storage Config for details. 3. Install the SATA hard disks into the drive bays. 2. Connect the SATA signal cables. 3. See section 5.2.5 Manuals menu. 5.4.2 NVIDIA® RAID configurations The motherboard includes a high performance SATA RAID...
User Manual
Page 162
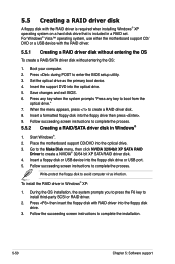
... key to create a RAID driver disk. 8. To install the RAID driver in a RAID set. For Windows® Vista™ operating system, use either the motherboard support CD/ DVD or a USB device with RAID driver into the floppy disk drive. 3. Press during POST to complete the process. Save changes and exit BIOS. 6. Place the motherboard support CD/DVD into the optical drive. 5. Follow succeeding screen instructions to enter the BIOS setup utility. 3. Follow succeeding screen instructions to install third-party SCSI or RAID driver. 2. Set the optical drive as the primary boot device...
... key to create a RAID driver disk. 8. To install the RAID driver in a RAID set. For Windows® Vista™ operating system, use either the motherboard support CD/ DVD or a USB device with RAID driver into the floppy disk drive. 3. Press during POST to complete the process. Save changes and exit BIOS. 6. Place the motherboard support CD/DVD into the optical drive. 5. Follow succeeding screen instructions to enter the BIOS setup utility. 3. Follow succeeding screen instructions to install third-party SCSI or RAID driver. 2. Set the optical drive as the primary boot device...
User Manual
Page 163
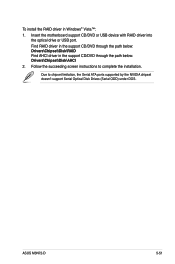
ASUS M3N72-D 5-51 Follow the succeeding screen instructions to chipset limitation, the Serial ATA ports supported by the NVIDIA chipset doesn't support Serial Optical Disk Drives (Serial ODD) under DOS. Find RAID driver in the support CD/DVD through the path below : Drivers\Chipset\Disk\AHCI 2. To install the RAID driver in the support CD/DVD through the path below : Drivers\Chipset\Disk\RAID Find AHCI driver in Windows® Vista™: 1. Due to complete the installation. Insert the motherboard support CD/DVD or USB device with RAID driver into the optical drive or...
ASUS M3N72-D 5-51 Follow the succeeding screen instructions to chipset limitation, the Serial ATA ports supported by the NVIDIA chipset doesn't support Serial Optical Disk Drives (Serial ODD) under DOS. Find RAID driver in the support CD/DVD through the path below : Drivers\Chipset\Disk\AHCI 2. To install the RAID driver in the support CD/DVD through the path below : Drivers\Chipset\Disk\RAID Find AHCI driver in Windows® Vista™: 1. Due to complete the installation. Insert the motherboard support CD/DVD or USB device with RAID driver into the optical drive or...


