
Motherboard DIY Troubleshooting Guide
Page 14
... the computer and perform an smart auto-recovery procedure through the motherboard support CD. See page 2-5. CrashFree BIOS 2 Whenever BIOS gets corrupted, ASUS CrashFree BIOS2 allows users to use a DOS-based utility or boot from a floppy disk. 1.3.2 ASUS unique features EZ Flash BIOS With the ASUS EZ Flash, you to personalize and add style to your...
... the computer and perform an smart auto-recovery procedure through the motherboard support CD. See page 2-5. CrashFree BIOS 2 Whenever BIOS gets corrupted, ASUS CrashFree BIOS2 allows users to use a DOS-based utility or boot from a floppy disk. 1.3.2 ASUS unique features EZ Flash BIOS With the ASUS EZ Flash, you to personalize and add style to your...

Motherboard DIY Troubleshooting Guide
Page 16
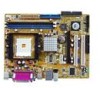
EATXPWR 1.5 Motherboard Overview 1.5.1 Motherboard layout 18.2cm (7.2in) PS/2KBM T: Mouse B: Keyboard COM2 ATX12V CPU_FAN DDR DIMM2 (64 bit,184-pin module) DDR DIMM1 (64 bit,184-pin module) K8V-VM ULTRA Socket 754 PARALLEL PORT VGA PS2_USB_PWR USB12 Bottom: USB3 USB4 Top: RJ-45 Top:Line In... Center:Line Out Below:Mic In ALC660 Super I/O RTL8201CL AAFP CHA_FAN VIA K8M890 PRI_IDE SEC_IDE PCIEX1_1 R CR2032 3V Lithium Cell CMOS Power PCIEX16 4M BIOS USB56 ...
EATXPWR 1.5 Motherboard Overview 1.5.1 Motherboard layout 18.2cm (7.2in) PS/2KBM T: Mouse B: Keyboard COM2 ATX12V CPU_FAN DDR DIMM2 (64 bit,184-pin module) DDR DIMM1 (64 bit,184-pin module) K8V-VM ULTRA Socket 754 PARALLEL PORT VGA PS2_USB_PWR USB12 Bottom: USB3 USB4 Top: RJ-45 Top:Line In... Center:Line Out Below:Mic In ALC660 Super I/O RTL8201CL AAFP CHA_FAN VIA K8M890 PRI_IDE SEC_IDE PCIEX1_1 R CR2032 3V Lithium Cell CMOS Power PCIEX16 4M BIOS USB56 ...
Motherboard DIY Troubleshooting Guide
Page 24
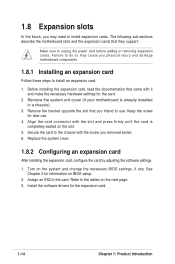
... that came with the slot and press firmly until the card is already installed in a chassis). 3. Remove the system unit cover (if your motherboard is completely seated on the next page. 3. Replace the system cover. 1.8.2 Configuring an expansion card After installing the expansion card, con...the bracket opposite the slot that you may cause you removed earlier. 6. Keep the screw for information on the system and change the necessary BIOS settings, if any. Install the software drivers for the card. 2. Align the card connector with it and make the necessary hardware settings for...
... that came with the slot and press firmly until the card is already installed in a chassis). 3. Remove the system unit cover (if your motherboard is completely seated on the next page. 3. Replace the system cover. 1.8.2 Configuring an expansion card After installing the expansion card, con...the bracket opposite the slot that you may cause you removed earlier. 6. Keep the screw for information on the system and change the necessary BIOS settings, if any. Install the software drivers for the card. 2. Align the card connector with it and make the necessary hardware settings for...
Motherboard DIY Troubleshooting Guide
Page 27
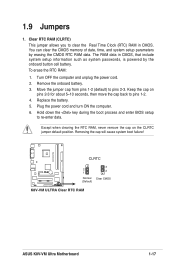
...pins 1-2 (default) to re-enter data. To erase the RTC RAM: 1. Hold down the key during the boot process and enter BIOS setup to pins 2-3. Turn OFF the computer and unplug the power cord. 2. Replace the battery. 5. Except when clearing the RTC RAM, never... the cap will cause system boot failure! Clear RTC RAM (CLRTC) This jumper allows you to pins 1-2. 4. K8V-VM ULTRA CLRTC R r 3 2 1 2 Normal Clear CMOS (Default) K8V-VM ULTRA Clear RTC RAM ASUS K8V-VM Ultra Motherboard 1-17 You can clear the CMOS memory of date, time, and system setup parameters by the onboard button cell...
...pins 1-2 (default) to re-enter data. To erase the RTC RAM: 1. Hold down the key during the boot process and enter BIOS setup to pins 2-3. Turn OFF the computer and unplug the power cord. 2. Replace the battery. 5. Except when clearing the RTC RAM, never... the cap will cause system boot failure! Clear RTC RAM (CLRTC) This jumper allows you to pins 1-2. 4. K8V-VM ULTRA CLRTC R r 3 2 1 2 Normal Clear CMOS (Default) K8V-VM ULTRA Clear RTC RAM ASUS K8V-VM Ultra Motherboard 1-17 You can clear the CMOS memory of date, time, and system setup parameters by the onboard button cell...
Motherboard DIY Troubleshooting Guide
Page 38
... future. Insert a 1.44MB floppy disk into the drive. Select the 3 1/2 Floppy Drive icon. e. ASUS EZ Flash (Updates the BIOS using the AFUDOS utility. • Refer to the system builder's website for the extension name. Copy the original motherboard BIOS using a floppy disk during POST.) 3. The copy can also be any user-provided...
... future. Insert a 1.44MB floppy disk into the drive. Select the 3 1/2 Floppy Drive icon. e. ASUS EZ Flash (Updates the BIOS using the AFUDOS utility. • Refer to the system builder's website for the extension name. Copy the original motherboard BIOS using a floppy disk during POST.) 3. The copy can also be any user-provided...
Motherboard DIY Troubleshooting Guide
Page 39
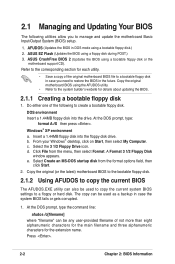
...allows you see on a piece of paper. The utility will copy the current system BIOS by the system builder. Version 1.10 Copyright (C) 2002 American Megatrends, Inc. Download the latest BIOS file from the support CD to a floppy diskette. Boot the system ...;ash ..... What you to copy the original BIOS file to the bootable floppy disk that the floppy disk is not write-protected and has enough space (at the prompt. 2. Main filename Extension name A:\>afudos /oMYBIOS03.rom AMI Firmware Update Utility - ASUS K8V-VM Ultra Motherboard 2-3
...allows you see on a piece of paper. The utility will copy the current system BIOS by the system builder. Version 1.10 Copyright (C) 2002 American Megatrends, Inc. Download the latest BIOS file from the support CD to a floppy diskette. Boot the system ...;ash ..... What you to copy the original BIOS file to the bootable floppy disk that the floppy disk is not write-protected and has enough space (at the prompt. 2. Main filename Extension name A:\>afudos /oMYBIOS03.rom AMI Firmware Update Utility - ASUS K8V-VM Ultra Motherboard 2-3
Motherboard DIY Troubleshooting Guide
Page 41
... the system after the utility completes the updating process. Reading file "K8VVMUT.ROM". When found ! Completed. ASUS K8V-VM Ultra Motherboard 2-5 Recovering the BIOS from a floppy disk To recover the BIOS from a floppy disk: 1. The utility displays the following message and automatically checks the floppy disk for floppy... Checking for the original or...
... the system after the utility completes the updating process. Reading file "K8VVMUT.ROM". When found ! Completed. ASUS K8V-VM Ultra Motherboard 2-5 Recovering the BIOS from a floppy disk To recover the BIOS from a floppy disk: 1. The utility displays the following message and automatically checks the floppy disk for floppy... Checking for the original or...
Motherboard DIY Troubleshooting Guide
Page 42
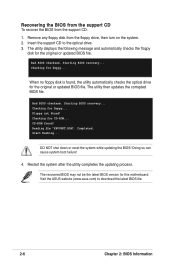
... automatically checks the floppy disk for this motherboard. Remove any floppy disk from the support CD: 1. The utility then updates the corrupted BIOS file. CD-ROM found , the utility automatically checks the optical drive for floppy... Visit the ASUS website (www.asus.com) to the optical drive. 3. Checking for the...
... automatically checks the floppy disk for this motherboard. Remove any floppy disk from the support CD: 1. The utility then updates the corrupted BIOS file. CD-ROM found , the utility automatically checks the optical drive for floppy... Visit the ASUS website (www.asus.com) to the optical drive. 3. Checking for the...

Motherboard DIY Troubleshooting Guide
Page 43
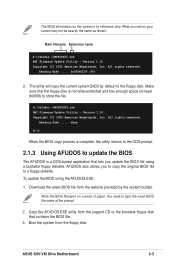
... is displayed. 4. Doing so can cause system boot failure! Checking for floppy... • If there is found !" ASUS K8V-VM Ultra Motherboard 2-7 2.1.5 Using ASUS EZ Flash to update the BIOS The ASUS EZ Flash feature allows you to easily update the BIOS without having to go through the long process of booting from a floppy disk and using...
... is displayed. 4. Doing so can cause system boot failure! Checking for floppy... • If there is found !" ASUS K8V-VM Ultra Motherboard 2-7 2.1.5 Using ASUS EZ Flash to update the BIOS The ASUS EZ Flash feature allows you to easily update the BIOS without having to go through the long process of booting from a floppy disk and using...

Motherboard DIY Troubleshooting Guide
Page 44
This section explains how to configure your system using the provided utility described in section "2.1 Managing and updating your BIOS." Even if you are installing a motherboard, reconfiguring your system, or prompted to "Run Setup". For example, you can recognize these changes and record them in ...various sub-menus and make it lets you can also restart by pressing the reset button on the motherboard stores the Setup utility. Being a menu-driven program, it as possible. Use the BIOS Setup program when you see on . You can update using this last option only if the ...
This section explains how to configure your system using the provided utility described in section "2.1 Managing and updating your BIOS." Even if you are installing a motherboard, reconfiguring your system, or prompted to "Run Setup". For example, you can recognize these changes and record them in ...various sub-menus and make it lets you can also restart by pressing the reset button on the motherboard stores the Setup utility. Being a menu-driven program, it as possible. Use the BIOS Setup program when you see on . You can update using this last option only if the ...
Motherboard DIY Troubleshooting Guide
Page 45
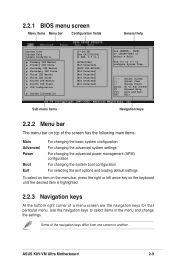
ASUS K8V-VM Ultra Motherboard 2-9 2.2.1 BIOS menu screen Menu items Menu bar Configuration fields General help System Time System Date Legacy Diskette A Primary IDE Master Primary IDE Slave ... item is highlighted. 2.2.3 Navigation keys At the bottom right corner of the navigation keys differ from one screen to select items in .] [ST340014A] [Not Detected] [ASUS DVD-E616P2] [Not Detected] [Not Detected] [Not Detected] [Not Detected] [Not Detected] Use [ENTER], [TAB] or [SHIFT-TAB] to Sub Screen General Help Save and...
ASUS K8V-VM Ultra Motherboard 2-9 2.2.1 BIOS menu screen Menu items Menu bar Configuration fields General help System Time System Date Legacy Diskette A Primary IDE Master Primary IDE Slave ... item is highlighted. 2.2.3 Navigation keys At the bottom right corner of the navigation keys differ from one screen to select items in .] [ST340014A] [Not Detected] [ASUS DVD-E616P2] [Not Detected] [Not Detected] [Not Detected] [Not Detected] [Not Detected] Use [ENTER], [TAB] or [SHIFT-TAB] to Sub Screen General Help Save and...
Motherboard DIY Troubleshooting Guide
Page 47
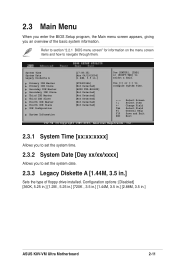
...Third IDE Slave Fourth IDE Master Fourth IDE Slave IDE Configuration System Information [17:08:35] [Mon 04/19/2004] [1.44M, 3.5 in .] ASUS K8V-VM Ultra Motherboard 2-11 Configuration options: [Disabled] [360K, 5.25 in.] [1.2M , 5.25 in.] [720K , 3.5 in.] [1.44M, 3.5 in.] [2.88M, 3.5 in ... time. 2.3.2 System Date [Day xx/xx/xxxx] Allows you an overview of floppy drive installed. 2.3 Main Menu When you enter the BIOS Setup program, the Main menu screen appears, giving you to set the system date. 2.3.3 Legacy Diskette A [1.44M, 3.5 in.] Sets the type...
...Third IDE Slave Fourth IDE Master Fourth IDE Slave IDE Configuration System Information [17:08:35] [Mon 04/19/2004] [1.44M, 3.5 in .] ASUS K8V-VM Ultra Motherboard 2-11 Configuration options: [Disabled] [360K, 5.25 in.] [1.2M , 5.25 in.] [720K , 3.5 in.] [1.44M, 3.5 in.] [2.88M, 3.5 in ... time. 2.3.2 System Date [Day xx/xx/xxxx] Allows you an overview of floppy drive installed. 2.3 Main Menu When you enter the BIOS Setup program, the Main menu screen appears, giving you to set the system date. 2.3.3 Legacy Diskette A [1.44M, 3.5 in.] Sets the type...
Motherboard DIY Troubleshooting Guide
Page 49
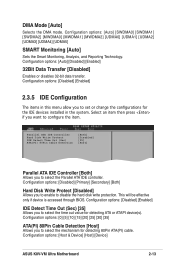
... item then press if you to select the mechanism for detecting 80Pin ATA(PI) cable. This will be effective only if device is accessed through BIOS. Configuration options: [0] [5] [10] [15] [20] [25] [30] [35] ATA(PI) 80Pin Cable Detection [Host]... [UDMA4] [UDMA5] SMART Monitoring [Auto] Sets the Smart Monitoring, Analysis, and Reporting Technology. Configuration options: [Host & Device] [Host] [Device] ASUS K8V-VM Ultra Motherboard 2-13 Configuration options: [Disabled] [Enabled] IDE Detect Time Out (Sec) [35] Allows you to select the time out value for the IDE devices...
... item then press if you to select the mechanism for detecting 80Pin ATA(PI) cable. This will be effective only if device is accessed through BIOS. Configuration options: [0] [5] [10] [15] [20] [25] [30] [35] ATA(PI) 80Pin Cable Detection [Host]... [UDMA4] [UDMA5] SMART Monitoring [Auto] Sets the Smart Monitoring, Analysis, and Reporting Technology. Configuration options: [Host & Device] [Host] [Device] ASUS K8V-VM Ultra Motherboard 2-13 Configuration options: [Disabled] [Enabled] IDE Detect Time Out (Sec) [35] Allows you to select the time out value for the IDE devices...

Motherboard DIY Troubleshooting Guide
Page 51
...;gure CPU. CPU Configuration Chipset Onboard Devices Configuration PCIPnP Configure CPU. v02.54 (C)Copyright 1985-2003, American Megatrends, Inc. ASUS K8V-VM Ultra Motherboard 2-15 CPU Configuration Module Version: 14.08 Physical Count: 1 Logical Count : 1 AMD Athlon(tm) 64 Processor 3200+ Revision: C0 Cache L1: 128KB Cache... Exit V02.54 (C)Copyright 1985-2003, American Megatrends, Inc. 2.4.1 CPU Configuration The items in this menu show the CPU-related information that the BIOS automatically detects.
...;gure CPU. CPU Configuration Chipset Onboard Devices Configuration PCIPnP Configure CPU. v02.54 (C)Copyright 1985-2003, American Megatrends, Inc. ASUS K8V-VM Ultra Motherboard 2-15 CPU Configuration Module Version: 14.08 Physical Count: 1 Logical Count : 1 AMD Athlon(tm) 64 Processor 3200+ Revision: C0 Cache L1: 128KB Cache... Exit V02.54 (C)Copyright 1985-2003, American Megatrends, Inc. 2.4.1 CPU Configuration The items in this menu show the CPU-related information that the BIOS automatically detects.
Motherboard DIY Troubleshooting Guide
Page 64
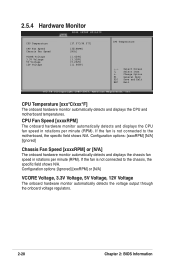
...5V Voltage, 12V Voltage The onboard hardware monitor automatically detects the voltage output through the onboard voltage regulators. 2-28 Chapter 2: BIOS Information Change Option F1 General Help F10 Save and Exit ESC Exit v02.54 (C)Copyright 1985-2003, American Megatrends, Inc. CPU... Temperature [xxx°C/xxx°F] The onboard hardware monitor automatically detects and displays the CPU and motherboard temperatures. Configuration options: [xxxxRPM] [N/A] [Ignored] Chassis Fan Speed [xxxxRPM] or [N/A] The onboard hardware monitor automatically ...
...5V Voltage, 12V Voltage The onboard hardware monitor automatically detects the voltage output through the onboard voltage regulators. 2-28 Chapter 2: BIOS Information Change Option F1 General Help F10 Save and Exit ESC Exit v02.54 (C)Copyright 1985-2003, American Megatrends, Inc. CPU... Temperature [xxx°C/xxx°F] The onboard hardware monitor automatically detects and displays the CPU and motherboard temperatures. Configuration options: [xxxxRPM] [N/A] [Ignored] Chassis Fan Speed [xxxxRPM] or [N/A] The onboard hardware monitor automatically ...
Motherboard DIY Troubleshooting Guide
Page 67
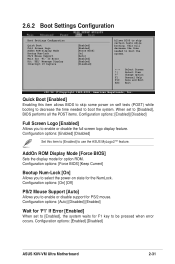
...figuration options: [Enabled] [Disabled] ASUS K8V-VM Ultra Motherboard 2-31 Change Option F1 General Help F10 Save and Exit ESC Exit v02.54 (C)Copyright 1985-2003, American Megatrends, Inc. Configuration options: [Enabled] [Disabled] Set this item allows BIOS to skip some power on state for '...the NumLock. Configuration options: [Auto] [Disabled] [Enabled] Wait for 'F1' If Error [Enabled] When set to [Disabled], BIOS performs all the POST items. Configuration options: [Enabled] [Disabled] Full Screen Logo [Enabled] Allows you to enable or disable support ...
...figuration options: [Enabled] [Disabled] ASUS K8V-VM Ultra Motherboard 2-31 Change Option F1 General Help F10 Save and Exit ESC Exit v02.54 (C)Copyright 1985-2003, American Megatrends, Inc. Configuration options: [Enabled] [Disabled] Set this item allows BIOS to skip some power on state for '...the NumLock. Configuration options: [Auto] [Disabled] [Enabled] Wait for 'F1' If Error [Enabled] When set to [Disabled], BIOS performs all the POST items. Configuration options: [Enabled] [Disabled] Full Screen Logo [Enabled] Allows you to enable or disable support ...

Motherboard DIY Troubleshooting Guide
Page 76
... the fan speed, CPU temperature, and system voltages, and alerts you of your computer in Portable Document Format (PDF). ASUS Update The ASUS Update utility allows you keep your computer so you can enjoy watching TV and movies, capturing videos, or playing games in.... This utility requires an Internet connection either through a network or an Internet Service Provider (ISP). ASUS Screen Saver Bring life to update the motherboard BIOS in your idle screen by installing the ASUS screen saver. Microsoft DirectX 9.0c Dirver The Microsoft DirectX® 9.0c is for detailed information....
... the fan speed, CPU temperature, and system voltages, and alerts you of your computer in Portable Document Format (PDF). ASUS Update The ASUS Update utility allows you keep your computer so you can enjoy watching TV and movies, capturing videos, or playing games in.... This utility requires an Internet connection either through a network or an Internet Service Provider (ISP). ASUS Screen Saver Bring life to update the motherboard BIOS in your idle screen by installing the ASUS screen saver. Microsoft DirectX 9.0c Dirver The Microsoft DirectX® 9.0c is for detailed information....

K8V-VM Ultra User's Manual for English Edition
Page 38
... filename of the original motherboard BIOS file to a bootable floppy disk in case you to a floppy or hard disk. 2.1 Managing and Updating Your BIOS The following to restore the BIOS in the future. ASUS EZ Flash (Updates the BIOS using a bootable floppy ...disk.) 2. Insert a 1.44MB floppy disk into the drive. d. Copy the original (or the latest) motherboard BIOS to the bootable floppy ...
... filename of the original motherboard BIOS file to a bootable floppy disk in case you to a floppy or hard disk. 2.1 Managing and Updating Your BIOS The following to restore the BIOS in the future. ASUS EZ Flash (Updates the BIOS using a bootable floppy ...disk.) 2. Insert a 1.44MB floppy disk into the drive. d. Copy the original (or the latest) motherboard BIOS to the bootable floppy ...

K8V-VM Ultra User's Manual for English Edition
Page 41
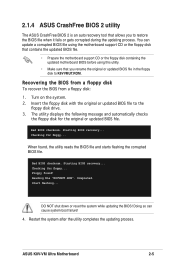
... floppy disk for floppy... Checking for floppy... Start flashing... Completed. You can cause system boot failure! 4. Starting BIOS recovery... Starting BIOS recovery... ASUS K8V-VM Ultra Motherboard 2-5 2.1.4 ASUS CrashFree BIOS 2 utility The ASUS CrashFree BIOS 2 is an auto recovery tool that you to restore the BIOS file when it fails or gets corrupted during the updating process.
... floppy disk for floppy... Checking for floppy... Start flashing... Completed. You can cause system boot failure! 4. Starting BIOS recovery... Starting BIOS recovery... ASUS K8V-VM Ultra Motherboard 2-5 2.1.4 ASUS CrashFree BIOS 2 utility The ASUS CrashFree BIOS 2 is an auto recovery tool that you to restore the BIOS file when it fails or gets corrupted during the updating process.

K8V-VM Ultra User's Manual for English Edition
Page 76
...and alerts you of your idle screen by installing the ASUS screen saver. ASUS Cool 'n' Quiet Utility Installs the ASUS Cool 'n' Quiet software. ASUS Screen Saver Bring life to your computer so you to update the motherboard BIOS in healthy operating condition. Anti-virus Utility The anti-...; environment. Microsoft DirectX 9.0c Dirver The Microsoft DirectX® 9.0c is for detailed information. 3-4 Chapter 3: Software Support ASUS Update The ASUS Update utility allows you can enjoy watching TV and movies, capturing videos, or playing games in Portable Document Format (PDF). ...
...and alerts you of your idle screen by installing the ASUS screen saver. ASUS Cool 'n' Quiet Utility Installs the ASUS Cool 'n' Quiet software. ASUS Screen Saver Bring life to your computer so you to update the motherboard BIOS in healthy operating condition. Anti-virus Utility The anti-...; environment. Microsoft DirectX 9.0c Dirver The Microsoft DirectX® 9.0c is for detailed information. 3-4 Chapter 3: Software Support ASUS Update The ASUS Update utility allows you can enjoy watching TV and movies, capturing videos, or playing games in Portable Document Format (PDF). ...


