

User Manual
Page 8
... or disconnected without restarting the computer. 4 Display (Monitor) Output The 15-pin D-sub monitor port supports a standard VGAcompatible device such as keyboards, pointing devices, cameras, hard disk drives, printers, and scanners connected in sites or hubs. Knowing the Parts Right Side 12 3 4 56 1 Headphone Output Jack The stereo headphone jack (1/8 inch) is...
... or disconnected without restarting the computer. 4 Display (Monitor) Output The 15-pin D-sub monitor port supports a standard VGAcompatible device such as keyboards, pointing devices, cameras, hard disk drives, printers, and scanners connected in sites or hubs. Knowing the Parts Right Side 12 3 4 56 1 Headphone Output Jack The stereo headphone jack (1/8 inch) is...
User Manual
Page 12
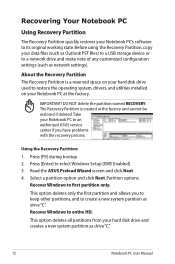
...partition as network settings). The Recovery Partition is a reserved space on your hard disk drive used to restore the operating system, drivers, and utilities installed on your Notebook PC to an authorized ASUS service center if you to keep other partitions, and to entire HD.... IMPORTANT! Recovering Your Notebook PC Using Recovery Partition The Recovery Partition quickly restores your hard disk drive and creates a new system partition as drive "C". 12 Notebook PC User Manual Read the ASUS Preload Wizard screen and click Next. 4. About the Recovery Partition The Recovery Partition ...
...partition as network settings). The Recovery Partition is a reserved space on your hard disk drive used to restore the operating system, drivers, and utilities installed on your Notebook PC to an authorized ASUS service center if you to keep other partitions, and to entire HD.... IMPORTANT! Recovering Your Notebook PC Using Recovery Partition The Recovery Partition quickly restores your hard disk drive and creates a new system partition as drive "C". 12 Notebook PC User Manual Read the ASUS Preload Wizard screen and click Next. 4. About the Recovery Partition The Recovery Partition ...
User Manual
Page 13
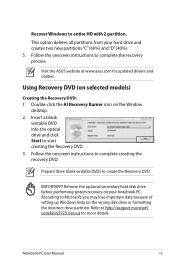
Visit the ASUS website at www.asus.com for more details. Follow the onscreen instructions to create the Recovery DVD. com/kb/937251/en-us for updated drivers and utilities. Prepare three ... creating the recovery DVD. According to http://support.microsoft. Refer to Microsoft, you may lose important data because of setting up Windows Vista on your hard drive and creates two new partitions "C" (60%) and "D" (40%). 5. Using Recovery DVD (on the Window desktop. 2. This option deletes all partitions from your Notebook PC. Follow...
Visit the ASUS website at www.asus.com for more details. Follow the onscreen instructions to create the Recovery DVD. com/kb/937251/en-us for updated drivers and utilities. Prepare three ... creating the recovery DVD. According to http://support.microsoft. Refer to Microsoft, you may lose important data because of setting up Windows Vista on your hard drive and creates two new partitions "C" (60%) and "D" (40%). 5. Using Recovery DVD (on the Window desktop. 2. This option deletes all partitions from your Notebook PC. Follow...
User Manual
Page 14
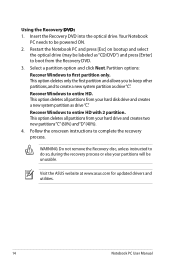
... the ASUS website at www.asus.com for updated drivers and utilities. 14 Notebook PC User Manual Insert the Recovery DVD into the optical drive.Your Notebook PC needs to be labeled as "CD/DVD") and press [Enter] to do so, during the recovery process or else your hard drive and .... WARNING: Do not remove the Recovery disc, unless instructed to boot from your hard disk drive and creates a new system partition as drive"C". Restart the Notebook PC and press [Esc] on bootup and select the optical drive (may be powered ON. 2. This option deletes all partitions from your partitions will...
... the ASUS website at www.asus.com for updated drivers and utilities. 14 Notebook PC User Manual Insert the Recovery DVD into the optical drive.Your Notebook PC needs to be labeled as "CD/DVD") and press [Enter] to do so, during the recovery process or else your hard drive and .... WARNING: Do not remove the Recovery disc, unless instructed to boot from your hard disk drive and creates a new system partition as drive"C". Restart the Notebook PC and press [Esc] on bootup and select the optical drive (may be powered ON. 2. This option deletes all partitions from your partitions will...
User Manual
Page 3
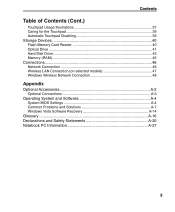
... Contents (Cont.) Touchpad Usage Illustrations 37 Caring for the Touchpad 39 Automatic Touchpad Disabling 39 Storage Devices 40 Flash Memory Card Reader 40 Optical Drive 41 Hard Disk Drive 43 Memory (RAM 45 Connections 46 Network Connection 46 Wireless LAN Connection (on selected models 47 Windows Wireless Network Connection 48 Appendix Optional Accessories...
... Contents (Cont.) Touchpad Usage Illustrations 37 Caring for the Touchpad 39 Automatic Touchpad Disabling 39 Storage Devices 40 Flash Memory Card Reader 40 Optical Drive 41 Hard Disk Drive 43 Memory (RAM 45 Connections 46 Network Connection 46 Wireless LAN Connection (on selected models 47 Windows Wireless Network Connection 48 Appendix Optional Accessories...
User Manual
Page 8
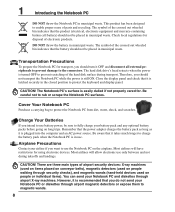
... before going on people or individual items). There are three main types of electronic products. Check local regulations for . The hard disk drive's head retracts when the power is latched securely in use only between and not during transport. Remember that you should turn... conveyor belts), magnetic detectors (used on people walking through airport magnetic detectors or expose them to enable proper reuse of the hard disk surface during takeoffs and landings. Transportation Precautions To prepare the Notebook PC for using electronic devices. CAUTION! The Notebook PC...
... before going on people or individual items). There are three main types of electronic products. Check local regulations for . The hard disk drive's head retracts when the power is latched securely in use only between and not during transport. Remember that you should turn... conveyor belts), magnetic detectors (used on people walking through airport magnetic detectors or expose them to enable proper reuse of the hard disk surface during takeoffs and landings. Transportation Precautions To prepare the Notebook PC for using electronic devices. CAUTION! The Notebook PC...
User Manual
Page 15
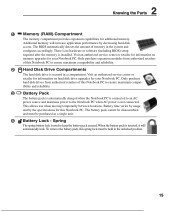
... Battery Lock - Only purchase expansion modules from authorized retailers of this Notebook PC to ensure maximum compatibility and reliability. 2 Hard Disk Drive Compartments The hard disk drive is used to the Notebook PC when AC power is not connected. Battery time varies by usage and by decreasing... the Notebook PC is connected to an AC power source and maintains power to keep the battery pack secured. Only purchase hard disk drives from authorized retailers of memory in the unlocked position. 15 Additional memory will automatically lock. This allows use when moving temporarily...
... Battery Lock - Only purchase expansion modules from authorized retailers of this Notebook PC to ensure maximum compatibility and reliability. 2 Hard Disk Drive Compartments The hard disk drive is used to the Notebook PC when AC power is not connected. Battery time varies by usage and by decreasing... the Notebook PC is connected to an AC power source and maintains power to keep the battery pack secured. Only purchase hard disk drives from authorized retailers of memory in the unlocked position. 15 Additional memory will automatically lock. This allows use when moving temporarily...

User Manual
Page 16
...Left Side Refer to the illustration below to identify the components on a single computer, with some peripherals acting as keyboards, pointing devices, cameras, hard disk drives, printers, and scanners connected in a series up to 12Mbits/sec (USB 1.1) and 480Mbits/sec (USB 2.0). See the marketing specifications for details... hot-swapping of the electronic eject. 3 2.0 USB Port (2.0/1.1) The USB (Universal Serial Bus) port is used to eject the optical drive tray in sites or hubs. Do not use the emergency eject in place of devices so that most peripherals can be connected or disconnected ...
...Left Side Refer to the illustration below to identify the components on a single computer, with some peripherals acting as keyboards, pointing devices, cameras, hard disk drives, printers, and scanners connected in a series up to 12Mbits/sec (USB 1.1) and 480Mbits/sec (USB 2.0). See the marketing specifications for details... hot-swapping of the electronic eject. 3 2.0 USB Port (2.0/1.1) The USB (Universal Serial Bus) port is used to eject the optical drive tray in sites or hubs. Do not use the emergency eject in place of devices so that most peripherals can be connected or disconnected ...
User Manual
Page 25
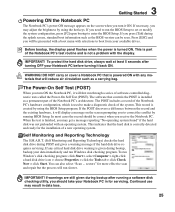
...BIOS Setup program. Before bootup, the display panel flashes when the power is used to enter the BIOS Setup. To protect the hard disk drive, always wait at least 5 seconds after running BIOS Setup. IMPORTANT! If necessary, you press [Tab] during POST and gives a ... Notebook PC's hardware configuration, which is turned ON. Self Monitoring and Reporting Technology The S.M.A.R.T. (Self Monitoring and Reporting Technology) checks the hard disk drive during the splash screen, standard boot information such as the BIOS version can also select "Scan ... If you turn it will display a...
...BIOS Setup program. Before bootup, the display panel flashes when the power is used to enter the BIOS Setup. To protect the hard disk drive, always wait at least 5 seconds after running BIOS Setup. IMPORTANT! If necessary, you press [Tab] during POST and gives a ... Notebook PC's hardware configuration, which is turned ON. Self Monitoring and Reporting Technology The S.M.A.R.T. (Self Monitoring and Reporting Technology) checks the hard disk drive during the splash screen, standard boot information such as the BIOS version can also select "Scan ... If you turn it will display a...
User Manual
Page 27
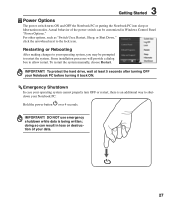
... loss or destruction of the power switch can result in Windows Control Panel "Power Options." To restart the system manually, choose Restart. To protect the hard drive, wait at least 5 seconds after turning OFF your operating system cannot properly turn OFF or restart, there is being written; IMPORTANT! IMPORTANT! Emergency Shutdown In...
... loss or destruction of the power switch can result in Windows Control Panel "Power Options." To restart the system manually, choose Restart. To protect the hard drive, wait at least 5 seconds after turning OFF your operating system cannot properly turn OFF or restart, there is being written; IMPORTANT! IMPORTANT! Emergency Shutdown In...
User Manual
Page 28
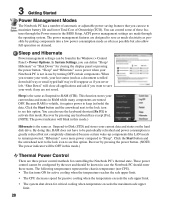
... a document scrolled down for closing the display panel or pressing the power button. Because RAM is greatly reduced but also allow full operation on the hard disk drive. ACPI power management settings are turned OFF. "Shut Down" will blink in this , RAM does not have to be periodically refreshed and power consumption...
... a document scrolled down for closing the display panel or pressing the power button. Because RAM is greatly reduced but also allow full operation on the hard disk drive. ACPI power management settings are turned OFF. "Shut Down" will blink in this , RAM does not have to be periodically refreshed and power consumption...
User Manual
Page 33
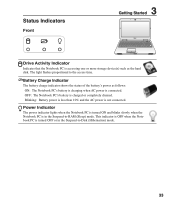
Battery Charge Indicator The battery charge indicator shows the status of the battery's power as the hard disk. The light flashes proportional to -RAM (Sleep) mode. Blinking: Battery power is less than 10% and the AC power is connected. Power Indicator The ... or more storage device(s) such as follows: ON: The Notebook PC's battery is charging when AC power is not connected. Status Indicators Front 3 Getting Started Drive Activity Indicator Indicates that the Notebook PC is charged or completely drained.
Battery Charge Indicator The battery charge indicator shows the status of the battery's power as the hard disk. The light flashes proportional to -RAM (Sleep) mode. Blinking: Battery power is less than 10% and the AC power is connected. Power Indicator The ... or more storage device(s) such as follows: ON: The Notebook PC's battery is charging when AC power is not connected. Status Indicators Front 3 Getting Started Drive Activity Indicator Indicates that the Notebook PC is charged or completely drained.
User Manual
Page 40
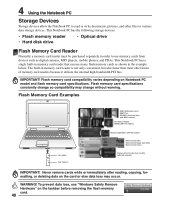
This Notebook PC has the following storage devices: • Flash memory reader • Hard disk drive • Optical drive Flash Memory Card Reader Normally a memory card reader must be purchased separately in the example below. This Notebook PC has a single built-in memory card ...
This Notebook PC has the following storage devices: • Flash memory reader • Hard disk drive • Optical drive Flash Memory Card Reader Normally a memory card reader must be purchased separately in the example below. This Notebook PC has a single built-in memory card ...

User Manual
Page 42
... should be used to remove the disc from your CD suppliers. Using the proper software, a CD-RW drive or DVD+CD-RW drive can be accessed just like a hard drive with writing, deleting, and editing capabilities. To decrease vibration, use the emergency eject in place of a CD disc in the same area. except that...
... should be used to remove the disc from your CD suppliers. Using the proper software, a CD-RW drive or DVD+CD-RW drive can be accessed just like a hard drive with writing, deleting, and editing capabilities. To decrease vibration, use the emergency eject in place of a CD disc in the same area. except that...
User Manual
Page 43
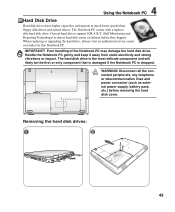
...Poor handling of the Notebook PC may damage the hard disk drive. Current hard drives support S.M.A.R.T. (Self Monitoring and Reporting Technology) to detect hard disk errors or failures before removing the hard disk cover. The Notebook PC comes with a replaceable hard disk drive. Handle the Notebook PC gently and keep it... likely be the first or only component that is damaged if the Notebook PC is dropped. When replacing or upgrading the hard drive, always visit an authorized service center or retailer for this Notebook PC. Disconnect all the connected peripherals, any telephone or ...
...Poor handling of the Notebook PC may damage the hard disk drive. Current hard drives support S.M.A.R.T. (Self Monitoring and Reporting Technology) to detect hard disk errors or failures before removing the hard disk cover. The Notebook PC comes with a replaceable hard disk drive. Handle the Notebook PC gently and keep it... likely be the first or only component that is damaged if the Notebook PC is dropped. When replacing or upgrading the hard drive, always visit an authorized service center or retailer for this Notebook PC. Disconnect all the connected peripherals, any telephone or ...
User Manual
Page 52
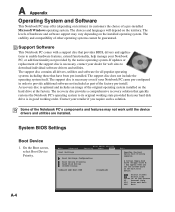
.... A-4 BIOS SETUP UTILITY Main Advanced Security Power Boot Exit Boot Settings Boot Settings Configuration Boot Device Priority Hard Disk Drives CD/DVD Drives Onboard LAN Boot ROM [Disabled] Specifies the Boot Device Boot Priority sequence. The support disc contains all drivers...guaranteed. System BIOS Settings Boot Device 1. A Appendix Operating System and Software This Notebook PC may offer (depending on the hard drive at the factory. A recovery disc is necessary even if your dealer for all popular operating systems including those that quickly...
.... A-4 BIOS SETUP UTILITY Main Advanced Security Power Boot Exit Boot Settings Boot Settings Configuration Boot Device Priority Hard Disk Drives CD/DVD Drives Onboard LAN Boot ROM [Disabled] Specifies the Boot Device Boot Priority sequence. The support disc contains all drivers...guaranteed. System BIOS Settings Boot Device 1. A Appendix Operating System and Software This Notebook PC may offer (depending on the hard drive at the factory. A recovery disc is necessary even if your dealer for all popular operating systems including those that quickly...
User Manual
Page 53
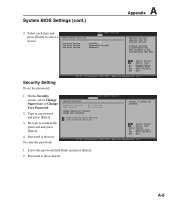
... the password and press [Enter]. 4. Boot Device Priority BIOS SETUP UTILITY Boot 1st Boot Device 2nd Boot Device 3rd Boot Device 4th Boot Device [Hard Drive] [CD/DVD] [Removable Device] [Network] Specifies the boot sequence from the availabe devices. Type in the corresponding type menu. Select Screen Select ...clear the password: BIOS SETUP UTILITY Security Security Settings Supervisor Password : Not Installed User Password : Not Installed Change Supervisor Password Change User Password Hard Disk Security Setting I/O Interface Security Install or Change the password.
... the password and press [Enter]. 4. Boot Device Priority BIOS SETUP UTILITY Boot 1st Boot Device 2nd Boot Device 3rd Boot Device 4th Boot Device [Hard Drive] [CD/DVD] [Removable Device] [Network] Specifies the boot sequence from the availabe devices. Type in the corresponding type menu. Select Screen Select ...clear the password: BIOS SETUP UTILITY Security Security Settings Supervisor Password : Not Installed User Password : Not Installed Change Supervisor Password Change User Password Hard Disk Security Setting I/O Interface Security Install or Change the password.
User Manual
Page 62
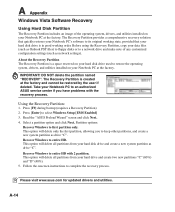
...created at the factory. Using the Recovery Partition: 1. This option will delete all partitions from your hard drive and create two new partitions "C" (60%) and "D" (40%). 5. Please visit www.asus.com for updated drivers and utilities. A-14 Follow the onscreen instructions to select Windows Setup [EMS... Enabled] 3. Take your Notebook PC to an authorized ASUS service center if you to restore the operating system, drivers, and utilities installed on your hard disk drive is a space reserved on your hard disk drive used to keep other partitions, and create a new system ...
...created at the factory. Using the Recovery Partition: 1. This option will delete all partitions from your hard drive and create two new partitions "C" (60%) and "D" (40%). 5. Please visit www.asus.com for updated drivers and utilities. A-14 Follow the onscreen instructions to select Windows Setup [EMS... Enabled] 3. Take your Notebook PC to an authorized ASUS service center if you to restore the operating system, drivers, and utilities installed on your hard disk drive is a space reserved on your hard disk drive used to keep other partitions, and create a new system ...
User Manual
Page 63
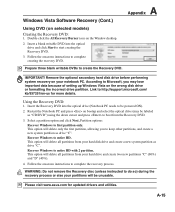
... a partition option and click Next. Please visit www.asus.com for more details. Link to keep other partitions, and create a new system partition as drive "C". Using the Recovery DVD: 1. Insert the Recovery DVD into the optical drive and click Start to boot from your partitions will delete... to start creating the Recovery DVD. 3. Restart the Notebook PC and press on bootup and select the optical drive (may lose important data because of setting up Windows Vista on your hard drive and create two new partitions "C" (60%) and "D" (40%). 4. This option will be powered ON). ...
... a partition option and click Next. Please visit www.asus.com for more details. Link to keep other partitions, and create a new system partition as drive "C". Using the Recovery DVD: 1. Insert the Recovery DVD into the optical drive and click Start to boot from your partitions will delete... to start creating the Recovery DVD. 3. Restart the Notebook PC and press on bootup and select the optical drive (may lose important data because of setting up Windows Vista on your hard drive and create two new partitions "C" (60%) and "D" (40%). 4. This option will be powered ON). ...

User Manual
Page 75
Owner's Name Owner's Telephone Manufacturer Model Serial Number Display Size Resolution Memory Size Retailer Location Purchase Date Hard Drive Manufacturer Capacity Optical Drive Manufacturer Type BIOS Version Date Accessories Accessories Software Operating System:___________Version Serial Number Software Version Serial Number Software Version Serial Number Security Supervisor Name Supervisor ...
Owner's Name Owner's Telephone Manufacturer Model Serial Number Display Size Resolution Memory Size Retailer Location Purchase Date Hard Drive Manufacturer Capacity Optical Drive Manufacturer Type BIOS Version Date Accessories Accessories Software Operating System:___________Version Serial Number Software Version Serial Number Software Version Serial Number Security Supervisor Name Supervisor ...


